为了对设计模型能够很好的运用并时常参考,为此在网络上进行了浏览和自己的整合
本文转自:http://blog.csdn.net/zhangerqing
设计模式就是一个软件的设计思想,为了升级和维护方便,降低依赖,降低耦合。不要死记硬背,要理解思想。
一、设计模式分类
总的分为三大类:
1、创建型模式(五种): 工厂方法模式、抽象工厂模式、单例模式、建造者模式、原型模式。
2、结构型模式(七种):适配器模式、装饰器模式、代理模式、外观模式、桥接模式、组合模式、亨元模式。
3、行为模式(十一种): 策略模式、摸版方法模式、观察者模式、迭代子模式、责任链模式、命令模式、备忘录模式、状态模式、访问模式、中介者模式、解释器模式。
4、还有两类模式:并发型模式和线程池模式。
二、设计模式的六大原则
1、开闭原则(Open Close Principle)
开闭原则就是对扩展开发,对修改关闭;为了使程序扩展性好,不能修改原代码,易于维护和升级。需要使用接口和抽象类。
2、里氏换代原则(Liskov Substitution Principle)
里氏换代原则面向对象设计的基本原则之一。任何基类出现的地方,子类一定可以出现。只当子类可以替换掉基类,程序不受影响时,基类才真正被复用,而子类也能在基类上增加新的行为。里氏换代原则是对实现抽象化的具体步骤规范。
3、依赖倒转原则(Dependence Inversion Principle)
针对接口编程,依赖于抽象而不是依赖于具体。
4、接口隔离原则(Interface Segregation Principle)
使用多个隔离接口,比使用单个接口要好,是为了降低类之间的耦合度。
5、迪米特法则(Demeter Principle)
迪米特法则也叫最少知道原则,一个实体应当减少与另一个实体发生相互作用,使得系统模块能够独立。
6、合成复用原则(Composite Reuse Principle)
尽量使用合成/聚合方式,而不是继承。
三、具体模式的讲解
1、工厂方法模式(Factory Method)
工厂方法模式分为三种:
1.1 普通工厂方法模式:建立一个工厂类,对实现了同一个接口的类进行实例创建。
举例如下:举一个发送短信和发送邮件的例子
  //1.首先创建二者共同接口
    public interface Sender{
        public void send();
    }
    //2.创建邮件类
    public class MailSender implements Sender{
        @Override
        public void send() {
            System.out.println("发送邮件!");
        }
    }
    //3.创建短信类
    public class SmsSender implements Sender {
        @Override
        public void send() {
            System.out.println("发送短信!");
        }
    }
    //4.创建工厂类
    public class SendFactory{
        public Sender produce(String type) {
            if ("mail".equals(type)) {
                return new MailSender();
            } else if ("sms".equals(type)) {
                return new SmsSender();
            } else {
                System.out.println("请输入正确的类型!");
                return null;
            }
        }
    }
    //最后测试创建的工厂
    public class FactoryTest {
        public static void main(String[] args) {
            SendFactory factory = new SendFactory();
            Sender sender = factory.produce("sms");
            sender.send();
        }
    }
输出结果:发送短信!
2、多个工厂方法模式:是普通工厂的改进版,普通工厂如果传递的字符串出错,则不能创建工厂,而多个工厂方法是创建多个工厂,分别创建对象。
 //创建多个工厂(对普通工厂的改进)
    public class SendFactory{
        public Sender produceMail(){
                    return new MailSender();
        }
        public Sender produceSms(){
                return new SmsSender();
        }

    }
    //最后测试多个工厂
    public class FactoryTest {
        public static void main(String[] args) {
            SendFactory factory = new SendFactory();
            Sender sender = factory.produceSms();
            sender.send();
        }
    }
输出结果:发送短信!
3、静态工厂方法模式:是工厂的改进版,将工厂方法设置为静态的,不需要创建实例,直接调用即可。
//创建静态工厂
    public class SendFactory{
        public static Sender produceMail(){
                    return new MailSender();
        }
        public static Sender produceSms(){
                return new SmsSender();
        }

    }
    //最后测试静态工厂
    public class FactoryTest {
        public static void main(String[] args) {
            SendFactory factory = new SendFactory();
            sender.send();
        }
    }
输出结果:发送短信!
总体来说,工厂方法模式适合:凡是出现了大量的产品需要创建,并有共同的接口时,通过工厂方法创建。以上三种工厂方法模式,第一种如果传入的字符串有误,不能正确创建对象,第三种相对于第二种,不需要创建对象,所以选用第三种。
  //1.首先创建二者共同接口
    public interface Sender{
        public void send();
    }
    //2.创建邮件实现类
    public class MailSender implements Sender{
        @Override
        public void send() {
            System.out.println("发送邮件!");
        }
    }
    //3.创建短信实现类
    public class SmsSender implements Sender {
        @Override
        public void send() {
            System.out.println("发送短信!");
        }
    }
    //4.创建工厂类
    public class SendMailFactory implements Provider{
        @Override
        public Sender produce() {
            return new MailSender();
        }
    }
    public class SendSmsFactory implements Provider{
        @Override
        public Sender produce() {
            return new SmsSender();
        }
    }

    //5.创建一个接口
    public interface Provider{
        public Sender produce();
    }

    //6.测试类
    public class Text{
        public static void main(String[] args) {
            Provider provider=new SendSmsFactory();
            Sender sender= provider.produce();
            sender.send();
        }
    }
 //1、饱汉式,线程不安全
    public class  Singleton{
        //持有私有静态实例,防止被引用,目的是实现延迟加载
        private static Singleton instance=null;
        //定义私有的构造方法
        private Singleton(){}

        //获取实例的方法
        public static Singleton getInstance(){
            if (instance==null){
                instance =new Singleton();
            }
            return instance;
        }
        //如果该对象被实例化,可以保证对象在实例化前后保持一致
        public Object readResolve(){
            return instance;
        }
    }
         //2、对该方法改进(添加synchronized(同步锁)关键字)
        //备注:synchronized是锁对象的,每次调用该方法都要给对象上锁,性能较低。
        public static synchronized Singleton getInstance(){
            if (instance==null){
                instance =new Singleton();
            }
            return instance;
        }
         //3、对该方法改进,将synchronized(同步锁)方法内部,只有instance为null,并创建对象时才加锁,性能有所提高
        public static  Singleton getInstance(){
            if (instance==null){
                synchronized(instance){
                    if (instance==null){
                        instance =new Singleton();
                    }
                }
            }
            return instance;
        }
    //4、改进单例模式最终结果(接近完美,但还有其它的实现方式)
    public class  Singleton{
        //持有私有静态实例,防止被引用,目的是实现延迟加载
        private static Singleton instance=null;
        //定义私有的构造方法
        private Singleton(){}
        //创建内部类工厂
        private static class SingletonFactory{
            private static Singleton instance=new Singleton();
        }
        //获取实例的方法
        //备注:该方法在第一次调用时是线程互斥的
        public static Singleton getInstance(){
            return SingletonFactory.instance;
        }
        //如果该对象被实例化,可以保证对象在实例化前后保持一致
        public Object readResolve(){
            return instance;
        }
    }
4、建造者模式(Builder)
 //建造者模式
    public class Builder{
        private List<Sender> list=new ArrayList<Sender>();
            //发送邮件方法
        public void produceMailSender(int count){
            for (int i=0;i<count;i++){
                list.add(new MailSender());
            }
        }
            //发送短信方法
        public void produceSmsSender(int count){
            for (int i=0;i<count;i++){
                list.add(new SmsSender());
            }
        }

    }
    public class Test{
        public static void main(String[] args) {
            Builder builder=new Builder();
            builder.produceSmsSender(10);
        }
    }
5、原型模式(Prototype)
1、浅复制:只会复制原有对象中的基本数据类型变量,而引用类型还是指向原有对象。
public class Prototype implements Cloneable,Serializable{
        private static final long serialVersionUID=1L;
        private String string;
        private SerializableObject obj;
        //浅复制,只复制原有对象的基本数据类型变量
       public Object clone() throws CloneNotSupportedException {
           Prototype prototype=(Prototype) super.clone();
           return prototype;
       }
       //深复制,用IO流复制所有属性
       public Object deeClone() throws IOException, ClassNotFoundException {
           //写入当前对象的二进制流
           ByteArrayOutputStream bos=new ByteArrayOutputStream();
           ObjectOutputStream oos=new ObjectOutputStream(bos);
           //读取二进制流产生对象
           ByteArrayInputStream bis =new ByteArrayInputStream(bos.toByteArray());
           ObjectInputStream ois=new ObjectInputStream(bis);
           return ois.readObject();
       }

       public String getString() {
           return string;
       }
       public void setString(String string) {
           this.string = string;
       }
       public SerializableObject getObj() {
           return obj;
       }
       public void setObj(SerializableObject obj) {
           this.obj = obj;
       }
   }
    class  SerializableObject implements Serializable{
        private static final long serialVersionUID=1L;
    }
6、适配器模式(Abapter)
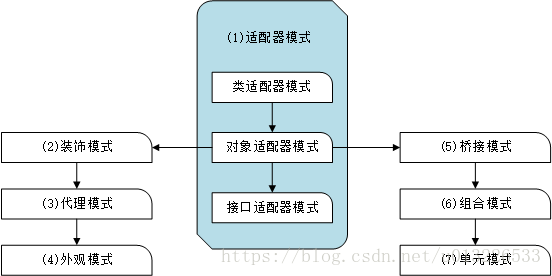
    //1、类适配器,有一个Source类,方法是method1(),目标接口是Targetable,通过Adapter类,将Source的功能扩展到Targetable
    //使用场景:当希望将一个类转换成满足另一个新接口的类时,可以使用类的适配器模式,创建一个新类,继承原有的类,实现新的接口即可。
    public class Source{
        public void method1(){
            System.out.print("这是第一个方法");
        }
    }
    public interface Targetable{
        //原类中的方法
        public void method1();
        //新类的方法
        public void method2();
    }
    //类适配器,添加新的方法
    public class Adapter extends Source implements Targetable{
        @Override
        public void method2() {
            System.out.print("这是新类的方法");
        }
    }
    //测试
    public class AdapterTest{
        public static void main(String[] args) {
            Targetable targetable=new Adapter();
            targetable.method1();
            targetable.method2();
        }
    }
    输出结果为:这是第一个方法
             这是新类的方法
//2、对象适配器,对象适配器与类适配器模式一样,只需要改类的源码即可
    //使用场景:希望将一个对象满足另一个新接口的对象时,创建一个类并持有原类的一个实例,在新类的方法中,调用实例的方法即可。
    public class Wrapper implements Targetable{
        private Source source;
        public Wrapper(Source source){
            super();
            this.source=source;
        }
        @Override
        public void method2() {
            System.out.println("这是新加的方法!");
        }
        @Override
        public void method1() {
            source.method1();
        }
    }
    public class AdapterTest{
        public static void main(String[] args) {
            Source source=new Source();
            Targetable target=new Wrapper(source);
            target.method1();
            target.method2();
        }
    }
  //3、接口适配器,创建一个abstract(抽象)类并实现接口,只需要把abstract(抽象)类提供给外部使用即可。
    //使用场景:当不希望实现接口中所有方法时,可以创建一个抽象类,实现所有方法,调用时只需继承抽象类即可。
    public interface Sourceable{
        public void method1();
        public void method2();
    }
    //创建抽象类
    public abstract class Wrappper implements Sourceable{
        public void method1(){}
        public void method2(){}
    }
    public class SourceSub extends  Wrappper{
        public void method1(){
            System.out.print("这是新的方法!");
        }
    }
    //测试类
    public class WrappperTest{
        public static void main(String[] args) {
            SourceSub ss=new SourceSub();
            ss.method1();
        }
    }
    输出结果:这是新的方法!
7、装饰模式(Decorator)
装饰模式就是就是给对象增加新的功能并且是动态的,要求装饰对象和被装饰对象实现同一个接口,
装饰对象持有被装饰对象的实例。
  //使用场景:需要扩展类的功能,动态的为对象添加功能,还不能动态撤销(继承做不到,因为继承是静态的,不能动态增删)。
    //缺点:产生过多相似对象,不易排错。
    public interface Sourceable{
        public void method();
    }
    //被装饰类
    public class Source implements Sourceable{
        @Override
        public void method() {
            System.out.println("被装饰类");
        }
    }
    //装饰类
    public class Decorator implements Sourceable{
        private Sourceable sourceable;
        public Decorator(Sourceable sourceable){
            super();
            this.sourceable=sourceable;
        }
        @Override
        public void method() {
            System.out.print("开始!");
            sourceable.method();
            System.out.print("结束!");
        }
    }
    //测试类
    public class DecoratorTest{
        public static void main(String[] args) {
            Sourceable sourceable=new Sourceable();
            Sourceable obj=new Decorator(sourceable);
            obj.method();
        }
    }
        输出结果:开始
                被装饰类
                结束
8、代理模式(Proxy)
代理模式就是用一个代理类调用原有的方法,且对产生的结果进行控制;比如在法院打官司时需要找律师,因为律师在法律方面比较专业,这就是代理。
   //使用场景:需要对原有的方法进行改进,并需要对产生的结果进行控制,为此就需要代理。
    public interface Sourceable{
        public void method();
    }
        //实现类
    public class Soure implements Sourceable{
        @Override
        public void method() {
            System.out.print("这是接口的方法");
        }
    }
    //创建代理模式
    public class Proxy implements Sourceable{
        private Soure soure;
        public Proxy(){
            super();
            this.soure=new Soure();
        }
        @Override
        public void method() {
            atfer();
            soure.method();
            before();
        }
        private void atfer(){
            System.out.print("atfer proxy");
        }
        private void before(){
            System.out.print("before proxy");
        }
    }
    //测试类
    public class ProxyTest{
        public static void main(String[] args) {
            Sourceable soure=new Proxy();
            soure.method();
        }
    }
9、外观模式(Facade)
 public class CPU{
            public void startup(){
                System.out.print("CPU startup");
            }
            public void shutdown(){
                System.out.print("CPU shutdown");
            }
        }
        public class Memory{
            public void startup(){
                System.out.print("Memory startup");
            }
            public void shutdown(){
                System.out.print("Memory shutdown");
            }
        }
        public class Disk {
            public void startup(){
                System.out.print("Disk  startup");
            }
            public void shutdown(){
                System.out.print("Disk  shutdown");
            }
        }
        //外观模式
        public class Computer{
            private CPU cpu;
            private Memory memory;
            private Disk disk;
            public Computer(){
                cpu=new CPU();
                memory=new Memory();
                disk=new Disk();
            }
            public void startup(){
                System.out.print("start the  computer!");
                cpu.startup();
                memory.startup();
                disk.startup();
                System.out.print("start computer finished!");
            }
            public void shutdown(){
                System.out.print("begin to close the computer!");
                cpu.startup();
                memory.startup();
                disk.startup();
                System.out.print("computer closed!");
            }
        }
        //测试类
        public class User{
            public static void main(String[] args) {
                Computer computer=new Computer();
                computer.shutdown();
                computer.startup();
            }
        }
10、桥连接模式(Bridge)
桥链接模式就是把事物和具体实现分开,使各模块各自独立化;与JDBC原理一样。JDBC原理就是有一个统一的接口,每种数据库实现接口即可。
//1.定义统一的接口
    public interface Sourceable{
        public void method();
    }
    //2.第一个实现类
    public class SourceSub1 implements Sourceable{
        @Override
        public void method() {
            System.out.print("第一个实现类");
        }
    }
    //3.第二个实现类
    public class SourceSub2 implements Sourceable{
        @Override
        public void method() {
            System.out.print("第二个实现类");
        }
    }
    //4.定义桥连接
    public abstract class Bridge{
        private Sourceable sourceable;
        public  void method(){
            sourceable.method();
        }
        public Sourceable getSourceable() {
            return sourceable;
        }
        public void setSourceable(Sourceable sourceable) {
            this.sourceable = sourceable;
        }
    }
    //5.
    public class MyBridge extends Bridge{
        public void method(){
            getSourceable().method();
        }
    }
    //6.测试类
    public class BridgeTest{
        public static void main(String[] args) {
            Bridge bridge=new MyBridge();
            //调用第一个对象
            SourceSub1 sourceSub1=new SourceSub1();
            bridge.setSourceable(sourceSub1);
            bridge.method();

            //调用第二个对象
            SourceSub2 sourceSub2=new SourceSub2();
            bridge.setSourceable(sourceSub2);
            bridge.method();
        }
    }
    输出结果:第一个实现类
            第二个实现类
11、组合模式(Composite)
//将多个对象组合一起进行操作,常用于树形结构,比如二叉树
public class TreeNode {
    private String name;
    private TreeNode parent;
    private Vector<TreeNode> children=new Vector<TreeNode>();
    //set和get方法省略


    //添加子节点
    public void add(TreeNode t){
        children.add(t);
    }
    //删除子节点
    public void remove(TreeNode t){
        children.remove(t);
    }
    //获取子节点
    public Enumeration<TreeNode> getChildren(){
        return children.elements();
    }
}
//测试类
public class Tree{
    TreeNode root=null;
    public Tree(String name){
        root=new TreeNode(name);
    }
    public static void main(String[] args) {
        Tree tree=new Tree("A");
        TreeNode t1=new TreeNode("B");
        TreeNode t2=new TreeNode("C");
        t1.add(t2);
        tree.root.add(t1);
        System.out.print("build the tree finished!");
    }
}
12、亨元模式(Flyweight)
import java.sql.Connection;
import java.sql.DriverManager;
import java.sql.SQLException;
import java.util.Vector;
//以JDBC连接池举例,该模式适用于 共享对象
public class ConnectionPool  {
    private Vector<Connection> pool;

    //共有属性
    private String url="jdbc:mysql://localhost:3306/test";
    private String username="root";
    private String password="root";
    private String driverClassName="com.mysql.jdbc.Driver";

    private int poolSize=100;
    private static ConnectionPool instance=null;
    Connection conn=null;

    //构造方法,做一些初始化工作
    private ConnectionPool(){
        pool=new Vector<Connection>(poolSize);
        for (int i = 0; i <poolSize ; i++) {
            try{
                Class.forName(driverClassName);
                conn= DriverManager.getConnection(url,username,password);
            }catch (ClassNotFoundException e){
                e.printStackTrace();
            }catch (SQLException e){
                e.printStackTrace();
            }
        }
    }
    //返回连接池
    public synchronized void release(){
        pool.add(conn);
    }
    //返回连接池中的一个数据库连接
    public synchronized Connection getConnection(){
        if (pool.size()>0){
            Connection conn=pool.get(0);
            pool.remove(conn);
            return conn;
        }else {
            return null;
        }
    }
}
13、策略模式(strategy) 属于父类和子类的实现
策略模式定义了一系列算法,并将每个算法封装起来,使其可以相互替换,且算法的变化不会影响到用户。设计一个接口,为一系列实现类提供统一方法,设计一个抽象类(可有可无,属于辅助类),提供辅助函数,使用算法的决定权在用户,该模式多用在算法中。
//该模式主要适用于算法封装,决定权在用户

//1.定义统一接口
public interface ICalculator{
    public int calculate(String exp);
}
//2.定义辅助类
public class AbstractCalculator  {
    public int[] split(String exp,String opt){
        String array[] = exp.split(opt);
        int arrayInt[] = new int[2];
        arrayInt[0] = Integer.parseInt(array[0]);
        arrayInt[1] = Integer.parseInt(array[1]);
        return arrayInt;
    }
}
//3.定义两个实现类
public class Plus extends AbstractCalculator implements ICalculator {
    @Override
    public int calculate(String exp) {
                int arrayInt[] = split(exp,"\\+");
                return arrayInt[0]+arrayInt[1];
    }
}
public class Minus extends AbstractCalculator implements ICalculator {
    @Override
    public int calculate(String exp) {
                int arrayInt[] = split(exp,"-");
               return arrayInt[0]-arrayInt[1];
    }
}
//测试类
public class StrategyTest{
    public static void main(String[] args) {
        String exp = "2+8";
        ICalculator cal = new Plus();
        int result = cal.calculate(exp);
        System.out.println(result);
    }
}
        输出结果为:10
14、摸版方法模式(Template Method) 属于父类和子类的实现
摸版方法模式:一个抽象类中,有一个主方法,在定义多个方法,可以是抽象的,也可以是实际的方法,定义一个类,继承该抽象类,通过调用抽象类,实现子类的调用。
//1.定义一个抽象类
public abstract class AbstractCalculator {
    //主方法,实现对本类其他方法的调用
    public  final int calculate(String exp,String opt){
        int array[] =split(exp,opt);
        return calculate(array[0],array[1]);
    }
    //被子类重写的方法
    abstract public int calculate(int num1,int num2);

    public int[] split(String exp,String opt){
        String array[] = exp.split(opt);
        int arrayInt[] = new int[2];
        arrayInt[0] = Integer.parseInt(array[0]);
        arrayInt[1] = Integer.parseInt(array[1]);
        return arrayInt;
    }
}
//2.继承抽象类并重写方法
public class Plus extends AbstractCalculator{
    @Override
    public int calculate(int num1, int num2) {
        return num1+num2;
    }
}
//3.测试
public class StrategyTest {
    public static void main(String[] args) {
        String exp = "8+8";
        AbstractCalculator cal = new Plus();
        int result = cal.calculate(exp, "\\+");
        System.out.println(result);
    }
}
15、观察者模式(Observer) 属于两个类之间的实现
观察者模式:就是当一个对象变化时,依赖本对象的类都会收到通知,并且随着变化!对象之间是一对多的关系。
import java.util.Enumeration;
import java.util.Vector;

//1.定义一个接口
public interface Observer {
    public void update();
}
//2.第一个实现类
public class Observer1 implements Observer {
    @Override
    public void update() {
         System.out.println("observer1 has received!");
    }
}
//3.第二个实现类
public class Observer2 implements Observer {
    @Override
    public void update() {
        System.out.println("observer2 has received!");
    }
}
//4.定义接口
public interface Subject{
    /*增加观察者*/
    public void add(Observer observer);
    /*删除观察者*/
    public void del(Observer observer);
    /*通知所有的观察者*/
    public void notifyObservers();
    /*自身的操作*/
    public void operation();
}
//5.定义监控对象列表类
public abstract class AbstractSubject implements Subject {
    private Vector<Observer> vector = new Vector<Observer>();
    @Override
    public void add(Observer observer) {
        vector.add(observer);
    }
    @Override
    public void del(Observer observer) {
        vector.remove(observer);
    }
    @Override
    public void notifyObservers() {
        Enumeration<Observer> enumo=vector.elements();
        while (enumo.hasMoreElements()){
            enumo.nextElement().update();
        }
    }
}
//6.定义主对象
public class MySubject extends AbstractSubject {
    @Override
    public void operation() {
        System.out.print("update self!");
        notifyObservers();
    }
}
//7.测试类
public class ObserverTest{
    public static void main(String[] args) {
        Subject sub=new MySubject();
        sub.add(new Observer1());
        sub.add(new Observer2());
        sub.notifyObservers();
    }
}
输出: update self!
      observer1 has received!
      observer2 has received!
16、迭代子模式(Iterator) 属于两个类之间的实现
迭代器模式就是顺序访问聚集中的对象,第一就是遍历聚集的对象,第二就是对聚集的对象进行遍历访问。
//模拟集合类的过程
//1.定义操作集合类的接口
public interface Collection {
    public Iterator iterator();
    //取集合元素
    public Object get(int i);
    //取大小
    public int size();
}
//2.定义迭代遍历集合类的接口
public interface Iterator{
    //前移
    public Object previous();
    //后移
    public Object next();
    public boolean hasNext();
    //取最后一个元素
    public Object first();
}
//3.实现操作集合类的接口
public class MyCollection implements Collection{
    public String string[]={"A","B","C","D","E"};
    @Override
    public Iterator iterator() {
        return new MyIterator(this);
    }

    @Override
    public Object get(int i) {
        return string[i];
    }

    @Override
    public int size() {
        return string.length;
    }
}
//4.实现迭代遍历集合的接口
public class MyIterator implements Iterator{
    private Collection collection;
    private int pos=-1;
    public MyIterator(Collection collection){
        this.collection=collection;
    }
    @Override
    public Object previous() {
        if (pos>0){
            pos--;
        }
        return collection.get(pos);
    }
    @Override
    public Object next() {
        if (pos<collection.size()-1){
            pos++;
        }
        return collection.get(pos);
    }
    @Override
    public boolean hasNext() {
        if (pos<collection.size()-1){
            return true;
        }else {
            return false;
        }
    }
    @Override
    public Object first() {
        pos=0;
        return collection.get(pos);
    }
}
//测试
public class Test{
    public static void main(String[] args) {
        Collection collection=new MyCollection();
        Iterator it=collection.iterator();
        while (it.hasNext()){
            System.out.print(it.next());
        }
    }
}
    //打印结果:A B C D E
17、责任链模式(Chain of Responsibility) 属于两个类之间的实现
责任链模式:有多个对象,每个对象持有对下一个对象的引用,请求在链上传递,直到某一个对象决定处理该请求。但发送请求者并不知道那个对象会处理该请求。链接上的一个请求可以是一条链,一个树,一个环。这个些需要我们自己去实现,在一个时刻,命令只允许由一个对象传给另一个对象,而不允许传给多个对象。
    //1.创建一个设置和修改引用对象的核心接口
public interface Handler{
    public void operator();
}
//2.创建私有的方法类
public abstract class AbstractHandler{
    private Handler handler;
    public Handler getHandler() {
        return handler;
    }
    public void setHandler(Handler handler) {
        this.handler = handler;
    }
}
//3.创建实现核心接口的类
public class MyHandler extends AbstractHandler implements Handler{

    private String name;
    public MyHandler(String name){
        this.name=name;
    }
    @Override
    public void operator() {
        System.out.print(name+"deal!");
        if (getHandler() !=null){
            getHandler().operator();
        }
    }
}
//测试类
public class Test{
    public static void main(String[] args) {
        MyHandler h1 = new MyHandler("h1");
        MyHandler h2 = new MyHandler("h2");
        MyHandler h3 = new MyHandler("h3");

        h1.setHandler(h2);
        h2.setHandler(h3);

        h1.operator();
    }
}

        //输出:  h1deal!
                h2deal!
                h3deal!
18、命令模式(Command) 属于两个类之间的实现
命令模式就是:命令的发出者和执行者之间解耦,实现请求和执行分开。举个例子,比如司令员下令让士兵干件事情,口令传到士兵哪里并去执行,司令员只要结果,不关心执行过程。
 //1.定义命令方法的接口
    public interface  Command{
        public  void  exe();
    }
    //2.实现命令方法接口的实现类(核心类)
    public class MyCommand implements  Command{
        private  Recciver recciver;
        public MyCommand(Recciver recciver){
            this.recciver=recciver;
        }
        @Override
        public void exe() {
            recciver.action();
        }
    }
    //3.创建士兵类
    public class Recciver{
        public  void action(){
            System.out.print("士兵执行命令!");
        }
    }
    //4.创建司令员类
    public class Invoker{
        private  Command command;
        public Invoker(Command command){
            this.command=command;
        }
        public void adtion(){
            System.out.print("司令员发出命令!");
        }
    }
    //测试类
    public class  Test{
        public static void main(String[] args) {
            Recciver recciver=new Recciver();
            Command cmd=new MyCommand(recciver);
            Invoker invoker=new Invoker(cmd);
            invoker.adtion();
        }
    }
        //输出:士兵执行命令!
19、备忘录模式(Memento) 类的状态
备忘录状态:就是要保存对象的某个状态,在适当的时候恢复对象。
//1.创建原始类
    public class Original {
        private String value;  //需要保存的属性

        public String getValue() {
            return value;
        }

        public void setValue(String value) {
            this.value = value;
        }

        public Original(String value) {
            this.value = value;
        }

        //创建备忘录类
        public Memento creatememento() {
            return new Memento(value);
        }

        public void restoreMemento(Memento memento) {
            this.value = memento.getValue();
        }
    }
       //2.创建备忘录类
    public class Memento{
            private String value;
            public Memento(String value){
                this.value=value;
            }
           public String getValue() { return value;}
           public void setValue(String value) {this.value = value;}
       }
       //3.创建存储备忘录类
    public class Storage{
           private Memento memento;
           public Storage(Memento memento){
               this.memento=memento;
           }
           public Memento getMemento() {return memento; }
           public void setMemento(Memento memento) {this.memento = memento;}
       }
       //测试类
    public class Test{
           public static void main(String[] args) {
               //创建原始类
               Original original=new Original("agg");
               //创建备忘录类
               Storage storage=new Storage(original.creatememento());
               //修改原始类状态
               System.out.print("初始化状态为:"+original.getValue());
               original.setValue("niu");
               System.out.print("修改后的状态为:"+original.getValue());
               //恢复原始类状态
               original.restoreMemento(storage.getMemento());
               System.out.print("恢复后的状态为:"+original.getValue());
           }
       }
       // 输出结果为:初始状态为:egg
                    修改后的状态为:niu
                    恢复后的状态为:egg
20、状态模式(State) 类的状态
状态模式:当对象改变状态时,同时改变其行为,并且每个状态对应不同的操作。
 //1.创建状态的核心类
    public class State{
        private String value;
        public String getValue() {return value;}
        public void setValue(String value) {this.value = value;}
        public void method1(){System.out.print("execute the first opt!");}
        public void method2(){System.out.print("execute the second opt!");}
    }
    //2.创建状态模式的切换类
    public class Context{
        private State state;
        public Context(State state){this.state=state;}
        public State getState() {return state;}
        public void setState(State state) {this.state = state;}
        public  void method(){
            if (state.getValue().equals("state1")){
                state.method1();
            }else if (state.getValue().equals("state2")){
                state.method2();
            }
        }
    }
    //测试类
    public class Test{
        public static void main(String[] args) {
            State state=new State();
            Context context=new Context(state);
            //设置第一种状态
            state.setValue("state1");
            context.method();
            //设置第二种状态
            state.setValue("state2");
            context.method();
        }
    }
            //输出结果:execute the first opt!
                      execute the second opt!
21、访问者模式(Visitor) 通过中间类
访问者模式就是把数据结构和操作解耦合,使操作集合相对自由的演化。总的来说该模式添加数据结构很困难,添加操作很容易,并不会影响其它的操作效果。
 //1创建存放要访问的对象接口
    public interface Visitor{
        public void visit(Subject sub);
    }

    //2.创建实现要访问对象接口的实现类
    public class MyVisitor implements Visitor{
        @Override
        public void visit(Subject sub) {
            System.out.print("visit the subject:"+sub.getSubject());
        }
    }
    //3.创建访问的对象接口
    public interface Subject{
        //接受将要访问它的对象
        public void accept(Visitor visitor);
        //获取将要被访问的属性
        public String getSubject();
    }
    //4.创建实现访问对象的实现类
    public class MySubject implements Subject{
        @Override
        public void accept(Visitor visitor) {
            visitor.visit(this);
        }
        @Override
        public String getSubject() {
            return "love";
        }
    }
    //测试类
    public class Test{
        public static void main(String[] args) {
            Visitor visitor=new MyVisitor();
            Subject sub=new MySubject();
            sub.accept(visitor);
        }
    }
    //输出:visit the subject:love
22、中介者模式(Mediator) 通过中间类
中介者模式就是降低类与类之间的耦合,类与类的关系与调度交给中间类就行,类似有Spring的容器。
 //1.创建中间类的接口
    public interface Mediator{
        public void createMediator();
        public void workAll();
    }
    //2.创建中间类的实现类
    public class MyMediator implements Mediator{
        private User user1;
        private User user2;
        public User getUser1(){return user1;}
        public User getUser2(){return user2;}
        @Override
        public void createMediator() {
            user1=new User1(this);
            user2=new User2(this);
        }
        @Override
        public void workAll() {
            user1.work();
            user2.work();
        }
    }
    //3.创建私有的类
    public abstract class User{
        private Mediator mediator;
        public Mediator getMediator(){return mediator;}
        public User(Mediator mediator){
            this.mediator=mediator;
        }
        public abstract void work();
    }
    //4.创建私有类的继承类
    public class User1 extends User{
        public User1(Mediator mediator){super(mediator);}

        @Override
        public void work() {
            System.out.print("执行user1类!");
        }
    }
    //5.创建私有类的继承类
    public class User2 extends User{
        public User2(Mediator mediator){super(mediator);}

        @Override
        public void work() {
            System.out.print("执行user2类!");
        }
    }
    //测试类
    public class Test{
        public static void main(String[] args) {
            Mediator mediator=new MyMediator();
            mediator.createMediator();
            mediator.workAll();
        }
    }
            //输出:执行user1类!
                    执行user2类!
23、解释器模式(Interpreter) 通过中间类
解释器模式用来做各种各样的解释器,一般应用在OOP开发中的编译器,比如:正则表达式解释器等。
  //.创建计算  的接口
    public interface Expression{
        public int interpret(Context context);
    }
    //2.创建   实现计算类
    public  class Plus implements Expression{
        @Override
        public int interpret(Context context) {
            return context.num1+context.num2;
        }
    }
    //3.创建   实现计算类
    public  class Minus implements Expression{
        @Override
        public int interpret(Context context) {
            return context.num1-context.num2;
        }
    }
    //4.创建上下文环境类
    public  class Context{
        private int num1;
        private int num2;
        public Context(int num1,int num2){
            this.num1=num1;
            this.num2=num2;
        }
        //get和set方法省略
    }
    //测试类
    public class  Text{
        public static void main(String[] args) {
            //计算9+2-8的值
            int result=new Minus().interpret((new Context(new Plus().interpret(new Context(9,2)),8)));
            System.out.print(result);
        }
    }
            //输出结果:3