JavaWeb——SpringBoot 系列(3)Thymeleaf 模板引擎

一、Thymeleaf 简介

  • Thymeleaf 是一个 Java 类库,是一个 xml/xhtml/html5 的模板引擎,可以作为 MVC 的 Web 应用的 View 层,并且提供了额外的模块与 Spring MVC 集成,从而可以替代 JSP。

1、Thymeleaf 模板页面

  • Thymeleaf 模板的基本页面的代码如下:
    <!DOCTYPE html>
    <html xmlns:th="http://www.thymeleaf.org" lang="en">
    <head>
        <meta content="text/html;charset=UTF-8"/>
        <meta http-equiv="X-UA-Compatible" content="IE=edge"/>
        <meta name="viewport" content="width=device-width, initial-scale=1"/>
        <title>Thymeleaf</title>
    </head>
    <body>
    </body>
    </html>
    
  • xmlns:th=“http://www.thymeleaf.org” 是一个命名空间,通过该命名空间可以将静态页面转换为动态的视图,需要进行动态处理的元素将使用 “th:" 为前缀。

1.1、加载静态资源

  • Thymeleaf 页面使用 @{} 来引用 Web 静态资源:
     <link th:href="@{bootstrap/css/bootstrap.min.css}" rel="stylesheet"/>
    <link th:href="@{bootstrap/css/bootstrap-theme.min.css}" rel="stylesheet"/>
    

1.2、数据的访问和使用

  • Thymeleaf 页面中可以使用 Spring 的 Model.addAttribute() 方法添加到视图层的数据,例如:
    @RequestMapping("/")
    public String index(Model model){
        Person single = new Person("aa",11);
        List<Person> people = new ArrayList<>();
        Person p1 = new Person("xx",11);
        Person p2 = new Person("yy",22);
        Person p3 = new Person("zz",33);
        people.add(p1);
        people.add(p2);
        people.add(p3);
        model.addAttribute("singlePerson",single);
        model.addAttribute("people",people);
        return "index";
    }
    
  • 在 index.html 页面:
    <!--访问 model 中的数据-->
    <div class="panel panel-primary">
        <div class="panel-heading">
            <h3 class="panel-title">
                访问model
            </h3>
        </div>
        <div class="panel-body">
            <span th:text="${singlePerson.name}"></span>
        </div>
    </div>
    <!--    数据判断-->
    <div th:if="${not #lists.isEmpty(people)}">
        <div class="panel panel-primary">
            <div class="panel-heading">
                <h3 class="panel-title">列表</h3>
            </div>
            <div class="panel-body">
                <ul class="list-group">
    <!--                数据迭代-->
                    <li class="list-group-item" th:each="person:${people}">
                        <span th:text="${person.name}"></span>
                        <span th:text="${person.age}"></span>
                        <button class="btn" th:onclick="'getName(\'' + ${person.name} + '\');'">获得名字</button>
                    </li>
                </ul>
            </div>
        </div>
    </div>
    
  • 从上面可以看出,Thymeleaf 页面用 ${} 来访问和使用 model 中的数据。
  • Thymeleaf 页面也支持数据迭代,使用 th:each="att:${list},att 为迭代元素。
  • ${not #list.isEmpty(attribute)} 表达式可用来判断属性是否为空值;Thymeleaf 支持 >、<、>=、<=、==、!= 作为比较条件,也支持将 SpringEL 表达式语言用于条件中。
  • 以上表达式都是在非 Javascript 的部分,若在 Javascript 中访问 model 中的数据,其格式稍微不同:
    <script th:inline="javascript">
        var single=[[${singlePerson}]];
        console.log(single.name+"/"+single.age)
    
        function getName(name) {
            console.log(name);
        }
    </script>
    
  • th:inline="javascript 标签可让 Javascript 代码也能够访问 model 中的数据。
  • 用**[[${}]]** 格式来访问值。

二、Thymeleaf+Spring Boot 简单项目

1、准备 Thymeleaf 依赖

  • 打开项目的 pom 文件,编辑 Thymeleaf 依赖,POM 文件具体代码如下:
    <?xml version="1.0" encoding="UTF-8"?>
    <project xmlns="http://maven.apache.org/POM/4.0.0" xmlns:xsi="http://www.w3.org/2001/XMLSchema-instance"
             xsi:schemaLocation="http://maven.apache.org/POM/4.0.0 https://maven.apache.org/xsd/maven-4.0.0.xsd">
        <modelVersion>4.0.0</modelVersion>
        <parent>
            <groupId>org.springframework.boot</groupId>
            <artifactId>spring-boot-starter-parent</artifactId>
            <version>1.3.0.M1</version>
            <relativePath/> <!-- lookup parent from repository -->
        </parent>
        <groupId>com.wisely</groupId>
        <artifactId>ch5_2_3</artifactId>
        <version>0.0.1-SNAPSHOT</version>
        <name>ch5_2_3</name>
        <description>Demo project for Spring Boot</description>
    
        <properties>
            <java.version>1.8</java.version>
        </properties>
    
        <dependencies>
    <!--        Thymeleaf 依赖-->
            <dependency>
                <groupId>org.springframework.boot</groupId>
                <artifactId>spring-boot-starter-thymeleaf</artifactId>
            </dependency>
            <dependency>
                <groupId>org.springframework.boot</groupId>
                <artifactId>spring-boot-starter-websocket</artifactId>
            </dependency>
            <dependency>
                <groupId>org.springframework.boot</groupId>
                <artifactId>spring-boot-starter-test</artifactId>
                <scope>test</scope>
                <exclusions>
                    <exclusion>
                        <groupId>org.junit.vintage</groupId>
                        <artifactId>junit-vintage-engine</artifactId>
                    </exclusion>
                </exclusions>
            </dependency>
        </dependencies>
    
        <build>
            <plugins>
                <plugin>
                    <groupId>org.springframework.boot</groupId>
                    <artifactId>spring-boot-maven-plugin</artifactId>
                </plugin>
            </plugins>
        </build>
    
        <repositories>
            <repository>
                <id>spring-milestones</id>
                <name>Spring Milestones</name>
                <url>https://repo.spring.io/milestone</url>
            </repository>
        </repositories>
        <pluginRepositories>
            <pluginRepository>
                <id>spring-milestones</id>
                <name>Spring Milestones</name>
                <url>https://repo.spring.io/milestone</url>
            </pluginRepository>
        </pluginRepositories>
    </project>
    

2、JavaBean

  • 编辑一个 JavaBean 用于演示,代码如下:
    //IntelliJ IDEA
    //ch5_2_3
    //Person
    //2020/2/3
    // Author:御承扬
    //E-mail:[email protected]
    
    package com.wisely.ch5_2_3.bean;
    
    public class Person {
        private String name;
        private Integer age;
        public Person(){
            super();
        }
        public Person(String name, Integer age) {
            super();
            this.name = name;
            this.age = age;
        }
        public String getName() {
            return name;
        }
        public void setName(String name) {
            this.name = name;
        }
        public Integer getAge() {
            return age;
        }
        public void setAge(Integer age) {
            this.age = age;
        }
    }
    

3、准备视图页面

  • 建立一个 Thymeleaf 页面作为视图层,具体代码如下:
    <!DOCTYPE html>
    <!--引入 Thymeleaf-->
    <html xmlns:th="http://www.thymeleaf.org" lang="en">
    <head>
        <meta content="text/html;charset=UTF-8"/>
        <meta http-equiv="X-UA-Compatible" content="IE=edge"/>
        <meta name="viewport" content="width=device-width, initial-scale=1"/>
        <link th:href="@{bootstrap/css/bootstrap.min.css}" rel="stylesheet"/>
        <link th:href="@{bootstrap/css/bootstrap-theme.min.css}" rel="stylesheet"/>
        <title>Thymeleaf</title>
    </head>
    <body>
    <!--访问 model 中的数据-->
    <div class="panel panel-primary">
        <div class="panel-heading">
            <h3 class="panel-title">
                访问model
            </h3>
        </div>
        <div class="panel-body">
            <span th:text="${singlePerson.name}"></span>
        </div>
    </div>
    <!--    数据判断-->
    <div th:if="${not #lists.isEmpty(people)}">
        <div class="panel panel-primary">
            <div class="panel-heading">
                <h3 class="panel-title">列表</h3>
            </div>
            <div class="panel-body">
                <ul class="list-group">
    <!--                数据迭代-->
                    <li class="list-group-item" th:each="person:${people}">
                        <span th:text="${person.name}"></span>
                        <span th:text="${person.age}"></span>
                        <button class="btn" th:onclick="'getName(\'' + ${person.name} + '\');'">获得名字</button>
                    </li>
                </ul>
            </div>
        </div>
    </div>
    <script th:src="@{jquery-1.10.2.min.js}" type="text/javascript"></script>
    <script th:src="@{bootstrap/js/bootstrap.min.js}"></script>
    <script th:inline="javascript">
        var single=[[${singlePerson}]];
        console.log(single.name+"/"+single.age)
    
        function getName(name) {
            console.log(name);
        }
    </script>
    </body>
    </html>
    

4、数据准备

  • 这一步主要在入口类中完成:
    @Controller
    @SpringBootApplication
    public class Ch523Application {
        @RequestMapping("/")
        public String index(Model model){
            Person single = new Person("aa",11);
            List<Person> people = new ArrayList<>();
            Person p1 = new Person("xx",11);
            Person p2 = new Person("yy",22);
            Person p3 = new Person("zz",33);
            people.add(p1);
            people.add(p2);
            people.add(p3);
            model.addAttribute("singlePerson",single);
            model.addAttribute("people",people);
            return "index";
        }
    
        public static void main(String[] args) {
            new SpringApplicationBuilder(Ch523Application.class)
                    .showBanner(true)
                    .run(args);
        }
    }
    

5、运行

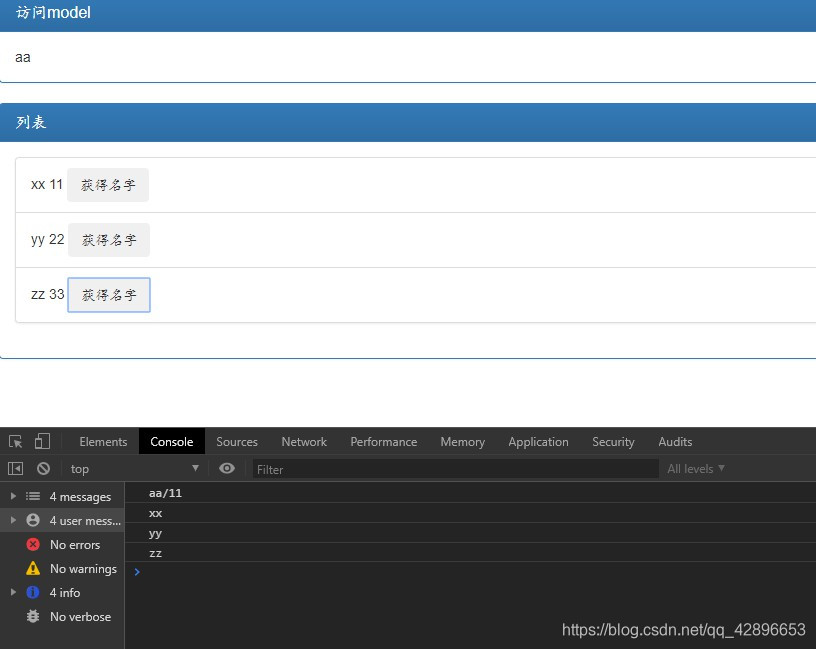
  • 运行项目,然后用浏览器访问 localhost:8080,页面如下:
    在这里插入图片描述

上一篇
下一篇

发布了146 篇原创文章 · 获赞 15 · 访问量 1万+

猜你喜欢

转载自blog.csdn.net/qq_42896653/article/details/104158395