java多线程是java高级阶段的知识点,也是java中比较难学的一部分,今天我们来初步学习一下java的多线程知识。说在前面,只是简单的入门,更高深的讲解可以参考其它大牛博文。
一、首先对于学习多线程有必要先了解一些概念:
1、什么是并行?什么是并发?
并行是指真正意义上的在同一时刻同时执行多个任务,比如多处理机的电脑就可以在同一时刻处理多个任务。
并发是虚拟上的同时执行,比如我们平时玩电脑,同时听歌,玩游戏,看电视,貌似是同时进行的,但是其实没有,只是cpu工作切换的时间很快,我们根本无法感受到,导致我们认为是同时进行的。并发的意义就在于充分利用cpu资源。对于java中的多线程就是并发程序。在某一刻只能有一个任务执行,cpu调度任务执行。
2、进程、线程、程序的区别?
首先说程序,它是静态的,它只是一连串的字符组成的代码块
进程:进程是操作系统的资源分配的基本空间,操作系统会为其分配对应的内存空间,而且进程有自己的代码和数据空间。不存在没有线程的进程
线程:线程是cpu调度的基本单位,没有自己的内存空间,线程可以理解为轻量级的进程,一个进程中可以有多个线程。
二、多线程实现的两者方式:
继承Thread类和实现Runnable接口
package com.yxc.thread;

/**
 * 多线程的学习
 * 创建多线程的两种方式
 * 第一继承Thread类
 * 第二种实现Runable接口
 */
public class MyThread extends Thread{
    private String name;
    //通过构造方法进行初始化工作
   public MyThread(String name){
       this.name=name;
   }
   //继承了Thread类,可以重写里面的run方法,这个方法是多线程的核心方法
   public void run(){
       //这个线程的工作根简单,就是从1打印到19
       System.out.println(name+"开始执行");
       for(int i=0;i<20;i++){
           System.out.println(i);
           try {
               Thread.sleep(20);
           } catch (InterruptedException e) {
               e.printStackTrace();
           }
       }
       System.out.println(name+"结束执行");
   }
}
package com.yxc.thread;

/**
 * 通过实现接口实现多线程
 */
public class MyThread2 implements Runnable{
    private String name;
    public MyThread2(String name){
        this.name=name;
    }
    @Override
    public void run() {
        System.out.println(name+"开始执行");
        for(int i=0;i<10;i++){
            System.out.println("java多线程的学习 使用runnable实现");
            try {
                Thread.sleep(20);
            } catch (InterruptedException e) {
                e.printStackTrace();
            }
        }
        System.out.println(name+"结束执行");
    }
}
package com.yxc.thread;

/**
 * 大部分情况下,我们都使用第二种方式实现多线程
 * 因为在java中继承是有限制的,那就是单继承,如果继承了这个类以后,如果这个
 * 类还想继承其它的类,那么就不可以,但是实现接口可以实现多个。
 */
public class TestThread {
    public static void main(String[] args) {
        //下面是实现两者多线程方式的测试代码
        MyThread myThread = new MyThread("打印线程");
        //对于实现接口来说。最终还是要通过Thread类来创建执行多线程的对象
        MyThread2 myThread2=new MyThread2("输出线程");
        Thread thread=new Thread(myThread2);
        //开启线程一定是调用start()方法,而不是通过对象调用run方法
        myThread.start();
        thread.start();
        //最后的执行效果的肯定是没有规律的,因为多线程的执行情况我们根本无法预知,是操作系统随机调度的
        //后面的学习中还会涉及到这个概念
    }
}
这里面涉及到几个常用的多线程中的方法:
start():开启线程,注意开启线程不一定就开始执行了,只是进入就绪态,要想真正执行需要cpu的调度
Sleep():休眠,传入一个毫秒数,表示当前线程休眠一定时间后又进入就绪态
三、线程的五种状态
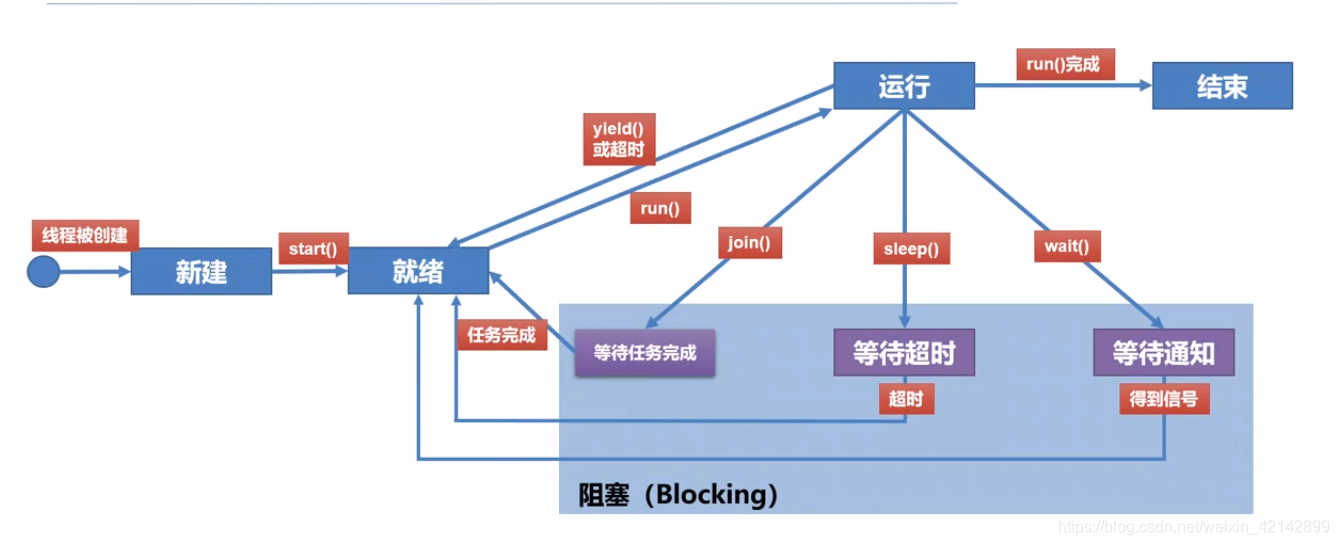
下面通过一段案例来了解这几种状态的具体情况:
package com.yxc.thread;

/**
 * 线程的五种状态的了解
 */
public class ThreadStatusDemo {
    public static void main(String[] args) {
        PrintStar printStar=new PrintStar();
        System.out.println("线程新建状态");
        Thread thread=new Thread(printStar,"数星星线程");
        thread.start();
        System.out.println("线程进入就绪转状态");
        //这个时候还不一定指定,要等待cpu调用才进入真正的运行态
    }
}
//一个数星星的线程
class PrintStar implements Runnable{
    @Override
    public void run() {
        System.out.println(Thread.currentThread().getName()+"线程进入运行态");
        for(int i=1;i<100;i++){
            System.out.println("第"+i+"颗星星");
            try {
                Thread.sleep(10);
                System.out.println(Thread.currentThread().getName()+"线程进入阻塞态");
            } catch (InterruptedException e) {
                e.printStackTrace();
            }
            System.out.println("线程阻塞结束进入就绪态");
        }
        System.out.println(Thread.currentThread().getName()+"线程结束");
    }
}
4、几种方法的学习以及对比:
sleep():让当前线程休眠指定的时间,线程进入阻塞态,时间到以后又进入就绪态,开始抢占cpu资源
yield ():这个方法比较有意思,表面上是让出,让其它线程执行,但是它让出以后又马上进入就绪态,同其它的线程抢占资源,可以理解为给你们个机会,公平竞争。
join(); 等待其它的线程执行完以后再执行,前面的两个方法都是属于类方法,这个是实例方法,要通过对象来调用的,这个方法是用在其它线程里面的,通过单词join(加入)也可以理解,强行加入到某一个线程中去执行
wait():实例方法,调用这个方法以后线程进入阻塞状态,而且需要等待其它线程的唤起才能进入就绪态,而且调用它,资源会被释放
package com.yxc.thread;

public class MthodDemo {
    public static void main(String[] args) {
        Thread thread=new Thread(new MyThread1());
        thread.start();
        for(int i=100;i<120;i++){
            if(i==105) {
                try {
                    thread.join();
                } catch (InterruptedException e) {
                    e.printStackTrace();
                }
            }
            System.out.println(i);
        }
    }
}
class MyThread1 implements Runnable{
    @Override
    public void run() {
        for(int i=0;i<20;i++){
            System.out.println(i);
        }
    }
}
在代码中join()方法加入到了main线程中去,当main线程中的执行到105的时候将不再执行,线程将强行加入到main线程中执行。
5、经典的生产者与消费者模式:
下面通过代码实现多线程最经典的生产者与消费者模式,通过两个线程之前的通知等待来实现,也学习一下wait方法和notify()、notifyAll()三个方法的使用。我们写一个简单的,一个机器负责生产和消费,然后两个线程去执行,话不多说,直接上代码。
package com.yxc.producerAndConsumer;

import java.util.ArrayDeque;
import java.util.Queue;

/**
 * 这个类是生产和消费冰淇淋的机器类
 */
public class IceMachine {
    //定义一个机器中最大的容量
    private static final int MAX_BUFFER=20;

    //定义一个队列来存放冰淇淋
    Queue<Integer> IceQueue=new ArrayDeque<>();
    /**生产者生产冰淇淋的方法*/
    public synchronized void produceIce(){
        //如果机器中的数量达到了上线,那么通知生产者暂时不要生产
        //直接调用wait()方法就可以
        while(IceQueue.size()==MAX_BUFFER){
            try {
                wait();
            } catch (InterruptedException e) {
                e.printStackTrace();
            }
        }
        int count=0;
        //如果机器中数量没有达到限定,那么就不断的生产
        while(IceQueue.size()<MAX_BUFFER){
            //随机产生一个1~100整数
            int i = (int)(Math.random()*100+1);
            //将编号为I的冰淇淋添加到队列中,等待消费者的消费
            IceQueue.offer(i);
            count++;
        }
        System.out.println("入库了"+count);
        //通知消费者可以消费了
        notify();
    }

    /**消费者消费方法*/
    public synchronized int ConsumeIce(){
        //如果队列中的产品数量为零,那么通知消费者等待
        while(IceQueue.size()==0){
            try {
                wait();
            } catch (InterruptedException e) {
                e.printStackTrace();
            }
        }
        Integer i = IceQueue.poll();
        System.out.println(i+"号产品被消费");
        return i;
    }
}
package com.yxc.producerAndConsumer;

/**
 * 消费者线程
 */
public class Consumer implements  Runnable{
    //将生产机器传进来
   private  IceMachine iceMachine=null;
    //通过构造方法初始化
    public Consumer(IceMachine iceMachine){
        this.iceMachine=iceMachine;
    }
    @Override
    public void run() {
        System.out.println("消费者开始消费产品");
        while(true){
            try {
                iceMachine.ConsumeIce();
                Thread.sleep(100);
            } catch (InterruptedException e) {
                e.printStackTrace();
            }
        }

    }
}
package com.yxc.producerAndConsumer;

/**
 * 生产者线程
 */
public class Producer implements Runnable{
    //将生产机器传进来
    private IceMachine iceMachine=null;
    //通过构造方法初始化
    public Producer(IceMachine iceMachine){
        this.iceMachine=iceMachine;
    }
    @Override
    public void run() {
        System.out.println("生产者开始生产产品");
        while(true){
            try {
                iceMachine.produceIce();
                Thread.sleep(200);
            } catch (InterruptedException e) {
                e.printStackTrace();
            }
        }

    }
}
package com.yxc.producerAndConsumer;

/**
 * 测试类
 */
public class TestMain {
    public static void main(String[] args) {
        IceMachine iceMachine=new IceMachine();
        Producer produce=new Producer(iceMachine);
        Consumer consumer=new Consumer(iceMachine);
        new Thread(produce).start();
        new Thread(consumer).start();
    }
}
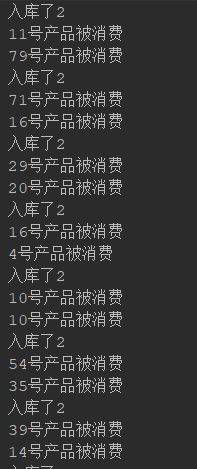
部分实现的结果图:
6、线程池
*概念:*池顾名思义就是由很多线程组成的一个集合,系统启动时系统就创建了很多空的线程保存在线程池中,程序将一个任务传给线程池时,系统就会在线程池中寻找空闲的线程来执行这个任务。
优势:大量的创建线程、释放线程需要花费很多的系统资源,有了线程池以后,有效的提高了性能。减少了资源的消耗
线程池工作原理:任务直接提交给线程池,又线程池寻找空闲线程执行任务,执行完以后,线程又返回空的状态,返回线程池中,等待下一个任务的执行。一个任务只能有分配一个线程,但是可以同时向线程池发送多个任务。
下面通过代码实现集中常见的创建线程池的方法
为了方便,我将四种常见的创建方法以静态方法的形式实现,然后在主方法中直接调用四种方式,每一种都写了注释。
package com.yxc.threadPool;

import java.util.concurrent.*;

/**
 * 线程池的学习使用
 */

public class ThreadPoolDemo {
    public static void main(String[] args) {
        test1();
        test2();
        test3();
        test4();
    }
    /**创建指定个数的线程池*/
    public static void test1(){
        //创建一个容量为3的线程池
        ExecutorService executorService = Executors.newFixedThreadPool(3);
        for(int i=0;i<10;i++){
            executorService.execute(new Runnable() {
                @Override
                public void run() {
                    System.out.println(Thread.currentThread().getName()+"线程被执行");
                    try {
                        Thread.sleep(2000);
                    } catch (InterruptedException e) {
                        e.printStackTrace();
                    }
                }
            });
        }
    }
    /**执行线程池的个数,而且有定时效果的 */
    public static void test2(){
        //创建一个这样的线程池,可以定时以及周期性执行任务
        ScheduledExecutorService scheduledExecutorService = Executors.newScheduledThreadPool(3);
        scheduledExecutorService.scheduleAtFixedRate(new Runnable() {
            @Override
            public void run() {
                System.out.println("延迟一秒以后每两秒执行一次");
            }
        },1,2,TimeUnit.SECONDS);//这里两个参数 延时时间和周期时间
    }
    /**创建一个单例线程,线程池中只有一个线程可以执行任务,这样符合先来先执行的规则*/
     public static void test3(){
         ExecutorService executorService = Executors.newSingleThreadExecutor();
         for(int i=0;i<10;i++){
             int index=i;
             executorService.execute(new Runnable() {
                 @Override
                 public void run() {
                     System.out.println(index);
                     try {
                         Thread.sleep(20);
                     } catch (InterruptedException e) {
                         e.printStackTrace();
                     }
                 }
             });
         }
     }
     /**带缓存的线程池,如果这个线程被用过,直接分配,如果没有被用过,那么就生成一个新的线程分配给任务,然后将线程添加到线程池中*/
     public static void test4(){
         ExecutorService executorService = Executors.newCachedThreadPool();
         for(int i=0;i<10;i++){
             try {
                 Thread.sleep(100);
             } catch (InterruptedException e) {
                 e.printStackTrace();
             }
             executorService.execute(new Runnable() {
                 @Override
                 public void run() {
                     System.out.println(Thread.currentThread().getName()+"在被执行");
                 }
             });
         }
     }
}
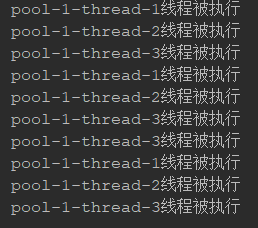
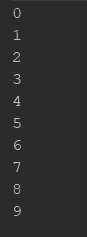
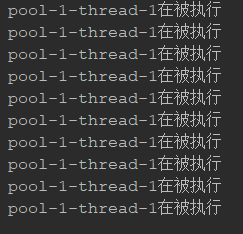
代码执行结果:
test1:
test3:
test4:
对于测试2,代码延迟一秒执行,然后之后每两秒执行一次,无限循环下去
当然对于多线程这一章,代码一样,很可能执行的结果是不一样的,总结它是一个不靠谱的东西。这一章还有一些方法,没有说明,比如设置权限,设置权限只能优先级高一点,但是不能保证一定被执行。还有设置守护线程等等。
