整合一
通常搭建一个基于spring的web应用,我们需要做以下工作:
1、pom文件中引入相关jar包,包括spring、springmvc、redis、mybaits、log4j、mysql-connector-java 等等相关jar …
2、配置web.xml,Listener配置、Filter配置、Servlet配置、log4j配置、error配置 …
3、配置数据库连接、配置spring事务
4、配置视图解析器
5、开启注解、自动扫描功能
6、配置完成后部署tomcat、启动调试
而springboot采用自动配置原理简化了很多步骤
在springboot中我们只需要引入下面简单的几步就可以完成一个ssm后台项目的初始搭建。
1、引入jar
<parent>
 <groupId>org.springframework.boot</groupId>
 <artifactId>spring-boot-starter-parent</artifactId>
 <version>2.0.4.RELEASE</version>
 <relativePath/> <!-- lookup parent from repository -->
</parent>
<!--mybatis 开发包-->
<dependency>
 <groupId>org.mybatis.spring.boot</groupId>
 <artifactId>mybatis-spring-boot-starter</artifactId>
 <version>1.3.2</version>
</dependency>
<!--springboot web模块支持-->
<dependency>
 <groupId>org.springframework.boot</groupId>
 <artifactId>spring-boot-starter-web</artifactId>
</dependency>
<dependency>
 <groupId>mysql</groupId>
 <artifactId>mysql-connector-java</artifactId>
 <scope>runtime</scope>
</dependency>
<!--druid 的数据源-->
<dependency>
 <groupId>com.alibaba</groupId>
 <artifactId>druid</artifactId>
 <version>1.0.31</version>
</dependency>
spring-boot-starter-web包自动帮我们引入了web模块开发需要的相关jar包,
mybatis-spring-boot-starter帮我们引入了dao开发相关的jar包。
spring-boot-starter-xxx是官方提供的starter,xxx-spring-boot-starter是第三方提供的starter。
2、配置数据源
spring:
 datasource:
 url: jdbc:mysql://127.0.0.1:3306/mybatis_test
 username: root
 password: root
 driver-class-name: com.mysql.jdbc.Driver
 type: com.alibaba.druid.pool.DruidDataSource
 dbcp2:
 min-idle: 5
 initial-size: 5
 max-total: 5
 max-wait-millis: 200
stater机制帮我们完成了项目起步所需要的的相关jar包。那问题又来了,传统的spring应用中不是要在application.xml中配置很多bean的吗,比如dataSource的配置,transactionManager的配置 … springboot是如何帮我们完成这些bean的配置的?
我们可以将自动配置的关键几步以及相应的注解总结如下:
1、@Configuration&与@Bean->基于java代码的bean配置
2、@Conditional->设置自动配置条件依赖
3、@EnableConfigurationProperties与@ConfigurationProperties->读取配置文件转换为bean。
4、@EnableAutoConfiguration、@AutoConfigurationPackage 与@Import->实现bean发现与加载。
参考文章:
https://msd.misuland.com/pd/2884250034537241066
整合二
我们开发任何一个Spring Boot项目,都会用到如下的启动类
1 @SpringBootApplication
2 public class Application {
3     public static void main(String[] args) {
4         SpringApplication.run(Application.class, args);
5     }
6 }
从上面代码可以看出,Annotation定义(@SpringBootApplication)和类定义(SpringApplication.run)最为耀眼,所以要揭开SpringBoot的神秘面纱,我们要从这两位开始就可以了。
一、SpringBootApplication背后的秘密
@SpringBootApplication注解是Spring Boot的核心注解,它其实是一个组合注解:
 1 @Target(ElementType.TYPE)
 2 @Retention(RetentionPolicy.RUNTIME)
 3 @Documented
 4 @Inherited
 5 @SpringBootConfiguration
 6 @EnableAutoConfiguration
 7 @ComponentScan(excludeFilters = {
 8         @Filter(type = FilterType.CUSTOM, classes = TypeExcludeFilter.class),
 9         @Filter(type = FilterType.CUSTOM, classes = AutoConfigurationExcludeFilter.class) })
10 public @interface SpringBootApplication {
11 ...
12 }
虽然定义使用了多个Annotation进行了原信息标注,但实际上重要的只有三个Annotation:
- @Configuration(@SpringBootConfiguration点开查看发现里面还是应用了@Configuration)
- @EnableAutoConfiguration
- @ComponentScan
即 @SpringBootApplication = (默认属性)@Configuration + @EnableAutoConfiguration + @ComponentScan。
所以,如果我们使用如下的SpringBoot启动类,整个SpringBoot应用依然可以与之前的启动类功能对等:
1 @Configuration
2 @EnableAutoConfiguration
3 @ComponentScan
4 public class Application {
5     public static void main(String[] args) {
6         SpringApplication.run(Application.class, args);
7     }
8 }
每次写这3个比较累,所以写一个@SpringBootApplication方便点。接下来分别介绍这3个Annotation。
1、@Configuration
这里的@Configuration对我们来说不陌生,它就是JavaConfig形式的Spring Ioc容器的配置类使用的那个@Configuration,SpringBoot社区推荐使用基于JavaConfig的配置形式,所以,这里的启动类标注了@Configuration之后,本身其实也是一个IoC容器的配置类。
举几个简单例子回顾下,XML跟config配置方式的区别:
(1)表达形式层面
基于XML配置的方式是这样:
1 <?xml version="1.0" encoding="UTF-8"?>
2 <beans xmlns="http://www.springframework.org/schema/beans"
3        xmlns:xsi="http://www.w3.org/2001/XMLSchema-instance"
4        xsi:schemaLocation="http://www.springframework.org/schema/beans http://www.springframework.org/schema/beans/spring-beans-3.0.xsd"
5        default-lazy-init="true">
6     <!--bean定义-->
7 </beans>
而基于JavaConfig的配置方式是这样:
1 @Configuration
2 public class MockConfiguration{
3     //bean定义
4 }
任何一个标注了@Configuration的Java类定义都是一个JavaConfig配置类。
(2)注册bean定义层面
基于XML的配置形式是这样:
1 <bean id="mockService" class="..MockServiceImpl">
2     ...
3 </bean>
而基于JavaConfig的配置形式是这样的:
1 @Configuration
2 public class MockConfiguration{
3     @Bean
4     public MockService mockService(){
5         return new MockServiceImpl();
6     }
7 }
任何一个标注了@Bean的方法,其返回值将作为一个bean定义注册到Spring的IoC容器,方法名将默认成该bean定义的id。
(3)表达依赖注入关系层面
为了表达bean与bean之间的依赖关系,在XML形式中一般是这样:
1 <bean id="mockService" class="..MockServiceImpl">
2     <propery name ="dependencyService" ref="dependencyService" />
3 </bean>
4
5 <bean id="dependencyService" class="DependencyServiceImpl"></bean>
而基于JavaConfig的配置形式是这样的:
 1 @Configuration
 2 public class MockConfiguration{
 3     @Bean
 4     public MockService mockService(){
 5         return new MockServiceImpl(dependencyService());
 6     }
 7
 8     @Bean
 9     public DependencyService dependencyService(){
10         return new DependencyServiceImpl();
11     }
12 }
如果一个bean的定义依赖其他bean,则直接调用对应的JavaConfig类中依赖bean的创建方法就可以了。
@Configuration:提到@Configuration就要提到他的搭档@Bean。使用这两个注解就可以创建一个简单的spring配置类,可以用来替代相应的xml配置文件。
1 <beans>
2     <bean id = "car" class="com.test.Car">
3         <property name="wheel" ref = "wheel"></property>
4     </bean>
5     <bean id = "wheel" class="com.test.Wheel"></bean>
6 </beans>
相当于:
 1 @Configuration
 2 public class Conf {
 3     @Bean
 4     public Car car() {
 5         Car car = new Car();
 6         car.setWheel(wheel());
 7         return car;
 8     }
 9
10     @Bean
11     public Wheel wheel() {
12         return new Wheel();
13     }
14 }
@Configuration的注解类标识这个类可以使用Spring IoC容器作为bean定义的来源。
@Bean注解告诉Spring,一个带有@Bean的注解方法将返回一个对象,该对象应该被注册为在Spring应用程序上下文中的bean。
2、@ComponentScan
@ComponentScan这个注解在Spring中很重要,它对应XML配置中的元素,@ComponentScan的功能其实就是自动扫描并加载符合条件的组件(比如@Component和@Repository等)或者bean定义,最终将这些bean定义加载到IoC容器中。
我们可以通过basePackages等属性来细粒度的定制@ComponentScan自动扫描的范围,如果不指定,则默认Spring框架实现会从声明@ComponentScan所在类的package进行扫描。
注:所以SpringBoot的启动类最好是放在root package下,因为默认不指定basePackages。
3、@EnableAutoConfiguration
个人感觉@EnableAutoConfiguration这个Annotation最为重要,所以放在最后来解读,大家是否还记得Spring框架提供的各种名字为@Enable开头的Annotation定义?比如@EnableScheduling、@EnableCaching、@EnableMBeanExport等,@EnableAutoConfiguration的理念和做事方式其实一脉相承,简单概括一下就是,借助@Import的支持,收集和注册特定场景相关的bean定义。
- @EnableScheduling是通过@Import将Spring调度框架相关的bean定义都加载到IoC容器。
- @EnableMBeanExport是通过@Import将JMX相关的bean定义加载到IoC容器。
而@EnableAutoConfiguration也是借助@Import的帮助,将所有符合自动配置条件的bean定义加载到IoC容器,仅此而已!
@EnableAutoConfiguration会根据类路径中的jar依赖为项目进行自动配置,如:添加了spring-boot-starter-web依赖,会自动添加Tomcat和Spring MVC的依赖,Spring Boot会对Tomcat和Spring MVC进行自动配置。
@EnableAutoConfiguration作为一个复合Annotation,其自身定义关键信息如下:
 1 @SuppressWarnings("deprecation")
 2 @Target(ElementType.TYPE)
 3 @Retention(RetentionPolicy.RUNTIME)
 4 @Documented
 5 @Inherited
 6 @AutoConfigurationPackage
 7 @Import(EnableAutoConfigurationImportSelector.class)
 8 public @interface EnableAutoConfiguration {
 9     ...
10 }
其中,最关键的要属@Import(EnableAutoConfigurationImportSelector.class),借助EnableAutoConfigurationImportSelector,@EnableAutoConfiguration可以帮助SpringBoot应用将所有符合条件的@Configuration配置都加载到当前SpringBoot创建并使用的IoC容器。就像一只“八爪鱼”一样,借助于Spring框架原有的一个工具类:SpringFactoriesLoader的支持,@EnableAutoConfiguration可以智能的自动配置功效才得以大功告成!
自动配置幕后英雄:SpringFactoriesLoader详解
SpringFactoriesLoader属于Spring框架私有的一种扩展方案,其主要功能就是从指定的配置文件META-INF/spring.factories加载配置。
 1 public abstract class SpringFactoriesLoader {
 2     //...
 3     public static <T> List<T> loadFactories(Class<T> factoryClass, ClassLoader classLoader) {
 4         ...
 5     }
 6
 7
 8     public static List<String> loadFactoryNames(Class<?> factoryClass, ClassLoader classLoader) {
 9         ....
10     }
11 }
配合@EnableAutoConfiguration使用的话,它更多是提供一种配置查找的功能支持,即根据@EnableAutoConfiguration的完整类名org.springframework.boot.autoconfigure.EnableAutoConfiguration作为查找的Key,获取对应的一组@Configuration类。
上图就是从SpringBoot的autoconfigure依赖包中的META-INF/spring.factories配置文件中摘录的一段内容,可以很好地说明问题。
所以,@EnableAutoConfiguration自动配置的魔法骑士就变成了:从classpath中搜寻所有的META-INF/spring.factories配置文件,并将其中org.springframework.boot.autoconfigure.EnableutoConfiguration对应的配置项通过反射(Java Refletion)实例化为对应的标注了@Configuration的JavaConfig形式的IoC容器配置类,然后汇总为一个并加载到IoC容器。
二、深入探索SpringApplication执行流程
SpringApplication的run方法的实现是我们本次旅程的主要线路,该方法的主要流程大体可以归纳如下:
1) 如果我们使用的是SpringApplication的静态run方法,那么,这个方法里面首先要创建一个SpringApplication对象实例,然后调用这个创建好的SpringApplication的实例方法。在SpringApplication实例初始化的时候,它会提前做几件事情:
- 根据classpath里面是否存在某个特征类(org.springframework.web.context.ConfigurableWebApplicationContext)来决定是否应该创建一个为Web应用使用的ApplicationContext类型。
- 使用SpringFactoriesLoader在应用的classpath中查找并加载所有可用的ApplicationContextInitializer。
- 使用SpringFactoriesLoader在应用的classpath中查找并加载所有可用的ApplicationListener。
- 推断并设置main方法的定义类。
2) SpringApplication实例初始化完成并且完成设置后,就开始执行run方法的逻辑了,方法执行伊始,首先遍历执行所有通过SpringFactoriesLoader可以查找到并加载的SpringApplicationRunListener。调用它们的started()方法,告诉这些SpringApplicationRunListener,“嘿,SpringBoot应用要开始执行咯!”。
3) 创建并配置当前Spring Boot应用将要使用的Environment(包括配置要使用的PropertySource以及Profile)。
4) 遍历调用所有SpringApplicationRunListener的environmentPrepared()的方法,告诉他们:“当前SpringBoot应用使用的Environment准备好了咯!”。
5) 如果SpringApplication的showBanner属性被设置为true,则打印banner。
6) 根据用户是否明确设置了applicationContextClass类型以及初始化阶段的推断结果,决定该为当前SpringBoot应用创建什么类型的ApplicationContext并创建完成,然后根据条件决定是否添加ShutdownHook,决定是否使用自定义的BeanNameGenerator,决定是否使用自定义的ResourceLoader,当然,最重要的,将之前准备好的Environment设置给创建好的ApplicationContext使用。
7) ApplicationContext创建好之后,SpringApplication会再次借助Spring-FactoriesLoader,查找并加载classpath中所有可用的ApplicationContext-Initializer,然后遍历调用这些ApplicationContextInitializer的initialize(applicationContext)方法来对已经创建好的ApplicationContext进行进一步的处理。
8) 遍历调用所有SpringApplicationRunListener的contextPrepared()方法。
9) 最核心的一步,将之前通过@EnableAutoConfiguration获取的所有配置以及其他形式的IoC容器配置加载到已经准备完毕的ApplicationContext。
10) 遍历调用所有SpringApplicationRunListener的contextLoaded()方法。
11) 调用ApplicationContext的refresh()方法,完成IoC容器可用的最后一道工序。
12) 查找当前ApplicationContext中是否注册有CommandLineRunner,如果有,则遍历执行它们。
13) 正常情况下,遍历执行SpringApplicationRunListener的finished()方法、(如果整个过程出现异常,则依然调用所有SpringApplicationRunListener的finished()方法,只不过这种情况下会将异常信息一并传入处理)
去除事件通知点后,整个流程如下:
本文以调试一个实际的SpringBoot启动程序为例,参考流程中主要类类图,来分析其启动逻辑和自动化配置原理。
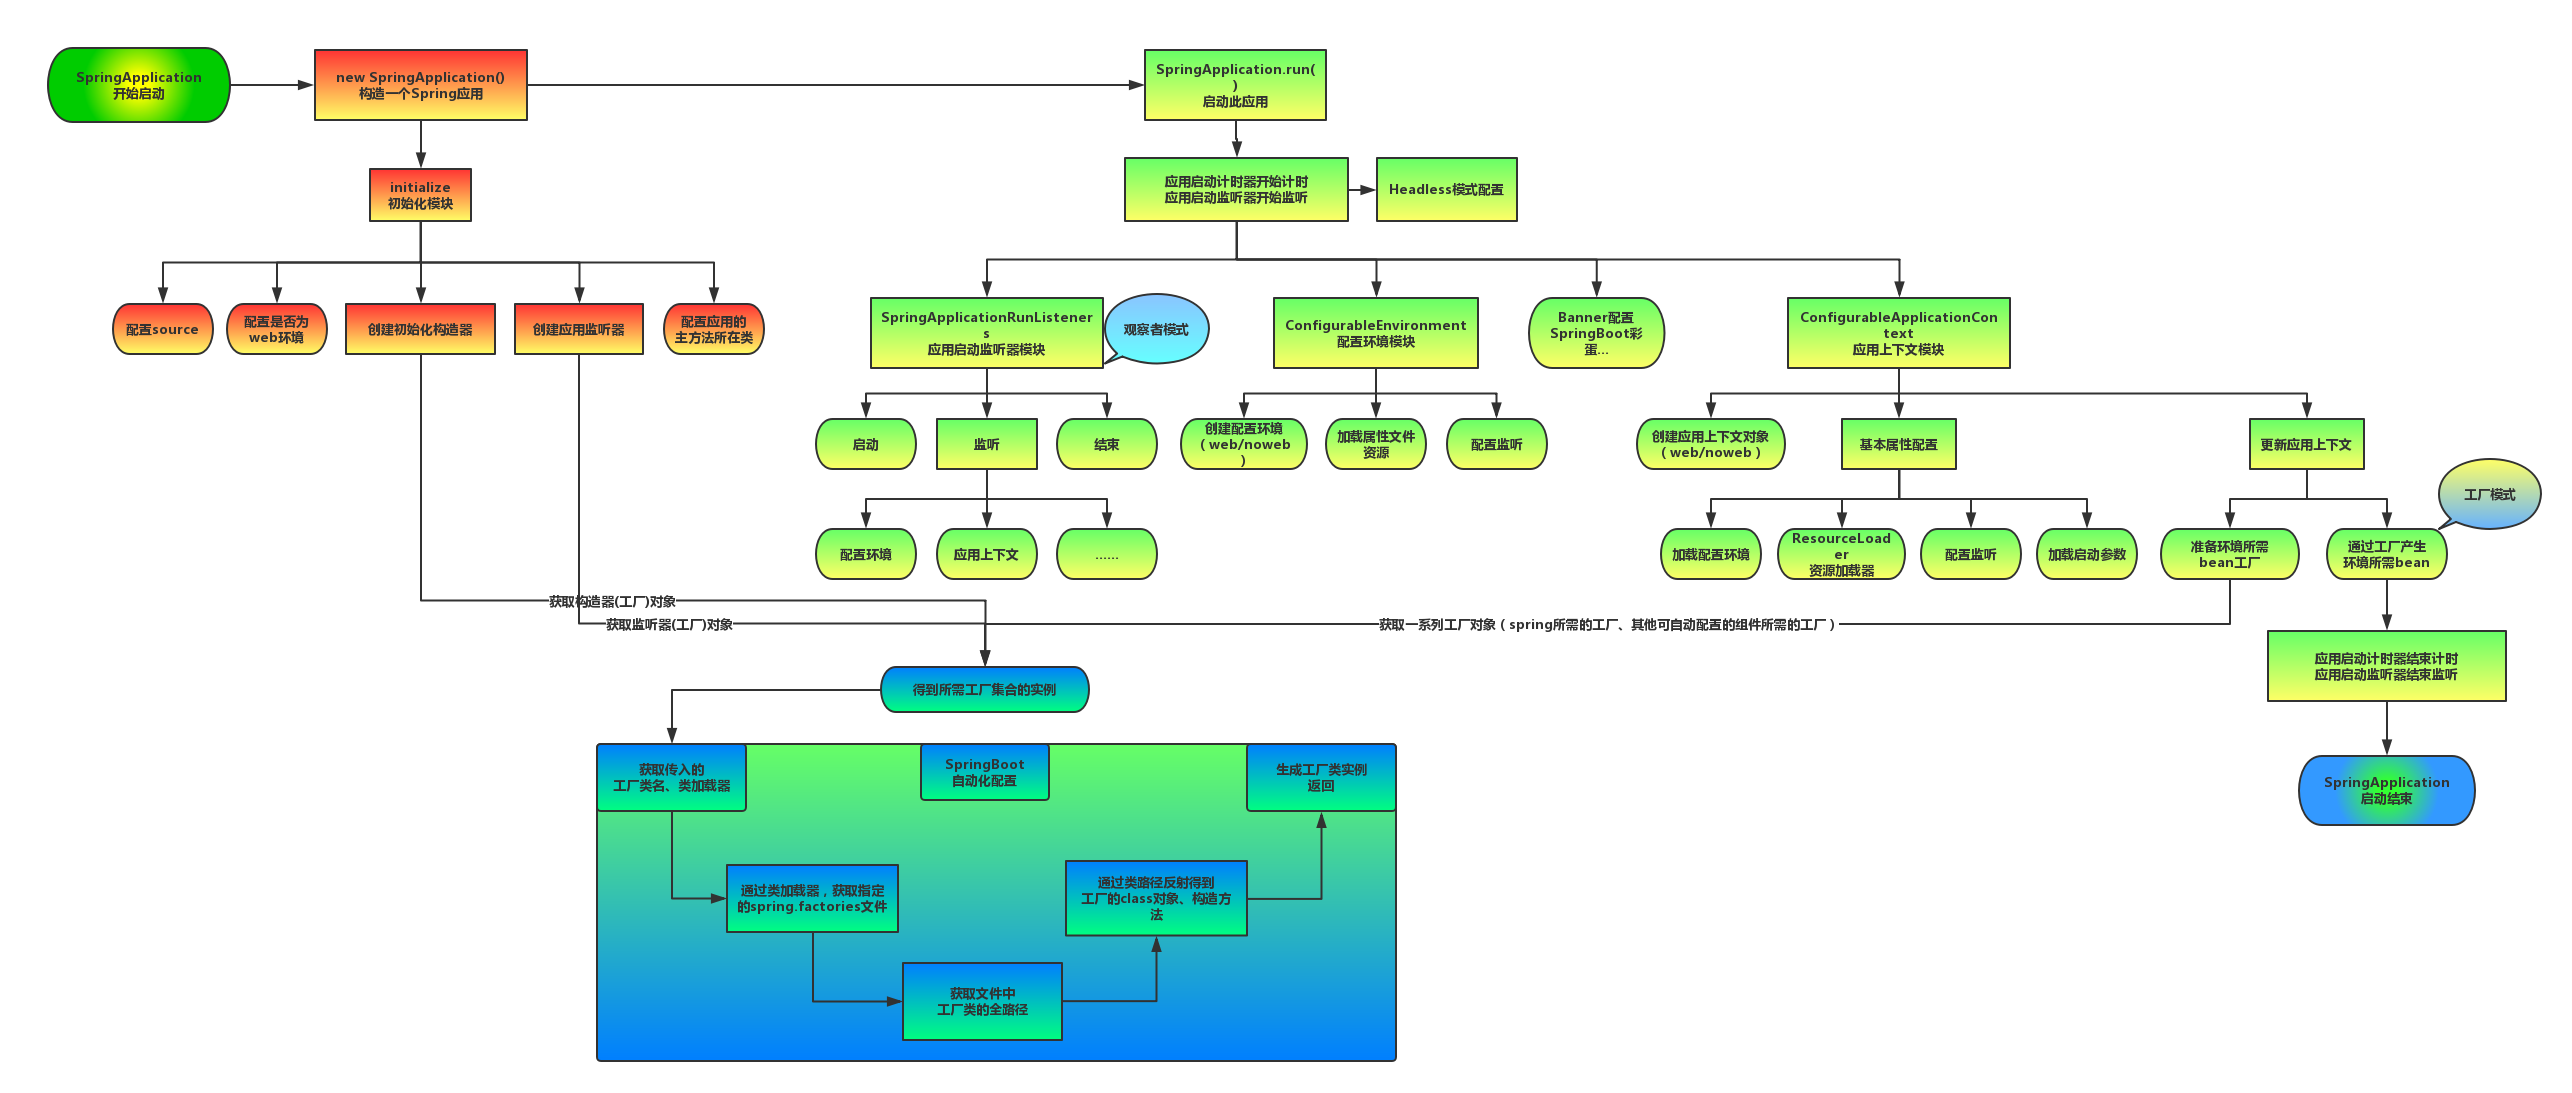
总览:
上图为SpringBoot启动结构图,我们发现启动流程主要分为三个部分,第一部分进行SpringApplication的初始化模块,配置一些基本的环境变量、资源、构造器、监听器,第二部分实现了应用具体的启动方案,包括启动流程的监听模块、加载配置环境模块、及核心的创建上下文环境模块,第三部分是自动化配置模块,该模块作为springboot自动配置核心,在后面的分析中会详细讨论。在下面的启动程序中我们会串联起结构中的主要功能。
启动:
每个SpringBoot程序都有一个主入口,也就是main方法,main里面调用SpringApplication.run()启动整个spring-boot程序,该方法所在类需要使用@SpringBootApplication注解,以及@ImportResource注解(if need),@SpringBootApplication包括三个注解,功能如下:
@EnableAutoConfiguration:SpringBoot根据应用所声明的依赖来对Spring框架进行自动配置。
@SpringBootConfiguration(内部为@Configuration):被标注的类等于在spring的XML配置文件中(applicationContext.xml),装配所有bean事务,提供了一个spring的上下文环境。
@ComponentScan:组件扫描,可自动发现和装配Bean,默认扫描SpringApplication的run方法里的Booter.class所在的包路径下文件,所以最好将该启动类放到根包路径下。
SpringBoot启动类
首先进入run方法
run方法中去创建了一个SpringApplication实例,在该构造方法内,我们可以发现其调用了一个初始化的initialize方法
这里主要是为SpringApplication对象赋一些初值。构造函数执行完毕后,我们回到run方法
该方法中实现了如下几个关键步骤:
1.创建了应用的监听器SpringApplicationRunListeners并开始监听
2.加载SpringBoot配置环境(ConfigurableEnvironment),如果是通过web容器发布,会加载StandardEnvironment,其最终也是继承了ConfigurableEnvironment,类图如下
可以看出,*Environment最终都实现了PropertyResolver接口,我们平时通过environment对象获取配置文件中指定Key对应的value方法时,就是调用了propertyResolver接口的getProperty方法
3.配置环境(Environment)加入到监听器对象中(SpringApplicationRunListeners)
4.创建run方法的返回对象:ConfigurableApplicationContext(应用配置上下文),我们可以看一下创建方法:
方法会先获取显式设置的应用上下文(applicationContextClass),如果不存在,再加载默认的环境配置(通过是否是web environment判断),默认选择AnnotationConfigApplicationContext注解上下文(通过扫描所有注解类来加载bean),最后通过BeanUtils实例化上下文对象,并返回。
ConfigurableApplicationContext类图如下:
主要看其继承的两个方向:
LifeCycle:生命周期类,定义了start启动、stop结束、isRunning是否运行中等生命周期空值方法
ApplicationContext:应用上下文类,其主要继承了beanFactory(bean的工厂类)
5.回到run方法内,prepareContext方法将listeners、environment、applicationArguments、banner等重要组件与上下文对象关联
6.接下来的refreshContext(context)方法(初始化方法如下)将是实现spring-boot-starter-*(mybatis、redis等)自动化配置的关键,包括spring.factories的加载,bean的实例化等核心工作。
配置结束后,Springboot做了一些基本的收尾工作,返回了应用环境上下文。回顾整体流程,Springboot的启动,主要创建了配置环境(environment)、事件监听(listeners)、应用上下文(applicationContext),并基于以上条件,在容器中开始实例化我们需要的Bean,至此,通过SpringBoot启动的程序已经构造完成,接下来我们来探讨自动化配置是如何实现。
自动化配置:
之前的启动结构图中,我们注意到无论是应用初始化还是具体的执行过程,都调用了SpringBoot自动配置模块。
SpringBoot自动配置模块
该配置模块的主要使用到了SpringFactoriesLoader,即Spring工厂加载器,该对象提供了loadFactoryNames方法,入参为factoryClass和classLoader,即需要传入上图中的工厂类名称和对应的类加载器,方法会根据指定的classLoader,加载该类加器搜索路径下的指定文件,即spring.factories文件,传入的工厂类为接口,而文件中对应的类则是接口的实现类,或最终作为实现类,所以文件中一般为如下图这种一对多的类名集合,获取到这些实现类的类名后,loadFactoryNames方法返回类名集合,方法调用方得到这些集合后,再通过反射获取这些类的类对象、构造方法,最终生成实例。
工厂接口与其若干实现类接口名称
下图有助于我们形象理解自动配置流程。
SpringBoot自动化配置关键组件关系图
mybatis-spring-boot-starter、spring-boot-starter-web等组件的META-INF文件下均含有spring.factories文件,自动配置模块中,SpringFactoriesLoader收集到文件中的类全名并返回一个类全名的数组,返回的类全名通过反射被实例化,就形成了具体的工厂实例,工厂实例来生成组件具体需要的bean。
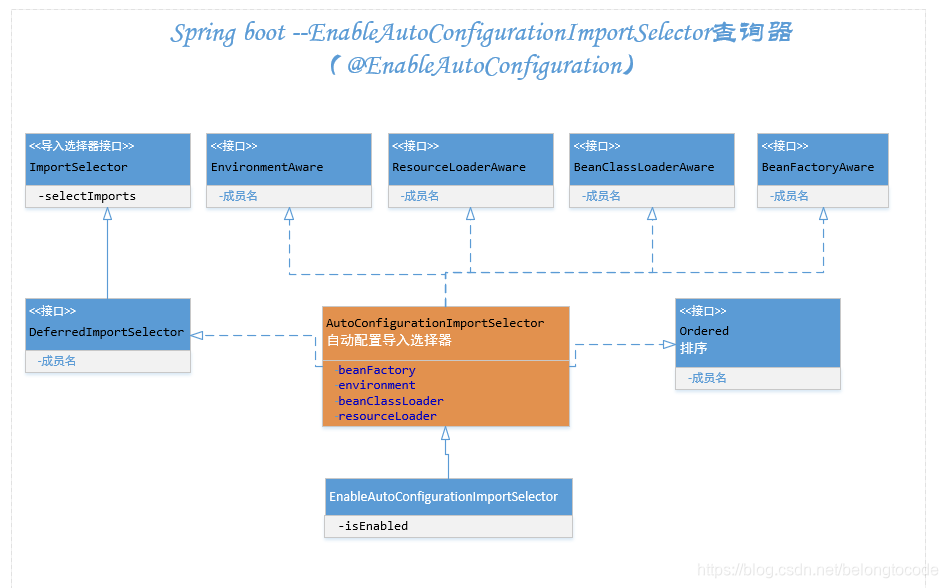
之前我们提到了EnableAutoConfiguration注解,其类图如下:
可以发现其最终实现了ImportSelector(选择器)和BeanClassLoaderAware(bean类加载器中间件),重点关注一下AutoConfigurationImportSelector的selectImports方法。
该方法在springboot启动流程——bean实例化前被执行,返回要实例化的类信息列表。我们知道,如果获取到类信息,spring自然可以通过类加载器将类加载到jvm中,现在我们已经通过spring-boot的starter依赖方式依赖了我们需要的组件,那么这些组建的类信息在select方法中也是可以被获取到的,不要急我们继续向下分析。
该方法中的getCandidateConfigurations方法,通过方法注释了解到,其返回一个自动配置类的类名列表,方法调用了loadFactoryNames方法,查看该方法
在上面的代码可以看到自动配置器会根据传入的factoryClass.getName()到项目系统路径下所有的spring.factories文件中找到相应的key,从而加载里面的类。我们就选取这个mybatis-spring-boot-autoconfigure下的spring.factories文件
进入org.mybatis.spring.boot.autoconfigure.MybatisAutoConfiguration中,主要看一下类头:
发现Spring的@Configuration,俨然是一个通过注解标注的springBean,继续向下看,
@ConditionalOnClass({ SqlSessionFactory.class, SqlSessionFactoryBean.class})这个注解的意思是:当存在SqlSessionFactory.class, SqlSessionFactoryBean.class这两个类时才解析MybatisAutoConfiguration配置类,否则不解析这一个配置类,make sence,我们需要mybatis为我们返回会话对象,就必须有会话工厂相关类。
@CondtionalOnBean(DataSource.class):只有处理已经被声明为bean的dataSource。
@ConditionalOnMissingBean(MapperFactoryBean.class)这个注解的意思是如果容器中不存在name指定的bean则创建bean注入,否则不执行(该类源码较长,篇幅限制不全粘贴)
以上配置可以保证sqlSessionFactory、sqlSessionTemplate、dataSource等mybatis所需的组件均可被自动配置,@Configuration注解已经提供了Spring的上下文环境,所以以上组件的配置方式与Spring启动时通过mybatis.xml文件进行配置起到一个效果。通过分析我们可以发现,只要一个基于SpringBoot项目的类路径下存在SqlSessionFactory.class, SqlSessionFactoryBean.class,并且容器中已经注册了dataSourceBean,就可以触发自动化配置,意思说我们只要在maven的项目中加入了mybatis所需要的若干依赖,就可以触发自动配置,但引入mybatis原生依赖的话,每集成一个功能都要去修改其自动化配置类,那就得不到开箱即用的效果了。所以Spring-boot为我们提供了统一的starter可以直接配置好相关的类,触发自动配置所需的依赖(mybatis)如下:
这里是截取的mybatis-spring-boot-starter的源码中pom.xml文件中所有依赖:
因为maven依赖的传递性,我们只要依赖starter就可以依赖到所有需要自动配置的类,实现开箱即用的功能。也体现出Springboot简化了Spring框架带来的大量XML配置以及复杂的依赖管理,让开发人员可以更加关注业务逻辑的开发。
文参考章:
https://www.cnblogs.com/xiaoxi/p/7999885.html
整合三
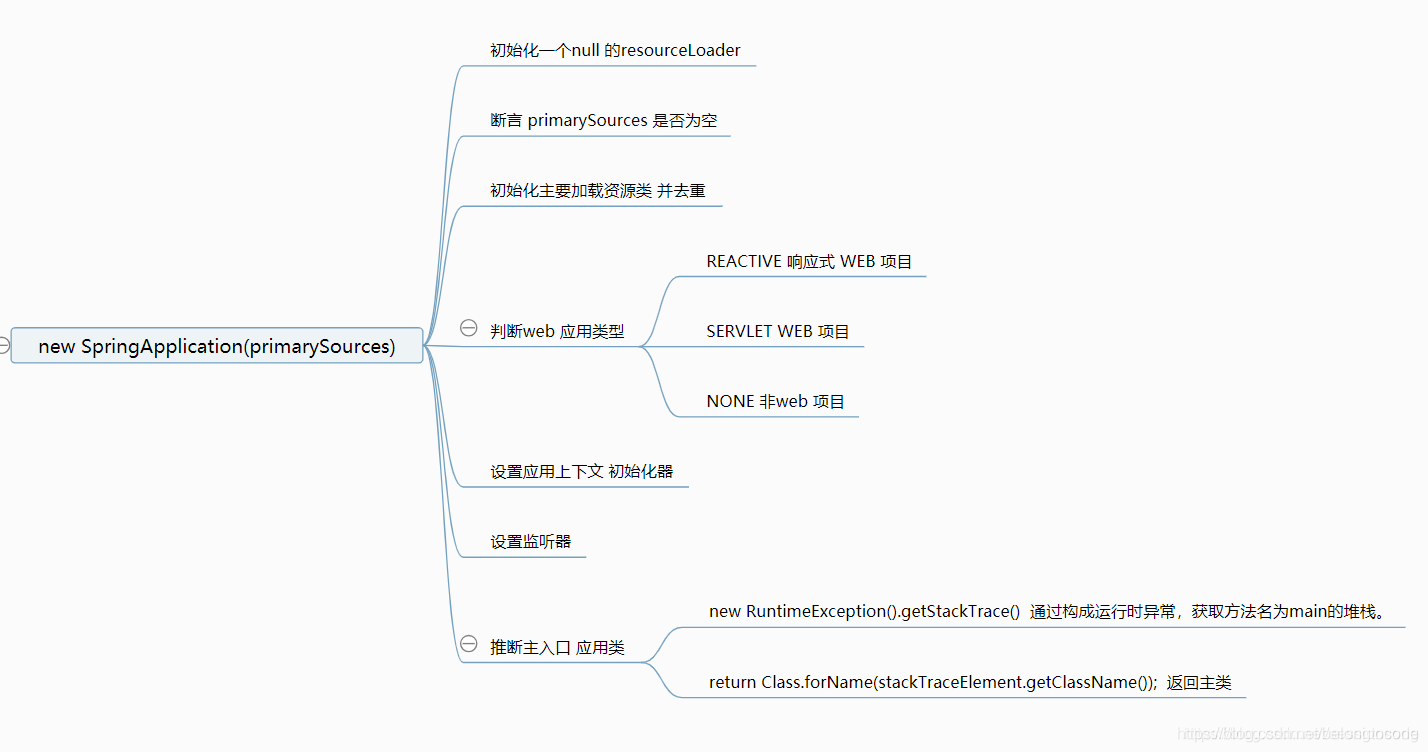
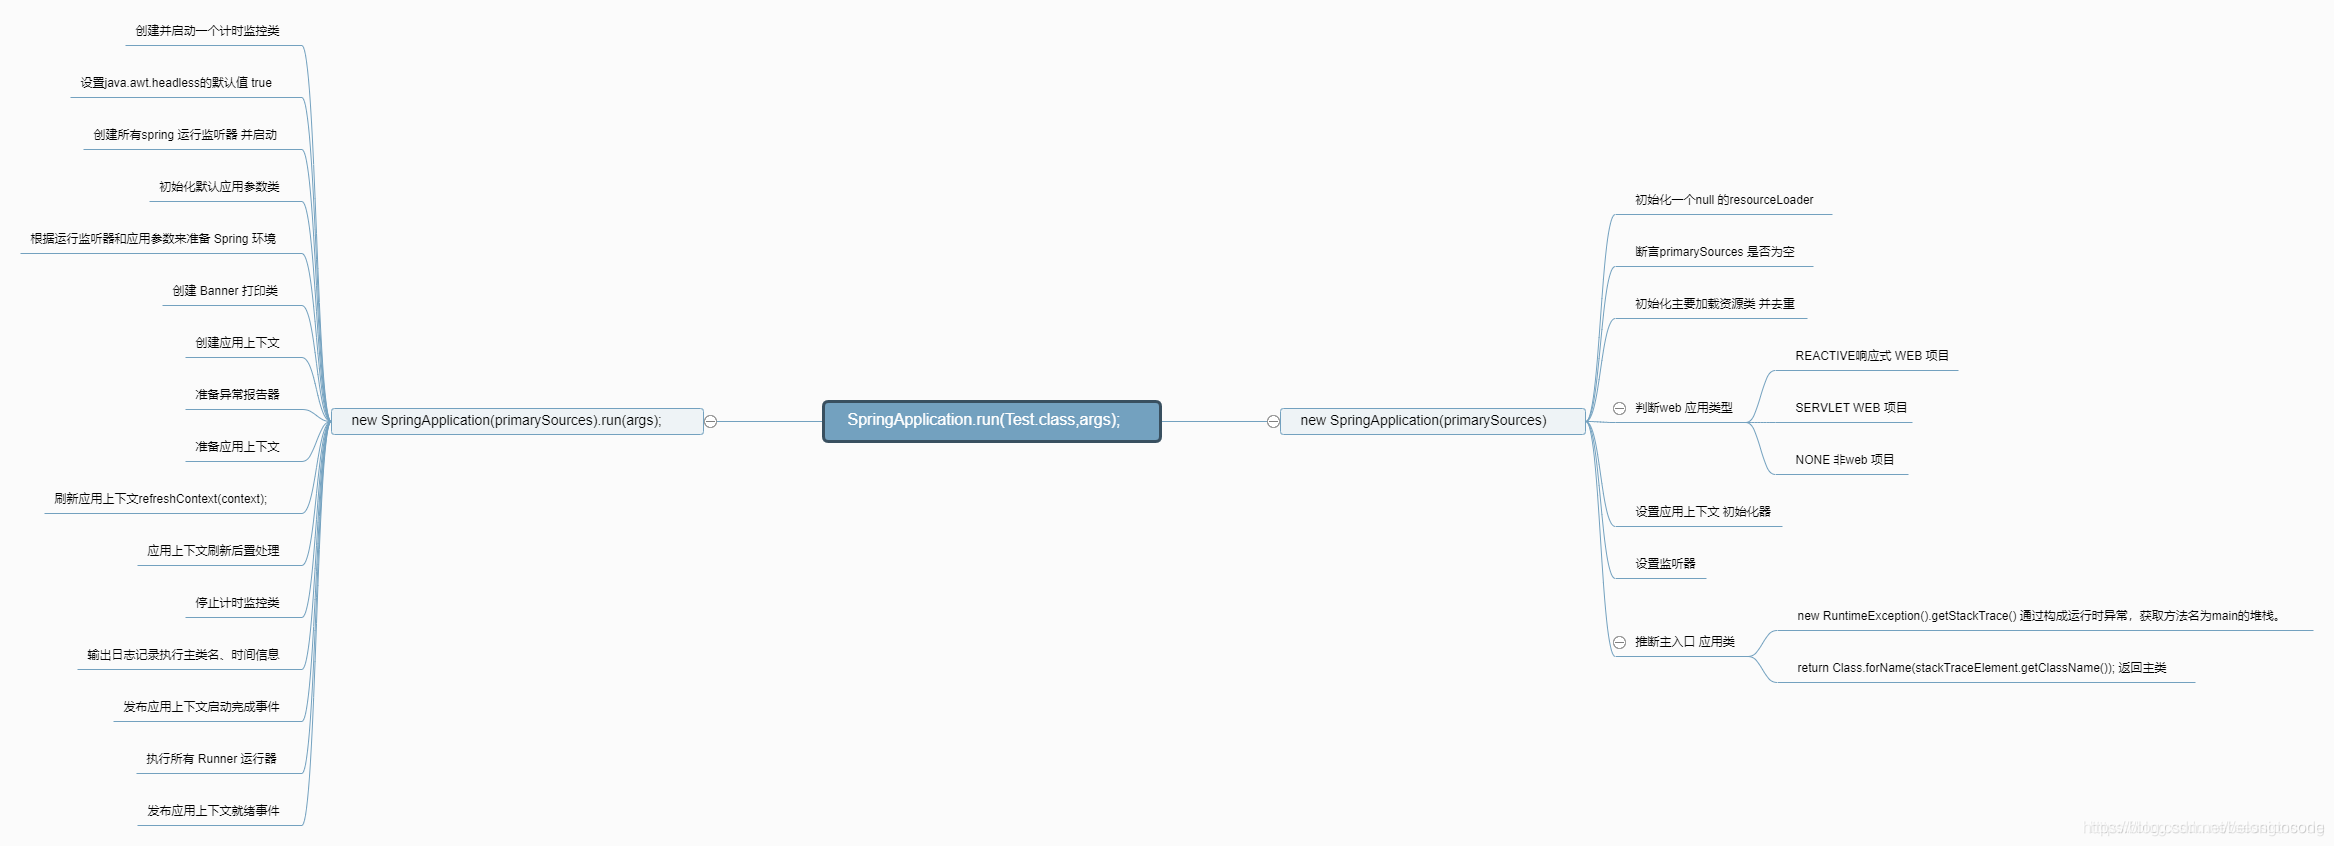
return new SpringApplication(primarySources).run(args);
主要分两步 第一步new 一个 SpringApplication 应用,第二步 运行SpringApplication 对象
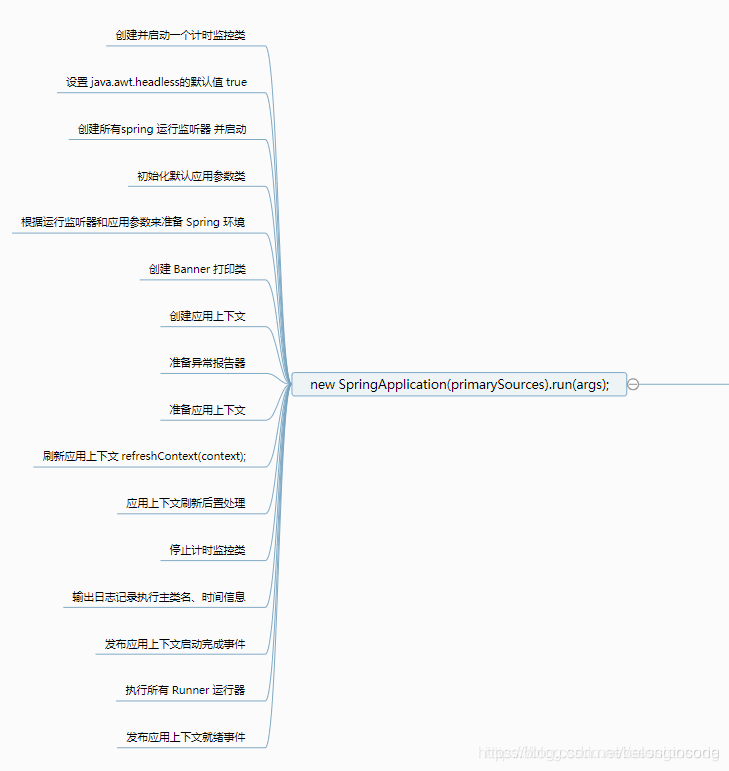
第二步 运行 springboot 应用
总图
参考文章:
https://blog.csdn.net/sessionsong/article/details/86682808
整合四
springboot容器启动流程:
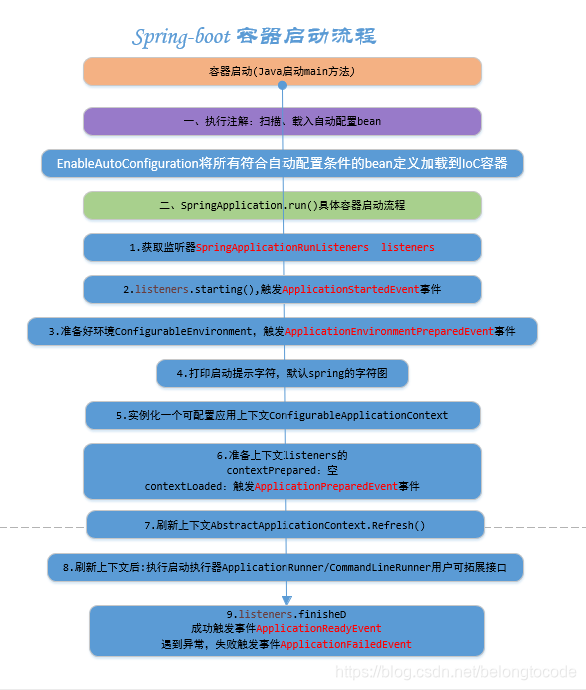
其中最重要的:

运行机制为:
springboot事件驱动:详情见:springboot事件驱动与观察者模式(http://www.cnblogs.com/dennyzhangdd/p/8343229.html)

参考文章:
https://blog.csdn.net/qq_41063141/article/details/83239941
整合六
1、首先从main方法开始看
public static void main(String[] args) {
    //代码很简单SpringApplication.run();
	SpringApplication.run(ConsumerApp.class, args);
}
public static ConfigurableApplicationContext run(Class<?> primarySource,
			String... args) {
        //这个里面调用了run() 方法,我们转到定义
		return run(new Class<?>[] { primarySource }, args);
	}


//这个run方法代码也很简单,就做了两件事情
//1、new了一个SpringApplication() 这么一个对象
//2、执行new出来的SpringApplication()对象的run()方法
public static ConfigurableApplicationContext run(Class<?>[] primarySources,
			String[] args) {
		return new SpringApplication(primarySources).run(args);
	}
2、上面代码主要分以下两步
- 第一步new了一个SpringApplication对象
- 第二部调用了run()方法
3、接下来我们来看看new SpringApplication()代码
public SpringApplication(ResourceLoader resourceLoader, Class<?>... primarySources) {
		this.resourceLoader = resourceLoader;
		Assert.notNull(primarySources, "PrimarySources must not be null");
        //1、先把主类保存起来
		this.primarySources = new LinkedHashSet<>(Arrays.asList(primarySources));


    //2、判断运行项目的类型
	this.webApplicationType = WebApplicationType.deduceFromClasspath();

    //3、扫描当前路径下META-INF/spring.factories文件的
         ApplicationContextInitializer并加载
	setInitializers((Collection) getSpringFactoriesInstances(
			ApplicationContextInitializer.class));

    //4、同样也是扫描当前路径下META-INF/spring.factories文件下的
         ApplicationListener并加载
	setListeners((Collection) getSpringFactoriesInstances(ApplicationListener.class));
	this.mainApplicationClass = deduceMainApplicationClass();
}
这里面还是要说一下ApplicationContextInitializer和ApplicationListener
- ApplicationContextInitializer 这个类当springboot上下文Context初始化完成后会调用
- ApplicationListener 当springboot启动时事件change后都会触发
我们来看一个案例,就更好理解上面这两个类
/**

- Context初始化后调用类

- @author ShiMinChen
  *
   */
  public class StarterApplicationContextInitializer implements ApplicationContextInitializer<ConfigurableApplicationContext> {

  @Override
  public void initialize(ConfigurableApplicationContext applicationContext) {
  	System.out.println("applicationContext 初始化完成 ... ");
  }

}
public class StarterApplicationListener implements ApplicationListener {


@Override
public void onApplicationEvent(ApplicationEvent event) {
    System.out.println(event.toString());
    System.out.println("ApplicationListener .... " + System.currentTimeMillis());
}
}
我们需要把这两个类集成到springboot里面去,其实操作也挺简单的
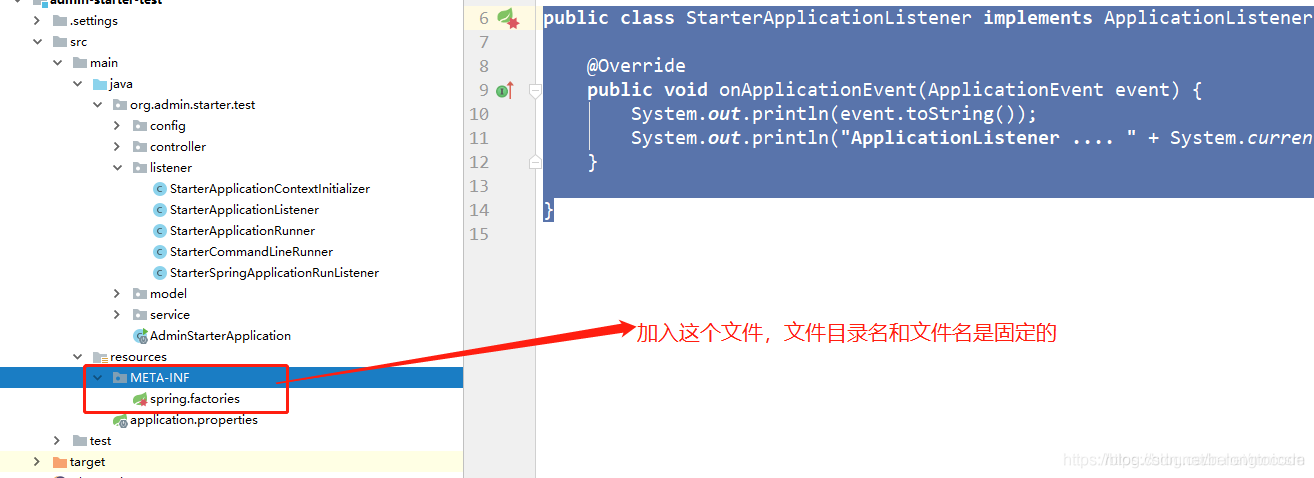
然后在META-INF/spring.factories 文件配置那两个类
org.springframework.context.ApplicationContextInitializer=\
org.admin.starter.test.listener.StarterApplicationContextInitializer

org.springframework.context.ApplicationListener=\
  org.admin.starter.test.listener.StarterApplicationListener
4、我们代码DEBUG一下,在loadSpringFactories() 方法打一个断点
private static Map<String, List<String>> loadSpringFactories(@Nullable ClassLoader classLoader) {
		MultiValueMap<String, String> result = cache.get(classLoader);
		if (result != null)
			return result;
		try {
			Enumeration<URL> urls = (classLoader != null ?
					classLoader.getResources(FACTORIES_RESOURCE_LOCATION) :
					ClassLoader.getSystemResources(FACTORIES_RESOURCE_LOCATION));
			result = new LinkedMultiValueMap<>();
			while (urls.hasMoreElements()) {
				URL url = urls.nextElement();
				UrlResource resource = new UrlResource(url);
				Properties properties = PropertiesLoaderUtils.loadProperties(resource);
				for (Map.Entry<?, ?> entry : properties.entrySet()) {
					List<String> factoryClassNames = Arrays.asList(
							StringUtils.commaDelimitedListToStringArray((String) entry.getValue()));
					result.addAll((String) entry.getKey(), factoryClassNames);
				}
			}
			cache.put(classLoader, result);

        // 端点打在这里就行了
		return result;
	}
	catch (IOException ex) {
		throw new IllegalArgumentException("Unable to load factories from location [" +
				FACTORIES_RESOURCE_LOCATION + "]", ex);
	}
}
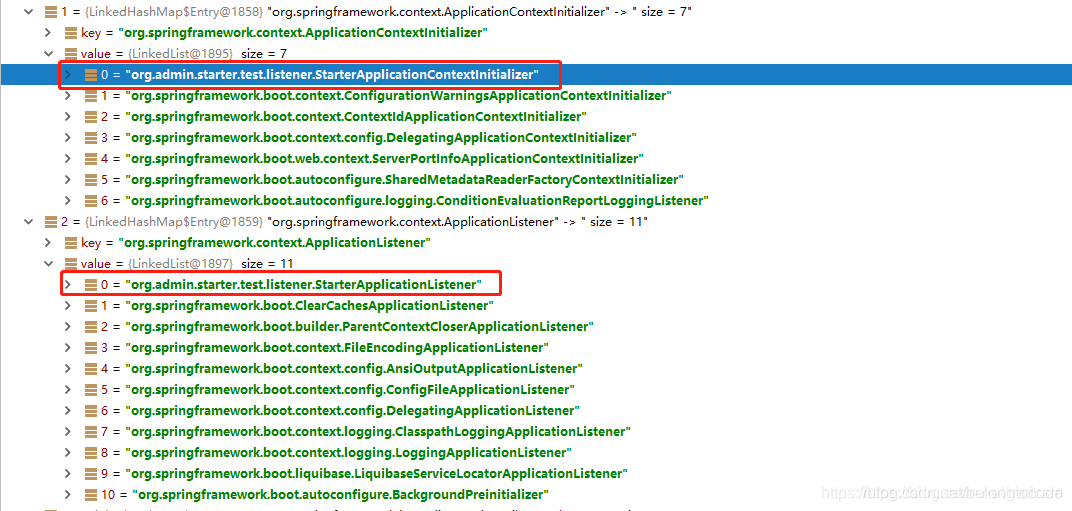
总结:上面就是SpringApplication初始化的代码,new SpringApplication()没做啥事情 ,主要加载了META-INF/spring.factories 下面定义的事件监听器接口实现类
5、接下来看看run()方法,这个里面感觉有一大堆东西
public ConfigurableApplicationContext run(String... args) {

    <!--1、这个是一个计时器,没什么好说的-->
	StopWatch stopWatch = new StopWatch();
	stopWatch.start();
	ConfigurableApplicationContext context = null;
	Collection<SpringBootExceptionReporter> exceptionReporters = new ArrayList<>();

    <!--2、这个也不是重点,就是设置了一些环境变量-->
    configureHeadlessProperty();

    <!--3、获取事件监听器SpringApplicationRunListener类型,并且执行starting()方法-->
	SpringApplicationRunListeners listeners = getRunListeners(args);
	listeners.starting();

	try {

        <!--4、把参数args封装成DefaultApplicationArguments,这个了解一下就知道-->
		ApplicationArguments applicationArguments = new DefaultApplicationArguments(
				args);

        <!--5、这个很重要准备环境了,并且把环境跟spring上下文绑定好,并且执行environmentPrepared()方法-->
		ConfigurableEnvironment environment = prepareEnvironment(listeners,
				applicationArguments);

        <!--6、判断一些环境的值,并设置一些环境的值-->
		configureIgnoreBeanInfo(environment);

        <!--7、打印banner-->
		Banner printedBanner = printBanner(environment);

        <!--8、创建上下文,根据项目类型创建上下文-->
		context = createApplicationContext();

        <!--9、获取异常报告事件监听-->
		exceptionReporters = getSpringFactoriesInstances(
				SpringBootExceptionReporter.class,
				new Class[] { ConfigurableApplicationContext.class }, context);

        <!--10、准备上下文,执行完成后调用contextPrepared()方法,contextLoaded()方法-->
		prepareContext(context, environment, listeners, applicationArguments,
				printedBanner);

        <!--11、这个是spring启动的代码了,这里就回去里面就回去扫描并且初始化单实列bean了-->
        //这个refreshContext()加载了bean,还启动了内置web容器,需要细细的去看看
		refreshContext(context);

        <!--12、啥事情都没有做-->
		afterRefresh(context, applicationArguments);
		stopWatch.stop();
		if (this.logStartupInfo) {
			new StartupInfoLogger(this.mainApplicationClass)
					.logStarted(getApplicationLog(), stopWatch);
		}

        <!--13、执行ApplicationRunListeners中的started()方法-->
		listeners.started(context);

        <!--执行Runner(ApplicationRunner和CommandLineRunner)-->
		callRunners(context, applicationArguments);
	}
	catch (Throwable ex) {
		handleRunFailure(context, listeners, exceptionReporters, ex);
		throw new IllegalStateException(ex);
	}
	listeners.running(context);
	return context;
}
我们还是重点来看refreshContext(context) 这个方法,这个方法启动spring的代码加载了bean,还启动了内置web容器
private void refreshContext(ConfigurableApplicationContext context) {
        // 转到定义看看
		refresh(context);
		if (this.registerShutdownHook) {
			try {
				context.registerShutdownHook();
			}
			catch (AccessControlException ex) {
				// Not allowed in some environments.
			}
		}
	}
protected void refresh(ApplicationContext applicationContext) {
		Assert.isInstanceOf(AbstractApplicationContext.class, applicationContext);
        //看看refresh()方法去
		((AbstractApplicationContext) applicationContext).refresh();
	}
转到AbstractApplicationContext - >refresh()方法里面发现这是spring容器启动代码
@Override
	public void refresh() throws BeansException, IllegalStateException {
		synchronized (this.startupShutdownMonitor) {
			// Prepare this context for refreshing.
			prepareRefresh();

		// Tell the subclass to refresh the internal bean factory.
		ConfigurableListableBeanFactory beanFactory = obtainFreshBeanFactory();

		// Prepare the bean factory for use in this context.
		prepareBeanFactory(beanFactory);

		try {
			// Allows post-processing of the bean factory in context subclasses.
			postProcessBeanFactory(beanFactory);

			// Invoke factory processors registered as beans in the context.
			invokeBeanFactoryPostProcessors(beanFactory);

			// Register bean processors that intercept bean creation.
			registerBeanPostProcessors(beanFactory);

			// Initialize message source for this context.
			initMessageSource();

			// Initialize event multicaster for this context.
			initApplicationEventMulticaster();

			// Initialize other special beans in specific context subclasses.
			onRefresh();

			// Check for listener beans and register them.
			registerListeners();

			// Instantiate all remaining (non-lazy-init) singletons.
			finishBeanFactoryInitialization(beanFactory);

			// Last step: publish corresponding event.
			finishRefresh();
		}

		catch (BeansException ex) {
			if (logger.isWarnEnabled()) {
				logger.warn("Exception encountered during context initialization - " +
						"cancelling refresh attempt: " + ex);
			}

			// Destroy already created singletons to avoid dangling resources.
			destroyBeans();

			// Reset 'active' flag.
			cancelRefresh(ex);

			// Propagate exception to caller.
			throw ex;
		}

		finally {
			// Reset common introspection caches in Spring's core, since we
			// might not ever need metadata for singleton beans anymore...
			resetCommonCaches();
		}
	}
}
spring容器启动代码就不说了,这里主要看一下onRefresh() 这个方法,转到定义发现这个方法里面啥都没有,因为这个AbstractApplicationContext是一个抽象类,所以我们要找到继承AbstractApplicationContext的子类,去看子类里面的onRefresh()
protected void onRefresh() throws BeansException {
    //这是一个空方法,AbstractApplicationContext 这个类是一个抽象类,
    //所以我们要找到集成AbstractApplicationContext的子类,去看子类里面的onRefresh()
	// For subclasses: do nothing by default.
}

我们这里是一个Web项目,所以我们就去看 ServletWebServerApplicationContext 这个类 ,我还是把类的关系图贴一下
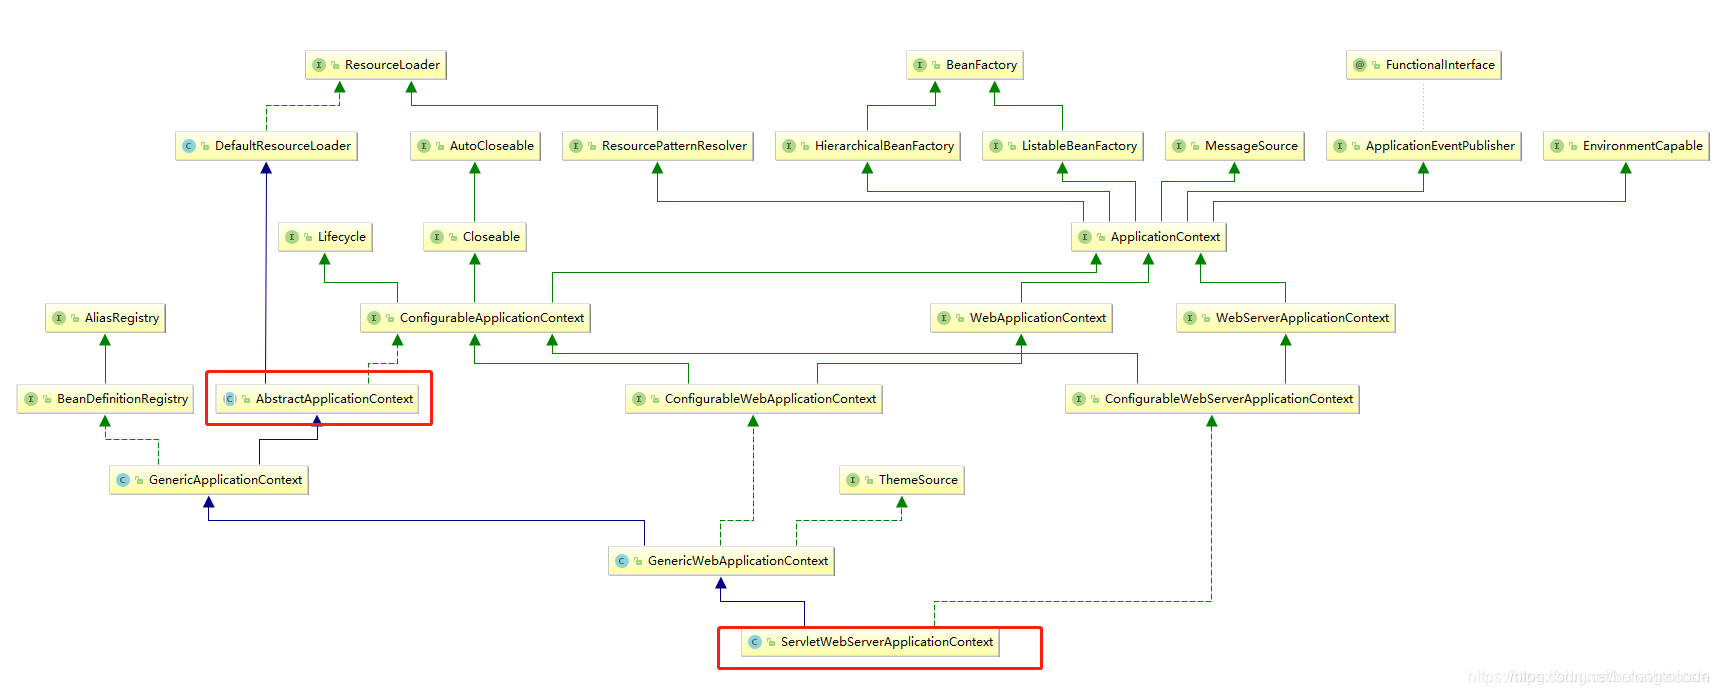
我们就去看 ServletWebServerApplicationContext 这个类下面的 onRefresh() 方法
protected void onRefresh() {
		super.onRefresh();
		try {
            //看到内置容器的影子了,进去看看
			createWebServer();
		}
		catch (Throwable ex) {
			throw new ApplicationContextException("Unable to start web server", ex);
		}
	}
private void createWebServer() {
		WebServer webServer = this.webServer;
		ServletContext servletContext = getServletContext();
		if (webServer == null && servletContext == null) {
            //1、这个获取webServerFactory还是要进去看看
			ServletWebServerFactory factory = getWebServerFactory();
			this.webServer = factory.getWebServer(getSelfInitializer());
		}
		else if (servletContext != null) {
			try {
				getSelfInitializer().onStartup(servletContext);
			}
			catch (ServletException ex) {
				throw new ApplicationContextException("Cannot initialize servlet context",
						ex);
			}
		}
		initPropertySources();
	}
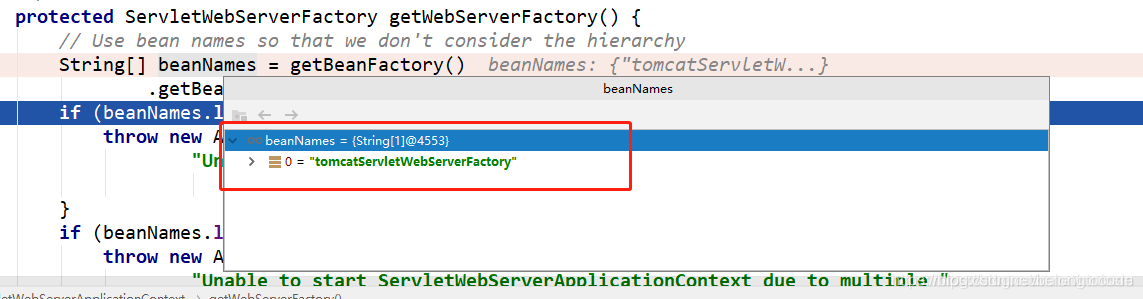
我们继续看下getWebServletFactory() 这个方法,这个里面其实就是选择出哪种类型的web容器了
protected ServletWebServerFactory getWebServerFactory() {
		// Use bean names so that we don't consider the hierarchy
		String[] beanNames = getBeanFactory()
				.getBeanNamesForType(ServletWebServerFactory.class);
		if (beanNames.length == 0) {
			throw new ApplicationContextException(
					"Unable to start ServletWebServerApplicationContext due to missing "
							+ "ServletWebServerFactory bean.");
		}
		if (beanNames.length > 1) {
			throw new ApplicationContextException(
					"Unable to start ServletWebServerApplicationContext due to multiple "
							+ "ServletWebServerFactory beans : "
							+ StringUtils.arrayToCommaDelimitedString(beanNames));
		}
		return getBeanFactory().getBean(beanNames[0], ServletWebServerFactory.class);
	}
我们再回头去看factory.getWebServer(getSelfInitializer()) ,转到定义就会看到很熟悉的名字tomcat
public WebServer getWebServer(ServletContextInitializer... initializers) {
        //tomcat这位大哥出现了
		Tomcat tomcat = new Tomcat();
		File baseDir = (this.baseDirectory != null ? this.baseDirectory
				: createTempDir("tomcat"));
		tomcat.setBaseDir(baseDir.getAbsolutePath());
		Connector connector = new Connector(this.protocol);
		tomcat.getService().addConnector(connector);
		customizeConnector(connector);
		tomcat.setConnector(connector);
		tomcat.getHost().setAutoDeploy(false);
		configureEngine(tomcat.getEngine());
		for (Connector additionalConnector : this.additionalTomcatConnectors) {
			tomcat.getService().addConnector(additionalConnector);
		}
		prepareContext(tomcat.getHost(), initializers);
		return getTomcatWebServer(tomcat);
	}
Tomcat 就在这里启动的
总结:
1、run() 方法主要调用了spring容器启动方法扫描配置,加载bean到spring容器中
2、启动的内置Web容器
参考文章:
https://blog.csdn.net/mnicsm/article/details/93893669
