前言:
之前做主从复制和读写分离中,只有一个master
多个mysql形成一个中心化的群集
一个master对应多个slave
网页中的master,做一个代理功能,管理请求,把任务下发下去
一旦master挂了,群龙无首,就没有管理者,MHA 可以解决这个问题;解决这个问题还有一个是MMM架构,做两台master,每台master都与下面的从服务器相连
- 案例概述
- 案例前置知识点
- 案例环境
- 案例实施
一:案例概述
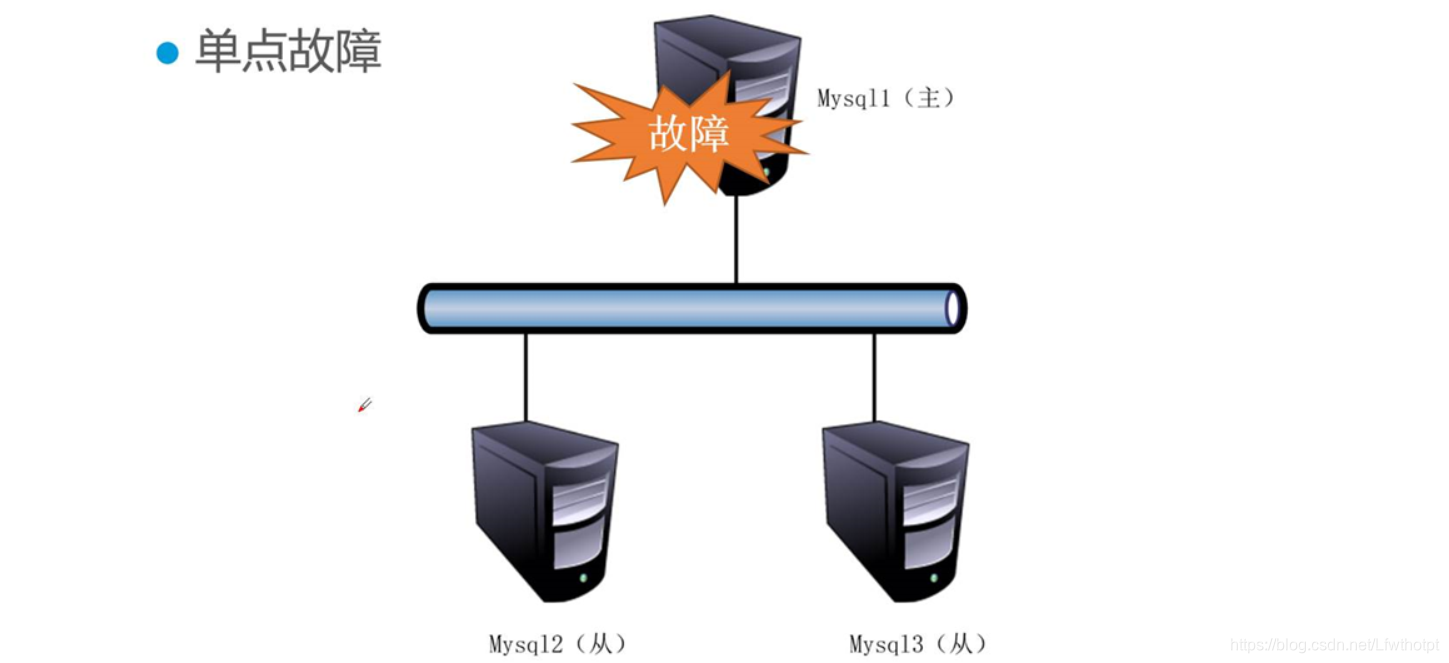
1.1 传统的mysql主从架构存在的问题
- 单点故障
二:案例前置知识点
2.1 MHA概述
- 日本DeNA公司youshimation(现就职于Facebook公司)开发
- 一套优秀的作为mysql高可用性环境下故障切换和主从提升的高可用软件
优点:1.故障切换;2.主从提升
2.2 MHA的组成
- MHA Manager(管理节点)————负责处理接待请求
- MHA Node(数据节点)————负责工作
2.3 MHA特点
- 自动故障切换过程中,MHA会试图从宕机的主服务器上保存二进制日志,最大程度的保存数据的不丢失
- 使用mysql 5.5 的半同步复制,可以大大降低数据丢失的风险
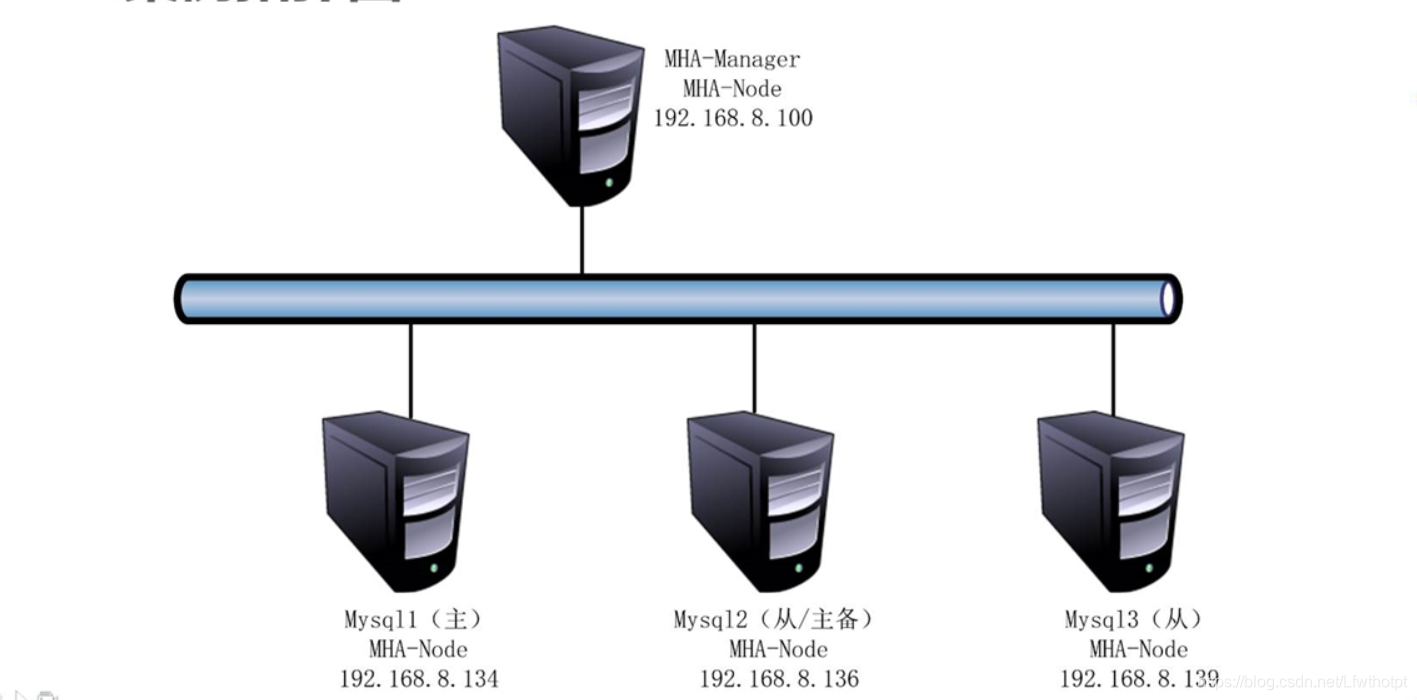
三:案例环境——拓扑图
四:案例实施
4.1 搭建mysql主从复制环境
-
详见之前博客内容
- mysql主从同步的用户名:myslave 密码:123
-
额外调整
- 所有数据库授权mha用户对数据库的操作权限

- mysql2和mysql3两个从数据库设置只读

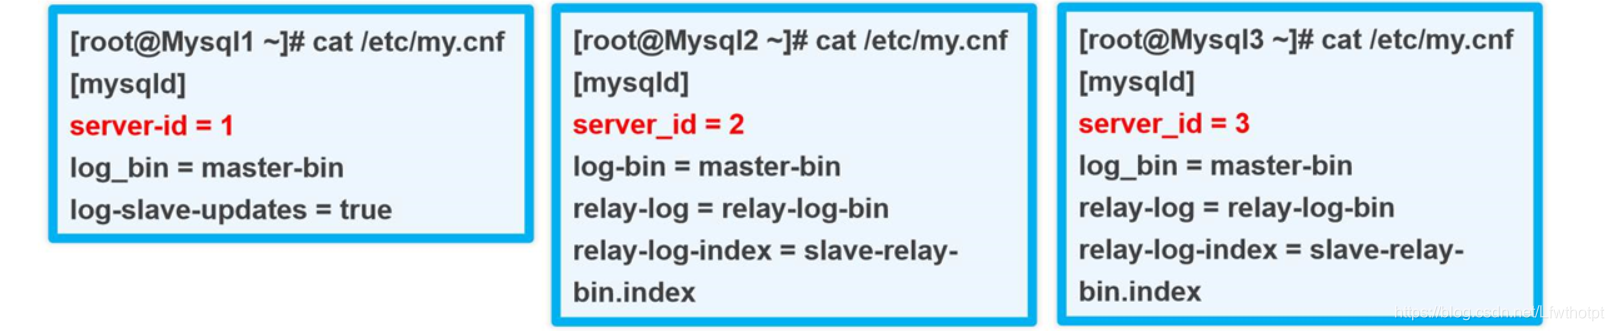
4.2 调整mysql的配置文件(所有数据库)
4.3 安装Node组件(所有节点)
- 安装基本环境(需要联网)

- 安装Node组件

备注:0.57只支持centos7
4.4 安装Manager组件(MHA-Manager节点)

4.5 配置所有节点之间SSH免交互登录
- 工具:ssh-keygen ssh-copy-id
4.6 配置MHA(MHA-Manager节点)
- 复制相关脚本到/usr/local/bin目录
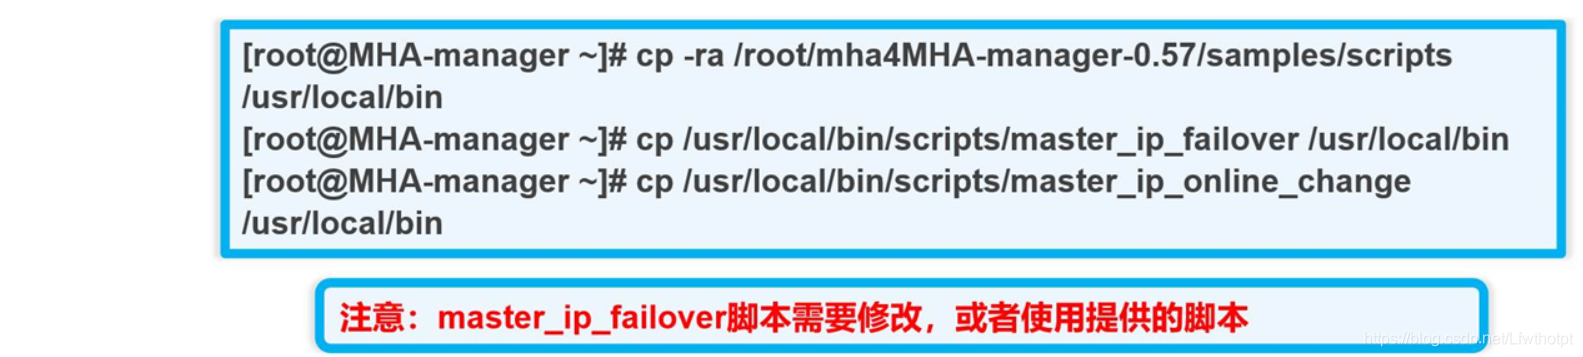
- 创建MHA软件目录并拷贝修改配置文件

4.7 测试
- SSH免交互登录(MHA-Manager节点)

- 测试mysql主从连接

4.8 启动MHA& 查看MHA 状态

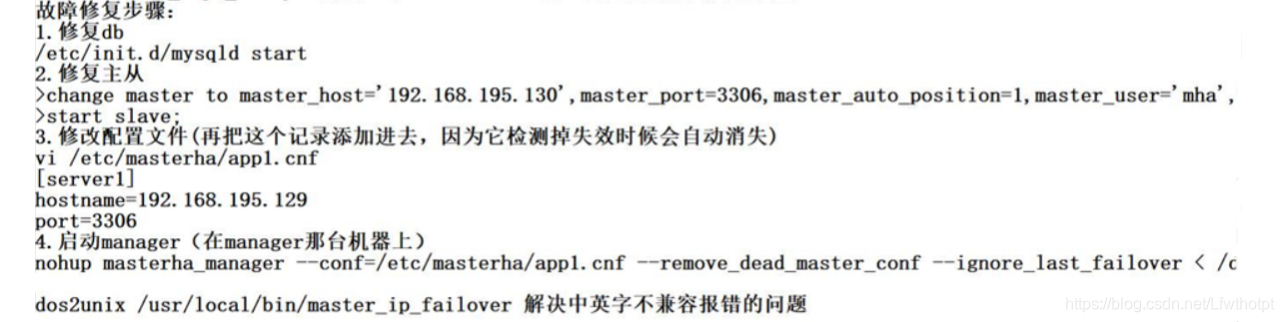
五:模拟故障(1)
-
自动切换
-
mysql主库修复后加入数据库步骤
- 启动mysql数据库

- 启动从库同步并设置为只读

- 停掉当前主库(mysql2)的同步进程

六:模拟故障(2)
- 手动切换
- 修改/etc/masterha/app1.cnf文件
- 停止MHA
- 手动设置当前的主库mysql2为dead
- 设置新的master为mysql1
- 注释脚本/usr/local/bin/script/master_ip_online_change里面的152行
- 重新执行设置新的master为alive命令
七:实操

7.1 实验思路
- MHA架构
- 1.数据库安装
- 2.一主两从
- 3.MHA搭建
- 故障模拟
- 1.主库失效
- 2.备选主库成为主库
- 3.从库slave2将备选主库指向为主库
7.2 案例环境
- 服务器centos7.4(64位)manager/192.168.247.206
- 管理节点,安装manager组件(也需要安装node组件)
- 服务器centos7.4(64位)master/192.168.247.160
- master节点,安装node组件
- 服务器centos7.4(64位)slave1/192.168.247.161
- slave节点,安装node组件
- 服务器centos7.4(64位)slave2/192.168.247.154
- slave节点,安装node组件
这里操作系统是centos7,所以下载MHA版本为0.57版本
一旦master挂了,主备会顶上去干活
[root@lamp ~]# hostnamectl set-hostname manager
[root@lamp ~]# su
[root@manager ~]#
[root@nginx ~]# hostnamectl set-hostname master
[root@nginx ~]# su
[root@master ~]#
[root@localhost ~]# hostnamectl set-hostname slave1
[root@localhost ~]# su
[root@slave1 ~]#
[root@localhost ~]# hostnamectl set-hostname slave2
[root@localhost ~]# su
[root@slave2 ~]#
7.3 案例需求
本案例要求通过MHA 监控mysql数据库在故障时进行自动切换,不影响业务
7.4 案例实现思路
- 1安装mysql数据库
- 2配置mysql一主两从
- 3安装MHA软件
- 4配置ssh免密码认证
- 5配置mysql MHA高可用
- 6模拟master故障切换
7.5 实验步骤
在三个mysql 节点上分别安装数据库,mysql版本请使用5.6.36,cmake版本请使用2.8.6。下面只在mysql上做演示,安装过程如下
7.5.1 安装mysql数据库
①安装编译依赖的环境
yum install ncurses-devel gcc-c++ perl-Module-Install -y
②安装cmake编译软件
[root@master ~]# mkdir /abc
mkdir: cannot create directory ‘/abc’: File exists
[root@master ~]# mount.cifs //192.168.254.10/linuxs /abc
Password for root@//192.168.254.10/linuxs:
[root@master ~]# cd /abc/mha/
[root@master mha]# ls
cmake-2.8.6.tar.gz             mha4mysql-node-0.57.tar.gz  ruby-2.4.1.tar.gz
mha4mysql-manager-0.57.tar.gz  mysql-5.6.36.tar.gz         ruby安装.png
[root@master mha]# tar zxvf cmake-2.8.6.tar.gz -C /opt
//解压cmake-2.8.6源码包到系统内
[root@master mha]# cd /opt
[root@master opt]# ls
cmake-2.8.6  data  nginx-1.12.2  rh
[root@master opt]# cd cmake-2.8.6/
[root@master cmake-2.8.6]# ls
bootstrap                   CMakeLists.txt            CTestCustom.cmake.in  Modules
ChangeLog.manual            CMakeLogo.gif             CTestCustom.ctest.in  Readme.txt
ChangeLog.txt               cmake_uninstall.cmake.in  DartConfig.cmake      Source
cmake.1                     CompileFlags.cmake        DartLocal.conf.in     Templates
CMakeCPack.cmake            configure                 Docs                  Tests
CMakeCPackOptions.cmake.in  Copyright.txt             doxygen.config        Utilities
CMakeGraphVizOptions.cmake  CTestConfig.cmake         Example
[root@master cmake-2.8.6]# ./configure
CMake has bootstrapped.  Now run gmake.
[root@master cmake-2.8.6]# gmake
[root@master cmake-2.8.6]# gmake install
③安装mysql数据库
[root@master cmake-2.8.6]# cd /abc/mha/
[root@master mha]# ls
cmake-2.8.6.tar.gz             mha4mysql-node-0.57.tar.gz  ruby-2.4.1.tar.gz
mha4mysql-manager-0.57.tar.gz  mysql-5.6.36.tar.gz         ruby安装.png
[root@master mha]# tar zxvf mysql-5.6.36.tar.gz -C /opt
//解压mysql-5.6.36源码包到/opt下
[root@master mha]# cd /opt
[root@master opt]# ls
cmake-2.8.6  data  mysql-5.6.36  nginx-1.12.2  rh
[root@master opt]# cd mysql-5.6.36/
[root@master mysql-5.6.36]# ls
BUILD           configure.cmake      include      man         README      storage        vio
client          COPYING              INSTALL      mysql-test  regex       strings        win
cmake           dbug                 libevent     mysys       scripts     support-files  zlib
CMakeLists.txt  Docs                 libmysql     mysys_ssl   sql         tests
cmd-line-utils  Doxyfile-perfschema  libmysqld    packaging   sql-bench   unittest
config.h.cmake  extra                libservices  plugin      sql-common  VERSION
[root@master mysql-5.6.36]# cmake -DCMAKE_INSTALL_PREFIX=/usr/local/mysql -DDEFAULT_CHARSET=utf8 -DDEFAULT_COLLATION=utf8_general_ci -DWITH_EXTRA_CHARSETS=all -DSYSCONFDIR=/etc
。。。。。。
-- Configuring done
-- Generating done
-- Build files have been written to: /opt/mysql-5.6.36
[root@master mysql-5.6.36]#
[root@master mysql-5.6.36]# make && make install
④优化mysql数据库路径,创建mysql用户,初始化数据库
[root@master mysql-5.6.36]# cp support-files/my-default.cnf /etc/my.cnf
cp: overwrite ‘/etc/my.cnf’? y
[root@master mysql-5.6.36]# cp support-files/mysql.server /etc/init.d/mysqld
[root@master mysql-5.6.36]# chmod 755 /etc/init.d/mysqld
[root@master mysql-5.6.36]# chkconfig --add mysqld
[root@master mysql-5.6.36]# echo "PATH=$PATH:/usr/local/mysql/bin" >> /etc/profile
[root@master mysql-5.6.36]# source /etc/profile
[root@master mysql-5.6.36]# useradd -M -s /sbin/nologin mysql
[root@master mysql-5.6.36]# chown -R mysql.mysql /usr/local/mysql
[root@master mysql-5.6.36]# /usr/local/mysql/scripts/mysql_install_db \
 --basedir=/usr/local/mysql \
 --datadir=/usr/local/mysql/data \
 --user=mysql
⑤修改master的主配置文件/etc/my.cnf,还有slave的/etc/my.cnf(注意里面的server id 不可以一样)
- 修改master服务器
[root@master mysql-5.6.36]# vim /etc/my.cnf
写在[mysqld]下
server-id = 1
log_bin = master-bin
log-slave-update = true
- 修改slave服务器
[root@slave1 mysql-5.6.36]# vim /etc/my.cnf
server-id = 2		//另外一个从服务器不要相同。写3
log_bin = master-bin
relay-log = relay-log-bin
relay-log-index = slave-relay-bin.index
⑥三台mysql服务器各做两个软连接
[root@slave2 mysql-5.6.36]# ln -s /usr/local/mysql/bin/mysql /usr/sbin/
[root@slave2 mysql-5.6.36]# ln -s /usr/local/mysql/bin/mysqlbinlog /usr/sbin/
⑦三台mysql启动
[root@slave2 mysql-5.6.36]# mysqld_safe --user=mysql &
[1] 26225
[root@slave2 mysql-5.6.36]# Logging to '/usr/local/mysql/data/slave2.err'.
200109 23:23:19 mysqld_safe Starting mysqld daemon with databases from /usr/local/mysql/data

[root@slave2 mysql-5.6.36]# netstat -natp | grep 3306
tcp6       0      0 :::3306                 :::*                    LISTEN      26364/mysqld
[root@slave2 mysql-5.6.36]#
[root@master mysql-5.6.36]# systemctl stop firewalld
[root@master mysql-5.6.36]# setenforce 0
7.5.2 配置mysql,一主两从
-
1.mysql主从配置相对比较简单,需要注意的是授权。步骤如下:
所有数据库节点上授权两个用户,一个是从库同步使用用户myslave,另外一个是manager使用监控用户mha
[root@master mysql-5.6.36]# mysqladmin -uroot -p password '123123'
Enter password:
Warning: Using a password on the command line interface can be insecure.
[root@master mysql-5.6.36]# mysql -uroot -p
Enter password:
Welcome to the MySQL monitor.  Commands end with ; or \g.

mysql> grant replication slave on *.* to 'myslave'@'192.168.247.%' identified by '123123';
Query OK, 0 rows affected (0.00 sec)

mysql> grant all privileges on *.* to 'mha'@'192.168.247.%' identified by 'manager';
Query OK, 0 rows affected (0.00 sec)

mysql> flush privileges;
Query OK, 0 rows affected (0.00 sec)
- 2.下面三条授权理论是不用添加的,但是做案例实验环境时候通过MHA检查mysql时主从有报错,报两个从库通过主机名连接不上主库,所以所有数据加上下面的授权
mysql> grant all privileges on *.* to 'mha'@'master' identified by 'manager';
Query OK, 0 rows affected (0.00 sec)

mysql> grant all privileges on *.* to 'mha'@'slave1' identified by 'manager';
Query OK, 0 rows affected (0.00 sec)

mysql> grant all privileges on *.* to 'mha'@'slave2' identified by 'manager';
Query OK, 0 rows affected (0.00 sec)
mysql> flush privileges;
Query OK, 0 rows affected (0.00 sec)
- 3.在master上查看二进制文件和同步点
mysql> show master status;
+-------------------+----------+--------------+------------------+-------------------+
| File              | Position | Binlog_Do_DB | Binlog_Ignore_DB | Executed_Gtid_Set |
+-------------------+----------+--------------+------------------+-------------------+
| master-bin.000001 |     1436 |              |                  |                   |
+-------------------+----------+--------------+------------------+-------------------+
1 row in set (0.00 sec)
-
4.接下来再slave1和slave2分别执行同步
查看然后再slave下查看slave状态——查看IO和mysql线程都是yes代表同步是否正常
mysql> change master to master_host='192.168.247.160',master_user='myslave',master_password='123123',master_log_file='master-bin.000001',master_log_pos=1436;
Query OK, 0 rows affected, 2 warnings (0.02 sec)

mysql> start slave;
Query OK, 0 rows affected (0.01 sec)
mysql> show slave status\G
*************************** 1. row ***************************
               Slave_IO_State: Waiting for master to send event
                  Master_Host: 192.168.247.160
                  Master_User: myslave
                  Master_Port: 3306
                Connect_Retry: 60
              Master_Log_File: master-bin.000001
          Read_Master_Log_Pos: 1436
               Relay_Log_File: relay-log-bin.000002
                Relay_Log_Pos: 284
        Relay_Master_Log_File: master-bin.000001
             Slave_IO_Running: Yes
            Slave_SQL_Running: Yes
- 5.必须设置两个从库为只读模式
mysql> set global read_only=1;
Query OK, 0 rows affected (0.00 sec)
mysql> flush privileges;
Query OK, 0 rows affected (0.00 sec)
7.5.3 安装MHA软件
①所有服务器上都安装MHA以来的环境,首先安装epel源
[root@master ~]# systemctl stop firewalld
[root@master ~]# setenforce 0
[root@master ~]# yum install epel-release --nogpgcheck -y
//--nogpgcheck 不进行gpg检查
[root@master ~]# yum install -y perl-DBD-MySQL \	//perl 针对mysql数据库的包
 perl-Config-Tiny \		//从配置文件中去提拿数据
 perl-Log-Dispatch \	//日志
 perl-Parallel-ForkManager \		//多线程管理
 perl-ExtUtils-CBuilder \			//扩展工具
 perl-ExtUtils-MakeMaker \
 perl-CPAN							//程序库
yum install -y perl-DBD-MySQL \
perl-Config-Tiny \
perl-Log-Dispatch \
perl-Parallel-ForkManager \
perl-ExtUtils-CBuilder \
perl-ExtUtils-MakeMaker \
perl-CPAN
②MHA软件包对于每个操作版本不一样,这里centos7.4必须选择0.57版本
在所有服务器上必须先安装node组件,最后再manager节点上安装manager组件
因为manager依赖node组件,下面都是在master上操作演示安装node组件
- perl Makefile.PL
- make
- make install
[root@master ~]# mount.cifs //192.168.254.10/linuxs /abc
Password for root@//192.168.254.10/linuxs:
[root@master ~]# cd /abc/mha/
[root@master mha]# ls
cmake-2.8.6.tar.gz             mha4mysql-node-0.57.tar.gz  ruby-2.4.1.tar.gz
mha4mysql-manager-0.57.tar.gz  mysql-5.6.36.tar.gz         ruby安装.png
[root@master mha]# cd ~
[root@master ~]# tar zxvf /abc/mha/mha4mysql-node-0.57.tar.gz
//解压源码包到root家目录
[root@master ~]# ls
anaconda-ks.cfg       mha4mysql-node-0.57  公共  文档  模板  音乐
initial-setup-ks.cfg  下载                 图片  桌面  视频
[root@master ~]# cd mha4mysql-node-0.57/
[root@master mha4mysql-node-0.57]# ls
AUTHORS  bin  COPYING  debian  inc  lib  Makefile.PL  MANIFEST  META.yml  README  rpm  t
[root@master mha4mysql-node-0.57]# perl Makefile.PL
*** Module::AutoInstall version 1.06
*** Checking for Perl dependencies...
[Core Features]
- DBI        ...loaded. (1.627)
- DBD::mysql ...loaded. (4.023)
*** Module::AutoInstall configuration finished.
Checking if your kit is complete...
Looks good
Writing Makefile for mha4mysql::node
Writing MYMETA.yml and MYMETA.json

[root@master mha4mysql-node-0.57]# make
[root@master mha4mysql-node-0.57]# make install
此时,四台服务器上面都安装了node
③在manager上安装manager组件(注意,一定要先安装node组件才能安装manager组件)
[root@manager mha4mysql-node-0.57]# cd ~
[root@manager ~]# tar zxvf /abc/mha/mha4mysql-manager-0.57.tar.gz
[root@manager ~]# cd mha4mysql-manager-0.57/
[root@manager mha4mysql-manager-0.57]# perl Makefile.PL
*** Module::AutoInstall version 1.06
*** Checking for Perl dependencies...
[Core Features]
- DBI                   ...loaded. (1.627)
- DBD::mysql            ...loaded. (4.023)
- Time::HiRes           ...loaded. (1.9725)
- Config::Tiny          ...loaded. (2.14)
- Log::Dispatch         ...loaded. (2.41)
- Parallel::ForkManager ...loaded. (1.18)
- MHA::NodeConst        ...loaded. (0.57)
*** Module::AutoInstall configuration finished.
Checking if your kit is complete...
Looks good
Writing Makefile for mha4mysql::manager
[root@manager mha4mysql-manager-0.57]# make
[root@manager mha4mysql-manager-0.57]# make install
[root@manager mha4mysql-manager-0.57]#
manager安装后在/usr/local/bin下面会生成几个工具,主要包括以下几个:
[root@manager mha4mysql-manager-0.57]# ls /usr/local/bin
apply_diff_relay_logs  masterha_check_status    masterha_master_switch    save_binary_logs
filter_mysqlbinlog     masterha_conf_host       masterha_secondary_check
masterha_check_repl    masterha_manager         masterha_stop
masterha_check_ssh     masterha_master_monitor  purge_relay_logs
[root@manager mha4mysql-manager-0.57]#
masterha_check_ssh 检查MHA的SSH配置状况
masterha_check_repl 检查mysql的复制状况
masterha_manager 启动manager的脚本
masterha_check_status 检测当前MHA运行状态
masterha_master_monitor 检测master是否宕机
masterha_master_switch 控制故障转移(自动或者手动)
masterha_conf_host 添加或删除配置的server信息
masterha_stop 关闭manager
④node安装后也会在/usr/local/bin下面生成几个脚本(这些工具通常由MHA的manager的脚本出发,无需认为操作)
主要如下
[root@master mha4mysql-node-0.57]# ls /usr/local/bin
apply_diff_relay_logs  cmake  ctest               purge_relay_logs
ccmake                 cpack  filter_mysqlbinlog  save_binary_logs
save_binary_logs 保存和复制master的二进制日志
apply_diff_relay_logs 识别差异的中继日志事件并将其差异的事件应用于其他的slaves
filter_mysqlbinlog 去除不必要的ROLLBACK事件(MHA已不再使用这个工具)
purge_relay_logs 清除中继日志(不会阻塞sql线程)
7.5.4 配置SSH无密码认证
①在manager上配置到所有数据库节点的无密码认证
在manager下配置,然后发给下面的三台mysql
[root@manager mha4mysql-node-0.57]# ssh-keygen -t rsa
Generating public/private rsa key pair.
Enter file in which to save the key (/root/.ssh/id_rsa):
//因为是无密码验证,此处直接敲回车,下面也是一路回车
Enter passphrase (empty for no passphrase):
Enter same passphrase again:
Your identification has been saved in /root/.ssh/id_rsa.
Your public key has been saved in /root/.ssh/id_rsa.pub.
The key fingerprint is:
SHA256:dOoBHzuKW27T8fxKO19ho6w5aehH4XDjUDPnODKcrLs root@master
The key's randomart image is:
+---[RSA 2048]----+
|                 |
|          + .    |
|      .ooo.*     |
|       +O=* .    |
|       .SO +  +  |
|     ..o.o+. o o |
|    . oo.*..o .  |
|     ++ o.O+ .   |
|    ..E+.o=*o    |
+----[SHA256]-----+
[root@manager mha4mysql-node-0.57]#
[root@manager mha4mysql-manager-0.57]# ssh-copy-id 192.168.247.160
//依次炮制192.168.247.161和192.168.247.154
Now try logging into the machine, with:   "ssh '192.168.247.160'"
and check to make sure that only the key(s) you wanted were added.
②在mysql的master上配置到slave1和slave2的无密码认证
在master下面配置,然后发给下面的两台slave
[root@master mha4mysql-node-0.57]# ssh-keygen -t rsa
Generating public/private rsa key pair.
Enter file in which to save the key (/root/.ssh/id_rsa):
Enter passphrase (empty for no passphrase):
Enter same passphrase again:
Your identification has been saved in /root/.ssh/id_rsa.
Your public key has been saved in /root/.ssh/id_rsa.pub.
The key fingerprint is:
SHA256:dOoBHzuKW27T8fxKO19ho6w5aehH4XDjUDPnODKcrLs root@master
The key's randomart image is:
+---[RSA 2048]----+
|                 |
|          + .    |
|      .ooo.*     |
|       +O=* .    |
|       .SO +  +  |
|     ..o.o+. o o |
|    . oo.*..o .  |
|     ++ o.O+ .   |
|    ..E+.o=*o    |
+----[SHA256]-----+
[root@master mha4mysql-node-0.57]# ssh-copy-id 192.168.247.161
//还有192.168.247.154
Now try logging into the machine, with:   "ssh '192.168.247.161'"
and check to make sure that only the key(s) you wanted were added.
③在slave1上配置到master和slave2的无密码认证
在slave1下面配置,然后发送给其他两台数据库(master、slave2)
[root@slave1 mha4mysql-node-0.57]# ssh-keygen -t rsa
Generating public/private rsa key pair.
Enter file in which to save the key (/root/.ssh/id_rsa):
Enter passphrase (empty for no passphrase):
Enter same passphrase again:
Your identification has been saved in /root/.ssh/id_rsa.
Your public key has been saved in /root/.ssh/id_rsa.pub.
The key fingerprint is:
SHA256:7LkCQ0PZGw4oo7p4yGVW8Aqc8Hf+BJ4S+r4jhtmcw28 root@slave1
The key's randomart image is:
+---[RSA 2048]----+
|   . o           |
|+ ..+ o          |
|++..oo o         |
|.+. =o=.         |
|. .+o* oS        |
|. .=+ +...       |
|oO+o + oo        |
|*.X E . ..       |
| o *+o ..        |
+----[SHA256]-----+
[root@slave1 mha4mysql-node-0.57]# ssh-copy-id 192.168.247.160
//还有ssh-copy-id 192.168.247.154
Now try logging into the machine, with:   "ssh '192.168.247.160'"
and check to make sure that only the key(s) you wanted were added.
④在slave2上配置到master和slave1的无密码认证
在slave2下面配置,然后发送给其他两台数据库(master、slave1)
[root@slave2 mha4mysql-node-0.57]# ssh-keygen -t rsa
Generating public/private rsa key pair.
Enter file in which to save the key (/root/.ssh/id_rsa):
Enter passphrase (empty for no passphrase):
Enter same passphrase again:
Your identification has been saved in /root/.ssh/id_rsa.
Your public key has been saved in /root/.ssh/id_rsa.pub.
The key fingerprint is:
SHA256:wJZj2oUR+JKg9Y1ZrRLtpnVD4SpBvqwmd4pKIFKTh7k root@slave2
The key's randomart image is:
+---[RSA 2048]----+
|    .ooo..       |
|  o*o.o=o        |
| o*o+XOoo        |
|.. =BBB=o        |
|+ E =*o.S.       |
|+  ...           |
|..+ .            |
|.= o             |
|+ .              |
+----[SHA256]-----+
[root@slave2 mha4mysql-node-0.57]# ssh-copy-id 192.168.247.160
//还有192.168.247.161
Now try logging into the machine, with:   "ssh '192.168.247.160'"
and check to make sure that only the key(s) you wanted were added.
7.5.5配置mysql MHA高可用
①在manager节点上复制相关脚本到/usr/local/bin目录下,会复制四个执行文件
[root@manager ~]# cd mha4mysql-manager-0.57/
[root@manager mha4mysql-manager-0.57]# ls
AUTHORS  blib     debian  lib       Makefile.PL  META.yml    README  samples  tests
bin      COPYING  inc     Makefile  MANIFEST     pm_to_blib  rpm     t
[root@manager mha4mysql-manager-0.57]# cd samples/
[root@manager samples]# ls
conf  scripts
[root@manager samples]# ls scripts/
master_ip_failover  master_ip_online_change  power_manager  send_report
[root@manager samples]# cp -ra /root/mha4mysql-manager-0.57/samples/scripts /usr/local/bin
[root@manager samples]# cd /usr/local/
[root@manager local]# ls
bin  boost_1_59_0  etc  games  include  lib  lib64  libexec  sbin  share  src  tomcat9
[root@manager local]# cd bin/
[root@manager bin]# ls
apply_diff_relay_logs  masterha_check_status    masterha_master_switch    save_binary_logs
filter_mysqlbinlog     masterha_conf_host       masterha_secondary_check  scripts
masterha_check_repl    masterha_manager         masterha_stop
masterha_check_ssh     masterha_master_monitor  purge_relay_logs
[root@manager bin]# cd scripts/
[root@manager scripts]# ls -l
total 32
-rwxr-xr-x. 1 mysql mysql  3648 May 31  2015 master_ip_failover		//自动切换时VIP管理的脚本
-rwxr-xr-x. 1 mysql mysql  9870 May 31  2015 master_ip_online_change	//在线切换时vip的管理
-rwxr-xr-x. 1 mysql mysql 11867 May 31  2015 power_manager		//故障发生后关闭主机的脚本
-rwxr-xr-x. 1 mysql mysql  1360 May 31  2015 send_report		//因故障切换后发送报警的脚本
②复制上述的自动切换时vip的管理脚本到/usr/local/bin目录中并修改,这里使用脚本管理vip
[root@manager scripts]# cp /usr/local/bin/scripts/master_ip_failover /usr/local/bin
[root@manager scripts]# vim /usr/local/bin/master_ip_failover
③修改/usr/local/bin/master_ip_failover脚本,内容如下:(删除原有内容,直接复制)
:% s /#//
#!/usr/bin/env perl
use strict;
use warnings FATAL => 'all';

use Getopt::Long;

my (
$command, $ssh_user, $orig_master_host, $orig_master_ip,
$orig_master_port, $new_master_host, $new_master_ip, $new_master_port
);
my $vip = '192.168.247.100';		//设置的vip漂移地址,类似vvip
my $brdc = '192.168.247.255';		//广播地址
my $ifdev = 'ens33';
my $key = '1';
my $ssh_start_vip = "/sbin/ifconfig ens33:$key $vip";
my $ssh_stop_vip = "/sbin/ifconfig ens33:$key down";
my $exit_code = 0;
#my $ssh_start_vip = "/usr/sbin/ip addr add $vip/24 brd $brdc dev $ifdev label $ifdev:$key;/usr/sbin/arping -q -A -c 1 -I $ifdev $vip;iptables -F;";
#my $ssh_stop_vip = "/usr/sbin/ip addr del $vip/24 dev $ifdev label $ifdev:$key";
GetOptions(
'command=s' => \$command,
'ssh_user=s' => \$ssh_user,
'orig_master_host=s' => \$orig_master_host,
'orig_master_ip=s' => \$orig_master_ip,
'orig_master_port=i' => \$orig_master_port,
'new_master_host=s' => \$new_master_host,
'new_master_ip=s' => \$new_master_ip,
'new_master_port=i' => \$new_master_port,
);

exit &main();

sub main {

print "\n\nIN SCRIPT TEST====$ssh_stop_vip==$ssh_start_vip===\n\n";

if ( $command eq "stop" || $command eq "stopssh" ) {

my $exit_code = 1;
eval {
print "Disabling the VIP on old master: $orig_master_host \n";
&stop_vip();
$exit_code = 0;
};
if ($@) {
warn "Got Error: $@\n";
exit $exit_code;
}
exit $exit_code;
}
elsif ( $command eq "start" ) {

my $exit_code = 10;
eval {
print "Enabling the VIP - $vip on the new master - $new_master_host \n";
&start_vip();
$exit_code = 0;
};
if ($@) {
warn $@;
exit $exit_code;
}
exit $exit_code;
}
elsif ( $command eq "status" ) {
print "Checking the Status of the script.. OK \n";
exit 0;
}
else {
&usage();
exit 1;
}
}
sub start_vip() {
`ssh $ssh_user\@$new_master_host \" $ssh_start_vip \"`;
}
# A simple system call that disable the VIP on the old_master
sub stop_vip() {
`ssh $ssh_user\@$orig_master_host \" $ssh_stop_vip \"`;
}

sub usage {
print
"Usage: master_ip_failover --command=start|stop|stopssh|status --orig_master_host=host --orig_master_ip=ip --orig_master_port=port --new_master_host=host --new_master_ip=ip --new_master_port=port\n";
}
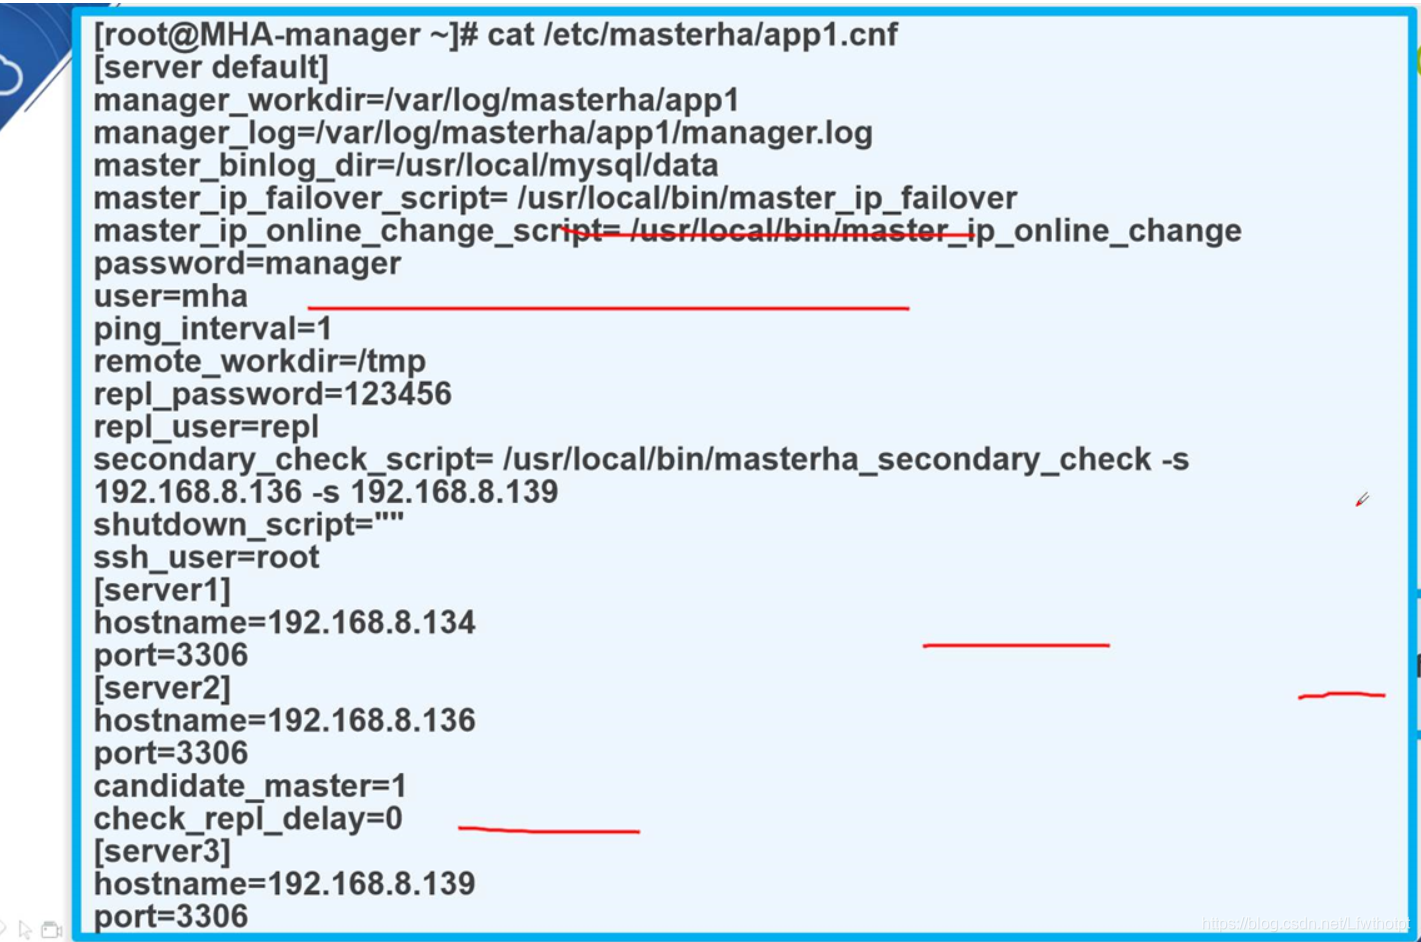
④创建MHA软件目录并拷贝配置文件
[root@manager scripts]# mkdir /etc/masterha
[root@manager scripts]# cp /root/mha4mysql-manager-0.57/samples/conf/app1.cnf /etc/masterha/
[root@manager scripts]# vim /etc/masterha/app1.cnf
[server default]
manager_log=/var/log/masterha/app1/manager.log	//manager日志
manager_workdir=/var/log/masterha/app1.log			//manager工作目录
master_binlog_dir=/usr/local/mysql/data			//master保存binlog的位置,这里的路径要与master里配置的binlog的相同
master_ip_failover_script=/usr/local/bin/master_ip_failover		//设置自动failover时候的切换脚本。也就是上边的那个脚本
master_ip_online_change_script=/usr/local/bin/master_ip_online_change	//设置手动切换时候的切换脚本
password=manager		//这个密码是前文中创建监控用户的那个密码
ping_interval=1		//设置监控主库,发送ping包的时间间隔,默认是3秒,尝试三次没有回应的时候自动进行railover
remote_workdir=/tmp		//设置远程mysql时在发生切换时的日志binlog的保存位置
repl_password=123123		//设置复制同步用户密码
repl_user=myslave			//设置复制同步用户的用户
secondary_check_script=/usr/local/bin/masterha_secondary_check -s 192.168.247.161 -s 192.168.247.154		//设置发生切换后发生报警的脚本,后面跟两个从服务器地址
shutdown_script=""		//设置故障发生关闭故障脚本主机,此处没有指定脚本,代表不关闭
ssh_user=root			//设置ssh的登录用户名
user=mha				//设置监控用户

#[server1]
#hostname=192.168.247.160
#port=3306

[server2]
candidate_master=1		//设置为候选master,如果设置该参数以后,MHA发送主从切换以后将会从此从库升级为主库,即使这个主库不是集群中事件最全的
hostname=192.168.247.161
check_repl_delay=0		//检查repl延迟为0,支持:默认情况下如果一个slave落后master 100M的relay logs话,MHA将不会选择该slave作为一个新的master,
port=3306

[server3]
hostname=192.168.247.154
port=3306
⑤测试ssh免密码认证:masterha_check_ssh -conf=/etc/masterha/app1.cnf
如果正常最后会输出successfully,如下所示
[root@manager scripts]# masterha_check_ssh -conf=/etc/masterha/app1.cnf
Fri Jan 10 10:26:03 2020 - [warning] Global configuration file /etc/masterha_default.cnf not found. Skipping.
Fri Jan 10 10:26:03 2020 - [info] Reading application default configuration from /etc/masterha/app1.cnf..
Fri Jan 10 10:26:03 2020 - [info] Reading server configuration from /etc/masterha/app1.cnf..
Fri Jan 10 10:26:03 2020 - [info] Starting SSH connection tests..
Fri Jan 10 10:26:04 2020 - [debug]
Fri Jan 10 10:26:03 2020 - [debug]  Connecting via SSH from [email protected](192.168.247.161:22) to [email protected](192.168.247.154:22)..
Fri Jan 10 10:26:04 2020 - [debug]   ok.
Fri Jan 10 10:26:05 2020 - [debug]
Fri Jan 10 10:26:04 2020 - [debug]  Connecting via SSH from [email protected](192.168.247.154:22) to [email protected](192.168.247.161:22)..
Fri Jan 10 10:26:04 2020 - [debug]   ok.
Fri Jan 10 10:26:05 2020 - [info] All SSH connection tests passed successfully.
⑥检查复制集:masterha_check_repl -conf=/etc/masterha/app1.cnf
[root@manager scripts]# masterha_check_repl -conf=/etc/masterha/app1.cnf
Fri Jan 10 10:26:46 2020 - [warning] Global configuration file /etc/masterha_default.cnf not found. Skipping.
Fri Jan 10 10:26:46 2020 - [info] Reading application default configuration from /etc/masterha/app1.cnf..
Fri Jan 10 10:26:46 2020 - [info] Reading server configuration from /etc/masterha/app1.cnf..
Fri Jan 10 10:26:46 2020 - [info] MHA::MasterMonitor version 0.57.
Creating directory /var/log/masterha/app1.. done.
Fri Jan 10 10:26:48 2020 - [error][/usr/local/share/perl5/MHA/ServerManager.pm, ln671] Master 192.168.247.160:3306 from which slave 192.168.247.154(192.168.247.154:3306) replicates is not defined in the configuration file!
Fri Jan 10 10:26:48 2020 - [error][/usr/local/share/perl5/MHA/MasterMonitor.pm, ln427] Error happened on checking configurations.  at /usr/local/share/perl5/MHA/MasterMonitor.pm line 329.
Fri Jan 10 10:26:48 2020 - [error][/usr/local/share/perl5/MHA/MasterMonitor.pm, ln525] Error happened on monitoring servers.
Fri Jan 10 10:26:48 2020 - [info] Got exit code 1 (Not master dead).

MySQL Replication Health is NOT OK!
出现错误
真正问题不是出在mysql的配置文件上面,问题是出现在manager管理节点上面,管理节点的配置文件有两个,一个对于虚拟ip的配置文件/usr/local/bin/master_ip_failover用于故障转移 ,还有一个是/etc/masterha/app1.cnf
把/etc/masterha/app1.cnf中的server 1 取消注释
要注意配置授权和ssh免密钥对验证是否配置完全
[root@manager scripts]# masterha_check_repl -conf=/etc/masterha/app1.cnf
。。。。。。
MySQL Replication Health is OK.
[root@manager scripts]#
⑦在master上手动开启VIP,虚拟ip
第一次配置,需要在master上手动配置master的虚拟IP
不要重启网卡,因为是通过命令设置,不是通过配置文件永久修改
[root@master ~]# /sbin/ifconfig ens33:1 192.168.247.100/24
[root@master ~]# ifconfig
ens33: flags=4163<UP,BROADCAST,RUNNING,MULTICAST>  mtu 1500
        inet 192.168.247.160  netmask 255.255.255.0  broadcast 192.168.247.255
        inet6 fe80::e2c1:c26d:afa1:a4ad  prefixlen 64  scopeid 0x20<link>
        ether 00:0c:29:52:4d:89  txqueuelen 1000  (Ethernet)
        RX packets 503726  bytes 98211279 (93.6 MiB)
        RX errors 0  dropped 0  overruns 0  frame 0
        TX packets 620773  bytes 84707696 (80.7 MiB)
        TX errors 0  dropped 0 overruns 0  carrier 0  collisions 0

ens33:1: flags=4163<UP,BROADCAST,RUNNING,MULTICAST>  mtu 1500
        inet 192.168.247.100  netmask 255.255.255.0  broadcast 192.168.247.255
        ether 00:0c:29:52:4d:89  txqueuelen 1000  (Ethernet)
7.5.6 启动MHA
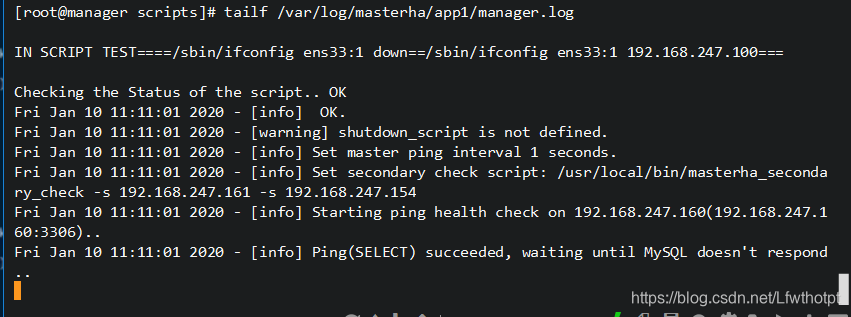
①nohup masterha_manager --conf=/etc/masterha/app1.cnf --remove_dead_master_conf --ignore_last_failover < /dev/null > /var/log/masterha/app1/manager.log 2>&1 &
[root@manager scripts]# nohup masterha_manager --conf=/etc/masterha/app1.cnf --remove_dead_master_conf --ignore_last_failover < /dev/null > /var/log/masterha/app1/manager.log 2>&1 &

[1] 35738
[root@manager scripts]#
nohup //选项
masterha_manager //开启
–conf=/etc/masterha/app1.cnf //指定配置文件
–remove_dead_master_conf //当master服务器失效时,发生主从切换后,会把旧的master的ip从主配置文件删除
–ignore_last_failover //忽略故障转移,忽略掉总是宕机不够可靠的服务器
在缺省情况下,如果MHA检测到连续发生宕机,且两次宕机间隔不足8小时的话,则不会进行Failover,之所以这样限制是为了避免ping-pong效应。该参数代表忽略桑次MHA出发切换产生的文件,默认情况下,MHA发生切换后会在日志记录下,也就是上面设置的日志app1.failover.complete文件,下次再次切换的时候如果发现该目录下存在该文件将不允许触发切换,除非在第一次切换后收到删除该文件;为了方便,这里设为为–ignore_last_failover
< /dev/null > //生成的所有信息会导到null下或者/var/log/masterha/app1/manager.log日志文件中
2>&1 & //把2错误性的输出从定向为标准性输出,开启后台运行
② 查看MHA状态
可以看到当前的master是master服务器节点
[root@manager scripts]# masterha_check_status --conf=/etc/masterha/app1.cnf
app1 (pid:35738) is running(0:PING_OK), master:192.168.247.160
[root@manager scripts]#
③查看MHA日志
[root@manager scripts]# cat /var/log/masterha/app1/manager.log
。。。。。
IN SCRIPT TEST====/sbin/ifconfig ens33:1 down==/sbin/ifconfig ens33:1 192.168.247.100===
。。。。。
/usr/local/bin/masterha_secondary_check -s 192.168.247.161 -s 192.168.247.154
Fri Jan 10 11:11:01 2020 - [info] Starting ping health check on 192.168.247.160(192.168.247.160:3306)..
Fri Jan 10 11:11:01 2020 - [info] Ping(SELECT) succeeded, waiting until MySQL doesn't respond..
[root@manager scripts]#
④查看master的VIP地址192.168.247.100是否存在
这个地址不会因为manager节点停止MHA服务而消失
[root@master ~]# ifconfig
ens33:1: flags=4163<UP,BROADCAST,RUNNING,MULTICAST>  mtu 1500
        inet 192.168.247.100  netmask 255.255.255.0  broadcast 192.168.247.255
7.5.7 模拟master故障切换进行测试
①先启用监控观察日志去记录
[root@manager scripts]# tailf /var/log/masterha/app1/manager.log
此时进入监控状态
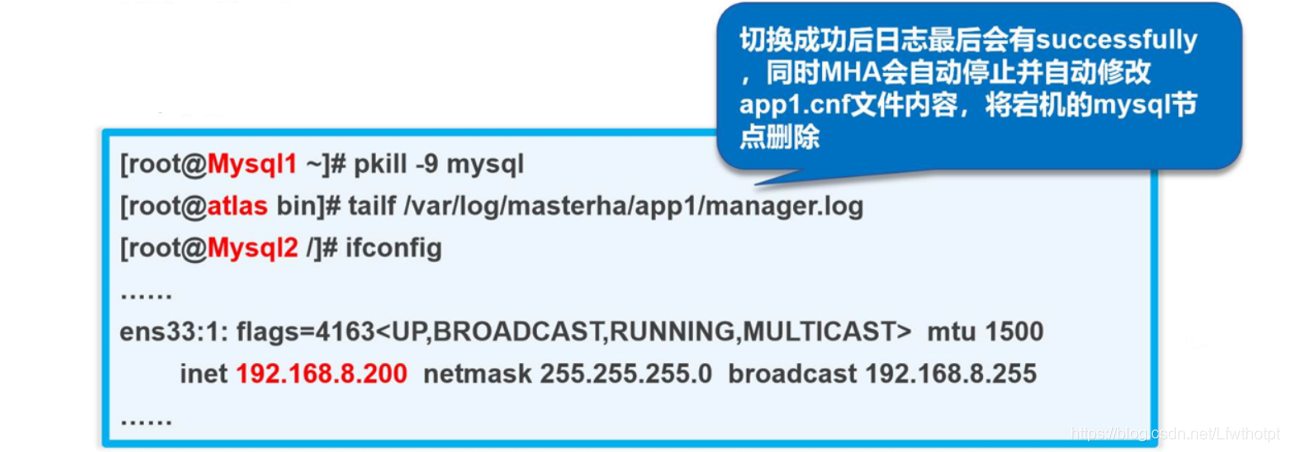
②此时在master服务器当中pkill掉
[root@master ~]# pkill -9 mysql
③此时vip不再master身上了
[root@master ~]# ifconfig
ens33: flags=4163<UP,BROADCAST,RUNNING,MULTICAST>  mtu 1500
        inet 192.168.247.160  netmask 255.255.255.0  broadcast 192.168.247.255
        inet6 fe80::e2c1:c26d:afa1:a4ad  prefixlen 64  scopeid 0x20<link>
        ether 00:0c:29:52:4d:89  txqueuelen 1000  (Ethernet)
        RX packets 568920  bytes 103836976 (99.0 MiB)
        RX errors 0  dropped 0  overruns 0  frame 0
        TX packets 707166  bytes 96117956 (91.6 MiB)
        TX errors 0  dropped 0 overruns 0  carrier 0  collisions 0

lo: flags=73<UP,LOOPBACK,RUNNING>  mtu 65536
        inet 127.0.0.1  netmask 255.0.0.0
        inet6 ::1  prefixlen 128  scopeid 0x10<host>
        loop  txqueuelen 1  (Local Loopback)
        RX packets 45  bytes 4284 (4.1 KiB)
        RX errors 0  dropped 0  overruns 0  frame 0
        TX packets 45  bytes 4284 (4.1 KiB)
        TX errors 0  dropped 0 overruns 0  carrier 0  collisions 0

virbr0: flags=4099<UP,BROADCAST,MULTICAST>  mtu 1500
        inet 192.168.122.1  netmask 255.255.255.0  broadcast 192.168.122.255
        ether 52:54:00:61:14:f5  txqueuelen 1000  (Ethernet)
        RX packets 0  bytes 0 (0.0 B)
        RX errors 0  dropped 0  overruns 0  frame 0
        TX packets 0  bytes 0 (0.0 B)
        TX errors 0  dropped 0 overruns 0  carrier 0  collisions 0

[root@master ~]#
④查看设置过candidate_master=1的slave1
[root@slave1 ~]# ifconfig
ens33: flags=4163<UP,BROADCAST,RUNNING,MULTICAST>  mtu 1500
        inet 192.168.247.161  netmask 255.255.255.0  broadcast 192.168.247.255
        inet6 fe80::1259:c72a:d63c:9f07  prefixlen 64  scopeid 0x20<link>
        ether 00:0c:29:6b:25:36  txqueuelen 1000  (Ethernet)
        RX packets 592080  bytes 148453591 (141.5 MiB)
        RX errors 0  dropped 0  overruns 0  frame 0
        TX packets 715917  bytes 97034436 (92.5 MiB)
        TX errors 0  dropped 0 overruns 0  carrier 0  collisions 0

ens33:1: flags=4163<UP,BROADCAST,RUNNING,MULTICAST>  mtu 1500
        inet 192.168.247.100  netmask 255.255.255.0  broadcast 192.168.247.255
        ether 00:0c:29:6b:25:36  txqueuelen 1000  (Ethernet)
发现vip跑到了slave上面
⑤ MHA也有反应了
----- Failover Report -----

app1: MySQL Master failover 192.168.247.160(192.168.247.160:3306) to 192.168.247.161(192.168.247.161:3306) succeeded

Master 192.168.247.160(192.168.247.160:3306) is down!

Check MHA Manager logs at manager:/var/log/masterha/app1/manager.log for details.

Started automated(non-interactive) failover.
Invalidated master IP address on 192.168.247.160(192.168.247.160:3306)
The latest slave 192.168.247.161(192.168.247.161:3306) has all relay logs for recovery.
Selected 192.168.247.161(192.168.247.161:3306) as a new master.
192.168.247.161(192.168.247.161:3306): OK: Applying all logs succeeded.
192.168.247.161(192.168.247.161:3306): OK: Activated master IP address.
192.168.247.154(192.168.247.154:3306): This host has the latest relay log events.
Generating relay diff files from the latest slave succeeded.
192.168.247.154(192.168.247.154:3306): OK: Applying all logs succeeded. Slave started, replicating from 192.168.247.161(192.168.247.161:3306)
192.168.247.161(192.168.247.161:3306): Resetting slave info succeeded.
Master failover to 192.168.247.161(192.168.247.161:3306) completed successfully.
⑥此时重开一个manager远程当作客户端,yum安装mysql客户端
连接成功
Last login: Fri Jan 10 09:10:46 2020 from 192.168.247.1
[root@manager ~]#
[root@manager ~]# yum install -y mysql
[root@manager ~]# mysql -h 192.168.247.100 -p
Enter password:
ERROR 1045 (28000): Access denied for user 'root'@'192.168.247.206' (using password: YES)
[root@manager ~]#
发现无法登陆,没有权限
去到当前的主服务器下设置权限,允许root在所有终端登陆
[root@slave1 ~]# mysql -uroot -p
Enter password:
mysql>  grant all on *.* to 'root'@'%' identified by '123123';
Query OK, 0 rows affected (0.01 sec)
此时再次在manager中登陆,指定的数据库IP是vip
[root@manager ~]# mysql -h 192.168.247.100 -p
Enter password:
ERROR 1045 (28000): Access denied for user 'root'@'192.168.247.206' (using password: YES)
[root@manager ~]# mysql -h 192.168.247.100 -p
Enter password:
MySQL [(none)]> show databases;
+--------------------+
| Database           |
+--------------------+
| information_schema |
| mysql              |
| performance_schema |
| test               |
+--------------------+
4 rows in set (0.01 sec)
MySQL [(none)]> create database school;
Query OK, 1 row affected (0.00 sec)

MySQL [(none)]> use school;
Database changed
MySQL [school]> create table info (id int);
Query OK, 0 rows affected (0.03 sec)

MySQL [school]> desc info;
+-------+---------+------+-----+---------+-------+
| Field | Type    | Null | Key | Default | Extra |
+-------+---------+------+-----+---------+-------+
| id    | int(11) | YES  |     | NULL    |       |
+-------+---------+------+-----+---------+-------+
1 row in set (0.01 sec)

MySQL [school]>
此时查看现在的slave1(现在已经成为master)
mysql> show databases;
+--------------------+
| Database           |
+--------------------+
| information_schema |
| mysql              |
| performance_schema |
| school             |
| test               |
+--------------------+
5 rows in set (0.00 sec)

mysql> use school;
Reading table information for completion of table and column names
You can turn off this feature to get a quicker startup with -A

Database changed
mysql> desc info;
+-------+---------+------+-----+---------+-------+
| Field | Type    | Null | Key | Default | Extra |
+-------+---------+------+-----+---------+-------+
| id    | int(11) | YES  |     | NULL    |       |
+-------+---------+------+-----+---------+-------+
1 row in set (0.01 sec)

mysql> show tables;
+------------------+
| Tables_in_school |
+------------------+
| info             |
+------------------+
1 row in set (0.00 sec)

mysql>
查看slave2,已被同步,之前设置的是slave同步的是master:192.168.247.160,现在同步的是slave1:192.168.247.161
[root@slave2 ~]# mysql -uroot -p
Enter password:
Welcome to the MySQL monitor.  Commands end with ; or \g.

mysql> show databases;
+--------------------+
| Database           |
+--------------------+
| information_schema |
| mysql              |
| performance_schema |
| school             |
| test               |
+--------------------+
5 rows in set (0.00 sec)

mysql> use school;
Reading table information for completion of table and column names
You can turn off this feature to get a quicker startup with -A

Database changed
mysql> show tables;
+------------------+
| Tables_in_school |
+------------------+
| info             |
+------------------+
1 row in set (0.00 sec)

mysql> show slave status\G
*************************** 1. row ***************************
               Slave_IO_State: Waiting for master to send event
                  Master_Host: 192.168.247.161
                  Master_User: myslave
                  Master_Port: 3306
                Connect_Retry: 60
              Master_Log_File: master-bin.000002
          Read_Master_Log_Pos: 714
               Relay_Log_File: relay-log-bin.000002
                Relay_Log_Pos: 878
        Relay_Master_Log_File: master-bin.000002
             Slave_IO_Running: Yes
            Slave_SQL_Running: Yes
八:切换备选主库的算法
1.一般判断从库的是从(postion/GTID)判断优劣,数据有差异,最接近于master的slave,成为备选主。
2.数据一致的情况下,按照配置文件顺序,选择备选主库
3.设定有权重(candidate_master=1),按照权重强制指定备选主
- 默认情况下,如果一个slave落后master 100M 的relay logs的话,即使有权重,也会失效
- 如果check_repl_delay=0的话,即使落后很多日志,也强制选择其为备选主
九:安装过程中可能出现的故障