【IT168 应用】本文将指导大家如何使用Spring MVC3去构建一个Web应用。在Spring MVC中,所有的用户请求都会被派发到控制器模块,控制器然后再根据业务逻辑去调用数据访问层获得数据,最后通过JSP视图返回。
在动手之前,我们先准备好我们的环境,需要的是JDK 1.5以上以及Eclipse IDE,当然还要下载最新版本的Spring 3,本文还要下载最新版本的ant,以便我们学习如何通过ant去构建应用。
Spring MVC3构建Web应用第一步
首先在Eclipse中利用新建菜单,建立一个Dynamic Web Project(动态Web工程),命名为SampleSpringMVC,接下来,我们要建立一个ant.xml的文件,这个文件会方便我们把做好的程序打包成war文件,这个可以有如下几步去实现:
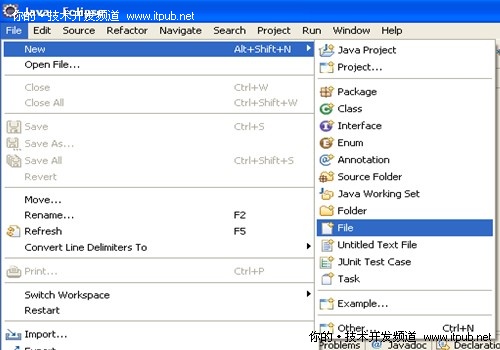
1、点文件—新建—文件,如下图:
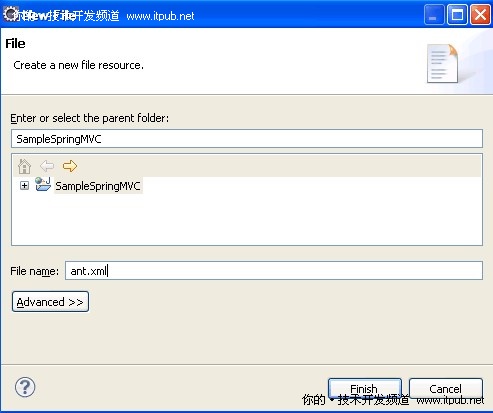
2、输入ant.xml作为文件名,并点完成。如下图:
3、打开ant.xml文件,编辑内容如下:
 <?
xml version
=
"
1.0
"
?>
<?
xml version
=
"
1.0
"
?>
2
3
<!--
Copyright : adobocode.com ,
2010
-->
4
5
<
project name
=
"
SampleSpringMVC
"
basedir
=
"
.
"
default
=
"
build
"
>
6
<
property file
=
"
ant.properties
"
/>
7
<
property name
=
"
src.dir
"
value
=
"
src
"
/>
8
<
property name
=
"
war.dir
"
value
=
"
war
"
/>
9
<
property name
=
"
build.dir
"
value
=
"
${war.dir}/WEB-INF/classes
"
/>
10
<
property name
=
"
deploy.path
"
value
=
"
${tomcat.home}/webapps
"
/>
11
<
property name
=
"
name
"
value
=
"
SampleSpringMVC
"
/>
12
13
<
path id
=
"
master-classpath
"
>
14
<
fileset dir
=
"
${war.dir}/WEB-INF/lib
"
>
15
<
include name
=
"
*.jar
"
/>
16
</
fileset
>
17
18
<
fileset dir
=
"
${tomcat.home}/lib
"
>
19
<
include name
=
"
servlet*.jar
"
/>
20
</
fileset
>
21
<
pathelement path
=
"
${build.dir}
"
/>
22
</
path
>
23
24
<
target name
=
"
build
"
description
=
"
Compile main source tree java files
"
>
25
<
echo
>
Building...
</
echo
>
26
<
mkdir dir
=
"
${build.dir}
"
/>
27
<
javac destdir
=
"
${build.dir}
"
failonerror
=
"
true
"
>
28
<
src path
=
"
${src.dir}
"
/>
29
<
classpath refid
=
"
master-classpath
"
/>
30
</
javac
>
31
</
target
>
32
33
<
target name
=
"
war-archiving
"
>
34
<
echo
>
Archiving...
</
echo
>
35
<
war destfile
=
"
${name}.war
"
webxml
=
"
${war.dir}/WEB-INF/web.xml
"
>
36
<
fileset dir
=
"
${war.dir}
"
>
37
<
include name
=
"
**/*.*
"
/>
38
</
fileset
>
39
</
war
>
40
</
target
>
41
42
<
target name
=
"
deploy
"
depends
=
"
build
"
>
43
<
echo
>
Deploying...
</
echo
>
44
<
copy todir
=
"
${deploy.path}
"
>
45
<
fileset dir
=
"
.
"
>
46
<
include name
=
"
*.war
"
/>
47
</
fileset
>
48
</
copy
>
49
</
target
>
50
51
</
project
>
Spring MVC3构建Web应用第二步
建立一个ant.properties文件,该文件会存放一些值的属性,并且这些值也会是ant.xml中用到的。请按如下步骤实现:
1)点文件—新建-文件
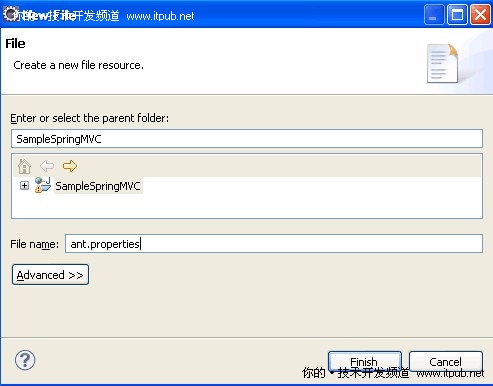
2) 将文件命名为ant.properties,并点完成,如下图:
3)打开ant.properties,修改tomcat.home的目录为你安装tomcat的实际目录。
tomcat.home
=
C:
/
Tools
/
apache
-
tomcat
-
6.0
.
2
2
 tomcat.lib
=
$
{tomcat.home}
/
lib
tomcat.lib
=
$
{tomcat.home}
/
lib
 tomcat.lib
下载下面列表的.jar文件,并放到SampleSpringMVC/war/WEB-INF/lib下。
commons
-
logging.jar2
jstl
-
api
-
1.2
.jar3
jstl.jar4
org.springframework.asm
-
3.0
.
5
.RELEASE.jar5
org.springframework.beans
-
3.0
.
5
.RELEASE.jar6
org.springframework.context
-
3.0
.
5
.RELEASE.jar7
org.springframework.core
-
3.0
.
5
.RELEASE.jar8
org.springframework.expression
-
3.0
.
5
.RELEASE.jar9
org.springframework.web
-
3.0
.
5
.RELEASE.jar10
org.springframework.web.servlet
-
3.0
.
5
.RELEASE.jar11
standard.jar
按如下修改web.xml:
<!--
Copyright : adobocode.com ,
2010
-->
2
3
<
web
-
app id
=
"
WebApp_ID
"
version
=
"
2.4
"
4
xmlns
=
"
http://java.sun.com/xml/ns/j2ee
"
xmlns:xsi
=
"
http://www.w3.org/2001/XMLSchema-instance
"
5
xsi:schemaLocation
=
"
http://java.sun.com/xml/ns/j2ee http://java.sun.com/xml/ns/j2ee/web-app_2_4.xsd
"
>
6
7
<
display
-
name
>
SampleSpringMVC
</
display
-
name
>
8
9
<
servlet
>
10
<
servlet
-
name
>
SampleSpringMVC
</
servlet
-
name
>
11
<
servlet
-
class
>
org.springframework.web.servlet.DispatcherServlet
</
servlet
-
class
>
12
<
load
-
on
-
startup
>
1
</
load
-
on
-
startup
>
13
</
servlet
>
14
15
<
servlet
-
mapping
>
16
<
servlet
-
name
>
SampleSpringMVC
</
servlet
-
name
>
17
<
url
-
pattern
>*
.htm
</
url
-
pattern
>
18
</
servlet
-
mapping
>
19
20
<
welcome
-
file
-
list
>
21
<
welcome
-
file
>
index.jsp
</
welcome
-
file
>
22
</
welcome
-
file
-
list
>
23
24
</
web
-
app
>
创建index.jsp,这个只需要在war/WEB-INF下建立即可,并且将内容设置为如下:
<%
@ page language
=
"
java
"
session
=
"
false
"
contentType
=
"
text/html; charset=UTF-8
"
%>
2
<%
@ taglib prefix
=
"
c
"
uri
=
"
http://java.sun.com/jsp/jstl/core
"
%>
3
<
html
>
4
<
head
>
5
<
title
>
Adobocode : Sample Spring MVC
</
title
>
6
</
head
>
7
<
body
>
8
<
h2
>
Adobocode : Hello World
</
h2
>
9
<
br
/>
10
<
a href
=
"
<c:url value=
"
personDisplay.htm
"
/>
"
>
Person List
</
a
>
11
</
body
>
12
</
html
>
Spring MVC3构建Web应用第三步
在SampleSpringMVC/war/WEB-INF中建立文件SampleSpringMVC-servlet.xml,并将内容修改如下:
<?
xml version
=
"
1.0
"
encoding
=
"
UTF-8
"
?>
2
3
<!--
Copyright : adobocode.com ,
2010
-->
4
5
<
beans xmlns
=
"
http://www.springframework.org/schema/beans
"
6
xmlns:xsi
=
"
http://www.w3.org/2001/XMLSchema-instance
"
7
xmlns:p
=
"
http://www.springframework.org/schema/p
"
8
xmlns:context
=
"
http://www.springframework.org/schema/context
"
9
xsi:schemaLocation
=
"
10
11
http:
//
www.springframework.org/schema/beans
12
13
http:
//
www.springframework.org/schema/beans/spring-beans-3.0.xsd
14
15
http:
//
www.springframework.org/schema/context
16
17
http:
//
www.springframework.org/schema/context/spring-context-3.0.xsd">
18
19
<
bean
class
=
"
org.springframework.web.servlet.mvc.annotation.DefaultAnnotationHandlerMapping
"
/>
20
21
<
bean
class
=
"
org.springframework.web.servlet.mvc.annotation.AnnotationMethodHandlerAdapter
"
/>
22
23
<
context:component
-
scan base
-
package
=
"
paul.sydney.controller
"
/>
24
25
<
context:component
-
scan base
-
package
=
"
paul.sydney.service
"
/>
26
27
<
bean id
=
"
viewResolver
"
class
=
"
org.springframework.web.servlet.view.InternalResourceViewResolver
"
>
28
<
property name
=
"
viewClass
"
><
value
>
org.springframework.web.servlet.view.JstlView
</
value
></
property
>
29
<
property name
=
"
prefix
"
><
value
>/
WEB
-
INF
/
jsp
/</
value
></
property
>
30<span


评论