一、Linux简要介绍
- Linux命令基础
- Linux命令帮助
- 目录与文件基本操作
Linux家族
- Redhat 红帽 三个认证 (开源但是不免费)---》社区(系统开发者)---》Centos(服务器端)
- Ubuntu 最好的客户端系统,开源纯免费(软件开发人群)
- Debian ---》kali Linux(专用工具资源占用很少) 树莓派
- suse Linux---》ISP(电信,移动,联通) 定制版
shell——Linux系统的一种特殊程序——“翻译官”
用户登录Linux系统时就自动加载一个shell程序,Bash是Linux系统中默认使用的shell程序
Linux的内核是由C语言开发出来的(面向过程的语言),应用程序是用c++开发
编译器—— gcc gcc-c++ jdk(Java的编译器)Python的编译器就是Python2/3
源码文件———》(编译器)——》执行文件
Linux命令的分类
- 内部命令
- 外部命令
通用的命令行使用格式:
命令字 [选项] [参数] (对应于操作、功能、操作对象)
- -单个字符的组合
- -- 单词
对root@localhost ~]# 的介绍
- root ——当前用户
- @ ——分隔符
- localhost ——主机名字
- ~ ——当前目录位置
- #——管理员
- $ ——普通用户
路径简介
绝对路径:例如——/etc/sysconfig/network-scripts/
相对路径(以当前所在位置的路径):例如——sysconfig/
家目录:管理员(/root) 普通用户(/home)
根目录: /
二、Linux命令集(结合实例)
cd:切换工作目录
pwd:查看当前所在的绝对目录路径
[root@lokott ~]# cd /etc/sysconfig/network-scripts/  //进入绝对路径下的文件夹
[root@lokott network-scripts]# pwd      //显示当前所在的目录的绝对路径
/etc/sysconfig/network-scripts
[root@lokott network-scripts]# cd - //返回上次进入的目录命令,即cd /etc/sysconfig/network-scripts/
/root
[root@lokott ~]# cd -
/etc/sysconfig/network-scripts
[root@lokott network-scripts]# cd ..    //返回上层目录
[root@lokott sysconfig]# cd ../../    //返回上两层目录
[root@lokott /]#
ls:显示当前目录的内容
- -l 显示文件详细信息
- -a 查看隐藏文件
- -A 查看除了. .. 的隐藏文件
- -d 显示本目录的信息
- -h 友好形式显示带有单位的信息
- -R 递归显示
- -- color 以颜色区分文件类型
- 黑色(数据文件)
- 蓝色(目录)
- 红色(压缩包)
- 绿色(执行文件/命令文件/脚本)
- 天蓝色(链接文件)
- 黄的(设备文件/磁盘文件)
[root@lokott ~]# ls
anaconda-ks.cfg  initial-setup-ks.cfg  note  shell  公共  模板  视频  图片  文档  下载  音乐  桌面
[root@lokott ~]# cd shell/
[root@lokott shell]# ls
1.sh  2.sh  3.sh  4.sh  5.sh  6.sh  hello
[root@lokott shell]# ls -a
.  ..  1.sh  2.sh  3.sh  4.sh  5.sh  6.sh  hello
[root@lokott shell]# ls -A
1.sh  2.sh  3.sh  4.sh  5.sh  6.sh  hello
[root@lokott shell]# ls -l
总用量 24
-rwxr-xr-x. 1 root root 111 10月 25 19:10 1.sh
-rwxr-xr-x. 1 root root 124 10月 25 19:12 2.sh
-rwxr-xr-x. 1 root root 192 10月 25 19:25 3.sh
-rwxr-xr-x. 1 root root 104 10月 25 19:33 4.sh
-rwxr-xr-x. 1 root root 147 10月 25 19:36 5.sh
-rwxr-xr-x. 1 root root  26 10月 25 19:37 6.sh
drwxr-xr-x. 2 root root  18 10月 30 13:53 hello
[root@lokott shell]# ls -R
.:
1.sh  2.sh  3.sh  4.sh  5.sh  6.sh  hello

./hello:
0.sh
[root@lokott shell]# ls -d
.
[root@lokott shell]# ls -ah
.  ..  1.sh  2.sh  3.sh  4.sh  5.sh  6.sh  hello

[root@lokott shell]# ls -lR
.:
总用量 24
-rwxr-xr-x. 1 root root 111 10月 25 19:10 1.sh
-rwxr-xr-x. 1 root root 124 10月 25 19:12 2.sh
-rwxr-xr-x. 1 root root 192 10月 25 19:25 3.sh
-rwxr-xr-x. 1 root root 104 10月 25 19:33 4.sh
-rwxr-xr-x. 1 root root 147 10月 25 19:36 5.sh
-rwxr-xr-x. 1 root root  26 10月 25 19:37 6.sh
drwxr-xr-x. 2 root root  18 10月 30 13:53 hello

./hello:
总用量 0
-rwxrwxrwx. 1 root root 0 10月 30 13:53 0.sh
[root@lokott shell]#
alias:给命令取一个别名
du:统计目录及文件空间占用情况
- -a
- -h 友好显示
- -s
which: 查找命令存放目录
- 搜索范围由环境变量PATH决定
mkdir:创建目录
- -p递归嵌套创建
touch:创建文件
[root@lokott shell]# alias c='clear'   //clear是表示清屏相当于Ctrl+l的操作
[root@lokott shell]# which c
alias c='clear'
    /usr/bin/clear
[root@lokott shell]# which clear
/usr/bin/clear
[root@lokott shell]# mkdir linux
[root@lokott shell]# ls
1.sh  2.sh  3.sh  4.sh  5.sh  6.sh  hello  linux
[root@lokott shell]# touch 0.sh
[root@lokott shell]# ls
0.sh  1.sh  2.sh  3.sh  4.sh  5.sh  6.sh  hello  linux
[root@lokott shell]# du -ah
4.0K    ./1.sh
4.0K    ./2.sh
4.0K    ./3.sh
4.0K    ./4.sh
4.0K    ./5.sh
4.0K    ./6.sh
0   ./hello/0.sh
0   ./hello
0   ./linux
0   ./0.sh
24K .
[root@lokott shell]# du -sh
24K .
[root@lokott shell]# du -as             //不可以设置选项为-as(h)
du: 不能既显示总用量,同时又显示每个项目
Try 'du --help' for more information.
[root@lokott shell]#
[root@lokott shell]# mkdir -p  /2019/2018/2017   //连续创建文件夹
[root@lokott shell]# cd /2019/2018/2017/
[root@lokott 2017]# touch {1..10}.txt  //..表示创建连续10个名为1-10的txt文件
[root@lokott 2017]# ls
10.txt  1.txt  2.txt  3.txt  4.txt  5.txt  6.txt  7.txt  8.txt  9.txt
下面的操作过程中会出现文件节点(inode值):文件在磁盘中存储的标识序列
ln:创建链接文件(类似于Windows系统的快捷方式)
- 软链接:相当于快捷方式 -s
- 硬链接:给文件取别名(无法创建硬链接文件夹)
[root@lokott shell]# ln -s 1.sh 8.sh
[root@lokott shell]# ln 1.sh 10.sh
[root@lokott shell]# ls -l
总用量 28
-rwxrwxrwx. 1 root root   0 10月 30 13:59 0.sh
-rwxr-xr-x. 2 root root 111 10月 25 19:10 10.sh  //硬链接
-rwxr-xr-x. 2 root root 111 10月 25 19:10 1.sh
-rwxr-xr-x. 1 root root 124 10月 25 19:12 2.sh
-rwxr-xr-x. 1 root root 192 10月 25 19:25 3.sh
-rwxr-xr-x. 1 root root 104 10月 25 19:33 4.sh
-rwxr-xr-x. 1 root root 147 10月 25 19:36 5.sh
-rwxr-xr-x. 1 root root  26 10月 25 19:37 6.sh
lrwxrwxrwx. 1 root root   4 10月 30 14:07 8.sh -> 1.sh  //软链接
drwxr-xr-x. 2 root root  18 10月 30 13:53 hello
drwxr-xr-x. 2 root root   6 10月 30 13:59 linux
[root@lokott shell]# ls -ih   //显示文件节点值的大小
19397655 0.sh  20564913 10.sh  20564913 1.sh  20564915 2.sh  20564917 3.sh  20564916 4.sh  20564918 5.sh  20564919 6.sh  19134334 8.sh  20565286 hello  35183604 linux
//上面文件左边的就是该文件的文件节点(inode值)软链接与源文件的文件节点是非一致的,而硬链接的文件节点与源文件是一致的
cp :复制文件或目录 源|目标
- -f 不询问
- -i 询问是否覆盖原有
- -p 保持源文件的用户权限不变,权限高用户使用
- -r 递归复制
rm:删除
- -i:默认提醒
- -rf :强制递归删除
mv:移动文件或目录
[root@lokott shell]# cd hello/
[root@lokott hello]# ls
0.sh
[root@lokott hello]# cp ../5.sh .
[root@lokott hello]# ls
0.sh  5.sh
[root@lokott hello]# cp -i ../5.sh .
cp:是否覆盖"./5.sh"? yes
[root@lokott hello]# cp -f ../5.sh .    //猜测被alias了
cp:是否覆盖"./5.sh"? y
[root@lokott hello]#
[root@lokott hello]# which cp     //查看cp命令果然是被alias更改了
alias cp='cp -i'
    /usr/bin/cp
[root@lokott hello]# cp -r ../linux/ .   //递归复制上层路径linux文件夹的所有内容到当前路径(目前无内容)
[root@lokott hello]# ls
0.sh  5.sh  linux
[root@lokott hello]# cd linux/
[root@lokott linux]# ls
[root@lokott linux]# mkdir 2020         //创建文件夹
[root@lokott linux]# ls
2020
[root@lokott linux]# cd 2020/
[root@lokott 2020]# touch 2.txt         //创建文件
[root@lokott 2020]# cd ../../
[root@lokott hello]# ls
0.sh  5.sh  linux
[root@lokott hello]# mv linux/ ../          //移动文件夹
mv:是否覆盖"../linux"? y
[root@lokott hello]# cd ..
[root@lokott shell]# ls
0.sh  10.sh  1.sh  2.sh  3.sh  4.sh  5.sh  6.sh  8.sh  hello  linux
[root@lokott shell]# ls -l linux/
总用量 0
drwxr-xr-x. 2 root root 19 10月 30 14:15 2020
[root@lokott shell]# cp -r linux/  hello/   //递归复制linux文件夹的所有内容到hello文件夹中
[root@lokott shell]# cd hello/
[root@lokott hello]# ls
0.sh  5.sh  linux
[root@lokott hello]# ls -l linux/
总用量 0
drwxr-xr-x. 2 root root 19 10月 30 14:16 2020
[root@lokott hello]# ls -lR linux/          //递归查看拷贝过来的文件夹的信息
linux/:
总用量 0
drwxr-xr-x. 2 root root 19 10月 30 14:16 2020

linux/2020:
总用量 0
-rw-r--r--. 1 root root 0 10月 30 14:16 2.txt
通配符
- ?表示一个
- *表示多个
find:查找文件或目录
find 【查找范围】【选项】[表达式]
- -name:根据目标名字查找
- -type:根据文件类型查找
- -size:根据大小查找
- -user:根据文件的用户所有者查找
[root@lokott hello]# find . -name "*.sh"  //*号表示通配符
./0.sh
./5.sh
[root@lokott hello]# find . -type f
./0.sh
./5.sh
./linux/2020/2.txt
[root@lokott hello]# find . -size -10k
.
./0.sh
./5.sh
./linux
./linux/2020
./linux/2020/2.txt
./ifcfg-ens33
[root@lokott hello]# find . -size -10k | du -ah
0   ./0.sh
4.0K    ./5.sh
0   ./linux/2020/2.txt
0   ./linux/2020
0   ./linux
4.0K    ./ifcfg-ens33
8.0K    .
centos7系统启动的命令清单
1. init 0 关机
2. init 1 单用户模式(系统维护,破解密码)
3. init 2 多用户模式无网络
4. init 3 多用户模式有网络  *
5. init 4 保留
6. init 5多用户模式图形化界面有网络
7. init 6 重启 (reboot)
三、Linux的目录结构
树形目录结构
/etc 管理员的家目录

/home 普通用户家目录

/bin 所有用户的命令文件目录

/sbin 管理员命令文件目录

/boot 启动分区(grub启动菜单,压缩内核等)

/usr 应用程序目录

/etc 配置文件目录

/var 可变长文件目录(日志)

/dev  设备文件目录(磁盘,光驱)

/tmp 临时文件

/proc 硬件信息(CPU 内存)

/lib 服务管理文件(systemctl)
查看文件内容命令
cat [] 文件名 ... :查看文件内容
more [] 文件名 .. :全屏方式分页显示文件内容
less [] 文件名 ... :more命令的扩展 END 可以查找 (man less进行查看,这边不是非常方便演示效果)
head 看文件开头一部分内容(默认为10行)
tail:看文件尾部的内容(默认10行)
[root@lokott hello]# cat ifcfg-ens33
TYPE="Ethernet"
PROXY_METHOD="none"
BROWSER_ONLY="no"
BOOTPROTO="dhcp"
DEFROUTE="yes"
IPV4_FAILURE_FATAL="no"
IPV6INIT="yes"
IPV6_AUTOCONF="yes"
IPV6_DEFROUTE="yes"
IPV6_FAILURE_FATAL="no"
IPV6_ADDR_GEN_MODE="stable-privacy"
NAME="ens33"
UUID="0d6ffef5-693f-4d48-88b5-d2e1a66cf9c4"
DEVICE="ens33"
ONBOOT="yes"
[root@lokott hello]# more ifcfg-ens33
TYPE="Ethernet"
PROXY_METHOD="none"
BROWSER_ONLY="no"
BOOTPROTO="dhcp"
DEFROUTE="yes"
IPV4_FAILURE_FATAL="no"
IPV6INIT="yes"
IPV6_AUTOCONF="yes"
IPV6_DEFROUTE="yes"
IPV6_FAILURE_FATAL="no"
IPV6_ADDR_GEN_MODE="stable-privacy"
NAME="ens33"
UUID="0d6ffef5-693f-4d48-88b5-d2e1a66cf9c4"
DEVICE="ens33"
ONBOOT="yes"
root@lokott hello]# head ifcfg-ens33
TYPE="Ethernet"
PROXY_METHOD="none"
BROWSER_ONLY="no"
BOOTPROTO="dhcp"
DEFROUTE="yes"
IPV4_FAILURE_FATAL="no"
IPV6INIT="yes"
IPV6_AUTOCONF="yes"
IPV6_DEFROUTE="yes"
IPV6_FAILURE_FATAL="no"
[root@lokott hello]# tail ifcfg-ens33
IPV4_FAILURE_FATAL="no"
IPV6INIT="yes"
IPV6_AUTOCONF="yes"
IPV6_DEFROUTE="yes"
IPV6_FAILURE_FATAL="no"
IPV6_ADDR_GEN_MODE="stable-privacy"
NAME="ens33"
UUID="0d6ffef5-693f-4d48-88b5-d2e1a66cf9c4"
DEVICE="ens33"
ONBOOT="yes"
统计文件内容
wc(默认全部统计)
- -l :统计行数
- -w:统计单词统计数
- -c:统计字节数
[root@lokott hello]# cat 5.sh
#!/bin/bash
read -p "please input a ip address!" ip
ping -c1 $ip &>/dev/null
if [ $? -eq 0 ]
then
    echo "$ip is up."
else
    echo "$ip is down"
fi
[root@lokott hello]# wc -l 5.sh
9 5.sh
[root@lokott hello]# wc -w 5.sh
30 5.sh
[root@lokott hello]# wc -c 5.sh
147 5.sh
[root@lokott hello]#
检索和过滤文件内容
grep命令:在文件中查找不显示包含指定字符串的行
- grep [options] PATTERN [FILE...]
- grep [options] [-e PATTERN | -f FILE] [FILE...]
- -i :忽略大小写
- -v:反转查找,输出与查找条件不相符的行
[root@lokott hello]# grep -i up 5.sh
    echo "$ip is up."
[root@lokott hello]# grep -v 'bash$' /etc/passwd
bin:x:1:1:bin:/bin:/sbin/nologin
daemon:x:2:2:daemon:/sbin:/sbin/nologin
adm:x:3:4:adm:/var/adm:/sbin/nologin
lp:x:4:7:lp:/var/spool/lpd:/sbin/nologin
sync:x:5:0:sync:/sbin:/bin/sync
shutdown:x:6:0:shutdown:/sbin:/sbin/shutdown
halt:x:7:0:halt:/sbin:/sbin/halt
mail:x:8:12:mail:/var/spool/mail:/sbin/nologin
operator:x:11:0:operator:/root:/sbin/nologin
games:x:12:100:games:/usr/games:/sbin/nologin
ftp:x:14:50:FTP User:/var/ftp:/sbin/nologin
nobody:x:99:99:Nobody:/:/sbin/nologin
systemd-network:x:192:192:systemd Network Management:/:/sbin/nologin
dbus:x:81:81:System message bus:/:/sbin/nologin
polkitd:x:999:998:User for polkitd:/:/sbin/nologin
abrt:x:173:173::/etc/abrt:/sbin/nologin
libstoragemgmt:x:998:996:daemon account for libstoragemgmt:/var/run/lsm:/sbin/nologin
rpc:x:32:32:Rpcbind Daemon:/var/lib/rpcbind:/sbin/nologin
colord:x:997:995:User for colord:/var/lib/colord:/sbin/nologin
saslauth:x:996:76:Saslauthd user:/run/saslauthd:/sbin/nologin
rtkit:x:172:172:RealtimeKit:/proc:/sbin/nologin
pulse:x:171:171:PulseAudio System Daemon:/var/run/pulse:/sbin/nologin
chrony:x:995:991::/var/lib/chrony:/sbin/nologin
rpcuser:x:29:29:RPC Service User:/var/lib/nfs:/sbin/nologin
nfsnobody:x:65534:65534:Anonymous NFS User:/var/lib/nfs:/sbin/nologin
ntp:x:38:38::/etc/ntp:/sbin/nologin
tss:x:59:59:Account used by the trousers package to sandbox the tcsd daemon:/dev/null:/sbin/nologin
usbmuxd:x:113:113:usbmuxd user:/:/sbin/nologin
geoclue:x:994:989:User for geoclue:/var/lib/geoclue:/sbin/nologin
qemu:x:107:107:qemu user:/:/sbin/nologin
radvd:x:75:75:radvd user:/:/sbin/nologin
setroubleshoot:x:993:988::/var/lib/setroubleshoot:/sbin/nologin
sssd:x:992:987:User for sssd:/:/sbin/nologin
gdm:x:42:42::/var/lib/gdm:/sbin/nologin
gnome-initial-setup:x:991:986::/run/gnome-initial-setup/:/sbin/nologin
sshd:x:74:74:Privilege-separated SSH:/var/empty/sshd:/sbin/nologin
avahi:x:70:70:Avahi mDNS/DNS-SD Stack:/var/run/avahi-daemon:/sbin/nologin
postfix:x:89:89::/var/spool/postfix:/sbin/nologin
tcpdump:x:72:72::/:/sbin/nologin
apache:x:48:48:Apache:/usr/share/httpd:/sbin/nologin
root@lokott hello]# grep -v 'bash$' /etc/passwd | wc -l  //将结果写入管道后用wc命令显示结果数量
40
[root@lokott hello]#
Ctrl + r 可以进行命令的搜索
[root@lokott hello]# vim ifcfg-ens33 用快捷键!进入下面的模式输入之前敲击过的命令会自动查找
(reverse-i-search)`v': vim ifcfg-ens33
压缩命令
gzip命令和bzip2命令:制作压缩文件、解压缩文件
- -9表示的是高压缩比
- -d进行解压缩
[root@lokott hello]# ls
0.sh  5.sh  ifcfg-ens33  linux
[root@lokott hello]# gzip -9 0.sh 5.sh
[root@lokott hello]# ls
0.sh.gz  5.sh.gz  ifcfg-ens33  linux
[root@lokott hello]# gzip -d 0.sh.gz
[root@lokott hello]# gzip -d 5.sh.gz
[root@lokott hello]# ls
0.sh  5.sh  ifcfg-ens33  linux
[root@lokott hello]# bzip2 -9 0.sh 5.sh
[root@lokott hello]# bzip2 -d 0.sh.bz2
[root@lokott hello]# bzip2 -d 5.sh.bz2
[root@lokott hello]# ls
0.sh  5.sh  ifcfg-ens33  linux
[root@lokott hello]#
tar命令:制作归档文件、释放归档文件
- -c:创建文件包
- -x:解压文件包
- -v:显示详细过程
- -f: 执行
- -p:保留原有权限
- -t:查看压缩包的内容
- -C:解压到某个地方去
- -z:gz格式
- -j:bz2格式
[root@lokott hello]# ls
0.sh 5.sh ifcfg-ens33 linux
[root@lokott hello]# tar czvf if.tar.gz ifcfg-ens33
ifcfg-ens33
[root@lokott hello]# ls
0.sh 5.sh ifcfg-ens33 if.tar.gz linux
[root@lokott hello]# tar xzvf if.tar.gz -C ../
ifcfg-ens33
[root@lokott hello]# cd ..
[root@lokott shell]# ls
0.sh 10.sh 1.sh 2.sh 3.sh 4.sh 5.sh 6.sh 8.sh hello ifcfg-ens33 linux
[root@lokott shell]#
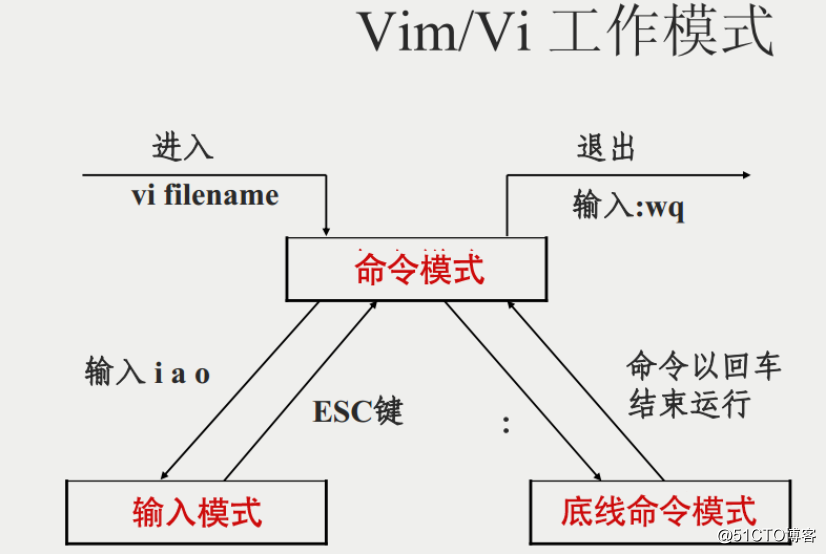
//如果是bz2格式就将文件格式的后缀名更换后用j替换z的命令四、文本编辑器vi/vim(对vim编辑器的熟练操作可以提高工作效率)
作用
- 创建或修改文本文件
- 维护Linux系统中的各种配置文件
命令模式、输入模式、末行模式(底线命令模式)转换关系和操作
vim编辑器的相关操作命令
行号设置操作
- :set nu
- :set nu!和:set nonu 取消行号 注意!!!记住切换为末行模式(底线命令模式)
定位行(命令模式下)
- gg:定位到开头
- G:定位到结尾
- 3G:3表示行号,定位到第三行
复制粘贴删除
- x:删除光标处的单个字符
- dd :删除当前光标所在行
- dw:删除光标所在位置的一个单词
- #dd :删除从光标所在行开始的#行内容
- ddp:上下行调换位置
- yy:复制改行到剪切板
- nyy:复制n行到剪切板
- p:粘贴
vim编辑器中的其他操作
shift+r 替换 在光标处进行替换
PG UP 向上翻页
PG DN 向下翻页
:e ~/install.log 打开新的文件进行编辑(末行模式下)
:r file——在编辑的数据中,读入另一个档案的数据。亦即将 『filename』 这个档案内容加到游标所在行后面(末行模式下)
:w /opt/test.txt 将该文件写入到opt下并且重新命名为test.txt文件但是不保持与源文件相同权限
:n1,n2s/word1/word2/g 在n1到n2行之间将所有的word1换为word2
:%s/word1/word2/g 将所有的word1换为word2