版权声明:本文为博主原创文章,遵循 CC 4.0 BY-SA 版权协议,转载请附上原文出处链接和本声明。
1、下载mysql5.7
下载地址:下载地址;提取码:xqh7
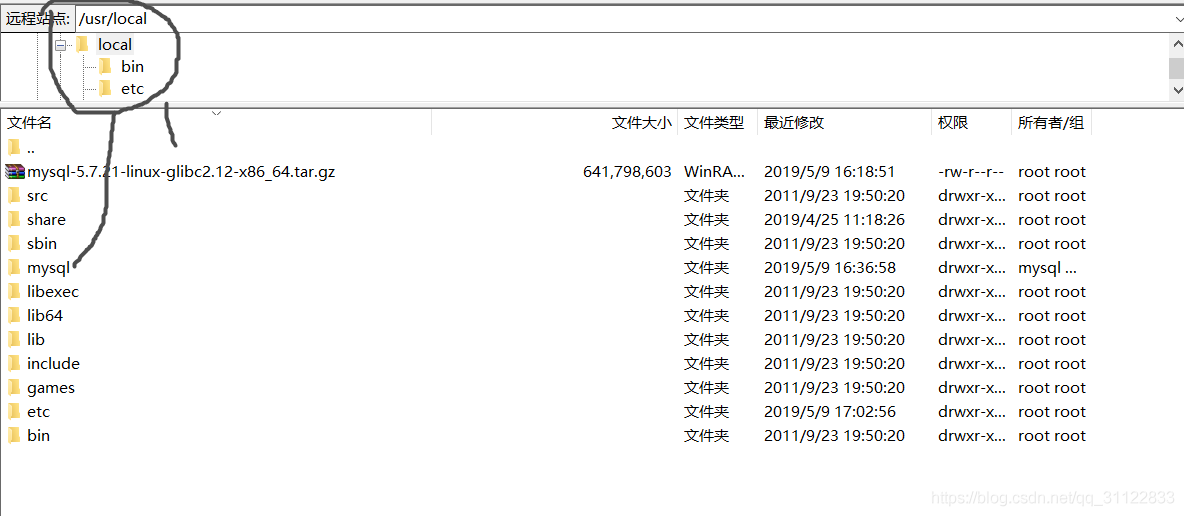
2、将下载好的压缩包上传至linux服务器
压缩包放在usr/local目录下
另外新加mysql目录放解压后的文件
3、#卸载系统自带的Mariadb
[root@localhost local]# rpm -qa|grep mariadb
mariadb-libs-5.5.52-1.el7.x86_64
[root@localhost local]# rpm -e --nodeps mariadb-libs-5.5.52-1.el7.x86_64
4、#删除etc目录下的my.cnf文件
[root@localhost local]# rm /etc/my.cnf
rm: 无法删除"/etc/my.cnf": 没有那个文件或目录
5、#检查mysql是否存在
[root@localhost local]# rpm -qa | grep mysql
[root@localhost local]#
6、#检查mysql组和用户是否存在,如无创建
[root@localhost local]# cat /etc/group | grep mysql
[root@localhost local]# cat /etc/passwd | grep mysql
7、#创建mysql用户组
[root@localhost local]# groupadd mysql
#创建一个用户名为mysql的用户并加入mysql用户组
[root@localhost local]# useradd -g mysql mysql
8、#制定password 为**************
[root@localhost local]# passwd mysql
更改用户 mysql 的密码 。
新的 密码:
重新输入新的 密码:
passwd:所有的身份验证令牌已经成功更新。
9、解压到指定文件夹下
tar -vxzf mysql-5.7.21-linux-glibc2.12-x86_64.tar.gz
mv mysql-5.7.21-linux-glibc2.12-x86_64/ /usr/local/mysql/
10、#更改所属的组和用户
[root@localhost local]# chown -R mysql mysql/
[root@localhost local]# chgrp -R mysql mysql/
11、#在mysql文件夹下创建 数据库数据存储目录 data
[root@localhost local]# cd mysql/
[root@localhost mysql]# mkdir data
[root@localhost mysql]# chown -R mysql:mysql data
12、#在etc下新建配置文件my.cnf,并在该文件内添加以下配置
[mysql]
# 设置mysql客户端默认字符集
default-character-set=utf8
[mysqld]
skip-name-resolve
#设置3306端口
port = 3306
# 设置mysql的安装目录
basedir=/usr/local/mysql
# 设置mysql数据库的数据的存放目录
datadir=/usr/local/mysql/data
# 允许最大连接数
max_connections=200
# 服务端使用的字符集默认为8比特编码的latin1字符集
character-set-server=utf8
# 创建新表时将使用的默认存储引擎
default-storage-engine=INNODB
lower_case_table_names=1
max_allowed_packet=16M
cp ./support-files/mysql.server /etc/init.d/mysqld
#将脚本文件设置成可执行文件
[root@localhost mysql]# chown 777 /etc/my.cnf
[root@localhost mysql]# chmod a+x /etc/init.d/mysqld
[root@localhost mysql]# killall mysqld
[root@localhost mysql]# /etc/init.d/mysqld start
Starting MySQL. SUCCESS!
[root@localhost mysql]# /etc/init.d/mysqld restart
Shutting down MySQL.. SUCCESS!
Starting MySQL. SUCCESS!
#设置开机启动
[root@localhost mysql]# chkconfig --level 35 mysqld on
[root@localhost mysql]# chkconfig --list mysqld
[root@localhost mysql]# chmod +x /etc/rc.d/init.d/mysqld
[root@localhost mysql]# chkconfig --add mysqld
[root@localhost mysql]# chkconfig --list mysqld
[root@localhost mysql]# service mysqld status
SUCCESS! MySQL running (6272)
#编辑 vi /etc/profile
export PATH=$PATH:/usr/local/mysql/bin
[root@localhost mysql]# source /etc/profile
#获得初始密码
[root@localhost bin]# cat /root/.mysql_secret
# Password set for user 'root@localhost' at 2018-03-07 20:15:37
hgfs1Z1uMw2=
修改密码
1、停止mysql服务
service mysql stop    # 停止 mysql 服务
Shutting down MySQL.. SUCCESS!

2、使用 mysqld_safe 来启动mysql服务
cd /usr/local/mysql/bin/
./mysqld_safe --skip-grant-tables
2018-03-02T07:49:52.491532Z mysqld_safe Logging to '/usr/local/mysql/data/CentOS.err'.
2018-03-02T07:49:52.528458Z mysqld_safe Starting mysqld daemon with databases from /usr/local/mysql/data

如上所示,执行 ./mysqld_safe --skip-grant-tables 后会暂停输出。其中 --skip-grant-tables 选项表示MySql服务器不加载权限判断,任何用户都能访问数据库。

3、然后另外打开一个终端窗口,免密码登录mysql
[root@CentOS bin]# ./mysql -u root -p
Enter password:                     # 此处为空密码

use mysql
flush privileges;
update mysql.user set authentication_string=password('newpassword') where user='root';
flush privileges;

Query OK, 0 rows affected (0.00 sec)
添加远程访问权限
#添加远程访问权限
[root@localhost ~]# mysql -u root -p
Enter password:
Welcome to the MySQL monitor.  Commands end with ; or \g.
Your MySQL connection id is 2
Server version: 5.7.21 MySQL Community Server (GPL)

Copyright (c) 2000, 2018, Oracle and/or its affiliates. All rights reserved.

Oracle is a registered trademark of Oracle Corporation and/or its
affiliates. Other names may be trademarks of their respective
owners.

Type 'help;' or '\h' for help. Type '\c' to clear the current input statement.

mysql> use mysql

Reading table information for completion of table and column names
You can turn off this feature to get a quicker startup with -A

Database changed

mysql> update user set host='%' where user='root';
Query OK, 1 row affected (0.00 sec)
Rows matched: 1  Changed: 1  Warnings: 0

mysql> select host,user from user;
+-----------+---------------+
| host      | user          |
+-----------+---------------+
| %         | root          |
| localhost | mysql.session |
| localhost | mysql.sys     |
+-----------+---------------+
3 rows in set (0.00 sec)
#这里 @‘%’ 表示在任何主机都可以登录
mysql> create user 'xxx'@'%' identified by '123';
Query OK, 0 rows affected (0.00 sec)
#重启mysql
[root@localhost init.d]# ./mysqld restart
Shutting down MySQL.. SUCCESS!
Starting MySQL. SUCCESS!
#为了在任何目录下可以登录mysql
[root@localhost init.d]# ln -s /usr/local/mysql/bin/mysql   /usr/bin/mysql
测试截图:
