睡一觉醒来,看到微信公众号推送的一篇鸡汤文,叫做《不会,我可以学!!!》深受鼓舞,回顾这些年,每天忙于业务开发,留给自己的学习时间并不多,一直很仰慕那些大牛们,梦想着自己有一天也能成为同样牛逼的人物,无奈只是一个普普通通的码农,但是梦想总是要有的,万一哪天实现了呢?
言归正传,还是回到小程序的话题上,随着Vue这两年的火爆,前后端完全分离的设计模式已经深入人心了,微信小程序就是该模式下的典型应用,至于该模式有什么优势,我就不说了,随便搜一下都能检索出来大量的文章,那么接下来的篇幅,就介绍一下小程序的前端代码。
关于小程序项目结构,框架介绍,组件说明等,请查看微信小程序官方文档,关于以下贴出来的代码部分我只是截取了一些片段,方便说明问题,如果需要查看完整源代码,可以在我的项目库中下载:
https://dev.tencent.com/u/dwBurning/p/ReallyWantToApi/git
https://git.dev.tencent.com/dwBurning/LazyOrders.git
前后端完全分析,按理一定会涉及到http请求跨域的问题,但是小程序通过wx.request发起请求的时候,并未涉及到跨域,为何?其实想想也知道,wx.request肯定不是通过ajax直接发请求到你的服务器的,而是先把请求交给微信的服务端,然后再由微信的服务端转发请求到你的服务器,每一个请求都在微信服务端做了中转,当然这个是小程序正式发布上线后的实现,那么,本地开发的时候是怎么解决这个问题的呢?
本地开发的时候,我搭建的http站点都是直接在本地跑的,也没有固定IP,用微信小程序的开发工具照样能拿到请求的数据,且没有跨域,这就要研究一下这个开发工具了,打开微信小程序开发工具的安装目录,你会发现里边有一个node.exe的文件,启动开发工具的时候,在进程中能找到node.exe的进程,关于这个进程的描述,写的很清楚,Node.js;JavaScript服务端到这里真相已经明了。
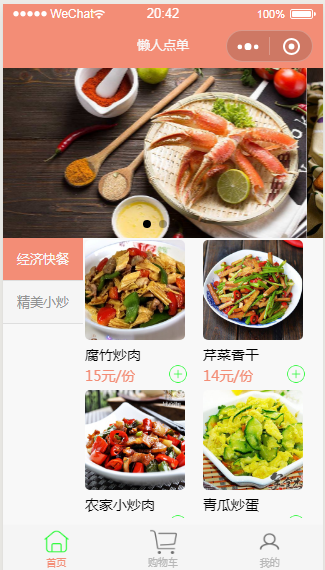
解决了跨域的问题,我们来看看首页的前端代码,如下图所示,首页分为三个部分,上边的轮播,左边导航,右边菜单

轮播是微信小程序提供的组件swiper,直接拿示例代码,改一改就是了
  <!-- swiper 轮播图片 -->
  <view class="top">
    <swiper class="swiper" indicator-dots="true" autoplay="true" interval="5000" duration="1000">
      <block wx:for="{{movies}}" wx:for-index="index">
        <swiper-item>
          <image src="{{item.url}}" class="slide-image" mode="aspectFill" />
        </swiper-item>
      </block>
    </swiper>
  </view>
  /**
   * 页面的初始数据
   */
  data: {
    movies: [{
        url: app.globalData.url + '?fileName=1.jpg'
      },
      {
        url: app.globalData.url + '?fileName=2.jpg'
      },
      {
        url: app.globalData.url + '?fileName=3.jpg'
      }
    ],
    navLeftItems: [],
    navRightItems: [],
    curNav: 1,
    curIndex: 0
  },
左边导航是菜单的分类,右边显示了这个分类下的菜单明细,这个就涉及到我们的实体设计了,通过我们的swagger界面接口测试http://localhost:8089/api/Category,可以拿到接口的数据,下面我先贴出来,只关注前端的同学或者没有.Net开发环境的同学,可以直接在JS文件中贴上去,就可以预览到效果了。
此段的重点就在数组下标的绑定:data-index="{{index}}",
每一次点击通过JQuery获取到这个index:index = parseInt(e.target.dataset.index),
然后右边就绑定这个数组下标对应得数据:<block wx:for="{{navRightItems[curIndex].Menus}}">


{
  "Code": 0,
  "Message": "Success",
  "Context": [
    {
      "CategoryId": 1,
      "CategoryName": "经济快餐",
      "Menus": [
        {
          "MenuId": 1,
          "CategoryId": 1,
          "MenuName": "腐竹炒肉",
          "ImgPath": "http://localhost:8089/api/lazyorders?fileName=11.jpg",
          "Price": 15
        },
        {
          "MenuId": 2,
          "CategoryId": 1,
          "MenuName": "芹菜香干",
          "ImgPath": "http://localhost:8089/api/lazyorders?fileName=12.jpg",
          "Price": 14
        },
        {
          "MenuId": 3,
          "CategoryId": 1,
          "MenuName": "农家小炒肉",
          "ImgPath": "http://localhost:8089/api/lazyorders?fileName=13.jpg",
          "Price": 18
        },
        {
          "MenuId": 4,
          "CategoryId": 1,
          "MenuName": "青瓜炒蛋",
          "ImgPath": "http://localhost:8089/api/lazyorders?fileName=14.jpg",
          "Price": 14
        }
      ]
    },
    {
      "CategoryId": 2,
      "CategoryName": "精美小炒",
      "Menus": [
        {
          "MenuId": 5,
          "CategoryId": 2,
          "MenuName": "茄子煲",
          "ImgPath": "http://localhost:8089/api/lazyorders?fileName=25.jpg",
          "Price": 28
        },
        {
          "MenuId": 6,
          "CategoryId": 2,
          "MenuName": "小龙虾",
          "ImgPath": "http://localhost:8089/api/lazyorders?fileName=26.jpg",
          "Price": 88
        }
      ]
    }
  ]
}
/**
   * 生命周期函数--监听页面加载
   */
  onLoad: function(options) {
    var _this = this;
    util.checkSession();
    wx.request({
      url: app.globalData.urlCategory,
      success: function(res) {
        _this.setData({
          navLeftItems: res.data.Context,
          navRightItems: res.data.Context
        })
      }
    })

  },

  //事件处理函数
  switchRightTab: function(e) {
    // 获取item项的id,和数组的下标值
    let id = e.target.dataset.id,
      index = parseInt(e.target.dataset.index);
    // 把点击到的某一项,设为当前index
    this.setData({
      curNav: id,
      curIndex: index
    })
  },
<!--左侧栏-->
    <view class="nav_left">
      <block wx:for="{{navLeftItems}}">
        <view class="nav_left_items {{curNav == item.CategoryId ? 'active' : ''}}" bindtap="switchRightTab" data-index="{{index}}" data-id="{{item.CategoryId}}">
          {{item.CategoryName}}
        </view>
      </block>
    </view>

    <!--右侧栏-->
    <view class="nav_right">
      <scroll-view scroll-y="true" style="height: 100%">
        <block wx:for="{{navRightItems[curIndex].Menus}}">

          <view class="nav_right_items">
            <navigator url="details/details?menuId={{item.MenuId}}">
              <image class='nav_right_items_image' src="{{item.ImgPath}}"></image>
            </navigator>
            <text>{{item.MenuName}}</text>
            <text class='price_text'>{{item.Price}}元/份</text>
            <navigator url="details/details?menuId={{item.MenuId}}">
              <image class='add_image' src='/images/add.png'></image>
            </navigator>
          </view>

        </block>

      </scroll-view>

    </view>
前端的设计就完成了,当然还有CSS相关的代码,因为有完整的源代码,这里就不贴了,贴一下对应的C#实体类吧!
/// <summary>
/// 分类
/// </summary>
public class Category
{
    /// <summary>
    /// 主键ID
    /// </summary>
    public int CategoryId { get; set; }

    /// <summary>
    /// 分类 类别名
    /// </summary>
    public string CategoryName { get; set; }

    /// <summary>
    /// 该类别下的菜单
    /// </summary>
    public List<Menu> Menus { get; set; }
}

/// <summary>
/// 菜单表
/// </summary>
public class Menu
{
    /// <summary>
    /// 菜单ID
    /// </summary>
    public int MenuId { get; set; }

    /// <summary>
    /// 类别ID
    /// </summary>
    public int CategoryId { get; set; }

    /// <summary>
    /// 菜单名
    /// </summary>
    public string MenuName { get; set; }

    /// <summary>
    /// 对应的图片路径
    /// </summary>
    public string ImgPath { get; set; }

    /// <summary>
    /// 单价
    /// </summary>
    public decimal Price { get; set; }
}