实验环境
三节点的社区版Openstack环境
controller:172.16.1.100
computer:172.16.1.131
cinder:172.16.1.132
这里三个节点使用的IP地址为Openstack的管理地址
ceph1:172.16.1.128
ceph2:172.16.1.129
ceph3:172.16.1.130
我这里使用的Openstack云平台跟ceph分布式集群均为手动搭建的测试环境
使用rbd方式为云平台提供存储
(1)image:保存glance中的映像文件
(2)volume存储:保存cinder的volume;保存创建虚拟机时选择创建新卷;
(3)vms存储:保存创建虚拟机时不选择创新卷;
首先在云平台安装rbd相关软件(云平台三个节点上全部安装)
yum install -y python-rbd
yum install -y ceph-common
#在ceph的控制节节点创建三个POOL
ceph osd pool create volumes 128
ceph osd pool create images 128
ceph osd pool create vms 128
#初始化POOL
rbd pool init volumes
rbd pool init images
rbd pool init vms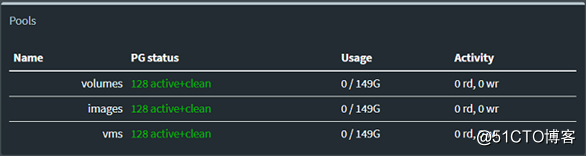
将ceph的配置文件导入到云平台的三个节点
在ceph集群的控制节点上执行
sudo ssh [email protected]  tee /etc/ceph/ceph.conf </etc/ceph/ceph.conf
sudo ssh [email protected]  tee /etc/ceph/ceph.conf </etc/ceph/ceph.conf
sudo ssh [email protected]  tee /etc/ceph/ceph.conf </etc/ceph/ceph.conf
创建ceph用户和密钥
查询用户,写入文件
#ceph auth get-or-create client.glance | ssh [email protected]  tee /etc/ceph/ceph.client.glance.keyring
#ssh [email protected] chown glance:glance /etc/ceph/ceph.client.glance.keyring
#ceph auth get-or-create client.cinder | ssh [email protected]  tee /etc/ceph/ceph.client.cinder.keyring
#ssh [email protected]  chown cinder:cinder /etc/ceph/ceph.client.cinder.keyring
#ceph auth get-or-create client.cinder-backup    |     ssh [email protected]  tee  /etc/ceph/ceph.client.cinder-backup.keyring
#ssh [email protected]  chown cinder:cinder /etc/ceph/ceph.client.cinder-backup.keyring
#ceph auth get-key client.cinder | ssh [email protected] tee client.cinder.key
接下来与云平台进行对接
以下操作在openstack的控制节点上执行
ceph与glance对接
```**
#更改glance默认存储为ceph
#修改/etc/glance/glance-api.conf文件,添加一下内容
[DEFAULT]
default_store = rbddefault_store = rbd
show_image_direct_url = True
show_image_direct_url = True
[glance_store]
#stores = file,http
#default_store = file
#filesystem_store_datadir = /var/lib/glance/images/
stores = rbd
default_store = rbd
rbd_store_pool = images
rbd_store_user = glance
rbd_store_ceph_conf = /etc/ceph/ceph.conf
rbd_store_chunk_size = 8
#重启服务
systemctl restart openstack-glance-api openstack-glance-registry
**ceph与nova对接,在computer节点上操作
使用uuidgen获取密钥信息**
编辑一个secret.xml文档
<secret ephemeral='no' private='no'>
<uuid>545ec73d-06b8-462e-8494-cbf1317dbc1a</uuid>
<usage type='ceph'>
<name>client.cinder secret</name>
</usage>
</secret>
virsh secret-define --file secret.xml
virsh secret-set-value --secret 545ec73d-06b8-462e-8494-cbf1317dbc1a --base64 AQAVkeJcqR2/GxAAtuPMq1MqF5wUBYTeDuDuiw==
注意--base64后面要跟的参数为ceph.client.cinder.keyring文件中的密钥信息,在cinder节点中将信息复制到此处
**如果openstack有多个计算节点,所有的计算节点节点使用同一个UUID来进行标识
virsh secret-list 使用命令进行查看**

**在computer节点的ceph配置文件里添加一下内容**[client]
rbd cache = true
rbd cache writethrough until flush = true
admin socket = /var/run/ceph/guests/$cluster-$type.$id.$pid.$cctid.asok
log file = /var/log/qemu/qemu-guest-$pid.log
rbd concurrent management ops = 20
[client.cinder]
keyring = /etc/ceph/ceph.client.cinder.keyring
#重启服务
systemctl restart libvirtd.service openstack-nova-compute.service
**ceph与cinder对接**
#修改/etc/cinder/cinder.conf配置文件,注意:将之前的lvm的配置都删掉
[DEFAULT]
#enabled_backends = lvm
enabled_backends = ceph
[ceph]
volume_driver = cinder.volume.drivers.rbd.RBDDriver
rbd_pool = volumes
rbd_ceph_conf = /etc/ceph/ceph.conf
rbd_flatten_volume_from_snapshot = false
rbd_max_clone_depth = 5
rbd_store_chunk_size = 4
rados_connect_timeout = -1
glance_api_version = 2
rbd_user = cinder
rbd_secret_uuid = ff2e1190-30f5-4849-9c1c-886b1e1ee181
#重启服务
systemctl restart openstack-cinder-volume.service

**在执行命令时如果出现下面的命令则说明认证信息出现错误,需要把ceph.client.admin.keyring文件拷贝到控制节点下。**创建一个新的虚拟机映像
glance image-create --name cirros_image --disk-format=qcow2 --container-format=bare < cirros-0.3.1-x86_64-disk.img
创建一个2G大小的cinder卷组
cinder create --display-name ceph-volume01 --display-description "cinder volume on CEPH storage" 2
**创建完之后可以在ceph集群的控制台看到Pools选项下面出现volumes以及images池**

**然后登录云平台进行虚拟机创建**

