实现64位操作系统的问题解决系列:(二)undefined reference to xxxx
问题出现
在实现64位操作系统的问题解决系列:(一)https://blog.csdn.net/m0_37329910/article/details/89633342 中已经出现过连接器找不到所需函数的符号的问题,从而导致链接失败,当时的做法时,把所需要的函数直接在 printk.c
中重写,这样的话自然是不存在链接问题。不过这只是折中的解决方法,在后面的实践中会发现,类似的问题会大量出现,比如下面所示,大量的符号链接器找不到,总不能全部都重写到相应的文件里吧。源程序的作者是在centos6上实践的,作者认为是ubuntu上的gcc版本太高,所以导致这些内核程序在高版本下编译出现问题。
$make
...........
ld -b elf64-x86-64 -z muldefs -o system head.o main.o printk.o -T Kernel.lds
main.o: In function `zj_sys_vector_init':
main.c:(.text+0x14a): undefined reference to `divide_error'
main.c:(.text+0x168): undefined reference to `set_trap_gate'
main.c:(.text+0x177): undefined reference to `debug'
main.c:(.text+0x195): undefined reference to `set_trap_gate'
main.c:(.text+0x1a4): undefined reference to `nmi'
main.c:(.text+0x1c2): undefined reference to `set_intr_gate'
main.c:(.text+0x1d1): undefined reference to `int3'
main.c:(.text+0x1ef): undefined reference to `set_system_gate'
main.c:(.text+0x1fe): undefined reference to `overflow'
main.c:(.text+0x21c): undefined reference to `set_system_gate'
问题产生的原因
其实就是一个常识,在ubuntu上编译c程序,是有一个原则的:
内联函数的链接错误,简单来说就是内联函数的使用应该在函数能够看得见的地方使用,最简单的就是在什么地方定义就在什么地方使用,不要跑到别的文件去调用。直接看例子:
zj@zj-virtual-machine:~/bochs_prj/64os$ gcc tmp2.c -o tmp2
/tmp/ccRHI6hl.o: In function `main':
tmp2.c:(.text+0xa): undefined reference to `hello'
collect2: error: ld returned 1 exit status
zj@zj-virtual-machine:~/bochs_prj/64os$ cat tmp2.c
#include <stdio.h>
#include "tmp2.h"


int main(){
    hello();
    return 0;
}
zj@zj-virtual-machine:~/bochs_prj/64os$ cat tmp2.h
#ifndef _TMP1_H
#define _TMP1_H
#include <stdlib.h>
inline void hello(){
    printf("hello world!\n");
}
#endif
从上面的例子能看到,其实就是内联函数出了问题,解决方案有两个。
解决方案
方法一
内联函数声明为static类型即可,见如下例子:
zj@zj-virtual-machine:~/bochs_prj/64os$ gcc tmp2.c -o tmp2
zj@zj-virtual-machine:~/bochs_prj/64os$ ./tmp2
hello world!
zj@zj-virtual-machine:~/bochs_prj/64os$ cat tmp2.h
#ifndef _TMP1_H
#define _TMP1_H
#include <stdlib.h>
static inline void hello(){
    printf("hello world!\n");
}
#endif
编译能通过,程序运行后正确输出。
方法二
在头文件如果内联函数不声明为static的话,就要在引用该内联函数符号的文件里面用extern ....声明这个内联函数符号,具体如下:
zj@zj-virtual-machine:~/bochs_prj/64os$ cat tmp1.c
#include <stdio.h>
#include "tmp1.h"

extern void hello();

int main(){
    hello();
    return 0;
}
zj@zj-virtual-machine:~/bochs_prj/64os$ cat tmp1.h
#ifndef _TMP1_H
#define _TMP1_H
#include <stdlib.h>
inline void hello(){
    printf("hello world!\n");
}
#endif
zj@zj-virtual-machine:~/bochs_prj/64os$ ./tmp1
hello world!
64位操作系统中问题该问题的解决
我采用的是上面的方法一来解决的,就是在内联函数前面加上static
下面是一个批量加static的shell命令,如下:
在相应的目录下使用
xxx$ sed -i "s/inline/static inline/g" `grep inline -rl ./`
再检查一下:
zj@zj-virtual-machine:~/bochs_prj/64os/4-5-symbol/kernel$ find ./ -name "*" | xargs grep "inline"
grep: ./: Is a directory
./lib.h:static inline void list_init(struct List * list)
./lib.h:static inline void list_add_to_behind(struct List * entry,struct List * new)	////add to entry behind
./lib.h:static inline void list_add_to_before(struct List * entry,struct List * new)	////add to entry behind
./lib.h:static inline void list_del(struct List * entry)
./lib.h:static inline long list_is_empty(struct List * entry)
./lib.h:static inline struct List * list_prev(struct List * entry)
./lib.h:static inline struct List * list_next(struct List * entry)
./lib.h:static inline void * memcpy(void *From,void * To,long Num)
./lib.h:static inline int memcmp(void * FirstPart,void * SecondPart,long Count)
./lib.h:static inline void * memset(void * Address,unsigned char C,long Count)
./lib.h:static inline char * strcpy(char * Dest,char * Src)
./lib.h:static inline char * strncpy(char * Dest,char * Src,long Count)
./lib.h:static inline char * strcat(char * Dest,char * Src)
./lib.h:static inline int strcmp(char * FirstPart,char * SecondPart)
./lib.h:static inline int strncmp(char * FirstPart,char * SecondPart,long Count)
./lib.h:static inline int strlen(char * String)
./lib.h:static inline unsigned long bit_set(unsigned long * addr,unsigned long nr)
./lib.h:static inline unsigned long bit_get(unsigned long * addr,unsigned long nr)
./lib.h:static inline unsigned long bit_clean(unsigned long * addr,unsigned long nr)
./lib.h:static inline unsigned char io_in8(unsigned short port)
./lib.h:static inline unsigned int io_in32(unsigned short port)
./lib.h:static inline void io_out8(unsigned short port,unsigned char value)
./lib.h:static inline void io_out32(unsigned short port,unsigned int value)
./gate.h:static inline void set_intr_gate(unsigned int n,unsigned char ist,void * addr)
./gate.h:static inline void set_trap_gate(unsigned int n,unsigned char ist,void * addr) //static is added by zj
./gate.h:static inline void set_system_gate(unsigned int n,unsigned char ist,void * addr)
./gate.h:static inline void set_system_intr_gate(unsigned int n,unsigned char ist,void * addr)	//int3
能够看到全部都加上了static
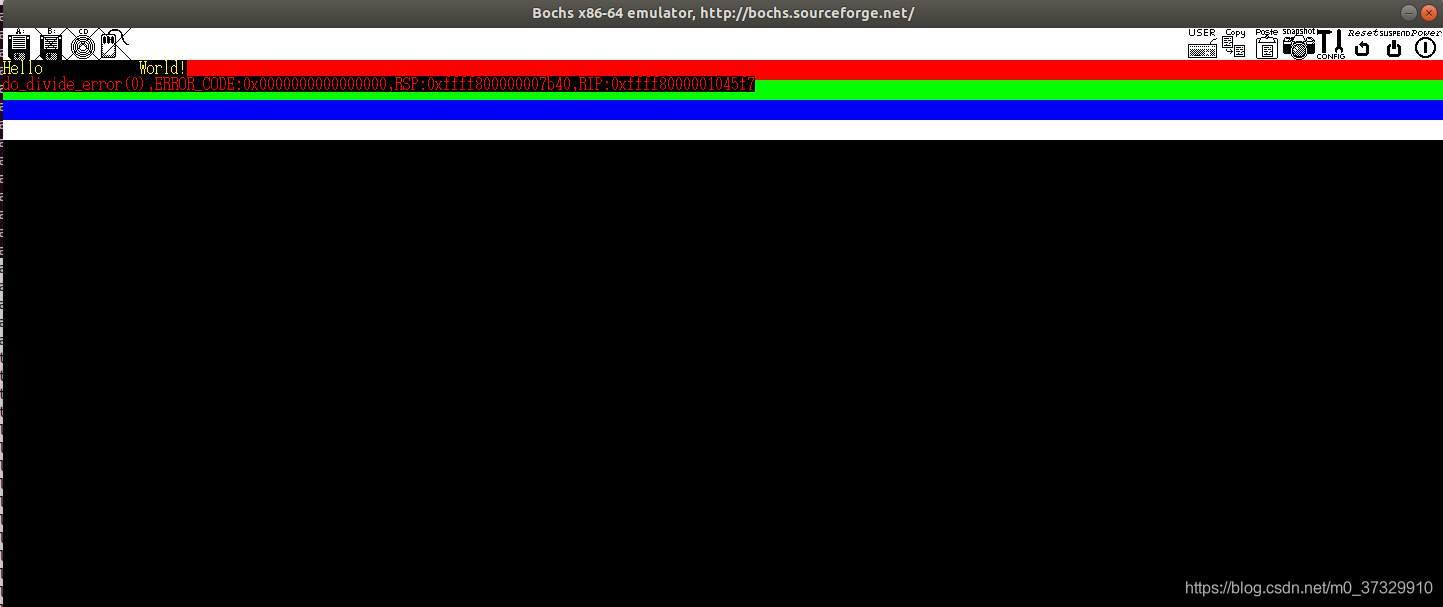
接下来,就可以重新编译了,其结果示意图如下:
备注
如有其它问题,请留言一起讨论,一起进步。