目录
转发请注明出处:https://www.cnblogs.com/guangze/p/10753929.html
1. 介绍
最近,因为需要对 Kubernetes 进行二次开发,接触了 client-go 库。client-go 作为官方维护的 go 语言实现的 client 库,提供了大量的高质量代码帮助开发者编写自己的客户端程序,来访问、操作 Kubernetes 集群。 在学习过程中我发现,除了官方的几个 examples 和 README 外,介绍 client-go 的文章较少。因此,这里有必要总结一下我的学习体会,分享出来。
访问 Kubernetes 集群的方式有多种(见 Access Clusters Using the Kubernetes API ),但本质上都要通过调用 Kubernetes REST API 实现对集群的访问和操作。比如,使用最多 kubernetes 命令行工具 kubectl,就是通过调用 Kubernetes REST API 完成的。当执行 kubectl get pods -n test 命令时, kubectl 向 Kubernetes API Server 完成认证、并发送 GET 请求:
GET /api/v1/namespaces/test/pods
---
200 OK
Content-Type: application/json
{
  "kind": "PodList",
  "apiVersion": "v1",
  "metadata": {"resourceVersion":"10245"},
  "items": [...]
}
那么如何编写自己的 http 客户端程序呢? 这就需要 Kubernetes 提供的 Golang client 库。
本文通过解读 Kubernetes client-go 官方例子之一 Create, Update & Delete Deployment ,详细介绍 client-go 原理和使用方法。该例子实现了创建、更新、查询、删除 deployment 资源。
2. 运行测试
2.1 测试环境
- Ubuntu 18.04.2
- Minikube 1.0.0
- golang 1.12.4
- k8s.io/client-go 源码
- GoLand IDE
下载 Minikube release 地址:https://github.com/kubernetes/minikube/releases
下载 k8s.io/client-go 源码:https://github.com/kubernetes/client-go
client-go 源码下载后,使用 go mod vendor 下载依赖库,或直接从github上下载依赖的其他库(如果没有设置外网代理的话)。
2.2 运行结果
因为我自己开了 VPN 连接到远程的 Kubernetes 集群内网,并复制 .kube/config 到了本地,所以我可以直接在 GoLand 上编译运行,就能看到如下输出:
Creating deployment...
Created deployment "demo-deployment".
-> Press Return key to continue.

Updating deployment...
Updated deployment...
-> Press Return key to continue.

Listing deployments in namespace "default":
 * demo-deployment (1 replicas)
 * intended-quail-fluentbit-operator (1 replicas)
 * test (1 replicas)
-> Press Return key to continue.

Deleting deployment...
Deleted deployment.

Process finished with exit code 0
在运行过程中,你也可以通过 kubectl 命令观察创建的 deployment 变化。可以看到,这个 example 分别完成了四个操作:

- 在 default namespace 下创建了一个叫 demo-deployment 的 deployment
- 更新该 deployment 的副本数量、修改容器镜像版本到 nginx:1.13
- 列出 default namespace 下的所有 deployment
- 删除创建的 demo-deployment
3. 原理解析
完成 deployment 资源的增删改查,大体可以分为以下几个步骤。这个流程对访问其他 Kubernete 资源也是一样的:
- 通过 kubeconfig 信息,构造 Config 实例。该实例记录了集群证书、 API Server 地址等信息;
- 根据 Config 实例携带的信息,创建 http 客户端;
- 向 apiserver 发送请求,创建 Kubernetes 资源等
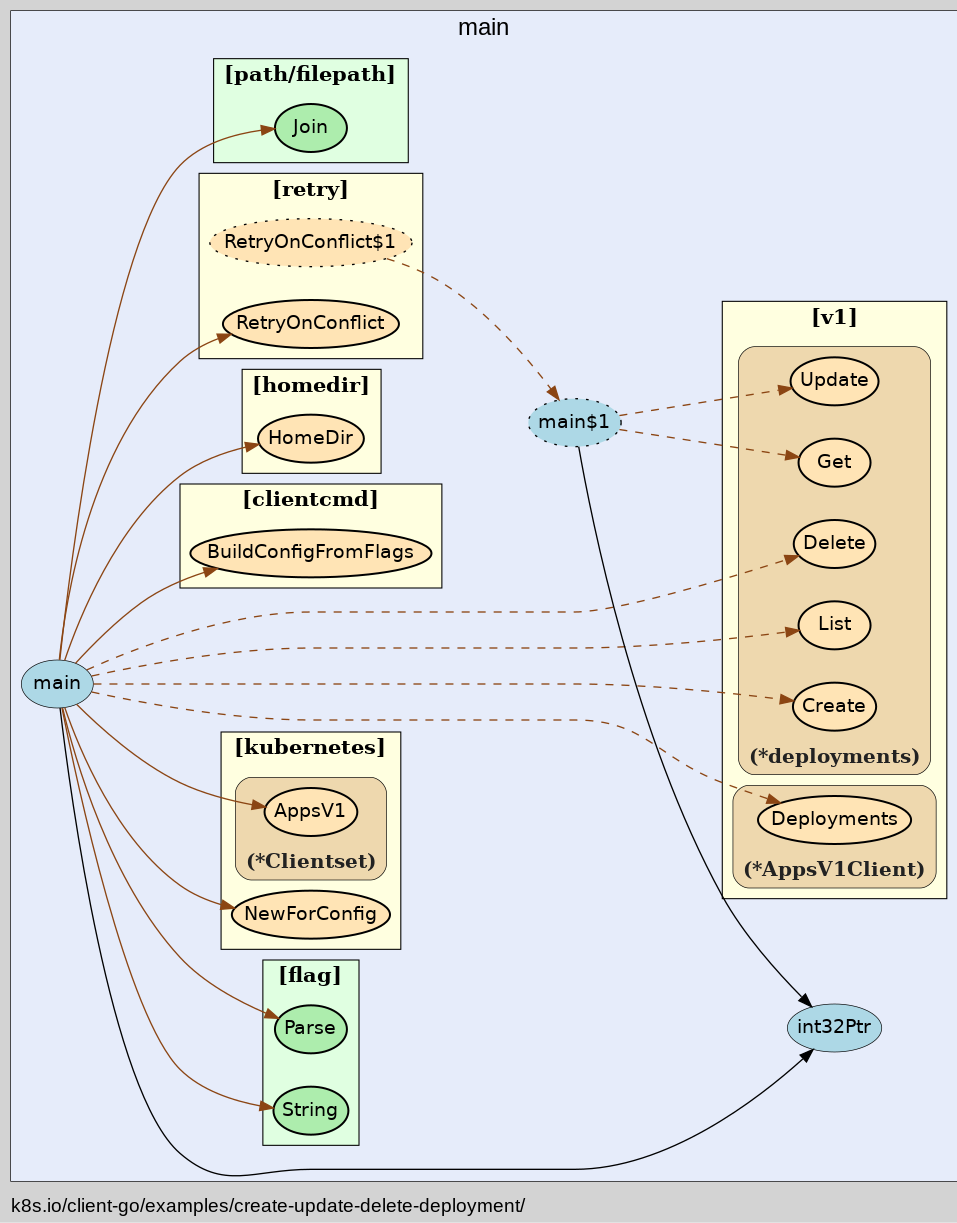
我用 go-callvis 制作了 example 中的函数调用图,以供参考:
3.1 获取 kubeconfig 信息,并构造 rest#Config 实例
Note: 我用 <package>#<func, struct> 表示某包下的函数、结构体
在访问 Kubernetes 集群时,少不了身份认证。使用 kubeconfig 配置文件是其中一种主要的认证方式。kubeconfig 文件描述了集群(cluster)、用户(user)和上下文(context)信息。默认的 kubeconfig 文件位于 $HOME/.kube/config 下。可以通过 cat $HOME/.kube/config, 或者 kubectl config view 查看:
apiVersion: v1
kind: Config
clusters:
- cluster:
    certificate-authority-data: DATA+OMITTED
    server: https://192.168.0.8:6443
  name: cluster.local
contexts:
- context:
    cluster: cluster.local
    user: kubernetes-admin
  name: [email protected]
users:
- name: kubernetes-admin
  user:
    client-certificate-data: REDACTED
    client-key-data: REDACTED
current-context: [email protected]
preferences: {}
我的测试环境 kubeconfig 配置显示,集群 API Server 地址位于 192.168.0.8:6443,集群开启 TLS,certificate-authority-data 指定公钥。客户端用户名为 kubernetes-admin,证书为 client-certificate-data,通过私钥 client-key-data 访问集群。上下文参数将集群和用户关联了起来。关于 kubeconfig 的更多介绍可以参考 [kubernetes中kubeconfig的用法]。(https://www.cnblogs.com/charlieroro/p/8489515.html)
源码中,kubeconfig 变量记录了 kubeconfig 文件路径。通过 BuildConfigFromFlags 函数返回了一个 rest#Config 结构体实例。该实例记录了 kubeconfig 文件解析、处理后的信息。
var kubeconfig *string
if home := homedir.HomeDir(); home != "" {
  kubeconfig = flag.String("kubeconfig", filepath.Join(home, ".kube", "config"), "(optional) absolute path to the kubeconfig file")
} else {
  kubeconfig = flag.String("kubeconfig", "", "absolute path to the kubeconfig file")
}
flag.Parse()

config, err := clientcmd.BuildConfigFromFlags("", *kubeconfig)
if err != nil {
  panic(err)
}
BuildConfigFromFlags 函数是如何实例化 Config 结构体的呢?
首先,BuildConfigFromFlags 函数接受一个 kubeconfigPath 变量,然后在内部依次调用如下函数:
func NewNonInteractiveDeferredLoadingClientConfig(loader ClientConfigLoader, overrides *ConfigOverrides) ClientConfigfunc (config *DeferredLoadingClientConfig) ClientConfig() (*restclient.Config, error)
func BuildConfigFromFlags(masterUrl, kubeconfigPath string) (*restclient.Config, error) {
  if kubeconfigPath == "" && masterUrl == "" {
    ...
  }
  return NewNonInteractiveDeferredLoadingClientConfig(
    &ClientConfigLoadingRules{ExplicitPath: kubeconfigPath},
    &ConfigOverrides{ClusterInfo: clientcmdapi.Cluster{Server: masterUrl}}).ClientConfig()
}
我们来看看这两个链式调用的函数都做了哪些工作:
3.1.1 tools/clientcmd#NewNonInteractiveDeferredLoadingClientConfig
func NewNonInteractiveDeferredLoadingClientConfig(loader ClientConfigLoader, overrides *ConfigOverrides) ClientConfig {
  return &DeferredLoadingClientConfig{loader: loader, overrides: overrides, icc: &inClusterClientConfig{overrides: overrides}}
}
返回值:
- 返回一个
tools/clientcmd#DirectClientConfig类型的实例。
DeferredLoadingClientConfig 结构体是 ClientConfig 接口的一种实现。主要工作是确保装载的 Config 实例使用的是最新 kubeconfig 数据(对于配置了多个集群的,export KUBECONFIG=cluster1-config:cluster2-config,需要执行 merge)。虽然本例子中还感受不到 Deferred Loading 体现在何处。源码注释中有这样一段话:
It is used in cases where the loading rules may change after you've instantiated them and you want to be sure that the most recent rules are used. This is useful in cases where you bind flags to loading rule parameters before the parse happens and you want your calling code to be ignorant of how the values are being mutated to avoid passing extraneous information down a call stack
参数列表:
loader ClientConfigLoader:
我的测试环境是通过单一的路径
$HOME/.kube/config获取 kubeconfig。但 kubeconfig 可能由不只一个配置文件 merge 而成,loader 确保在最终创建 Config 实例时,使用的是最新的 kubeconfig。loader 的 ExplicitPath 字段记录指定的 kubeconfig 文件路径,Precedence 字符串数组记录要 merge 的 kubeconfig 信息。这也是为什么返回值叫 Deferred Loading ClientConfig。loader 接受一个 ClientConfigLoader 接口实现,比如:
&ClientConfigLoadingRules{ExplicitPath: kubeconfigPath}(这里是地址类型,因为是 *ClientConfigLoadingRules 实现了 ClientConfigLoader 接口,而不是 ClientConfigLoadingRules)。overrides *ConfigOverrides:
overtrides 保存用于强制覆盖 Config 实例的信息。本例中没有用到。
3.1.2 (*DeferredLoadingClientConfig).ClientConfig()
上一个函数返回了 ClientConfig 接口实例。这里调用 ClientConfig 接口定义的 ClientConfig() 方法。ClientConfig() 工作是解析、处理 kubeconfig 文件里的认证信息,并返回一个完整的 rest#Config 实例。
// 错误处理省略
func (config *DeferredLoadingClientConfig) ClientConfig() (*restclient.Config, error) {
  mergedClientConfig, err := config.createClientConfig()
  ...

  // load the configuration and return on non-empty errors and if the
  // content differs from the default config
  mergedConfig, err := mergedClientConfig.ClientConfig()
  ...

  // check for in-cluster configuration and use it
  if config.icc.Possible() {
    klog.V(4).Infof("Using in-cluster configuration")
    return config.icc.ClientConfig()
  }

  // return the result of the merged client config
  return mergedConfig, err
}
这个函数主要有两个重要部分:
1.mergedClientConfig, err := config.createClientConfig()
内部执行遍历 kubeconfig files (如果有多个), 对每个 kubeconfig 执行 LoadFromFile 返回 tools/clientcmd/api#Config 实例。api#Config 顾名思义 api 包下的 Config,是把 kubeconfig (eg. $HOME/.kube/config) 序列化为一个 API 资源对象。
现在,我们看到了几种结构体或接口命名相似,不要混淆了:
- api#Config:序列化 kubeconfig 文件后生成的对象
- tools/clientcmd#ClientConfig:负责用 api#Config 真正创建 rest#Config。处理、解析 kubeconfig 中的认证信息,有了它才能创建 rest#Config,所以命名叫 ClientConfig
- rest#Config:用于创建 http 客户端
对于 merge 后的 api#Config,调用 NewNonInteractiveClientConfig 创建一个 ClientConfig 接口的实现。
2.mergedConfig, err := mergedClientConfig.ClientConfig()
真正创建 rest#Config 的地方。在这里解析、处理 kubeconfig 中的认证信息。
3.2 创建 ClientSet
// NewForConfig creates a new Clientset for the given config.
config, err := clientcmd.BuildConfigFromFlags("", *kubeconfig)
if err != nil {
  panic(err)
}
ClientSet 是一个重要的对象。它就是负责访问集群 apiserver 的客户端。那为什么叫 ClientSet 呢? 说明 Client 不止一个。比如 deployment 的 extensions/v1beta1、apps/v1beta、最新的 apps/v1 有多种版本(API Group),每种都有一个 Client 用于创建该版本的 deployment
// Clientset contains the clients for groups. Each group has exactly one
// version included in a Clientset.
type Clientset struct {
  ...
  appsV1                       *appsv1.AppsV1Client
  appsV1beta1                  *appsv1beta1.AppsV1beta1Client
  appsV1beta2                  *appsv1beta2.AppsV1beta2Client
  ...
  extensionsV1beta1            *extensionsv1beta1.ExtensionsV1beta1Client
}
3.3 创建一个 default 命名空间下的 apps/v1#deployment 资源
3.3.1 创建 deploymentsClient
创建 apps/v1 版本的 deployment,首先获得该版本的 client。
deploymentsClient := clientset.AppsV1().Deployments(apiv1.NamespaceDefault)3.3.2 构造一个 apps/v1#deployment 实例
deployment := &appsv1.Deployment{
  ObjectMeta: metav1.ObjectMeta{
    Name: "demo-deployment",  // 指定 deployment 名字
  },
  Spec: appsv1.DeploymentSpec{
    Replicas: int32Ptr(2), // 指定副本数
    Selector: &metav1.LabelSelector{  // 指定标签
      MatchLabels: map[string]string{
        "app": "demo",
      },
    },
    Template: apiv1.PodTemplateSpec{ // 容器模板
      ObjectMeta: metav1.ObjectMeta{
        Labels: map[string]string{
          "app": "demo",
        },
      },
      Spec: apiv1.PodSpec{
        ...
      },
    },
  },
}
3.3.3 向 apiserver 发送 POST 创建 deployment
有兴趣的朋友可以进一步看源码这里是如何实现 http client 的。
result, err := deploymentsClient.Create(deployment)

---

// Create takes the representation of a deployment and creates it.  Returns the server's representation of the deployment, and an error, if there is any.
func (c *deployments) Create(deployment *v1.Deployment) (result *v1.Deployment, err error) {
  result = &v1.Deployment{}
  err = c.client.Post().
    Namespace(c.ns).
    Resource("deployments").
    Body(deployment).
    Do().
    Into(result)
  return
}
至此,一个 deployment 就创建完成了。删、改、查操作也是一样。
4. 总结
要搞彻底清楚 client-go,一方面要多查看 K8s 的 API 文档,另一方建议用 GoLand 单步调试,搞清楚每一步的含义。