版权声明:尊重原创! https://blog.csdn.net/weixin_42675488/article/details/89191588
| 正常流程: | |
|---|---|
| 1.0、在app.js里正常调用,拿到 res.userInfo 用户的信息 | |
| 2.0、在loading里完成用户授权,拿到全局的用户信息 globalData.userInfo | |
3.0、在loading里调用函数 login(),执行 wx.login() ,向后台传一个 code, 然后再拿到后台传过来的用户 openid ,最后再做 if 判断 openid !== null,执行调用 4.0 函数 |
|
4.0、在loading里调用函数 bindSearchChange(),最后执行信息上传,完成用户信息上传 |
|
| 5.0、通过拿到每个列表的id 和 用户openid,再进行列表详情的数据传递,拿到不同详情的数据 | |
| —— | |
| 小程序 wx.login() 地址 | |
| 小程序登录、获取用户信息、openid和unionid详解(大官人博客) |
总结下整个openid、session_key获取的流程:
     1、注册微信小程序、登录后台在设置中获得appId 和 secret(密钥)

     2、调用 wx.login() 接口获取登录凭证 js_code  --------------- 详见 2.2、loading

	 3、调用 wx.request() 接口把 js_code 发送到服务器后台

	 4、在服务器后台,已知appId、secret、js_code,向后台传递用户信息,再缓存,或者直接从后台缓存用户信息

| 文章目录 | |
|---|---|
| 1、获取用户信息,接收、传递、返回、输出 | |
| 2、获取红包id和用户id,做列表跳转和接收数据 |
1.0、app.js调出loading页面: 会全局调用该方法
wx.getSetting - 判断用户是否已授权,没有则跳转到 loading 页面执行授权;
- app.globalData.userInfo - 可以全局使用
const app = getApp()
App({
    onLaunch: function () {
        // 展示本地存储能力
        var logs = wx.getStorageSync('logs') || []
        logs.unshift(Date.now())
        wx.setStorageSync('logs', logs)

        /**
         * 获取用户唯一凭证openId
        */
        wx.login({
            success: res => {
                // 发送 res.code 到后台换取 openId, sessionKey, unionId
            }
        })

        // 获取用户当前的授权状态
        wx.getSetting({
            success: res => {
                if (res.authSetting['scope.userInfo']) {
                    // 已经授权,可以直接调用 getUserInfo 获取头像昵称,不会弹框

                    wx.getUserInfo({
                        success: res => {
                            // 可以将 res 发送给后台解码出 unionId
                            this.globalData.userInfo = res.userInfo

                            // 由于 getUserInfo 是网络请求,可能会在 Page.onLoad 之后才返回
                            // 所以此处加入 callback 以防止这种情况
                            if (this.userInfoReadyCallback) {
                                this.userInfoReadyCallback(res)
                            }
                        }
                    })
                } else {
                    // 刚开始没有授权,重定向到 loading 启动页
                    wx.navigateTo({
                        url: '/pages/loading/index'
                    })
                }
            }
        })
    },
    //出口
    globalData: {
        userInfo: null
    }
})
2.0、loading - 创建弹出授权窗口,小程序 button 有具体参数:
创建loading页面 - 现在需要用户点击按钮才能弹出授权窗,从而获取用户信息
<view class="enter-container">
  <button class="enter-button" type='primary' lang="zh_CN" wx:if="{{canIUse}}" open-type="getUserInfo" bindgetuserinfo="getUserInfo" >开启授权
  </button>
</view>
2.1、loading - 先通过app.js 获取到用户信息,然后执行要向后台传code获取用户标识的函数 login():
- openid 如果为空,则向后台传递用户信息 和 拿到的openid,并将返回的信息保存到本地;
- 如果不为空,则通过openid查询用户信息,并保存到本地; 这两点是 login()函数的步骤
(代码有分具体步骤)
const app = getApp()
Page({
	data: {
		// 判断按钮是否可用
        canIUse: wx.canIUse('button.open-type.getUserInfo'),
        // 要传入到后台的信息
        openid: '',
        name: '',
        headimg: '',
        nickName: ''
	},
    getUserInfo: function (e) {
        var that = this
        //0、将获取的用户信息赋值给全局 userInfo 变量,再跳回之前页
        if (e.detail.userInfo) {

            //1.0 拿到传入用户信息
            app.globalData.userInfo = e.detail.userInfo
            //console.log(e.detail.userInfo)
            wx.navigateTo({
                url: '/pages/index/index'
            })
            console.log('授权成功');

            //2.0 调用获取标识的函数方法:
            that.login();

        } else {
            wx.showToast({
                title: '授权失败,请重新授权',
                icon: 'none',
                duration: 1000
            });
            console.log('授权失败');
        }
    },
 })
2.2、loading - 通过wx.login()获取code,并向后台传递,拿到后台返回的openid;有 2 个步骤,先查询,失败则向后台传入信息;
-
向后台传code,从而获取到后台传过来的用户标识openid,先通过id查询用户是否存在,存在则保存在本地; -
1、getQueryUserInfo() 函数 -
将wx.login() 得到的用户信息的数据传到 data() 里面,这样 bindSearchChange() 函数就可以拿到用户信息向后台传递了; -
2、bindSearchChange() 函数
login: function (res) {
    var that = this;
    // 拿到用户信息
    var urerinfo = app.globalData.userInfo;
    //console.log(app.globalData.userInfo)
    wx.login({
        success: function (res) {
            var code = res.code;
            //console.log(app.globalData.userInfo)

            console.log('获取用户登录凭证:' + res.code)
            //发送请求
            wx.request({
                url: 'http://192.168.1.116:8088/wx/wxLogin', //接口地址
                data: { code: res.code},
                method: 'POST',
                header: {
                    'content-type': 'application/json' //默认值
                },
                success: function (res) {
                    //3.0 判断openid是否为null
                    if (res.statusCode == 200) {
                        if (res.data.openid != null) {

                            // 把获取到的信息放到data存储
                            that.setData({
                                openid: res.data.openid,
                                name: urerinfo.nickName,
                                headimg: urerinfo.avatarUrl
                            });
                            //4.0 调用保存用户信息的方法
                            that.getQueryUserInfo(res.data.openid);

                            // 打印openid
                            console.log("获取到的openid为:" + res.data.openid)

                        } else {
                            console.log("没有获取到的openid");
                        }
                    } else {
                        console.log("code授权失败");
                    }
                },
                complete: function (res) {}
            })
        }
    })

},
2.3、loading - getQueryUserInfo() 查询用户数据是否已存在,如果是则将需要的信息缓存下来:
设置用户缓存 - 是为了在列表被点击后通过红包id 和 用户id 拿到各自对应的数据;可以被全局用到;
注意 var that = this 的用法
getQueryUserInfo: function(openid){  //通过openid查询用户数据,并缓存到本地
    var that = this;
    app.func.req('/user/findUserByOpenId', { 'openId': openid }, function (res) {
        if (res.data.code == 200) {

            if (res.data.data != null) {
                // 添加缓存
                wx.setStorage({
                    key: 'getHeadImg',
                    data: res.data.data.headImg
                });
                wx.setStorage({
                    key: 'getNickName',
                    data: res.data.data.nickName
                });

                wx.setStorage({
                    key: 'getUserId',
                    data: res.data.data.id
                });

                wx.getStorage({
                    key: 'getHeadImg',
                    success: function (res) {
                        console.log("本地获取的图像是:" + res.data)
                    },
                });
                wx.getStorage({
                    key: 'getNickName',
                    success: function (res) {
                        //console.log("本地获取的昵称是:" + res.data)
                    },
                });
                console.log("查到用户信息");
            } else {
                //5.0 重新获取用户openid
                wx.showToast({
                    title: '上传信息中',
                    icon: 'loading',
                    duration: 1000,
                })
                that.bindSearchChange();
            }

        }
    })
},
2.4、loading - 数据库没有该用户信息,执行 bindSearchChange() 函数,这一步是传入用户信息,并拿到返回的信息,缓存到本地:
创建所需要传入到后台的变量,通过app.func.req() 封装好的接口向后台传值;
- 设置用户缓存 - 异步缓存;
wx.getStorage(OBJECT):
从本地缓存中异步获取指定 key 对应的内容;
wx.setStorage(OBJECT):
将数据存储在本地缓存中指定的 key 中,会覆盖掉原来该 key 对应的内容
bindSearchChange: function (res) { //7.0 将用户信息传入到后台
    var that = this
    // 传值
    app.func.req('/user/addUser', {
    	openId: that.data.openid,
    	headImg: that.data.headimg,
    	nickName: that.data.name 	}, function (res) {
        if (res.data.code == 200) {

            if (res.data.data != null) {
                // 添加缓存
                wx.setStorage({
                    key: 'getHeadImg',
                    data: res.data.data.headImg
                });
                wx.setStorage({
                    key: 'getNickName',
                    data: res.data.data.nickName
                });
                wx.setStorage({
                    key: 'getUserId',
                    data: res.data.data.id
                });

                wx.getStorage({
                    key: 'getUserId',
                    success: function (res) {
                        console.log("本地获取的id是:" + res.data)
                    },
                });
                wx.getStorage({
                    key: 'getNickName',
                    success: function (res) {
                        //console.log("本地获取的昵称是:" + res.data)
                    },
                });
                console.log("添加用户信息");
            } else {  //添加用户信息
                console.log("用户信息查询失败");
                that.getUserInfo();
            }

        }
        // 打印
        console.log(res.data.code);
        console.log(res.data.msg);
    })
},
- 2、完成上面的步骤后,我们就可以在缓存中拿到用户的openid了,然后通过 navigator 列表拿到列表的id,这样子页面就拿到红包id 和 用户id,完成数据对接:
列表页:
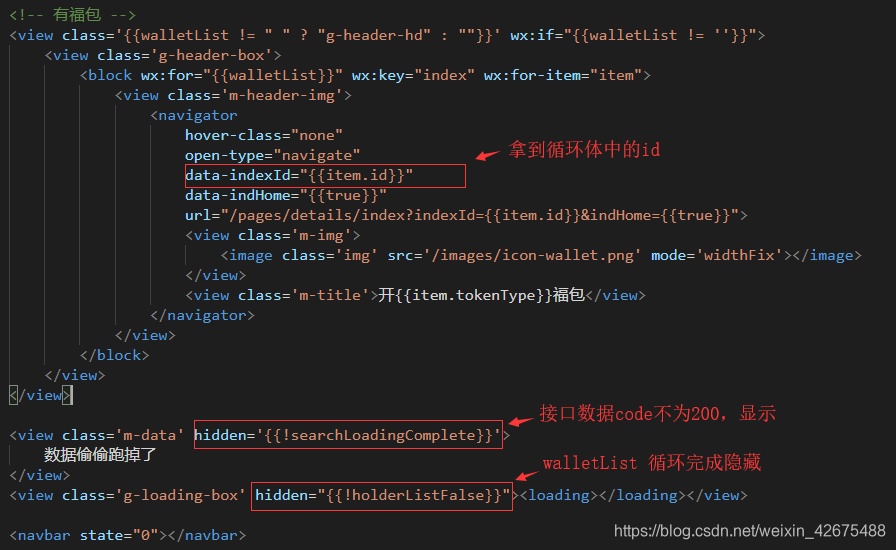
详情页:
var app = getApp();
var Api = require("../../utils/util.js");
Page({
/**
* 页面的初始数据
*/
data: {
userid: {}, //用户id
userOpenId: {}, //红包id
indHomeFalse: true, //首页传过来的值
packetUserList: [],
packetUserInfo: [],
// 状态
searchLoadingWere: false, //数据完成
searchLoadingComplete: false,//数据出错
searchLoading: false, //下拉提示
},
onShow: function () {
},
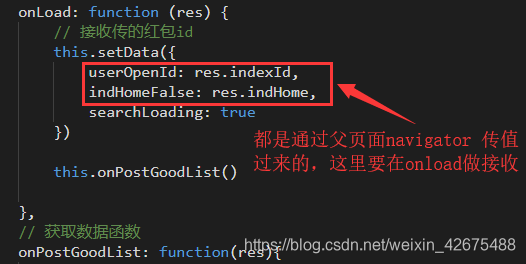
onLoad: function (res) {
// 接收传的红包id
this.setData({
userOpenId: res.indexId,
indHomeFalse: res.indHome,
searchLoading: true
})
this.onPostGoodList()
},
// 获取数据函数
onPostGoodList: function(res){
var that = this;
wx.showToast({
title: '正在加载数据',
icon: 'loading',
duration: 2000
})
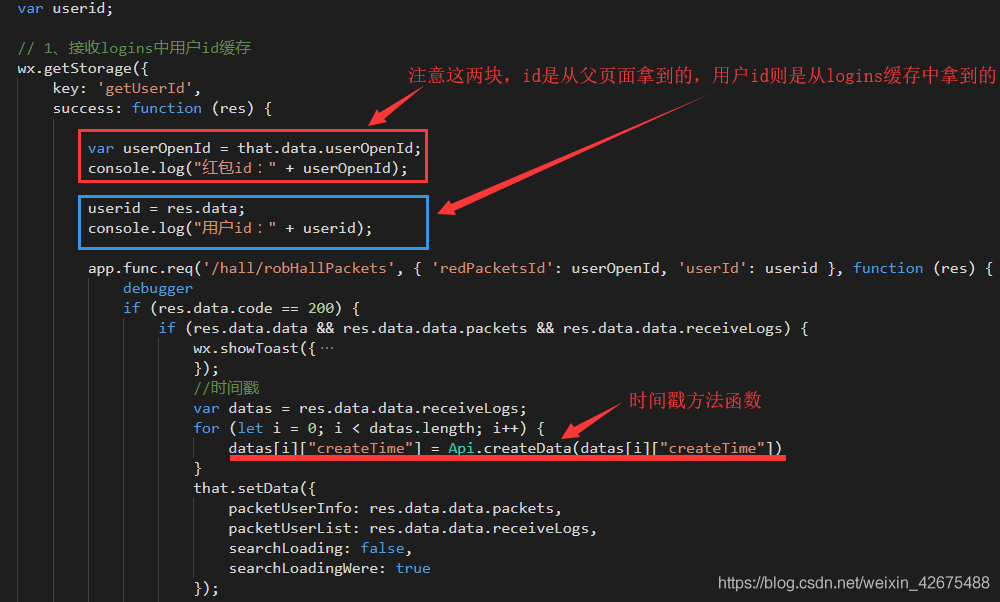
var userid;
// 1、接收logins中用户id缓存
wx.getStorage({
key: 'getUserId',
success: function (res) {
var userOpenId = that.data.userOpenId;
console.log("红包id:" + userOpenId);
userid = res.data;
console.log("用户id:" + userid);
app.func.req('/hall/robHallPackets', { 'redPacketsId': userOpenId, 'userId': userid }, function (res) {
debugger
if (res.data.code == 200) {
if (res.data.data && res.data.data.packets && res.data.data.receiveLogs) {
wx.showToast({
title: '数据出来啦',
icon: 'none',
success: function (e) {
}
});
//时间戳
var datas = res.data.data.receiveLogs;
for (let i = 0; i < datas.length; i++) {
datas[i]["createTime"] = Api.createData(datas[i]["createTime"])
}
that.setData({
packetUserInfo: res.data.data.packets,
packetUserList: res.data.data.receiveLogs,
searchLoading: false,
searchLoadingWere: true
});
wx.hideToast();
}
console.log("code:" + res.data.code);
} else {
wx.showToast({
title: '数据偷偷跑掉了',
icon: 'none',
success: function (e) {
that.setData({
searchLoadingComplete: true, //把“没有数据”设为true,显示
searchLoading: false
});
}
});
console.log("code:" + res.data.code);
}
})
},
});
},
navigateToBack: function() {
wx.redirectTo({
url: '/pages/holder/index/index',
})
},
navigateBackHome: function() {
wx.reLaunch({
url: '/pages/index/index',
})
},
//返回上一级
navigateBackGrade: function (e) {
wx.navigateBack({
delta: 1
})
},
onPullDownRefresh: function () {
this.onPostGoodList()
console.log('刷新数据')
wx.stopPullDownRefresh()
},
})