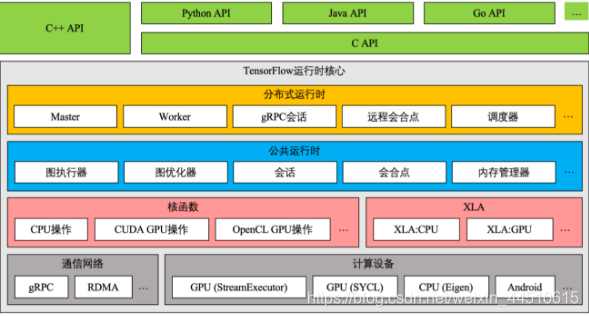
tensorflow核心和语言支持的API
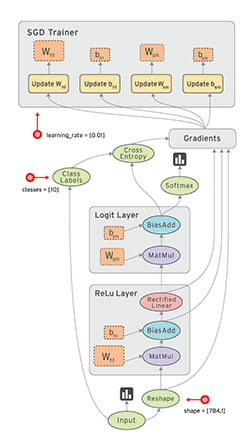
流动过程
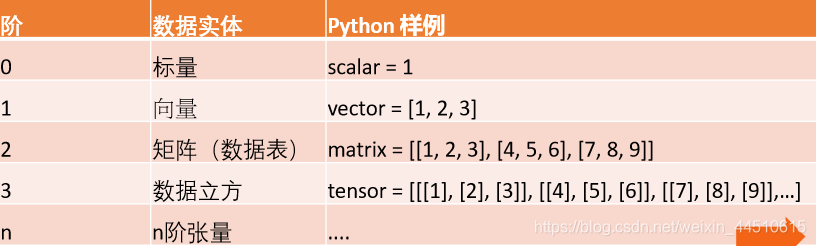
从张量出发
在TensorFlow系统中,张量的维数来被描述为阶.但是张量的阶和矩阵的阶并不是同一个概念.张量的阶(有时是关于如顺序或度数或者是n维)是张量维数的一个数量描述.比如,下面的张量(使用Python中list定义的)就是2阶.
t = [[1, 2, 3], [4, 5, 6], [7, 8, 9]]
在tensorlflow中,有几类特别的张量
- tf.constant //常量
- tf.placeholder //占位符
- tf.Variable //变量
多数用Variable定义张量
0阶张量
扫描二维码关注公众号,回复:
5744755 查看本文章

# 0阶张量
import tensorflwo as tf
mammal = tf.Variable("Elephant", tf.string)
ignition = tf.Variable(451, tf.int16)
floating = tf.Variable(3.14159265359, tf.float64)
its_complicated = tf.Variable(12.3 - 4.85j, tf.complex64)
[mammal, ignition, floating, its_complicated]
OUT:
[<tf.Variable 'Variable:0' shape=() dtype=string_ref>,
 <tf.Variable 'Variable_1:0' shape=() dtype=int32_ref>,
 <tf.Variable 'Variable_2:0' shape=() dtype=float32_ref>,
 <tf.Variable 'Variable_3:0' shape=() dtype=complex128_ref>]
1阶张量
# 1阶张量
mystr = tf.Variable(["Hello", "World"], tf.string)
cool_numbers  = tf.Variable([3.14159, 2.71828], tf.float32)
first_primes = tf.Variable([2, 3, 5, 7, 11], tf.int32)
its_very_complicated = tf.Variable([12.3 - 4.85j, 7.5 - 6.23j], tf.complex64)
[mystr, cool_numbers, first_primes, its_very_complicated]
OUT:
[<tf.Variable 'Variable_8:0' shape=(2,) dtype=string_ref>,
 <tf.Variable 'Variable_9:0' shape=(2,) dtype=float32_ref>,
 <tf.Variable 'Variable_10:0' shape=(5,) dtype=int32_ref>,
 <tf.Variable 'Variable_11:0' shape=(2,) dtype=complex128_ref>]
2阶张量
# 2阶张量
mymat = tf.Variable([[7],[11]], tf.int16)
myxor = tf.Variable([[False, True],[True, False]], tf.bool)
linear_squares = tf.Variable([[4], [9], [16], [25]], tf.int32)
squarish_squares = tf.Variable([ [4, 9], [16, 25] ], tf.int32)
mymatC = tf.Variable([[7],[11]], tf.int32)
[mymat, myxor, linear_squares, squarish_squares, rank_of_squares, mymatC]
OUT:
[<tf.Variable 'Variable_12:0' shape=(2, 1) dtype=int32_ref>,
 <tf.Variable 'Variable_13:0' shape=(2, 2) dtype=bool_ref>,
 <tf.Variable 'Variable_14:0' shape=(4, 1) dtype=int32_ref>,
 <tf.Variable 'Variable_15:0' shape=(2, 2) dtype=int32_ref>,
 <tf.Tensor 'Rank:0' shape=() dtype=int32>,
 <tf.Variable 'Variable_16:0' shape=(2, 1) dtype=int32_ref>]
如何这点张量的阶数
my_image = tf.zeros([10, 299, 299, 3])  # batch x height x width x color
rank_of_my_image = tf.rank(my_image)
rank_of_my_image
OUT:
<tf.Tensor 'Rank:0' shape=() dtype=int32>
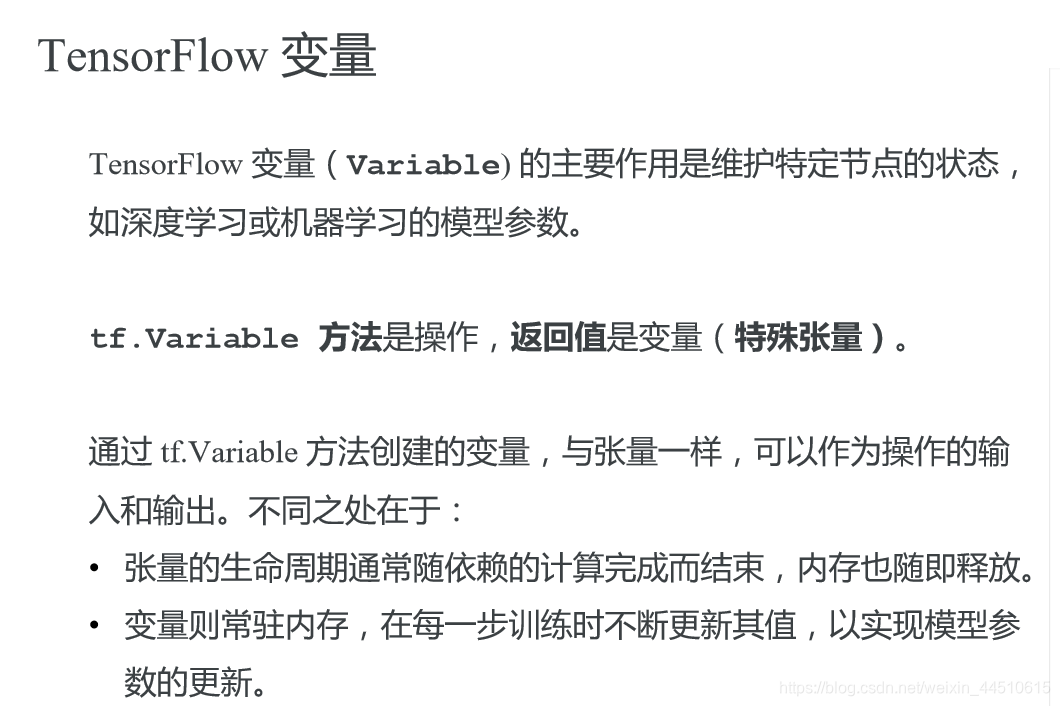
什么是变量
# 创建变量
# tf.random_normal 方法返回形状为(1,4)的张量。它的4个元素符合均值为100、标准差为0.35的正态分布。
W = tf.Variable(initial_value=tf.random_normal(shape=(1, 4), mean=100, stddev=0.35), name="W")
b = tf.Variable(tf.zeros([4]), name="b")
[W, b]
OUT:
[<tf.Variable 'W:0' shape=(1, 4) dtype=float32_ref>,
 <tf.Variable 'b:0' shape=(4,) dtype=float32_ref>]
初始化变量
# 创建会话
sess = tf.Session()
# 使用 global_variables_initializer 方法初始化全局变量 W 和 b
sess.run(tf.global_variables_initializer())
# 执行操作,获取变量值
sess.run([W, b])
# 执行更新变量 b 的操作
sess.run(tf.assign_add(b, [1, 1, 1, 1]))
# 查看变量 b 是否更新成功
sess.run(b)
Saver 使用
# 模板
v1 = tf.Variable(..., name='v1')
v2 = tf.Variable(..., name='v2')
# 指定需要保存和恢复的变量
saver = tf.train.Saver({'v1': v1, 'v2': v2})
saver = tf.train.Saver([v1, v2])
saver = tf.train.Saver({v.op.name: v for v in [v1, v2]})
# 保存变量的方法
tf.train.saver.save(sess, 'my-model', global_step=0) # ==> filename: 'my-model-0'
例子
# 创建Saver
saver = tf.train.Saver({'W': W, 'b': b})
# 存储变量到文件 './summary/test.ckpt-0'
saver.save(sess, './summary/test.ckpt', global_step=0)
# 再次执行更新变量 b 的操作
sess.run(tf.assign_add(b, [1, 1, 1, 1]))
# 获取变量 b 的最新值
sess.run(b)
# 从文件中恢复变量 b 的值
saver.restore(sess, './summary/test.ckpt-0')
# 查看变量 b 是否恢复成功
sess.run(b)
# 从文件中恢复数据流图结构
# tf.train.import_meta_graph