CIFAR数据集简介:
CIFAR由 Alex Krizhevsky、Vinod Nair 和 Geoffrey Hinton 收集而来,起初的数据集共分为 10 类,分别为:飞机、汽车、鸟、猫、鹿、狗、青蛙、马、船、卡车,所以 CIFAR10 数据集常用 CIFAR-10 命名。CIFAR10 共包含 60000 张 32x32的彩色图像(包含 50000 张 训练图片,10000张 测试图片),其中没有任何类型重叠的情况。
CIFAR-100 是后来又出的一个分类更多的版本,从名字也可以看出共有 100 类。
数据集下载链接:The CIFAR-10 dataset and The CIFAR-100 dataset
GitHub下载链接:https://github.com/tensorflow/models
在GitHub下载数据集的说明:
与MNIST类似,Tensorflow中同样有一个下载下载和导入CIFAR数据集的代码文件,不同的是,自从Tensorflow 1.0版本之后,将里面的Models模块分离了出来,下载和导入CIFAR数据集的代码在 models 里面,所以要先去 TensorFlow 的GitHub网站将其下载下来。
如果使用 Git,可以直接使用下面的命令下载:
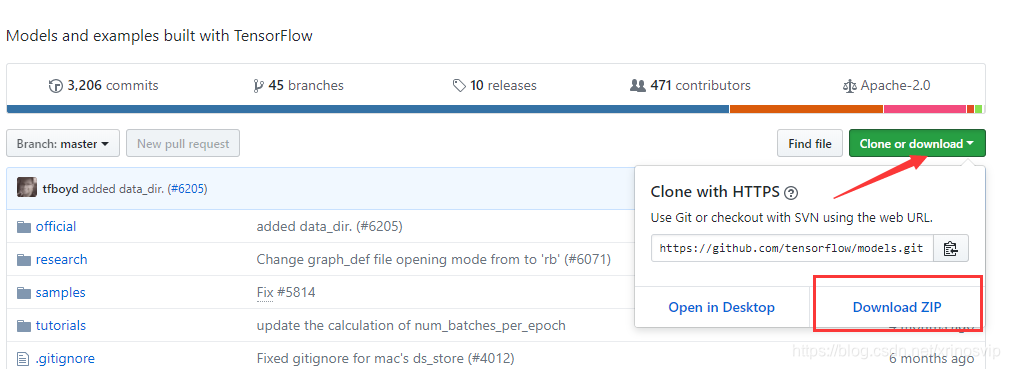
git clone https://github.com/tensorflow/models.git如果没有 Git,可直接复制上面的网址,在右下角单击 clone or download 按钮,在下方单击 Download ZIP按钮下载代码的压缩包,如图:
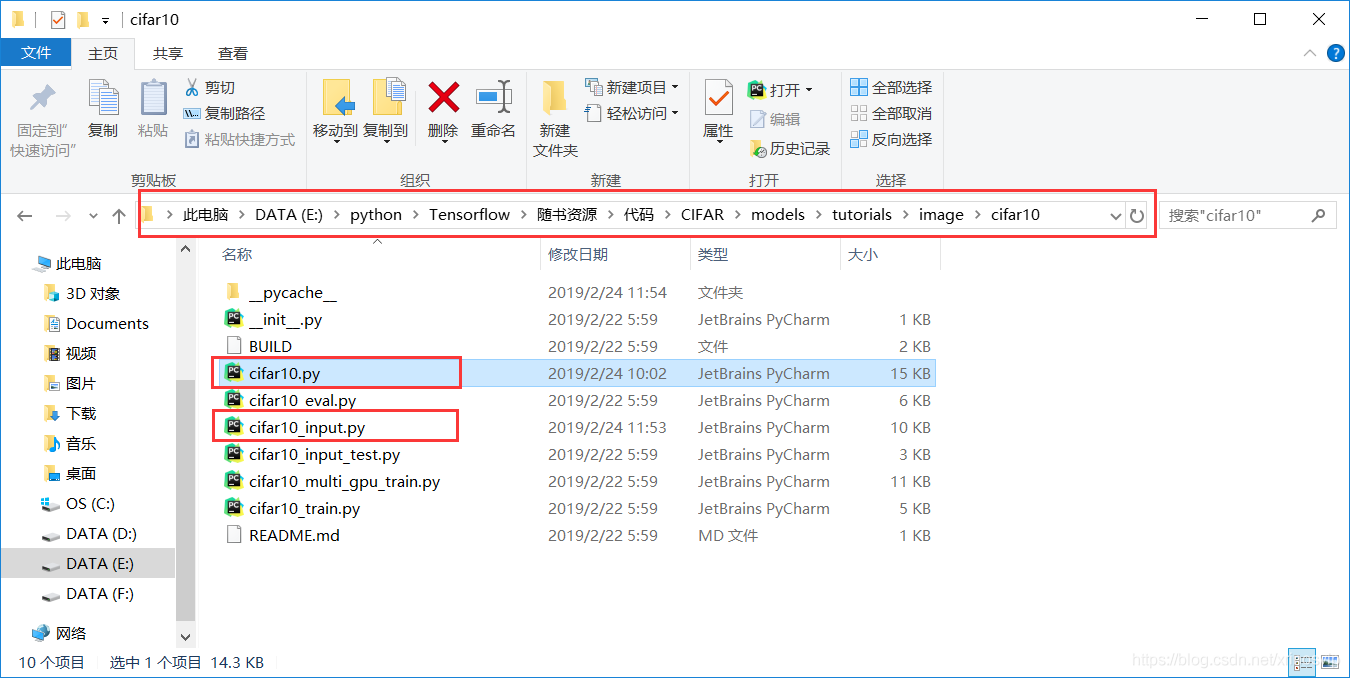
代码下载后,将其解压,将里面 models/tutorials/image/路径下的 CIFAR10 复制到本地的 Python 工作区即可。
将从GitHub下载的tensorflow的models 添加到python 的路径,可以通过下面的代码实现:
import os
import sys
model_dir = os.path.abspath('CIFAR/models/tutorials/image/cifar10/')    # 获取cifar10文件夹的完整路径
sys.path.append(model_dir)
print(model_dir)
print(os.getcwd())      # 获取当前工作目录路径
import cifar10          # 再 导入 cifar10 模块就不会报错了
import  cifar10_input
sys.path是python的搜索模块的路径集,是一个list 可以在python 环境下使用sys.path.append(path)添加相关的路径,但在退出python环境后自己添加的路径就会自动消失了!
或者 使用下面的方式:
我是把 models 整个文件夹复制到anaconda3 安装envs\keras文件目录下的 lib\site-packages下,从models中导入flowers.py模块的代码如下:
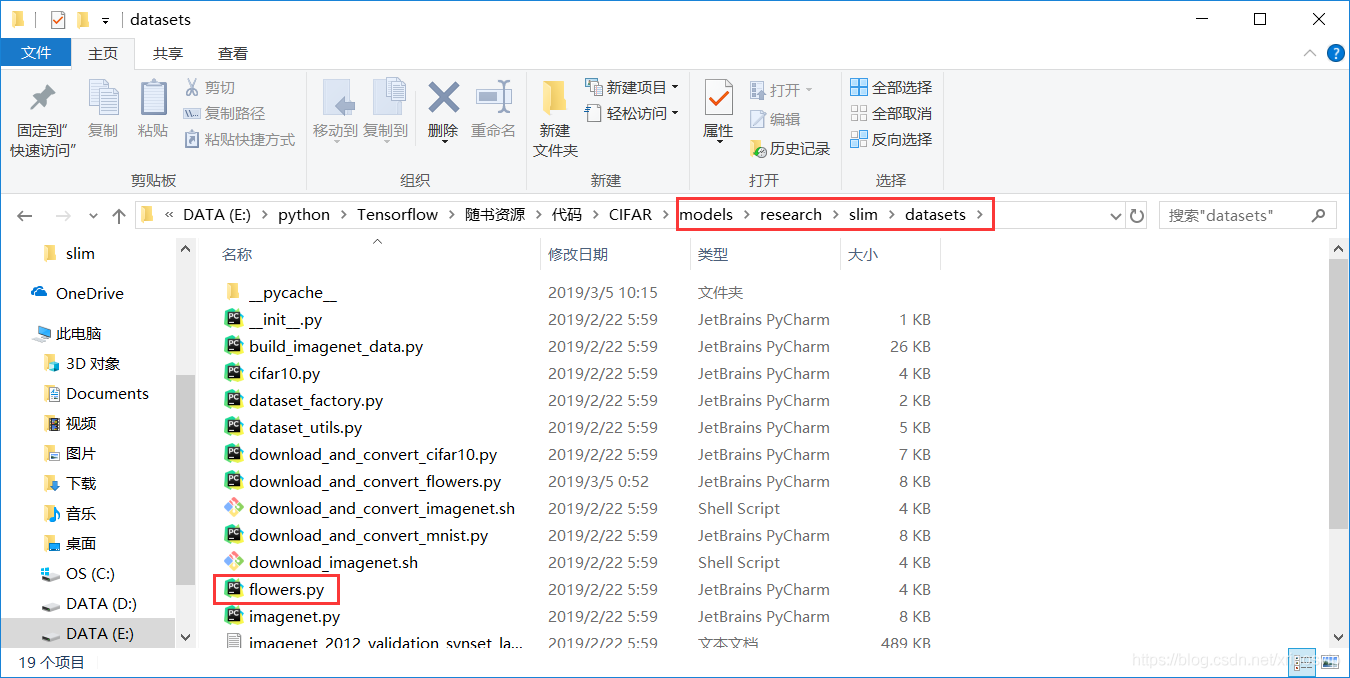
from models.research.slim.datasets import flowers自己下载并解压CIFAR10数据集,添加路径的具体步骤:
将cifar-10-binary.tar.gz拷贝到E:\python\Tensorflow\随书资源\代码\CIFAR\cifar10_data/。如果之前运行过程序,需要将此路径下的cifar-10-batches-bin文件夹删除。

具体:运行tensorflow cifar10教程时,cifar-10-binary.tar.gz下载太慢,自己下载并解压方法
#!/usr/bin/python
#-*-coding:utf-8-*-
import os
import sys
model_dir = os.path.abspath('CIFAR/models/tutorials/image/cifar10/')
sys.path.append(model_dir)
import cifar10
import cifar10_input
import tensorflow as tf
import tarfile
import gzip


#解压缩
# filepath = '/tmp/cifar10_data/cifar-10-binary.tar.gz'
filepath = os.path.join(os.getcwd(),'CIFAR/cifar10_data/cifar-10-binary.tar.gz')
#dest_directory = '/tmp/cifar10_data'
dest_directory = os.path.join(os.getcwd(),'CIFAR/cifar10_data')
print(dest_directory)
extracted_dir_path = os.path.join(dest_directory, 'cifar-10-batches-bin')
if not os.path.exists(extracted_dir_path):
  tarfile.open(filepath, 'r:gz').extractall(dest_directory)   # 解压 cifar-10-binary.tar.g 文件

#data_dir = '/tmp/cifar10_data/cifar-10-batches-bin'
data_dir = os.path.join(os.getcwd(),'CIFAR/cifar10_data/cifar-10-batches-bin')
batch_size = 100

#生成CIFAR-10的训练数据和训练标签数据
images_train, labels_train = cifar10_input.distorted_inputs(data_dir=data_dir, batch_size=batch_size)

#生成CIFAR-10的测试数据和测试标签数据
images_test, labels_test = cifar10_input.inputs(eval_data=True, data_dir=data_dir, batch_size=batch_size)

sess = tf.InteractiveSession()
tf.global_variables_initializer()
tf.train.start_queue_runners()
print(images_train)
print(images_test)
接下来就是训练过程:
import os
import sys
model_dir = os.path.abspath('CIFAR/models/tutorials/image/cifar10/')
sys.path.append(model_dir)
import cifar10_input
import tensorflow as tf
import numpy as np


batch_size = 128
data_dir = '/tmp/cifar10_data/cifar-10-batches-bin'
print("begin")
images_train, labels_train = cifar10_input.inputs(eval_data = False,data_dir = data_dir
images_test, labels_test = cifar10_input.inputs(eval_data = True, data_dir = data_dir,
print("begin data")


# tf Graph Input
x = tf.placeholder(tf.float32, [None, 24,24,3]) # cifar data image of shape 24*24*3
y = tf.placeholder(tf.float32, [None, 10]) # 0-9 数字=> 10 classes


x_image = tf.reshape(x, [-1,24,24,3])

# 使用 tf 封装好的高级库 tf.contrib.layers, 将网络中的全连接、卷积和池化 全部用该函数改写
# 这里不需要再指定输入的 channel,因为函数会自动根据input(x_image)的 shape 去判断
# 卷积核大小,不需要带上 batch 和 channel,只需输入尺寸即可,[5,5],就代表 5x5 大小的卷积核,如果长和宽都一样,也可以直接写一个数 5
# stride :步长,默认是长和宽都相等的步长,卷积时一般都用 1,所以默认值也是 1,如果长和宽的步长不相等,也可以用一个数组[1,2]

# tf.contrib.layers.conv2d() 函数的定义如下:
# def convolution(inputs,
#                 num_outputs,
#                 kernel_size,
#                 stride=1,
#                 padding='SAME',
#                 data_format=None,
#                 rate=1,
#                 activation_fn=nn.relu,
#                 normalizer_fn=None,
#                 normalizer_params=None,
#                 weights_initializer=initializers.xavier_initializer(),
#                 weights_regularizer=None,
#                 biases_initializer=init_ops.zeros_initializer(),
#                 biases_regularizer=None,
#                 reuse=None,
#                 variables_collections=None,
#                 outputs_collections=None,
#                 trainable=True,
#                 scope=None,
#                 conv_dims=None):
h_conv1 =tf.contrib.layers.conv2d(x_image,64,5,1,'SAME',activation_fn=tf.nn.relu)
h_pool1 = tf.contrib.layers.max_pool2d(h_conv1,[2,2],stride=2,padding='SAME')

h_conv2 =tf.contrib.layers.conv2d(h_pool1,64,[5,5],1,'SAME',activation_fn=tf.nn.relu)
h_pool2 = tf.contrib.layers.max_pool2d(h_conv2,[2,2],stride=2,padding='SAME')


nt_hpool2 = tf.contrib.layers.avg_pool2d(h_pool2,[6,6],stride=6,padding='SAME')

nt_hpool2_flat = tf.reshape(nt_hpool2, [-1, 64])

y_conv = tf.contrib.layers.fully_connected(nt_hpool2_flat,10,activation_fn=tf.nn.softma

cross_entropy = -tf.reduce_sum(y*tf.log(y_conv))
train_step = tf.train.AdamOptimizer(1e-4).minimize(cross_entropy)

correct_prediction = tf.equal(tf.argmax(y_conv,1), tf.argmax(y,1))
accuracy = tf.reduce_mean(tf.cast(correct_prediction, "float"))


sess = tf.Session()
sess.run(tf.global_variables_initializer())
tf.train.start_queue_runners(sess=sess)
for i in range(20001):#20000
  image_batch, label_batch = sess.run([images_train, labels_train])
  label_b = np.eye(10,dtype=float)[label_batch] #one hot

  train_step.run(feed_dict={x:image_batch, y: label_b},session=sess)

  if i%200 == 0:
    train_accuracy = accuracy.eval(feed_dict={
        x:image_batch, y: label_b},session=sess)
    print( "step %d, training accuracy %g"%(i, train_accuracy))


image_batch, label_batch = sess.run([images_test, labels_test])
label_b = np.eye(10,dtype=float)[label_batch]#one hot
print ("finished! test accuracy %g"%accuracy.eval(feed_dict={
     x:image_batch, y: label_b},session=sess))
Reference:
tensorflow入门教程(四)CIFAR-10图像识别(上)
python模块以及导入出现ImportError: No module named 'xxx'问题
os.getcwd && os.path.abspath详解
Python中使用tarfile压缩、解压tar归档文件示例