基于idea 编辑器下maven项目使用mybatis generator快速生成持久层
- 添加插件;插件网址:http://www.mybatis.org/generator/running/runningWithMaven.html
- 编写配置文件;
- 运行mybatis generator;
详情如下:
- 在pom文件中添加插件
   <build>
        <plugins>

            <plugin>
                <groupId>org.mybatis.generator</groupId>
                <artifactId>mybatis-generator-maven-plugin</artifactId>
                <version>1.3.7</version>
            </plugin>

        </plugins>
    </build>
- 详细配置文件
<?xml version="1.0" encoding="UTF-8"?>
<!DOCTYPE generatorConfiguration
        PUBLIC "-//mybatis.org//DTD MyBatis Generator Configuration 1.0//EN"
        "http://mybatis.org/dtd/mybatis-generator-config_1_0.dtd">

<generatorConfiguration>
    <!--导入属性配置-->
    <properties resource="application.yml"></properties>

    <!--指定特定数据库的jdbc驱动jar包的位置-->
    <classPathEntry location="src/main/tools/mysql-connector-java-5.1.6-bin.jar"/>
    <context id="default" targetRuntime="MyBatis3">

        <!-- optional,旨在创建class时,对注释进行控制 -->
        <commentGenerator>
            <property name="suppressDate" value="true"/>
            <property name="suppressAllComments" value="true"/>
        </commentGenerator>

        <!--jdbc的数据库连接 -->
        <jdbcConnection
                driverClass="com.mysql.jdbc.Driver"
                connectionURL="jdbc:mysql://192.168.1.0/oops"
                userId="root"
                password="XXXXXX">
        </jdbcConnection>


        <!-- 非必需,类型处理器,在数据库类型和java类型之间的转换控制-->
        <javaTypeResolver>
            <property name="forceBigDecimals" value="false"/>
        </javaTypeResolver>


        <!-- Model模型生成器,用来生成含有主键key的类,记录类 以及查询Example类
            targetPackage     指定生成的model生成所在的包名
            targetProject     指定在该项目下所在的路径
        -->
        <javaModelGenerator targetPackage="实体包名" targetProject="./src/main/java"<注意要到Java文件夹>>
            <!-- 是否允许子包,即targetPackage.schemaName.tableName -->
            <property name="enableSubPackages" value="false"/>
            <!-- 是否对model添加 构造函数 -->
            <property name="constructorBased" value="true"/>
            <!-- 是否对类CHAR类型的列的数据进行trim操作 -->
            <property name="trimStrings" value="true"/>
            <!-- 建立的Model对象是否 不可改变  即生成的Model对象不会有 setter方法,只有构造方法 -->
            <property name="immutable" value="false"/>
        </javaModelGenerator>

        <!--mapper映射文件生成所在的目录 为每一个数据库的表生成对应的SqlMap文件 -->
        <sqlMapGenerator targetPackage="mappers<映射文件sql目录>" targetProject="./src/main/resources"<注意走位,走位,走位>>
            <property name="enableSubPackages" value="false"/>
        </sqlMapGenerator>

        <!-- 客户端代码,生成易于使用的针对Model对象和XML配置文件 的代码
                type="ANNOTATEDMAPPER",生成Java Model 和基于注解的Mapper对象
                type="MIXEDMAPPER",生成基于注解的Java Model 和相应的Mapper对象
                type="XMLMAPPER",生成SQLMap XML文件和独立的Mapper接口
        -->

        <!-- targetPackage:mapper接口dao生成的位置 -->
        <javaClientGenerator type="XMLMAPPER" targetPackage="持久层接口包名称" targetProject="./src/main/java"<注意要到Java文件夹>>
            <!-- enableSubPackages:是否让schema作为包的后缀 -->
            <property name="enableSubPackages" value="false" />
        </javaClientGenerator>

     <!-- 配置文件多个表,简写可以英文逗号隔开,此处我就这样写啦,看不惯啊,咬我啊 -->
        <table tableName="数据库表名1" domainObjectName="生成后表名1" enableCountByExample="false" enableUpdateByExample="false" enableDeleteByExample="false" enableSelectByExample="false" selectByExampleQueryId="false"></table>
        <table tableName="数据库表名2" domainObjectName="数据库表名2" enableCountByExample="false" enableUpdateByExample="false" enableDeleteByExample="false" enableSelectByExample="false" selectByExampleQueryId="false"></table>

    </context>
</generatorConfiguration>
- 运行工程
 -双击666.
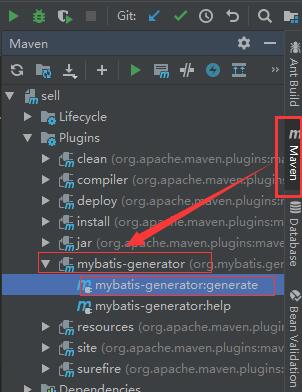
双击mybatis generator,可以吃鸡腿了。
在这里有个需要注意的点:如果使用springboot中的.yml结尾的配置文件时,运行时可能会出现找不到驱动等小问题。不要纠结,不要纠结,不要纠结,果断采用显示配置数据库连接即可。