1、render基础
render: function(createElement){//参数createElement又带有自己的参数,用来告诉Vue页面上需要渲染什么样的节点
  return createElement('div',//第一项参数是模板的标签渲染,即渲染成哪一种标签
  {//第二项参数是给渲染的标签的配置,如属性、样式、事件
    props:{},//标签属性
    style:{},//标签样式
    on: {//标签事件
      click: () => {}
    }
  },'标签内容')//第三项参数是渲染的标签中的文本内容;
}
以上是我项目中实际的使用过的参数,想更具体的可以看vue官方文档(https://cn.vuejs.org/v2/guide/render-function.html,现只领悟到这些);还可以插入多个标签,先最外面套有一个父标签,在父标签里在插入多个标签;
render: function(createElement){
  return createElement(
    'h2',[//h2第一层标签
      createElement('a',{//a是第二层标签
        attrs: {//这是a的属性
          name: 'headingId',
          href: '#'
        }
      },'标签内容')
  ])
}
若要嵌套多个标签写createElement很繁琐,其等价写法:
render: (h,params) => {//h相当于createElement
  h('h2',[
    h('a',{
      props:{
         name: 'headingId',
         href: '#'
      },
      style:{},
      on:{
         click:()=>{}
      }
    },'标签内容')
  ])
}
2、iview的Table表格
在columns里面配置,render:(h,params){},params包含了rows、columns、index信息;绑定事件必须使用箭头函数。现在iview的Table支持slot插入标签了,即在columns里配置时为
columns:[
  {
     title: '',
     slot: 'handle'
  }
]
//渲染的时候
<Table :columns="columns" :data="datas">
    <template slot="handle' slot-scope="{row,index,column}">
      <button>按钮</button>
   </template>
</Table>
3、Tree树形结构
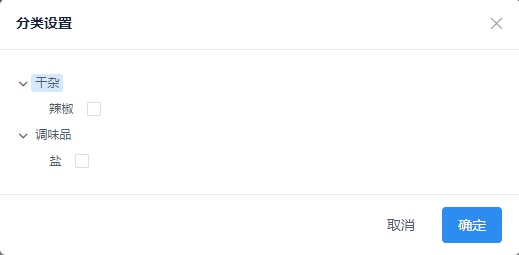
是在datas里配置,我是需要不使用它自带的选择框,而是在文本后面显示一个单选框来进行选择,所以就用了render函数来插入单选。
<template>
  <Modal title="分类设置">
    <Tree :data="datas"></Tree>
  </Modal>
</template>

<script>
export default {
    name: 'ClassifyPop',
    data(){
        return {
            datas:[
                {
                    title: '干杂',
                    children: [
                        {
                            title: '辣椒',
                            render: (h,params) => {
                                return h('span',[
                                    h('span',{
                                        style:{
                                            marginRight: '10px'
                                        }
                                    },params.data.title),
                                    h('Checkbox',{
                                        props:{
                                            name: 'classify'
                                        }
                                    })
                                ])
                            }
                        }
                    ]
                },
                {
                    title: '调味品',
                    children: [
                        {
                            title: '盐',
                            render: (h,params) => {
                                return h('span',[
                                    h('span',{
                                        style:{
                                            marginRight: '10px'
                                        }
                                    },params.data.title),
                                    h('Checkbox',{
                                        props:{
                                            name: 'classify'
                                        }
                                    })
                                ])
                            }
                        }
                    ]
                }
            ]
        }
    },
}
</script>
效果是这样的: