目录
1. 自动装配类型
Spring官网对于自动装配的类型说明如下:
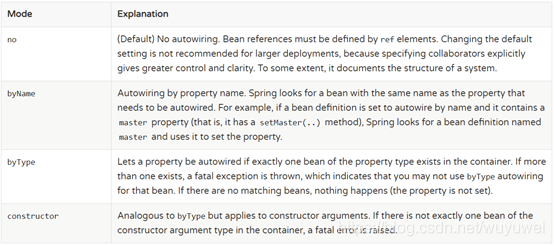
| no | 无自动装配(默认)。在大规模项目中Spring不建议修改该默认值。因为这种方式明确了各个bean之间的协同关系,能让层次更加清晰。也就是自注释的道理。 |
| byName | 按属性名自动装配。Spring自行查找与属性名相同的bean,然后自动装配上。 |
| byType |
按属性类型自动装配。Spring自行查找与属性类型相同的bean,然后自动装配上。如果存在多个类型相同的bean,则抛出异常。如果一个也没有找到,则属性不会被自动配置(属性默认为null)。项目开发过程中至少有20%的NullPointException来自于这里。 |
| constructor | 类似byType但适用于构造函数参数。如果容器中没有构造函数参数类型的一个bean,则会引发致命错误。(本文略过,不打算分析) |
2、@ Autowired 与 @Resource
2.1 @Autowired
在项目中随处可见的@Autowired与@Resource两个注解是用的上述何种方式呢?我们来做几个实验:
首先定义一个接口interface IComponent
package com.Hodey.autocollaboratelab.bean;

public interface IComponent {
    void print();
}
然后写该接口2个实现类:class ComponentA,class ComponentB,实现的方法print()功能是打印各自类的类名。
package com.Hodey.autocollaboratelab.bean;

import org.springframework.stereotype.Component;

@Component
public class ComponentA implements IComponent {

    @Override
    public void print() {
        System.out.println("ComponentA");
    }
}
package com.Hodey.autocollaboratelab.bean;
import org.springframework.stereotype.Component;
@Component
public class ComponentB implements IComponent {
@Override
public void print() {
System.out.println("ComponentB");
}
}再写一个服务类class MyService,该类中有一个属性componentA,类型是interface IComponent。该类中还有一个方法outputPrint(),用于调用interface IComponent实现类中的print()方法。
package com.Hodey.autocollaboratelab.service;
import com.Hodey.autocollaboratelab.bean.IComponent;
import org.springframework.beans.factory.annotation.Autowired;
import org.springframework.stereotype.Service;

@Service("MyService")
public class MyService {

    @Autowired
    private IComponent component;

    public void outputPrint(){
        component.print();
    }
}
最后,我们写上启动Spring的固定代码。并且从bean工厂中拿出。
package com.Hodey.autocollaboratelab;

import com.Hodey.autocollaboratelab.service.MyService;
import org.springframework.boot.autoconfigure.EnableAutoConfiguration;
import org.springframework.context.annotation.AnnotationConfigApplicationContext;
import org.springframework.context.annotation.ComponentScan;

@EnableAutoConfiguration
@ComponentScan("com.Hodey")
public class AutoCollaborateLabApplication {

	public static void main(String[] args) {

		AnnotationConfigApplicationContext ctx =
                new AnnotationConfigApplicationContext(AutoCollaborateLabApplication.class);

		MyService service = (MyService) ctx.getBean("MyService");
		service.outputPrint();
	}
}
运行程序后,依赖注入会报错:
Exception in thread "main" org.springframework.beans.factory.UnsatisfiedDependencyException: Error creating bean with name 'MyService': Unsatisfied dependency expressed through field 'beanA'; nested exception is org.springframework.beans.factory.NoUniqueBeanDefinitionException: No qualifying bean of type 'com.Hodey.autocollaboratelab.bean.IComponent' available: expected single matching bean but found 2: componentA,componentB原因是因为在装配MyService类时,component属性有两个可装配的类(ComponentA和ComponentB),Spring有些迷惑,不知道该帮用户装配哪个类的对象。
这时将MyService中的component属性名改为componentA再重启程序。
package com.Hodey.autocollaboratelab.service;
import com.Hodey.autocollaboratelab.bean.IComponent;
import org.springframework.beans.factory.annotation.Autowired;
import org.springframework.stereotype.Service;

@Service("MyService")
public class MyService {

    @Autowired
    private IComponent componentA;

    public void outputPrint(){
        componentA.print();
    }
}
程序会执行完成,并打印出“ComponentA”,说明MyService装配的IComponent属性是ComponentA,同理将component属性名改为componentB则会打印出“ComponentB”。
ComponentA如果把component属性名改为componenta,componetb或其他的名字,
package com.Hodey.autocollaboratelab.service;
import com.Hodey.autocollaboratelab.bean.IComponent;
import org.springframework.beans.factory.annotation.Autowired;
import org.springframework.stereotype.Service;

@Service("MyService")
public class MyService {

    @Autowired
    private IComponent componenta;

    public void outputPrint(){
        componenta.print();
    }
}则又会出现最早的异常错误expected single matching bean but found 2: componentA,component。
对class ComponentA注解@Component取名beanA,ComponentB取名为beanB,MyService的component属性名改为beanA。
package com.Hodey.autocollaboratelab.bean;

import org.springframework.stereotype.Component;

@Component("beanA")
public class ComponentA implements IComponent {

    @Override
    public void print() {
        System.out.println("ComponentA");
    }
}
package com.Hodey.autocollaboratelab.bean;
import org.springframework.stereotype.Component;
@Component("beanB")
public class ComponentB implements IComponent {
@Override
public void print() {
System.out.println("ComponentB");
}
}package com.Hodey.autocollaboratelab.service;
import com.Hodey.autocollaboratelab.bean.IComponent;
import org.springframework.beans.factory.annotation.Autowired;
import org.springframework.stereotype.Service;
@Service("MyService")
public class MyService {
@Autowired
private IComponent beanA;
public void outputPrint(){
beanA.print();
}
}重跑程序,也会输出“ComponentA”。
@Autowired是优先按照byType装配的。如果存在多个相同类型的对象,Spring会按照内部默认的规则 BeanNameGenerator 进行装配。装配规则是:
1.如果装配的bean存在用户自定义名称,则尝试按照用户自定义名称装配。
2.如果不满足条件1,则将被装配对象的类型名首字母小写作为临时的装配名尝试装配。
3.如果以上都不满足,则装配失败。
比如上述例子中在扫描出IComponent的两个实现类ComponentA和ComponentB之后,不会直接报错。而是看看是否可以根据bean的名称 beanA或beanB 进行唯一答案筛选,如果能够成功过滤出唯一答案,则自动装配上,否则按照componentA或componentB进行装配,如果都不满足上述条件,则装配失败。以上过程是bean实例化过程的一部分,流程很长,这里留个引子暂时不做介绍。后续会专门写一篇分析bean实例化流程的文章再做分析。
2.2 @Resource
将MyService中的component注解更换位@Resource。
package com.Hodey.autocollaboratelab.service;
import com.Hodey.autocollaboratelab.bean.IComponent;
import org.springframework.stereotype.Service;
import javax.annotation.Resource;

@Service("MyService")
public class MyService {

    @Resource
    private IComponent component;

    public void outputPrint(){
        component.print();
    }
}启动程序后,会抛出和@Autowired类似异常:expected single matching bean but found 2: beanA,beanB。说明Sping在装配时无法解决该歧义。
更改MyService的属性component更名为beanA,重跑程序,
package com.Hodey.autocollaboratelab.service;
import com.Hodey.autocollaboratelab.bean.IComponent;
import org.springframework.stereotype.Service;
import javax.annotation.Resource;

@Service("MyService")
public class MyService {

    @Resource
    private IComponent beanA;

    public void outputPrint(){
        beanA.print();
    }
}将会输出结果“ComponentA”,说明装配的类型是ComponentA,同理将component更名为beanB,则会输出ComponentB。除此之外更换为其他名字均不能完成自动装配。说明@Resource是通过byName方式进行自动装配的。当然,你也可以通过@Resource(name = "XXX")强行指定装配的类,过于简单,对此本文不再赘述。
3. 单例与原型的混合装配
在应用的开发过程中,有时难免会遇到单例与原型对象相互依赖的问题。当单例对象中存在一个属性是原型对象类型的时候,会让原型对象的性质发生一些变化。
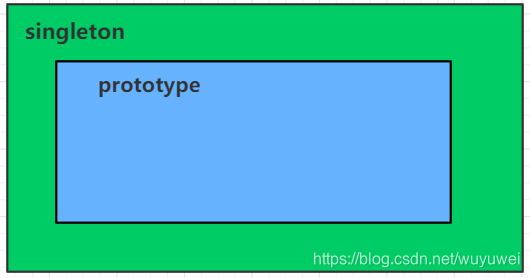
举一个例子,分别定义一个原型对象和单例对象如下:
import org.springframework.beans.factory.annotation.Autowired;
import org.springframework.stereotype.Component;

@Component("single")
public class SingleComponent {

    @Autowired
    private PrototypeComponent prototypeBean;

    public void print(){
        System.out.println("singleton:" + this.hashCode());
        prototypeBean.print();
    }
}
package com.Hodey.autocollaboratelab.bean;
import org.springframework.context.annotation.Scope;
import org.springframework.stereotype.Component;
@Component("prototype")
@Scope("prototype")
public class PrototypeComponent {
public void print(){
System.out.println("prototype:" + this.hashCode() + "\n");
}
}单例对象中有一个属性是依赖类PrototypeComponent注入原型对象。单例对象的print方法会打印该单例对象和被注入的原型对象的hashcode值。然后从Spring容器中拿出SingleComponent的单例对象single,执行print方法。
package com.Hodey.autocollaboratelab;

import com.Hodey.autocollaboratelab.bean.SingleComponent;
import org.springframework.boot.autoconfigure.EnableAutoConfiguration;
import org.springframework.context.annotation.AnnotationConfigApplicationContext;
import org.springframework.context.annotation.ComponentScan;

@EnableAutoConfiguration
@ComponentScan("com.Hodey")
public class AutoCollaborateLabApplication {

	public static void main(String[] args) {

		AnnotationConfigApplicationContext ctx =
                new AnnotationConfigApplicationContext(AutoCollaborateLabApplication.class);
		SingleComponent single = (SingleComponent) ctx.getBean("single");
		single.print();
		single.print();
		single.print();
		single.print();
		single.print();

	}
}
执行结果如下:
singleton:1991724700
prototype:762509150

singleton:1991724700
prototype:762509150

singleton:1991724700
prototype:762509150

singleton:1991724700
prototype:762509150

singleton:1991724700
prototype:762509150
从中可以看出原型对象的hashcode值从未改变,也就是说注入到单例对象每次在调用print方法时拿到的原型对象都是同一个,可能会与开发者的初衷事与愿违。那么导致该现象出现的原因是什么呢?

single的类型因为是单例,故容器仅会对其执行一次的实例化过程,实例化完成之后会将该对象放置到DefaultListableBeanFactory管理的singletonObjects CurrentHashMap中。在实例化过程中,single对象依赖的PrototypeComponent类属性prototypeBean,虽然prototypeBean声明为@Scope("Prototype"),但是它却因为依赖于single对象的仅有一次的实例化时创建,其后再无机会被Spring容器实例化出来。故注入到single对象成员属性prototypeBean的PrototypeComponent类对象始终是那一个。
如何做到prototypeBean对象成为真正的Prototype,请看下文。
方案一:使用ApplicationContextAware接口
只需要修改SingleComponent.java,将SingleComponent实现ApplicationContextAware接口,并实现其方法setApplicationContext(ApplicationContext applicationContext) 。其实设计该接口的原始目的就是去拿到Spring容器ApplicationContext。拿到容器ctx后,每次执行print()方法时都需要在内部通过getPrototypeBean()获取原型对象。
package com.Hodey.autocollaboratelab.bean;

import org.springframework.beans.factory.annotation.Autowired;
import org.springframework.context.ApplicationContext;
import org.springframework.context.ApplicationContextAware;
import org.springframework.stereotype.Component;

@Component("single")
public class SingleComponent implements ApplicationContextAware {

    private ApplicationContext ctx;

//    @Autowired
    private PrototypeComponent prototypeBean;

    public void print(){
        System.out.println("singleton:" + this.hashCode());
        prototypeBean = getPrototypeBean();
        prototypeBean.print();
    }

    @Override
    public void setApplicationContext(ApplicationContext applicationContext) throws BeansException {
        this.ctx = applicationContext;
    }

    private PrototypeComponent getPrototypeBean(){
        return (PrototypeComponent) ctx.getBean("prototype");
    }
}
执行结果如下,可以看出每次拿到的原型对象已经不同。
singleton:273777019
prototype:891894789

singleton:273777019
prototype:1644864746

singleton:273777019
prototype:766696861

singleton:273777019
prototype:829737737

singleton:273777019
prototype:1296109622
方案二:直接注入ApplicationContext
该方案Spring官网并未介绍。其实在应用层单纯为了获取ApplicationContext完全可以通过@Autowired方式显示注入一个Spring容器。其余操作与方案一相同。结果也能说明
package com.Hodey.autocollaboratelab.bean;

import org.springframework.beans.factory.annotation.Autowired;
import org.springframework.context.ApplicationContext;
import org.springframework.stereotype.Component;

@Component("single")
public class SingleComponent {

    @Autowired
    private ApplicationContext ctx;

//    @Autowired
    private PrototypeComponent prototypeBean;

    public void print(){
        System.out.println("singleton:" + this.hashCode());
        prototypeBean = getPrototypeBean();
        prototypeBean.print();
    }

    private PrototypeComponent getPrototypeBean(){
        return (PrototypeComponent) ctx.getBean("prototype");
    }
}
结果如下,证明该方案也是可行的。
singleton:583015088
prototype:1091781053

singleton:583015088
prototype:1280128554

singleton:583015088
prototype:1409342262

singleton:583015088
prototype:1991724700

singleton:583015088
prototype:762509150
那么Spring提供ApplicationContextAware这个接口是多此一举吗?本人观点如下:
Spring提供ApplicationContextAware接口的主要原因是Spring还未启动完成的过程中,Spring自己想要获取Spring容器做一些事情是在所难免的。为了这个初衷而实现了看似笨拙的ApplicationContextAware接口。
方案三:通过方法查找@lookup方式注入
该方法最具技术含量。官网的原话如下:
Lookup method injection is the ability of the container to override methods on container-managed beans and return the lookup result for another named bean in the container. The lookup typically involves a prototype bean, as in the scenario described in the preceding section. The Spring Framework implements this method injection by using bytecode generation from the CGLIB library to dynamically generate a subclass that overrides the method.
没看懂?很正常。用锅哥的话来说就是:实现该通过CGLIB 的字节码技术,动态生成一个覆盖该抽象方法的子类对象。子类是一个代理类,代理方法就是被代理抽象类的抽象方法。实例如下:
将SingleComponent.java代码修改如下:
package com.Hodey.autocollaboratelab.bean;

import org.springframework.beans.factory.annotation.Lookup;
import org.springframework.stereotype.Component;

@Component("single")
public abstract class SingleComponent {

    private PrototypeComponent prototypeBean;

    public void print(){
        System.out.println("singleton:" + this.hashCode());
        prototypeBean = getPrototypeBean();
        prototypeBean.print();
    }

    @Lookup
    protected abstract PrototypeComponent getPrototypeBean();
}
PrototypeComponent.java不变。执行程序结果如下。说明该方案确实可以实现这一功能。
singleton:829737737
prototype:318794136

singleton:829737737
prototype:939254952

singleton:829737737
prototype:55755528

singleton:829737737
prototype:2100771791

singleton:829737737
prototype:1835778392
补充说明一下,@lookup注解是通过类名进行依赖查找的。想根据bean的名称进行查找,可以更改为@lookup("beanName")实现。最后关于方案三,解答2个常见疑问:
1. 为什么要将方法设置为abstract ?用普通的方法行不行?
答:不行!方案三没有显式依赖Spring容器ApplicationContext ,故无法在getPrototypeBean()中手动创建出prototype对象。要想构造出prototype对象,至少需要在子类中进行完善,让Spring通过动态代理类的方式实现其子类。故需要将getPrototypeBean()设置位抽象方法,否则就写不下去。如果不明白我在说什么,您可以将abstract去掉。然后绞尽脑汁在最后,也无法在方法体中返回一个合适对象给Spring容器。
public PrototypeComponent getPrototypeBean(){
    return 我现在该返回啥?#@@#$&*, 总不可能让我返回一个 new Object()吧。
}
2. 在这里为什么底层需要借助CGLIB实现动态代理?JDK自带的动态代理能不能用么?
答:JDK和CGLIB的动态代理最大的区别就是JDK的动态代理仅支持接口代理。对于这种已经不是interface的类,它无能为力,只得去求助CGLIB。
总结:当单例对象中存在一个属性是原型对象类型的时候,想要还原原型类型本来的面目,就需要适当打破IoC。退一步,海阔天空。
补充:方案四:利用BeanFactory实现该功能(后续补充)。
该功能原理非常复杂,需要全面且深入了解Spring的IoC后,才能做到。接下来几篇文章会专注于Spring的IoC原理。