版权声明: https://blog.csdn.net/smileyan9/article/details/85917870
springboot整合cage 验证码
1. 例子下载github地址
由于代码非常简单,提供一个github下载地址,只有java文件。
https://github.com/smile-yan/example-cage-captcha
2. cage jar包下载地址
推荐使用maven,如果需要下载.jar,也可以在这个maven地址下载:
https://mvnrepository.com/artifact/com.github.cage/cage
3. 最简单例子
 	public static void main( String[] args ) throws FileNotFoundException {
    	Cage cage = new GCage();
        OutputStream os = new FileOutputStream("d://captcha.jpg", false);
        try {
			String token = cage.getTokenGenerator().next().substring(0,4);
			System.out.println("token=="+token);
			cage.draw(token, os);
		} catch (IOException e) {
			e.printStackTrace();
		}
    }
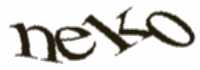
没错,就是这么简单,substring与sysout是我自己添加的。
生成图片如下:
4. web应用(springboot为例)
与上面例子其实没有多大区别,就是OutputStream发生了改变,不再是本地路径。
另外根据需要,加上session等等。这个java文件同样可以在上面github下载地址中下载。
package cn.smileyan.movie.controller;

import com.github.cage.Cage;
import com.github.cage.GCage;
import com.google.gson.Gson;
import org.omg.PortableInterceptor.SUCCESSFUL;
import org.springframework.stereotype.Controller;
import org.springframework.web.bind.annotation.CrossOrigin;
import org.springframework.web.bind.annotation.RequestMapping;
import org.springframework.web.bind.annotation.ResponseBody;

import javax.servlet.http.HttpServletRequest;
import javax.servlet.http.HttpServletResponse;
import javax.servlet.http.HttpSession;
import java.awt.image.BufferedImage;
import java.io.FileNotFoundException;
import java.io.FileOutputStream;
import java.io.IOException;
import java.io.OutputStream;

@Controller
@CrossOrigin
public class CageCaptchaController {
    private static final Cage cage = new GCage();

    /**
     * 获得验证码
     * @param request
     * @param response
     * @throws IOException
     */
    @RequestMapping("/captcha")
    private void cageCaptcha(HttpServletRequest request, HttpServletResponse response) throws IOException {
        // get session
        HttpSession session = request.getSession();
        setResponseHeaders(response);
        // get token
        String token = cage.getTokenGenerator().next().substring(0,4);
        // 设置session
        session.setAttribute("cage_token",token);
        session.setMaxInactiveInterval(60*15);                  // 15分钟内有效
        cage.draw(token, response.getOutputStream());
    }

    @RequestMapping("/login")
    @ResponseBody
    private String login(String code, HttpServletRequest request){
        HttpSession session = request.getSession();
        String str = session.getAttribute("cage_token").toString().trim();
        System.out.println("str=="+str);
        // 不区分大小写
        if(str.equalsIgnoreCase(code.trim())) {
            return "SUCCESS";
        }
        return "FAILURE";
    }

    /**
     * Helper method, disables HTTP caching.
     *
     * @param resp
     *            response object to be modified
     */
    protected void setResponseHeaders(HttpServletResponse resp) {
        resp.setContentType("image/" + cage.getFormat());
        resp.setHeader("Cache-Control", "no-cache, no-store");
        resp.setHeader("Pragma", "no-cache");
        long time = System.currentTimeMillis();
        resp.setDateHeader("Last-Modified", time);
        resp.setDateHeader("Date", time);
        resp.setDateHeader("Expires", time);
    }

}
编写完成后我们可以直接访问/captcha,来查看图片。
效果跟上面那个一样。
前端界面编写基本操作不必说,大概是添加img标签,将src属性修改为/captcha的绝对路径。
特别在此提供一个自己编写的前端界面github下载地址其中的index.html:
添加链接描述
效果如下:

5. 总结
首先说明这些并没有考虑验证码的安全性,现在很多工具可以很容易破解这样的验证码。但是我觉得这个使用方便,还是很不错的。
所有源码下载地址都在开头出,有问题欢迎交流。