一、集群启动
1.启动zookeeper
2.启动kafka
./bin/kafka-server-start.sh -daemon ./config/server.properties3.搭建flume集群
3.1上传并解压flume jar包
3.2修改conf下的flume-env.sh
export JAVA_HOME=/usr/lib/jvm/java-1.8.0-openjdk-1.8.0.191.b12-1.el7_6.x86_643.3创建于kafka的配置文件,命名为kf.conf
a1.sources = r1
a1.sinks = k1
a1.channels = c1

# Describe/configure the source
a1.sources.r1.type = avro
a1.sources.r1.bind = hadoop1
a1.sources.r1.port = 41414

# Describe the sink
a1.sinks.k1.type = org.apache.flume.sink.kafka.KafkaSink
a1.sinks.k1.topic = testflume
a1.sinks.k1.brokerList = hadoop1:9092,hadoop2:9092,hadoop3:9092
a1.sinks.k1.requiredAcks = 1
a1.sinks.k1.batchSize = 20

# Use a channel which buffers events in memory
a1.channels.c1.type = memory
a1.channels.c1.capacity = 1000000
a1.channels.c1.transactionCapacity = 10000

# Bind the source and sink to the channel
a1.sources.r1.channels = c1
a1.sinks.k1.channel = c1
3.4启动flume
bin/flume-ng agent -n a1 -c conf -f conf/kf.conf -Dflume.root.logger=DEBUG,console二、项目样例
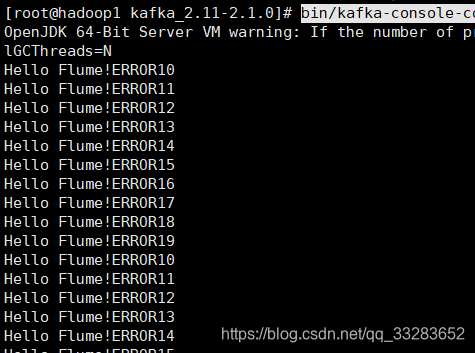
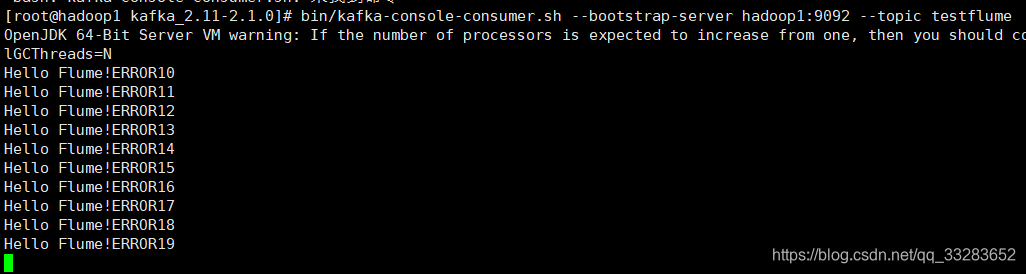
1.启动kafka消费者
bin/kafka-console-consumer.sh --bootstrap-server hadoop1:9092 --topic testflume2.验证flume发送,kafka接收
public class RpcClientDemo {
public static void main(String[] args) {
MyRpcClientFacade client = new MyRpcClientFacade();
// Initialize client with the remote Flume agent's host and port
client.init("192.168.30.141", 41414);
// Send 10 events to the remote Flume agent. That agent should be
// configured to listen with an AvroSource.
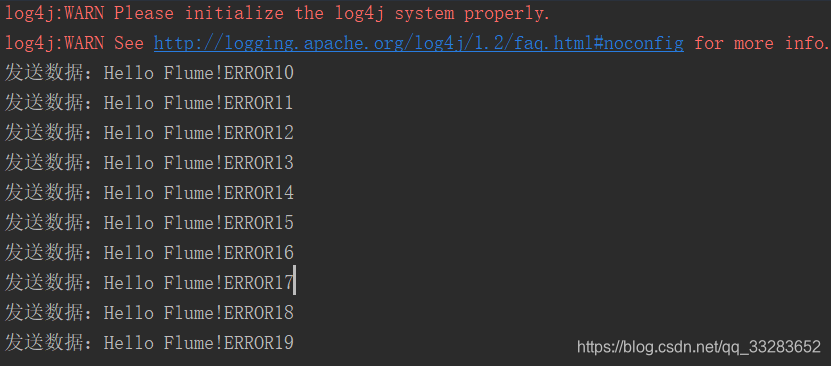
for (int i = 10; i < 20; i++) {
String sampleData = "Hello Flume!ERROR" + i;
client.sendDataToFlume(sampleData);
System.out.println("发送数据:" + sampleData);
}
client.cleanUp();
}
}
class MyRpcClientFacade {
private RpcClient client;
private String hostname;
private int port;
public void init(String hostname, int port) {
// Setup the RPC connection
this.hostname = hostname;
this.port = port;
this.client = RpcClientFactory.getDefaultInstance(hostname, port);
// Use the following method to create a thrift client (instead of the
// above line):
// this.client = RpcClientFactory.getThriftInstance(hostname, port);
}
public void sendDataToFlume(String data) {
// Create a Flume Event object that encapsulates the sample data
Event event = EventBuilder.withBody(data, Charset.forName("UTF-8"));
// Send the event
try {
client.append(event);
} catch (EventDeliveryException e) {
// clean up and recreate the client
client.close();
client = null;
client = RpcClientFactory.getDefaultInstance(hostname, port);
// Use the following method to create a thrift client (instead of
// the above line):
// this.client = RpcClientFactory.getThriftInstance(hostname, port);
}
}
public void cleanUp() {
// Close the RPC connection
client.close();
}
}flume发送
kafka接收
三、数据清洗
1.创建一个topic
bin/kafka-topics.sh --zookeeper hadoop1:2181,hadoop2:2181,hadoop3:2181 --create --replication-factor 2 --partitions 1 --topic LogError2.启动一个监听
bin/kafka-console-consumer.sh --bootstrap-server hadoop1:9092 --topic LogError3.代码逻辑
public class LogFilterTopology {

	public static class FilterBolt extends BaseBasicBolt {
		@Override
		public void execute(Tuple tuple, BasicOutputCollector collector) {
			String line = tuple.getString(0);
			System.err.println("Accept:  " + line);
			// 包含ERROR的行留下
			if (line.contains("ERROR")) {
				System.err.println("Filter:  " + line);
				collector.emit(new Values(line));
			}
		}

		@Override
		public void declareOutputFields(OutputFieldsDeclarer declarer) {
			// 定义message提供给后面FieldNameBasedTupleToKafkaMapper使用
			declarer.declare(new Fields("message"));
		}
	}

	public static void main(String[] args) throws Exception {
		TopologyBuilder builder = new TopologyBuilder();

		// https://github.com/apache/storm/tree/master/external/storm-kafka
		// config kafka spout,话题
		String topic = "testflume";
		ZkHosts zkHosts = new ZkHosts("hadoop1:2181,hadoop2:2181,hadoop3:2181");
		// /MyKafka,偏移量offset的根目录,记录队列取到了哪里
		SpoutConfig spoutConfig = new SpoutConfig(zkHosts, topic, "/MyKafka", "MyTrack");// 对应一个应用
		List<String> zkServers = new ArrayList<String>();
		System.out.println(zkHosts.brokerZkStr);
		for (String host : zkHosts.brokerZkStr.split(",")) {
			zkServers.add(host.split(":")[0]);
		}

		spoutConfig.zkServers = zkServers;
		spoutConfig.zkPort = 2181;
		// 是否从头开始消费
		spoutConfig.forceFromStart = true;
		spoutConfig.socketTimeoutMs = 60 * 1000;
		// StringScheme将字节流转解码成某种编码的字符串
		spoutConfig.scheme = new SchemeAsMultiScheme(new StringScheme());

		KafkaSpout kafkaSpout = new KafkaSpout(spoutConfig);

		// set kafka spout
		builder.setSpout("kafka_spout", kafkaSpout, 3);

		// set bolt
		builder.setBolt("filter", new FilterBolt(), 8).shuffleGrouping("kafka_spout");

		// 数据写出
		// set kafka bolt
		// withTopicSelector使用缺省的选择器指定写入的topic: LogError
		// withTupleToKafkaMapper tuple==>kafka的key和message
		KafkaBolt kafka_bolt = new KafkaBolt().withTopicSelector(new DefaultTopicSelector("LogError"))
				.withTupleToKafkaMapper(new FieldNameBasedTupleToKafkaMapper());

		builder.setBolt("kafka_bolt", kafka_bolt, 2).shuffleGrouping("filter");

		Config conf = new Config();
		// set producer properties.
		Properties props = new Properties();
		props.put("metadata.broker.list", "hadoop1:9092,hadoop2:9092,hadoop3:9092");
		/**
		 * Kafka生产者ACK机制 0 : 生产者不等待Kafka broker完成确认,继续发送下一条数据 1 :
		 * 生产者等待消息在leader接收成功确认之后,继续发送下一条数据 -1 :
		 * 生产者等待消息在follower副本接收到数据确认之后,继续发送下一条数据
		 */
		props.put("request.required.acks", "1");
		props.put("serializer.class", "kafka.serializer.StringEncoder");
		conf.put("kafka.broker.properties", props);

		conf.put(Config.STORM_ZOOKEEPER_SERVERS, Arrays.asList(new String[] { "hadoop1", "hadoop2", "hadoop3" }));

		// 本地方式运行
		LocalCluster localCluster = new LocalCluster();
		localCluster.submitTopology("mytopology", conf, builder.createTopology());

	}
}
4.先启动LogFilterTopology 类再启动RpcClientDemo 类