原文:Geofencing with Core Location: Getting Started
作者:Andy Pereira
译者:kmyhy更新说明:Andy Pereira 将本教程升级至 Xcode 9.3 和 Swift 4.1。
Geofencing 会在设备进入/离开指定的电子围栏时通知应用程序。它可以让你写出一些很酷的应用程序,当你从家里出来时触发通知,或者在附近出现最爱的商店时,用最近的、最多的订单提示给用户。在这个 Geofencing 教程中,你将学习如何在 iOS 和 swift 中使用区域检测——即 Core Location 的 Region Monitoring API。
另外,你将创建一个基于定位提醒的 app,Geotify,它允许用户基于物理位置创建提醒。让我们开始吧!
开始
使用底部的 Dowload Materials 按钮下载开始项目。它包含了一个用于在地图上添加/删除大头钉简单 UI。每个大头钉表示一个指定位置的提醒项,我把它叫做 geotification。
Build & run,你会看到一张空空的地图。

点击 + 按钮,添加一个 geotification。app 会另外显示一张视图,允许你设置 geotification 的各种属性。
在本教程中,你将在苹果的新总部卡布基诺添加一个大头钉。如果不知道位置,打开谷歌地图,用它找到正确的位置。要让大头钉定位精确,请放大地图。
注:要在模拟器上使用 pinch 手势,请按下 option 键,然后用 shift 键移动手指的中心点,然后放开 shift 键,拖动鼠标进行捏放。

Radius 表示从指定位置开始距离多少米,在这个位置上 iOS 将触发通知。该通知可以是您希望在通知中显示的任何消息。这个 app 还可以让用户通过顶部的 segment control 来指定在圆圈内是用进入还是退出来触发通知。
在 Radius 上输入 1000,在 Note 上输入 Say Hi to Tim!,把第一个电子围栏通知置于 Upon Entry 上。
填完后点击 Add 按钮。你会看到地图上显示了一个新的大头钉,外面还围了一个圆圈表示的电子围栏:

点击大头钉,你会看到通知详情,比如提醒内容和事件类型。不要点击那个小叉叉,除非你想删除它!
您可以随意添加或删除任意多的地理位置。由于该应用程序使用 UserDefaults 进行持久化,所以在重启后的位置列表仍然会存在。
配置 Core Location 和权限
现在,你添加到地图上的电子围栏通知还没有真正的功能,只能看看而已。要解决这个问题,你需要遍历每个位置,使用 Core Location 监听它的保护范围。
在开始监控电子围栏之前,你需要创建 CLLocationManager 实例并请求相应的权限。
打开 GeotificationsViewController.swift 声明一个 CLLocationManager 常量。可以将它放在 var geotifications: [Geotification] = []: 一句之后。
let locationManager = CLLocationManager()
然后修改 viewDidLoad() 代码:
override func viewDidLoad() {
  super.viewDidLoad()
  // 1
  locationManager.delegate = self
  // 2
  locationManager.requestAlwaysAuthorization()
  // 3
  loadAllGeotifications()
}
代码分为 3 步:
- 将 view controller 设置为 locationManager 的 delegate,这样 view controller 就会通过代理方法接收到通知。
- 调用 requestAlwaysAuthorization() 方法,它会显示一个对话框,向用户请求总是使用定位服务的全新。地理围栏 app 必须请求一直使用定位服务的权限,因为哪怕是 app 不运行的期间也要监听电子围栏。Info.plist 的 NSLocationAlwaysAndWhenInUseUsageDescription 键中包含了要向用户显示的信息。从 iOS 11 开始,所有请求一直允许权限的 app 同时也要允许用户选择“仅在应用期间使用”。Info.plist also 的 NSLocationWhenInUseUsageDescription 键用于指定它的信息。重要的是尽可能简单地向用户说明为什么要使用“一直允许”权限。
- 调用 loadAllGeotifications() 方法,读取之前保存到 UserDefaults 中的 geotification 列表并加载到 geotifications 数组中。这个方法还会将 geotification 加载到地图上的大头钉中。
当应用程序提示用户进行授权时,它将显示 NSLocationAlwaysAndWhenInUseUsageDescription 字符串,它向用户进行了很好的解释,说明为什么该应用需要访问用户的位置。当你请求授权时,这个 key 是必需的。如果缺失这个 key,系统会忽略请求,并禁用定位服务。
Build & run,你会看到:

你已经完成了 app 的请求授权许可。好了,请点击允许,确保 location manager 能够在适当的时机收到委托回调。
在继续下一步之前,还有一个小问题:用户当前的位置没有显示在地图图上!默认情况下,map view 会禁用这个特性,同时,在导航栏左上角的 zoom 按钮也不会起作用。
幸好这个问题很容易解决——你只需要在用户同意授权之后开启 current location属性。
在 GeotificationsViewController.swift 的CLLocationManagerDelegate 扩展中添加委托方法:
func locationManager(_ manager: CLLocationManager, didChangeAuthorization status: CLAuthorizationStatus) {
  mapView.showsUserLocation = (status == .authorizedAlways)
}
location manager 在授权状态发生改变时调用 locationManager(_:didChangeAuthorizationStatus:) 方法,如果用户同意授权,location manager 会在你初始化了 location mananger 并设置其 delegate 之后调用这个方法。
因此这个方法是检查 app 是否被授权的理想场所。如果用户已授权,你就可以启用 mapview 的 showsUserLocation。
Build & run。如果你在真机上运行,你会看到 mapview 上显示出大头钉。如果在模拟器运行,请点击 Debug ▸ Location ▸ Apple 菜单,就可以看见定位大头钉了:

另外,现在导航栏上的 zoom 按钮也可以使用了。
注册电子围栏
配置好 location manager 之后,你现在必须让 app 注册用户要监控的电子围栏范围。
用户的电子围栏信息保存在 Geotification 模型中。但是,要对电子围栏进行监控,Core Location 需要你将它们表示为 CLCircularRegion 对象。要满足这个条件,你需要创建一个助手方法,将一个 Geonotification 映射为 CLCircularRegion。
打开 GeotificationsViewController.swift 添加方法:
func region(with geotification: Geotification) -> CLCircularRegion {
  // 1
  let region = CLCircularRegion(center: geotification.coordinate,
    radius: geotification.radius,
    identifier: geotification.identifier)
  // 2
  region.notifyOnEntry = (geotification.eventType == .onEntry)
  region.notifyOnExit = !region.notifyOnEntry
  return region
}
这个方法做了这些事情:
- 以电子围栏的中心坐标、半径、以及识别 app 中已注册的不同电子围栏的 ID 来初始化一个 CLCircularRegion。初始化过程很简单,因为在 Geotification 中已经包含了这些信息。
- CLCircularRegion 有两个 boolean 属性: notifyOnEntry 和 notifyOnExit。它们代表在设备进入/离开围栏时所对应不同的事件。因为 app 只允许一个围栏监控一种类型的事件,你需要针对 Geotificaiton 对象的 eventType 值来设置这两个值。
接着,当用户添加了 geotification 之后,需要用一个方法来启动对指定 geotification 的监控。
在 GeotificationsViewController 中加入方法:
func startMonitoring(geotification: Geotification) {
  // 1
  if !CLLocationManager.isMonitoringAvailable(for: CLCircularRegion.self) {
    showAlert(withTitle:"Error", message: "Geofencing is not supported on this device!")
    return
  }
  // 2
  if CLLocationManager.authorizationStatus() != .authorizedAlways {
    let message = """
      Your geotification is saved but will only be activated once you grant
      Geotify permission to access the device location.
      """
    showAlert(withTitle:"Warning", message: message)
  }
  // 3
  let fenceRegion = region(with: geotification)
  // 4
  locationManager.startMonitoring(for: fenceRegion)
}
上述代码的执行步骤简单说明如下:
- isMonitoringAvailableForClass(_:) 方法判断设备是否支持电子围栏监控功能。如果不支持,退出并提示用户。showAlert() 是 Utilities.swift 中的一个助手方法,需要一个显示时用到的 title 参数和一个 message 参数。
- 然后,判断用户是否授权 app 使用定位服务。如果未授权,app 不会接收任何电子围栏通知。但是,你仍然需要用户能够保存围栏信息,因为用 Core Location 注册电子围栏不需要授权。当用户后面对 app 进行授权后,电子围栏监控会自动开启。
- 用工具方法为指定的 geotification 创建 CLCircularRegion 对象。
- 然后,注册该 CLCircularRegion,让 Core Location 的 location manager 开始监控。
写完这个方法,你需要另一个方法,当用户从 app 中删除 geotification 时停止监控它。
在 GeotificationsViewController.swift,在 startMonitoring(geotificiation:) 方法下添加:
func stopMonitoring(geotification: Geotification) {
  for region in locationManager.monitoredRegions {
    guard let circularRegion = region as? CLCircularRegion,
      circularRegion.identifier == geotification.identifier else { continue }
    locationManager.stopMonitoring(for: circularRegion)
  }
}
这个方法简单停止 locationManager 对指定 geotification 的监控。
开始和停止方法完成后,你可以用在添加、删除 geotification 时调用它们了。首先是添加部分。
首先打开 GeotificationsViewController.swift,找到 addGeotificationViewController(_:didAddCoordinate:radius:identifier:note:eventType:) 方法。
addGeotificationViewController 在创建 geotification时调用这个委托方法。它负责创建一个新的 Geotification对 象并刷新地图和 geotifications 数组。最后,它会调用 saveAllGeotifications(),这个个方法用新的 geotifications 数组作为参数,将它存到 UserDefaults 中。
现在,修改 addGeotificationViewController(_:didAddCoordinate:radius:identifier:note:eventType:) 方法为:
func addGeotificationViewController(
  _ controller: AddGeotificationViewController, didAddCoordinate coordinate: CLLocationCoordinate2D,
  radius: Double, identifier: String, note: String, eventType: Geotification.EventType
) {
  controller.dismiss(animated: true, completion: nil)
  // 1
  let clampedRadius = min(radius, locationManager.maximumRegionMonitoringDistance)
  let geotification = Geotification(coordinate: coordinate, radius: clampedRadius,
    identifier: identifier, note: note, eventType: eventType)
  add(geotification)
  // 2
  startMonitoring(geotification: geotification)
  saveAllGeotifications()
}
主要修改有两处:
- 防止 radius 的值不大于 locationManager 的 maximumRegionMonitoringDistance 属性,这个属性是以米为单位的电子围栏最大半径。这是重要的,因为如果超过了这个最大值,会导致监控失败。
- 调用 startMonitoring(geotification:) 以向 Core Location 注册新添加的 geotification。
这样,app 就能够注册电子围栏的监控了。但是有一个限制:因为电子围栏是系统共享资源,Core Location 限制每个 app 的最大监控电子围栏数是 20。
出于本教程的目的,对这个限制的解决办法(在最后面“接下来去哪儿”会有一些讨论),是限制用户能够添加 geotification 的数目。
在 updateGeotificationCount() 最后添加代码:
navigationItem.rightBarButtonItem?.isEnabled = (geotifications.count < 20)这行代码在添加书达到上限时禁用 Add 按钮。
最后,是删除 geotification。这个功能是在mapView(_:annotationView:calloutAccessoryControlTapped:) 中进行的,当用户点击大头钉上的 delete 按钮会调用这个方法。
在 mapView(_:annotationView:calloutAccessoryControlTapped:)的 remove(geotification) 前面添加一句:
stopMonitoring(geotification: geotification)
这会停止电子围栏监控,然后删除 geotification,保存修改到 UserDefaults。
这样,你的 app 已经能够监控和停止监控用户的电子围栏了。太好了!
Build & run。你发现没有任何改变,但 app 已经能够注册监控区域了。但是,它还不能响应电子围栏事件。别急——这是接下来的工作!
响应电子围栏事件
需要实现几个关于错误处理的委托方法。这会用在万一有错误出现的时候。
在 GeotificationsViewController.swift, 在 CLLocationManagerDelegate 扩展中添加:
func locationManager(_ manager: CLLocationManager, monitoringDidFailFor region: CLRegion?,
                     withError error: Error) {
  print("Monitoring failed for region with identifier: \(region!.identifier)")
}

func locationManager(_ manager: CLLocationManager, didFailWithError error: Error) {
  print("Location Manager failed with the following error: \(error)")
}
这些委托方法简单地输出错误信息以便调试。
注:在你的生产项目中,你肯定想在错误处理时更多做些事情。例如,你不想安静地输出日志,而想通知用户发生了什么。
然后,打开 AppDelegate.swift,你将在这里监听并处理电子围栏的进入/退出事件。
在头部 import Core Location 框架:
import CoreLocation
在 var window: UIWindow? 下添加新属性:
let locationManager = CLLocationManager()
将 application(_:didFinishLaunchingWithOptions:) 修改为:
func application(
  _ application: UIApplication,
  didFinishLaunchingWithOptions launchOptions: [UIApplicationLaunchOptionsKey : Any]? = nil
) -> Bool {
  locationManager.delegate = self
  locationManager.requestAlwaysAuthorization()
  return true
}
你让 AppDelegate 接收电子围栏事件。先不管 Xcode 在这里提示的错误警告,等会我们会解决它。你可能奇怪,“为什么要在 AppDelegate 而不是 view controller 中干这件事呢?”
iOS 会无时不刻地监控 app 注册的电子围栏, 哪怕 app 没有运行了。如果设备在 app 不在运行的情况下触发电子围栏事件,iOS 会自动打开后台中的 app。因此 AppDelegate 是处理这类事件的理想场所,因为 view controller 可能并没有加载或者就绪。
你还可能奇怪,“为什么刚刚才创建的 CLLocationMananger 就知道要监控什么电子围栏呢?”
你的 app 所注册的一切电子围栏都能被 app 中所有的 location mananger 访问,因此无论你在哪里初始化 location mananger 都无所谓。很爽吧?:]
接下来就是实现电子围栏事件的相关委托方法了。在此之前,需要创建一个处理电子围栏事件的方法。
在 AppDelegate.swift 添加方法:
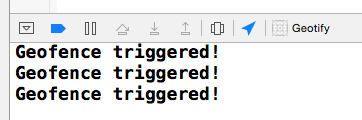
func handleEvent(for region: CLRegion!) {
  print("Geofence triggered!")
}
这个方法有一个 CLRegion 参数,它只是简单地打印一个信息。别急——后面你会实现事件的处理。
然后,在 AppDelegate 的最后添加一个扩展:
extension AppDelegate: CLLocationManagerDelegate {
  func locationManager(_ manager: CLLocationManager, didEnterRegion region: CLRegion) {
    if region is CLCircularRegion {
      handleEvent(for: region)
    }
  }

  func locationManager(_ manager: CLLocationManager, didExitRegion region: CLRegion) {
    if region is CLCircularRegion {
      handleEvent(for: region)
    }
  }
}
正如方法名所示,当设备进入某个区域时调用 locationManager(_:didEnterRegion:) 方法,当设备退出某个区域时调用 locationManager(_:didExitRegion:) 方法。
两个方法都会收到一个 CLRegion 参数。你需要判断它是不是 CLCircularRegion,因为如果 app 监控的是 iBeacon 时它有可能是一个 CLBeaconReion。如果 region 就是一个 CLCircularRegion,再调用 handleEvent(for:)。
注:iOS 在判断到有穿过边界的行为时触发电子围栏事件。如果用户已经位于某个区域内部,iOS 不产生事件。如果你需要知道设备是否位于指定区域以内或者以外,你需要使用苹果提供的 requestStateForRegion(_:) 方法。
现在 app 已经能够监控电子围栏事件了,你需要来测试一下。无论它能不能挑动你的神经,这都是一件值得兴奋的事情,因为在本教程中,你终于能够看到点结果了。
最真实的测试方式是在设备上运行你的 app,添加几个 geotification 然后拿着手机到处走或者开车溜溜。但是,这并不明智,因为你无法在设备不插线的情况下,查看电子围栏事件触发的打印日志。此外,在你提交测试之前,确保这个 app 工作正常是一个好的做法。
幸好,有一个简单的法子,不需要你离开你温暖的小窝。Xcode 允许你在项目中使用 GPX 文件模拟测试位置。在开始项目中已经包含了一个!
打开 Supporting Files 组下的 SimulatedLocations.gpx,你会看到:
<?xml version="1.0"?>
<gpx version="1.1" creator="Xcode">
  <wpt lat="37.3349285" lon="-122.011033">
    <name>Apple</name>
    <time>2014-09-24T14:00:00Z</time>
  </wpt>
  <wpt lat="37.422" lon="-122.084058">
    <name>Google</name>
    <time>2014-09-24T14:00:05Z</time>
  </wpt>
</gpx>
这其实是一个 XML 文件,包含了两个路径点(wpt,waypoint):Google 的山景城和丘珀蒂诺的苹果公园。你会看到每个路径点有一个 time 节点。它们之间相差有 5 秒,因此用这个文件模拟位置时,它会花 5 秒钟从苹果走到谷歌。还有两个 gpx 文件:Apple.gpx 和 Google.gpx。这是固定位置,你可以它们创建电子围栏。
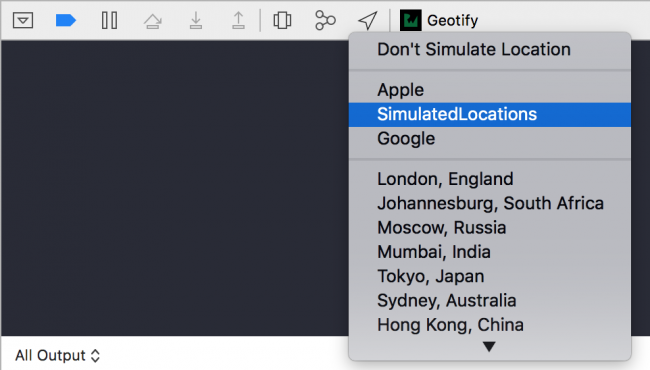
要模拟 GPX 文件中的位置,请 Build & run。当 app 进入主视图控制器后,回到 Xcode,选择调试工具栏的 Location 图标,然后选择 SimulatedLocations:
沿着两个路径点之间的路径添加几个 geotification。如果在注册电子围栏之前添加过 geotification,那么这些 geotification 不会有效,你可以删除它们重新开始。
关于测试位置,一种好的做法是在每个路径点上防止一个 geotification。这是可能的一种测试场景:
Google: Radius: 1000m, Message: "Say Bye to Google!", Notify on Exit
Apple: Radius: 1000m, Message: "Say Hi to Apple!", Notify on Entry
注:为了让添加位置的时候更容易,你可以用额外提供的测试地点。
一旦添加了 geotification,你会在进入/离开电子围栏时看到控制台打印消息。如果你按下 Home 键或者锁屏,让 app 转入后台,每当你穿过电子围栏时仍然能看到打印消息,尽管你无法虚拟地验证这种行为。
注:模拟位置既可以在模拟器也可以在设备上运行。但是,模拟器不是很精确,无论进入还是退出电子围栏,地触发对应的事件的时机不是很一致。在设备上要好得多,或者更流畅,拿起手机来起来逛逛!
通知用户电子围栏事件
app 已经完成大半。这里,当设备穿过电子围栏时通知用户的工作就留给你了,因此请自行完成这个功能。
要通过委托回调获取和 CLCircularRegion 相关的 note 描述字串,你必须从 UserDefaults 中检索对应的 geotification。这也不足为道,因你您可以使用注册时分配给 CLCircularRegion 的唯一 ID 来找到正确的 geotification。
在 AppDelegate.swift 添加一句导入语句:
import UserNotifications
接着,添加一个工具方法:
func note(from identifier: String) -> String? {
  let geotifications = Geotification.allGeotifications()
  guard let matched = geotifications.filter {
    $0.identifier == identifier
  }
  .first else { return nil }
  return matched.note
}
这个工具方法根据 ID 从持久存储中查找 geotification 的 note,然后返回。
现在你已经能返回电子围栏的 note 了,可以编写当电子围栏事件触发的代码并将 note 用于提示的消息。
在 application(_:didFinishLaunchingWithOptions:) 方法 returns 之前添加:
let options: UNAuthorizationOptions = [.badge, .sound, .alert]
UNUserNotificationCenter.current()
  .requestAuthorization(options: options) { success, error in
  if let error = error {
    print("Error: \(error)")
  }
}
最后,添加这个方法:
func applicationDidBecomeActive(_ application: UIApplication) {
  application.applicationIconBadgeNumber = 0
  UNUserNotificationCenter.current().removeAllPendingNotificationRequests()
  UNUserNotificationCenter.current().removeAllDeliveredNotifications()
}
这段代码提示用户打开远程通知。此外,还清空了已有的通知。
然后,修改 handleEvent(for:) 方法为:
func handleEvent(for region: CLRegion!) {
  // 如果 app 是 active 的,显示一个 alert
  if UIApplication.shared.applicationState == .active {
    guard let message = note(from: region.identifier) else { return }
    window?.rootViewController?.showAlert(withTitle: nil, message: message)
  } else {
    // 否则显示本地通知
    guard let body = note(from: region.identifier) else { return }
    let notificationContent = UNMutableNotificationContent()
    notificationContent.body = body
    notificationContent.sound = UNNotificationSound.default()
    notificationContent.badge = UIApplication.shared.applicationIconBadgeNumber + 1 as NSNumber
    let trigger = UNTimeIntervalNotificationTrigger(timeInterval: 1, repeats: false)
    let request = UNNotificationRequest(identifier: "location_change",
                                        content: notificationContent,
                                        trigger: trigger)
    UNUserNotificationCenter.current().add(request) { error in
      if let error = error {
        print("Error: \(error)")
      }
    }
  }
}
如果 app 是激活(active)的,上面的代码会用 alert controller 方式显示 note。否则,显示本地为通知。
Build & run,重复上一节所述的测试过程。当电子围栏事件触发,你会看到 alert 显示出 note 上的备注:

按 Home 键或者锁屏,将 app 切换至后台。你仍然会继续收到电子围栏事件的通知。

这样,你就拥有一个完整的、基于定位的提醒 app 了。好,请离开座位,把你的 app 带出去 show 一下吧!
注:在测试 app 时,可能会发现通知发出的时间并不是刚好在你穿过边界的时候。
这是因为 iOS 在判断是否穿过边界之前,有一个缓冲距离,和设备必须在新位置停留的最短时间。iOS 在内部定义了这些阈值,目的是减少用户在极度接近电子围栏边界的情况下发出的错误通知。
此外,这些阈值好像受定位硬件性能的限制。从经验上讲,当在设备上启用 Wi-Fi 时,电子围栏会更加精确。
接下来去哪里?
恭喜你!你已经可以编写你自己的电子围栏 app 了!
你可以从页尾的 Download Materials 按钮处下载完成后的项目。
电子围栏是一种很有用的技术,在市场营销、资源管理、安全、家长控制、甚至游戏等领域都有许多实用而深远的应用,你能达到什么样的目标完全取决于你的想象力。更多信息可以阅读苹果的区域监控。
我希望你喜欢这篇教程。欢迎在下面留言或提问。