头部登录状态
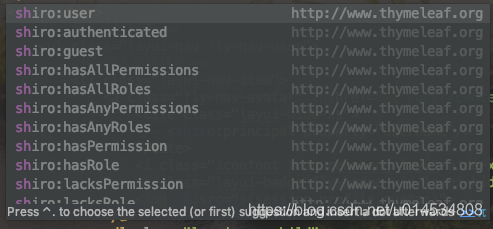
shiro标签的引用
由于shiro标签不是html的原生标签,所有我们需要先引入一个额外的依赖,shiro的标签库(thymeleaf的拓展标签)。
	<dependency>
			<groupId>com.github.theborakompanioni</groupId>
			<artifactId>thymeleaf-extras-shiro</artifactId>
			<version>2.0.0</version>
		</dependency>
依赖添加好之后,然后,我们需要在com.fly.config.ShiroConfig 中初始化一下,注入对应的Bean, 页面才能渲染出来
    //用于thymeleaf模板使用shiro标签,shiro方言标签
    @Bean
    public ShiroDialect shiroDialect() {
        return new ShiroDialect();
    }
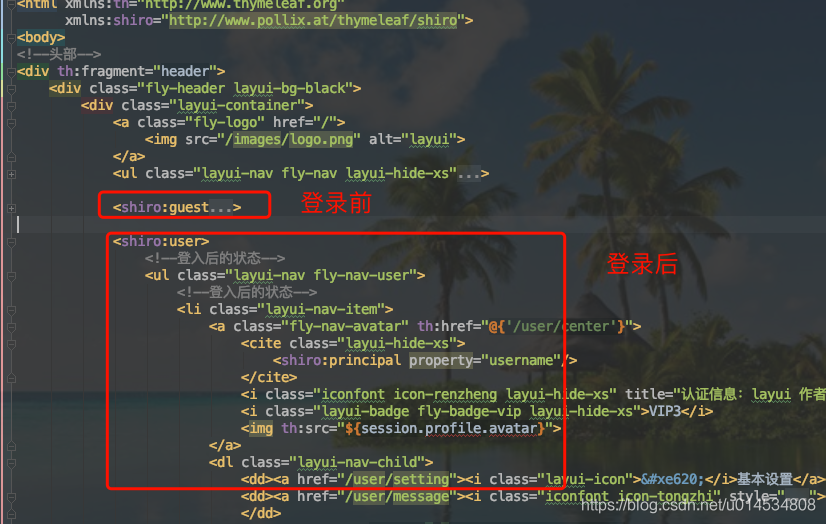
然后在需要使用shiro标签的html 文件的头部添加
<html xmlns:th="http://www.thymeleaf.org"
      xmlns:shiro="http://www.pollix.at/thymeleaf/shiro">
添加好之后,就可以使用<shiro:user></shiro:user> 将要权限控制的内容包起来,当然shiro 标签还有很多
用户信息存到session中
用户登录成功之后需要将用户的信息保存的session中。我们只需要在用户认证的方法中com.fly.shiro.OAuth2Realm 类的doGetAuthenticationInfo 方法中加上如下语句:
//        将登陆信息放在session
        SecurityUtils.getSubject().getSession().setAttribute("profile",profile);
经过如下如上设置我们就实现了登录头部状态的控制
完善个人信息
用户中心
用户中心主要就两个,我发的贴和我收藏的贴
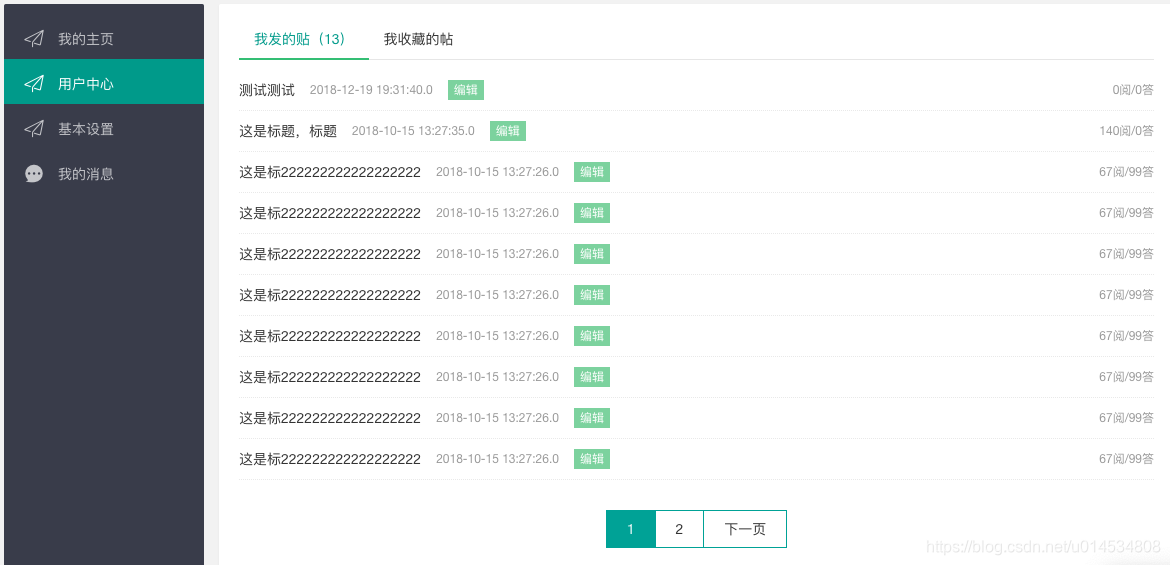
我发的帖子,在这里插入代码片com.homework.controller.CenterController#center 查询条件只有用户id
        QueryWrapper<Post> wrapper = new QueryWrapper<Post>().eq("user_id", getProfileId())
                .orderByDesc("created");
        IPage<Map<String, Object>> pageData = postService.pageMaps(page, wrapper);
        request.setAttribute("pageData", pageData);
我的收藏
 IPage<Map<String, Object>> pageData = userCollectionService.
                pageMaps(page, new QueryWrapper<UserCollection>()
                        .eq("user_id", getProfileId()).orderByDesc("created"));

        postService.join(pageData, "post_id");
        request.setAttribute("pageData", pageData);
基本设置
- tab 切换回显的问题,一个页面有多个tab,如何让在选中tab 之后刷新不丢失原来的tab选中选项呢?答案是在url 后面加上#,这相当于标签的效果。

当前tab页标签定义:

在static/mods/user.js 有如下语句:
  //显示当前tab
  if(location.hash){
    element.tabChange('user', location.hash.replace(/^#/, ''));
  }

  element.on('tab(user)', function(){
    var othis = $(this), layid = othis.attr('lay-id');
    if(layid){
      location.hash = layid;
    }
  });
我们在templates/common/static.html 放入了如下代码,并修改下信息
<script th:inline="javascript" th:if="${session.profile != null}">
    layui.cache.page = '';
    layui.cache.user = {
        username: [[${session.profile.username}]]
        ,uid: [[${session.profile.id}]]
        ,avatar: [[${session.profile.avatar}]]
        ,experience: 0
        ,sex: [[${session.profile.gender}]]
    };
    layui.config({
        version: "3.0.0",
        base: '/mods/' //这里实际使用时,建议改成绝对路径
    }).extend({
        fly: 'index'
    }).use('fly');
</script>
通过上面代码,我们把初始化layui的部分js代码,页面中很多class或id 的div 就拥有了特定的监听或其他。其中就报货截取url 获取#后面的标签用于tab 回显功能,还有头像的上传功能封装等。
加上了上面代码之后你会发现经常会有个异常的弹框,那是浏览器控制台发现去访问/message/nums 的链接,在index.js 文件中找到 新消息通知,按照接口要求我们修改地址为/user/message/nums 并在添加该接口
    @ResponseBody
    @PostMapping("/message/nums")
    public Object getMessNums() {
        Map<Object, Object> result = new HashMap<>();
        result.put("status", 0);
        result.put("count", 3);
        return result;
    }
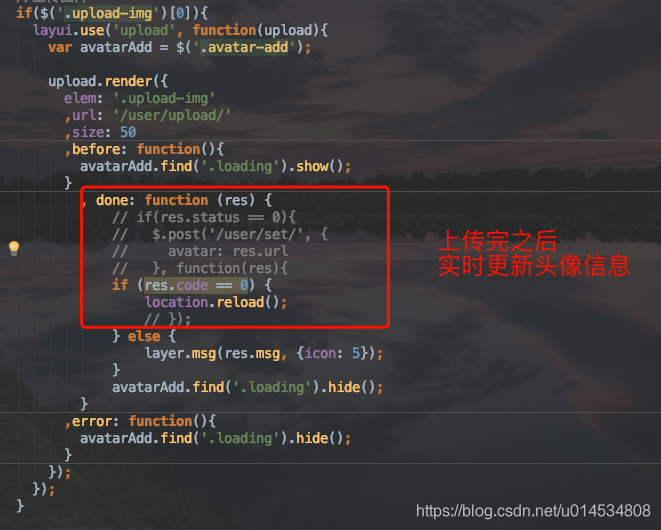
- 头像
头像上传接口com.fly.controller.CenterController#upload,
头像上传核心代码
        String orgName = file.getOriginalFilename();
        log.info("上传文件名为:" + orgName);
//        获取后缀名
        String suffixName = orgName.substring(orgName.lastIndexOf("."));
        log.info("上传的后缀名为:" + suffixName);
//        文件上传后的路径
        String filePath = Constant.uploadDir;
        if ("avatar".equalsIgnoreCase(type)) {
            fileName = "/avatar/avatar_" + getProfileId() + suffixName;
        } else if ("post".equalsIgnoreCase(type)) {
            fileName = "post/post_" + DateUtil.format(new Date(), DatePattern.PURE_DATETIME_MS_FORMAT) + suffixName;
        }

        File dest = new File(filePath + fileName);
//        检查目录是否存在
        if (!dest.getParentFile().exists()) {
            dest.getParentFile().mkdir();
        }
            //上传文件
            file.transferTo(dest);
            log.info("上传成功之后文件的路径={}", dest.getPath());
目前上传的图片我们是到了一个指定目录,然后nginx或者tomcat是可以读取这个目录的,所以可以通过url来访问,一般来说我们把图片上传到云存储服务上。这里先这样弄了。
头像上传之后,更新shiro 中的头像信息
    AccountProfile profile = getProfile();
      profile.setAvatar(url);
图片上传之后更新图像信息
- 密码
密码重置接口com.fly.controller.CenterController#resetPwd
接口代码比较简单:
    @ResponseBody
    @PostMapping("/resetPwd")
    public R restPwd(String nowpass, String pass) {
        //查询用户
        User user = userService.getById(getProfileId());
        if (user == null || !nowpass.equals(user.getPassword())) {
            return R.failed("密码不正确");
        }
        user.setPassword(pass);
        boolean result = userService.updateById(user);
        return R.ok(result);
    }
前端页面在 /user/setting.html 中
发表,编辑博客
发表和编辑博客是同一个页面,前端页面展示
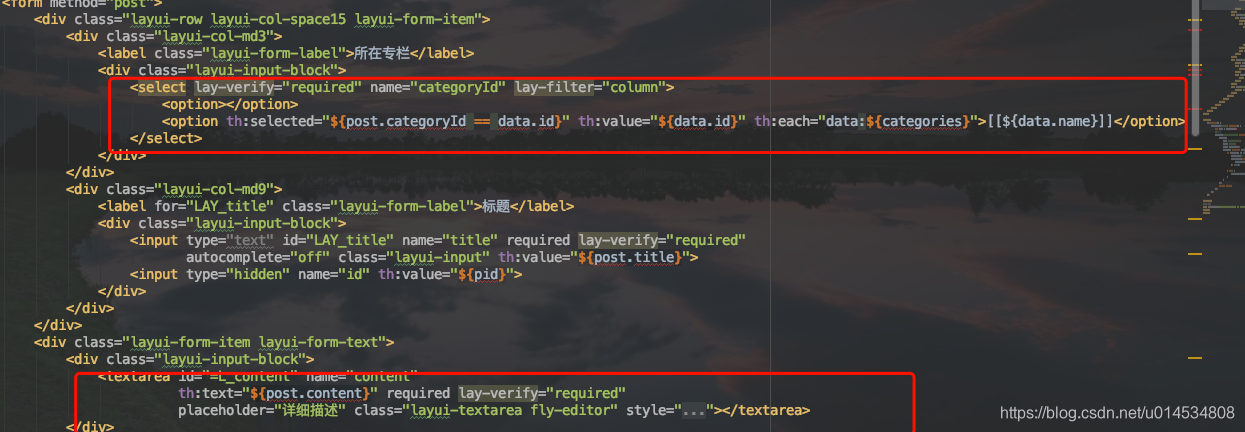
ajax 请求代码:
    $(function() {
        layui.use('form', function() {
            var form = layui.form;
            //监听提交
            form.on('submit(post)', function (data) {
                $.ajax({
                    url: '/user/post',
                    type: "POST",
                    data: data.field,
                    success: function (res) {
                        if (res.code == 0) {
                            layer.msg("操作成功");
                            setTimeout(function () {
                                location.href="/post/" + res.data;
                            }, 1000);

                        } else {
                            layer.msg(res.msg);
                        }
                    }
                });
                return false;
            });
        });
    });
后台接口在com.fly.controller.PostController类中:
  @ResponseBody
    @PostMapping("/user/post")
    public R postArticle(@Valid Post post, BindingResult bindingResult) {
        if (bindingResult.hasErrors()) {
            return R.failed(bindingResult.getFieldError().getDefaultMessage());
        }
//        新增文章
        if (post.getId() == null) {
            post.setUserId(getProfileId());

            post.setModified(new Date());
            post.setCreated(new Date());
            post.setCommentCount(0);
            post.setEditMode(Constant.EDIT_HTML_MODEL);
            post.setLevel(0);
            post.setRecommend(false);
            post.setViewCount(0);
            post.setVoteDown(0);
            post.setVoteUp(0);
            post.setStatus(Constant.NORMAL_STATUS);

        } else {
            Post tempPost = postService.getById(post.getId());
            if (tempPost.getUserId().equals(getProfileId())) {
                return R.failed("不是自己的帖子");
            }
        }
        postService.saveOrUpdate(post);
        // TODO: 2018/12/13 给所有订阅人发送消息

        return R.ok(post.getId());
    }
博文回显
用户编辑完博客之后,点击提交保存之后就可以 调用/user/post 进行博文回显,博客的地址com.fly.controller.PostController#index, 博文回显主要博文,用户,分类以及评论信息,核心代码如下:
        Map<String, Object> post = postService.getMap(new QueryWrapper<Post>().eq("id", id));

        userService.join(post, "user_id");
        categoryService.join(post, "category_id");

        Assert.notNull(post, "该文章已被删除");

        req.setAttribute("post", post);
        req.setAttribute("currentCategoryId", post.get("category_id"));


        Page<Comment> page = new Page<>();
        page.setCurrent(current);
        page.setSize(size);

        IPage<Map<String, Object>> pageData = commentService.pageMaps(page, new QueryWrapper<Comment>()
                .eq("post_id", id)
                .orderByDesc("created"));

        userService.join(pageData, "user_id");
        commentService.join(pageData, "parent_id");

        req.setAttribute("pageData", pageData);
前端页面在 templates/post/index.html 部分代码如下:

页面效果如下:
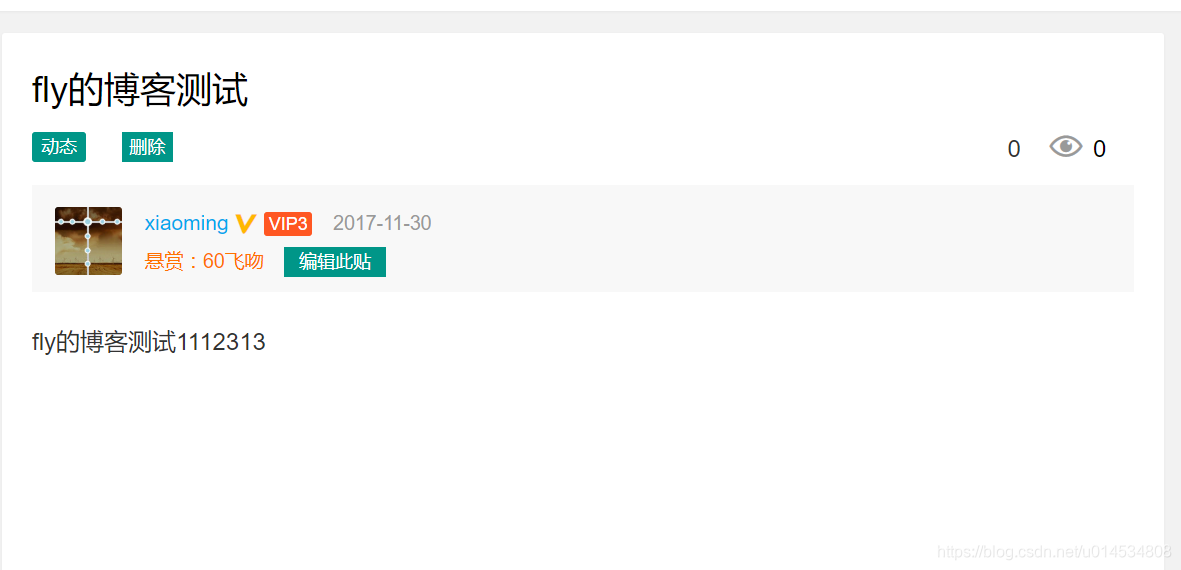
用户主页
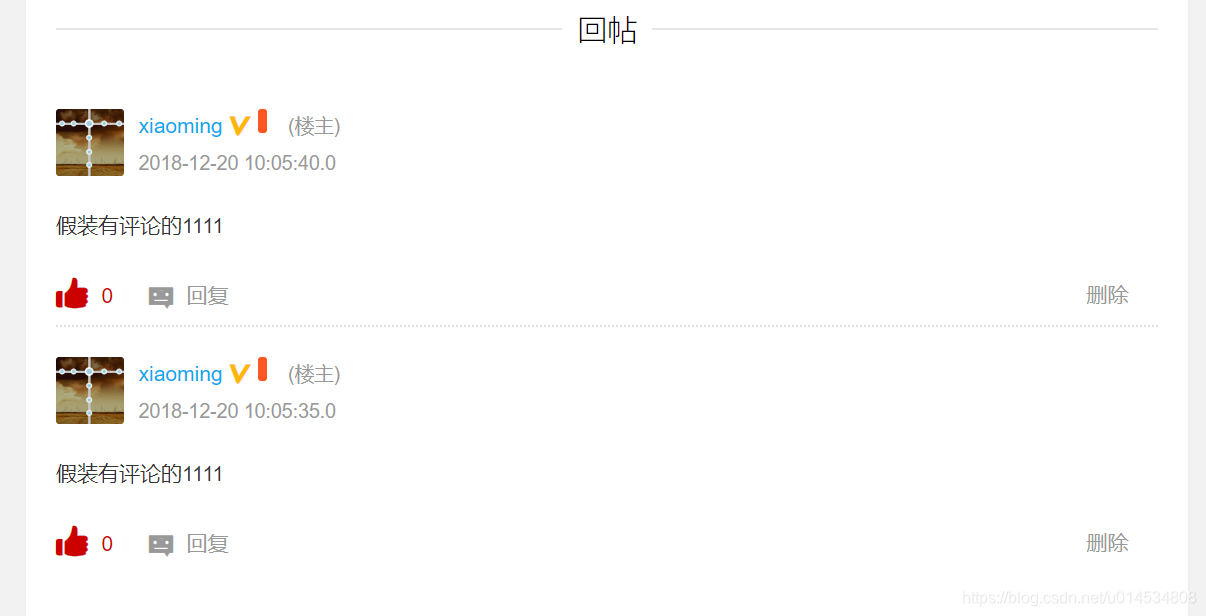
博客评论功能
用户评论表:
CREATE TABLE `comment` (
  `id` bigint(32) NOT NULL AUTO_INCREMENT COMMENT '主键ID',
  `content` longtext NOT NULL COMMENT '评论的内容',
  `parent_id` bigint(32) DEFAULT NULL COMMENT '回复的评论ID',
  `post_id` bigint(32) NOT NULL COMMENT '评论的内容ID',
  `user_id` bigint(32) NOT NULL COMMENT '评论的用户ID',
  `vote_up` int(11) unsigned NOT NULL DEFAULT '0' COMMENT '“顶”的数量',
  `vote_down` int(11) unsigned NOT NULL DEFAULT '0' COMMENT '“踩”的数量',
  `level` tinyint(2) unsigned NOT NULL DEFAULT '0' COMMENT '置顶等级',
  `status` tinyint(2) DEFAULT NULL COMMENT '评论的状态',
  `created` datetime NOT NULL COMMENT '评论的时间',
  `modified` datetime DEFAULT NULL COMMENT '评论的更新时间',
  PRIMARY KEY (`id`)
) ENGINE=InnoDB AUTO_INCREMENT=3 DEFAULT CHARSET=utf8mb4;
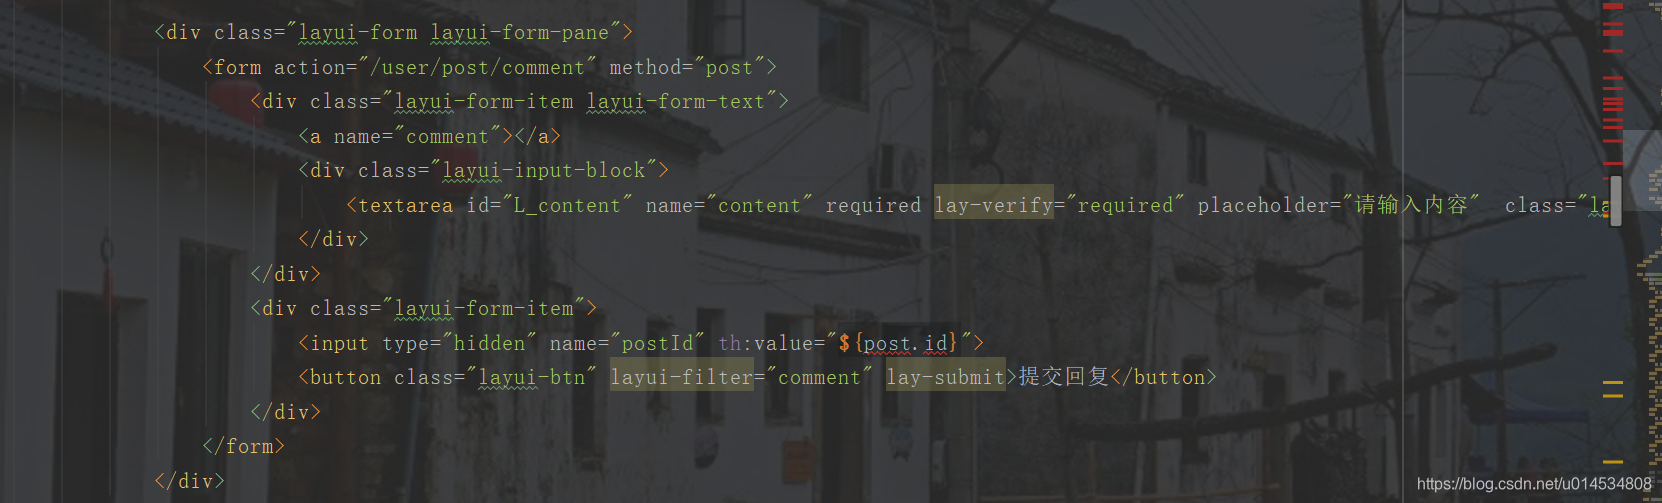
后端接口代码在在这里插入代码片
    @ResponseBody
    @PostMapping("/user/post/comment")
    public R commentAdd(@Valid Comment comment, BindingResult bindingResult) {
        Post post = postService.getById(comment.getPostId());
        Assert.isTrue(post != null, "该帖子已被删除");

        comment.setUserId(getProfileId());
        comment.setCreated(new Date());
        comment.setModified(new Date());
        comment.setStatus(Constant.NORMAL_STATUS);

        // TODO 记录动作

        // TODO 通知作者
        commentService.save(comment);
        return R.ok(null);
    }
前端页面在 templates/post/index.html 提交评论代码如下:
参考代码:
https://github.com/XWxiaowei/FlyBlog/tree/v5-collection-center