版权声明:本文为博主原创文章,未经博主允许不得转载。 https://blog.csdn.net/yql_617540298/article/details/84783350
一、仿射变换(Affine Transformation)
放射变换(平面变换、二维坐标变换):是空间直角坐标系的变换,从一个二维坐标变换到另一个二维坐标,仿射变换是一个线性变换,保持了图像的“平行性”和“平直性”,即图像中原来的直线和平行线,变换后仍然保持原来的直线和平行线。
仿射变换比较常用的特殊变换有平移(Translation)、缩放(Scale)、翻转(Flip)、旋转(Rotation)和剪切(Shear);
仿射变换性质:
(1)仿射变化只有6个自由度(对应变换中的6个系数),仿射变换后相互平行直线仍然是平行直线,三角形映射后仍是三角形;但却不能保证四边形以上的多变性映射为等边数的多边形;
(2)仿射变换的乘积和逆变换仍是仿射变换;
(3)仿射变换包含:平移、旋转、缩放等几何变换。
二、透视变换(Perspective Transformation)
透视变换(空间变换、三维坐标变换):是指利用透视中心、像点、目标点三点共线的条件,按透视旋转定律使承影面(透视面)绕迹线(透视轴)旋转某一角度,破坏原有的投影光线束,仍能保持承影面上投影几何图形不变的变换。
三、源码
图像若需保存代码为:
cv2.imwrite("F:/b.jpg",res)第一个参数:路径下,指定文件名;
第二个参数:保存的图像。
1. 平移
import cv2
import numpy as np
import matplotlib.pyplot as plt

img = cv2.imread('F:/a.jpg')
H = np.float32([[1,0,100],[0,1,100]])
rows,cols = img.shape[:2]
res = cv2.warpAffine(img,H,(rows,cols)) #需要图像、变换矩阵、变换后的大小
plt.subplot(121)
plt.imshow(img)
plt.subplot(122)
plt.imshow(res)
2. 放缩
resize()函数可以进行图像的放大、缩小,但需要选择合适的插值方式。
import cv2
import matplotlib.pyplot as plt

img = cv2.imread('F:/a.jpg')
res1 = cv2.resize(img,None,fx=2,fy=2,interpolation=cv2.INTER_CUBIC)
height,width = img.shape[:2]
res2 = cv2.resize(img,(2*width,2*height),interpolation=cv2.INTER_CUBIC)
plt.subplot(131)
plt.imshow(img)
plt.subplot(132)
plt.imshow(res1)
plt.subplot(133)
plt.imshow(res2)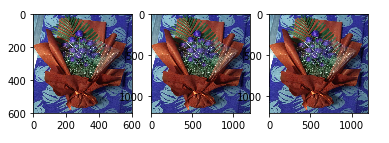
3. 旋转
import cv2
import matplotlib.pyplot as plt

img = cv2.imread('F:/a.jpg')
rows,cols = img.shape[:2]
#第一个参数旋转中心,第二个参数旋转角度,第三个参数:缩放比例
M = cv2.getRotationMatrix2D((cols/2,rows/2),45,1)
#第三个参数:变换后的图像大小
res = cv2.warpAffine(img,M,(rows,cols))

plt.subplot(121)
plt.imshow(img)
plt.subplot(122)
plt.imshow(res)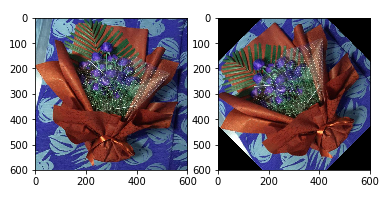
4. 仿射
import cv2
import numpy as np
import matplotlib.pyplot as plt

img = cv2.imread('F:/a.jpg')
rows,cols = img.shape[:2]
pts1 = np.float32([[50,50],[200,50],[50,200]])
pts2 = np.float32([[10,100],[200,50],[100,250]])
M = cv2.getAffineTransform(pts1,pts2)
#第三个参数:变换后的图像大小
res = cv2.warpAffine(img,M,(rows,cols))
plt.subplot(121)
plt.imshow(img)
plt.subplot(122)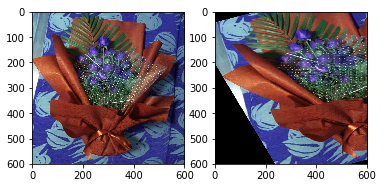
5. 投影
(1)垂直投影
import cv2
import numpy as np
from matplotlib import pyplot as plt

img=cv2.imread('F:/a.jpg')
GrayImage=cv2.cvtColor(img,cv2.COLOR_BGR2GRAY)   #将BGR图转为灰度图
ret,thresh1=cv2.threshold(GrayImage,130,255,cv2.THRESH_BINARY)  #将图片进行二值化(130,255)之间的点均变为255(背景)
(h,w)=thresh1.shape #返回高和宽
a = [0 for z in range(0, w)]
#记录每一列的波峰
for j in range(0,w): #遍历一列
    for i in range(0,h):  #遍历一行
        if  thresh1[i,j]==0:  #如果改点为黑点
            a[j]+=1  		#该列的计数器加一计数
            thresh1[i,j]=255  #记录完后将其变为白色
for j  in range(0,w):  #遍历每一列
    for i in range((h-a[j]),h):  #从该列应该变黑的最顶部的点开始向最底部涂黑
        thresh1[i,j]=0   #涂黑
plt.imshow(thresh1,cmap=plt.gray())
plt.show()
cv2.imshow('img',thresh1)
cv2.waitKey(0)
cv2.destroyAllWindows()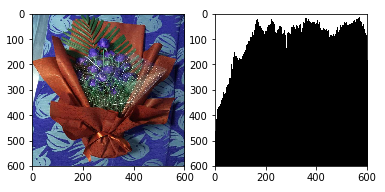
(2)水平投影
import cv2
import numpy as np
from matplotlib import pyplot as plt

img=cv2.imread('F:/a.jpg')
GrayImage=cv2.cvtColor(img,cv2.COLOR_BGR2GRAY)
ret,thresh1=cv2.threshold(GrayImage,130,255,cv2.THRESH_BINARY)

(h,w)=thresh1.shape #返回高和宽

a = [0 for z in range(0, h)]

for j in range(0,h):
    for i in range(0,w):
        if  thresh1[j,i]==0:
            a[j]+=1
            thresh1[j,i]=255

for j  in range(0,h):
    for i in range(0,a[j]):
        thresh1[j,i]=0

plt.imshow(thresh1,cmap=plt.gray())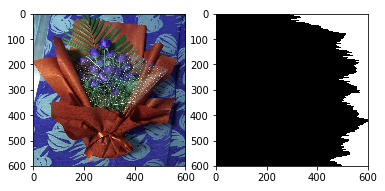
(3)基于投影的字符分割
import cv2
import numpy as np

path = 'F:/b.jpg'
root = 'F:/b/'
dsize = 28
img = cv2.imread(path)
data = np.array(img)
len_x = data.shape[0]
len_y = data.shape[1]
min_val = 10 #设置最小的文字像素高度

start_i = -1
end_i = -1
rowPairs = [] #存放每行的起止坐标

#行分割
for i in range(len_x):
    if(not data[i].all() and start_i < 0):
        start_i = i
    elif(not data[i].all()):
        end_i = i
    elif (data[i].all() and start_i >= 0):
        #print(end_i - start_i)
        if(end_i - start_i >= min_val):
            rowPairs.append((start_i, end_i))
        start_i, end_i = -1, -1
#列分割
start_j = -1
end_j = -1
min_val_word = 8  #最小文字像素长度
number = 0 #分割后保存编号
for start, end in rowPairs:
    for j in range(len_y):
        if(not data[start: end, j].all() and start_j < 0):
            start_j = j
        elif(not data[start: end, j].all()):
             end_j = j
        elif(data[start: end, j].all() and start_j >= 0):
            if(end_j - start_j >= min_val_word):
                #print(end_j - start_j)
                tmp = data[start:end, start_j: end_j]
                im2save = cv2.resize(tmp, (dsize,dsize)) #归一化处理
                cv2.imwrite(root + '%d.png' % number, im2save)
                number += 1
                #print("%d  pic" % number)
            start_j, end_j = -1, -1
