概述
Flume 是 Cloudera 提供的一个高可用的,高可靠的,分布式的海量日志采
集、聚合和传输的系统。Flume 支持定制各类数据发送方,用于收集各类型数据;同时,Flume 提供对数据进行简单处理,并写到各种数据接受方(可定制)的能
力。一般的采集需求,通过对 flume 的简单配置即可实现。针对特殊场景也具备
良好的自定义扩展能力。因此,flume 可以适用于大部分的日常数据采集场景。
当前 Flume 有两个版本。Flume 0.9X 版本的统称 Flume OG(original
generation),Flume1.X 版本的统称 Flume NG(next generation)。由于 Flume
NG 经过核心组件、核心配置以及代码架构重构,与 Flume OG 有很大不同,使用
时请注意区分。改动的另一原因是将 Flume 纳入 apache 旗下,cloudera Flume
改名为 Apache Flume。
该博客介绍Flume版本为:1.6.0,运行环境为:Centos 6.9
运行机制
Flume 的核心是把数据从数据源(source)收集过来,在将收集到的数据送到
指定的目的地(sink)。为了保证输送的过程一定成功,在送到目的地(sink)之前,
会先缓存数据(channel),待数据真正到达目的地(sink)后,flume 在删除自己缓
存的数据。
Flume 分布式系统中核心的角色是 agent,agent 本身是一个 Java 进程,一
般运行在日志收集节点。flume 采集系统就是由一个个 agent 所连接起来形成。
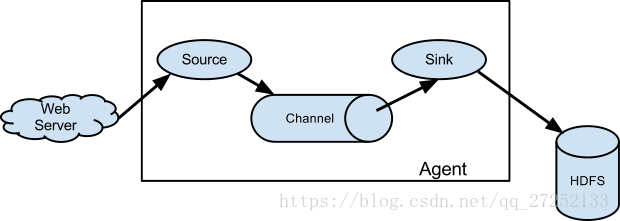
每一个 agent 相当于一个数据传递员,内部有三个组件:
- Source:采集源,用于跟数据源对接,以获取数据
- Sink:下沉地,采集数据的传送目的,用于往下一级 agent 传递数据或者往
最终存储系统传递数据 - Channel:agent 内部的数据传输通道,用于从 source 将数据传递到 sink
在整个数据的传输的过程中,流动的是 event,它是 Flume 内部数据传输的
最基本单元。一个完整的 event 包括:event headers、event body、event 信息,其中event 信息就是 flume 收集到的日记记录。
安装部署
- 下载地址:
https://www.apache.org/dist/flume/1.6.0/apache-flume-1.6.0-bin.tar.gz - 减压:
tar -zxvf apache-flume-1.6.0-bin.tar.gz - 进入flume的目录修改conf下的
flume.env.sh,在里面配置JAVA_HOME
测试Flume是否能正常运行
- 在conf目录下新建一个文件:vi netcat-logger.conf
# 定义这个 agent 中各组件的名字
a1.sources = r1
a1.sinks = k1
a1.channels = c1
# 描述和配置 source 组件:r1
a1.sources.r1.type = netcat
a1.sources.r1.bind = localhost
a1.sources.r1.port = 44444
# 描述和配置 sink 组件:k1
a1.sinks.k1.type = logger
# 描述和配置 channel 组件,此处使用是内存缓存的方式
a1.channels.c1.type = memory
a1.channels.c1.capacity = 1000
a1.channels.c1.transactionCapacity = 100
# 描述和配置 source channel sink 之间的连接关系
a1.sources.r1.channels = c1
a1.sinks.k1.channel = c1
2.启动agent去采集数据
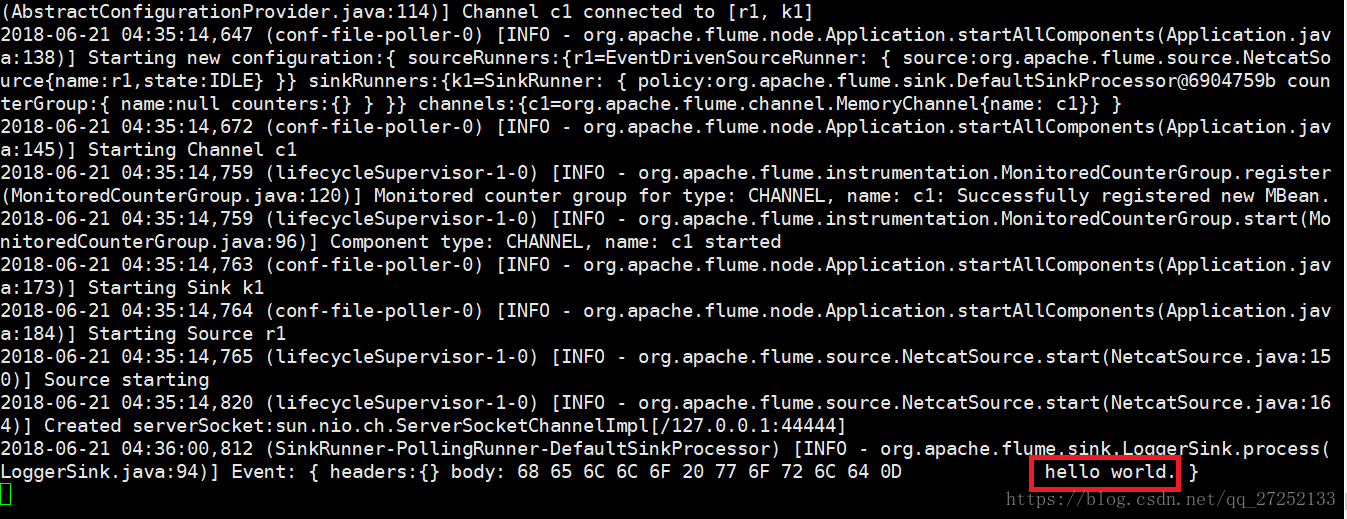
在flume目录下执行
bin/flume-ng agent -c conf -f conf/netcat-logger.conf -n a1 -Dflume.root.logger=INFO,console-c conf 指定 flume 自身的配置文件所在目录
-f conf/netcat-logger.con 指定我们所描述的采集方案
-n a1 指定我们这个 agent 的名字
3.测试
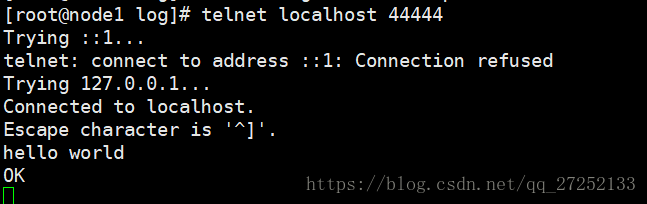
先要往 agent 采集监听的端口上发送数据,让 agent 有数据可采。
随便在一个能跟 agent 节点联网的机器上:
telnet localhost 44444如果没有安装telnet先使用yum -y install telnet 安装
如果产生如下效果证明flume安装并启动成功
Flume简单案例
采集目录到HDFS
采集需求:服务器的某特定目录下,会不断产生新的文件,每当有新文件出现,就需要把文件采集到HDFS中去
根据需求,首先定义以下三大要素:
- 采集源,即source:spooldir
- 下沉目标,即sink:hdfs sink
- source和sink之间传递的通道-channel,可用file channel也可以用内存channel
配置文件编写:
# Name the components on this agent
a1.sources = r1
a1.sinks = k1
a1.channels = c1

# Describe/configure the source
##注意:不能往监控目中重复丢同名文件
a1.sources.r1.type = spooldir
a1.sources.r1.spoolDir = /root/logs
a1.sources.r1.fileHeader = true

# Describe the sink
a1.sinks.k1.type = hdfs
a1.sinks.k1.channel = c1
a1.sinks.k1.hdfs.path = /flume/events/%y-%m-%d/%H%M/
a1.sinks.k1.hdfs.filePrefix = events-
a1.sinks.k1.hdfs.round = true
a1.sinks.k1.hdfs.roundValue = 10
a1.sinks.k1.hdfs.roundUnit = minute
a1.sinks.k1.hdfs.rollInterval = 3
a1.sinks.k1.hdfs.rollSize = 20
a1.sinks.k1.hdfs.rollCount = 5
a1.sinks.k1.hdfs.batchSize = 1
a1.sinks.k1.hdfs.useLocalTimeStamp = true
#生成的文件类型,默认是Sequencefile,可用DataStream,则为普通文本
a1.sinks.k1.hdfs.fileType = DataStream

# Use a channel which buffers events in memory
a1.channels.c1.type = memory
a1.channels.c1.capacity = 1000
a1.channels.c1.transactionCapacity = 100

# Bind the source and sink to the channel
a1.sources.r1.channels = c1
a1.sinks.k1.channel = c1
测试:
启动该agent和HDFS,向/root/logs 目录中创建一个文件,观察agent的输出,最终结果在HDFS的/flume/events/ 下有文件产生说明测试成功
采集文件到HDFS
需求:业务系统使用 j log4j 生成的日志,日志内容不断增加,需要把追加到日志文件中的数据实时采集到 HDFS
根据需求,首先定义一下3大要素:
- source :
exec tail -F file - sink :
hdfs - channel : 这里我们使用
memory
编写配置文件:
# Name the components on this agent
a1.sources = r1
a1.sinks = k1
a1.channels = c1

# Describe/configure the source
a1.sources.r1.type = exec
a1.sources.r1.command = tail -F /root/logs/test.log
a1.sources.r1.channels = c1

# Describe the sink
a1.sinks.k1.type = hdfs
a1.sinks.k1.channel = c1
a1.sinks.k1.hdfs.path = /flume/tailout/%y-%m-%d/%H%M/
a1.sinks.k1.hdfs.filePrefix = events-
a1.sinks.k1.hdfs.round = true
a1.sinks.k1.hdfs.roundValue = 10
a1.sinks.k1.hdfs.roundUnit = minute
a1.sinks.k1.hdfs.rollInterval = 3
a1.sinks.k1.hdfs.rollSize = 20
a1.sinks.k1.hdfs.rollCount = 5
a1.sinks.k1.hdfs.batchSize = 1
a1.sinks.k1.hdfs.useLocalTimeStamp = true
#生成的文件类型,默认是Sequencefile,可用DataStream,则为普通文本
a1.sinks.k1.hdfs.fileType = DataStream


# Use a channel which buffers events in memory
a1.channels.c1.type = memory
a1.channels.c1.capacity = 1000
a1.channels.c1.transactionCapacity = 100

# Bind the source and sink to the channel
a1.sources.r1.channels = c1
a1.sinks.k1.channel = c1
测试同采集目录到hfs
日志的采集和汇总
需求:把不同种类的日志采集汇总到hdfs的不同种类目录下。
access.log、nginx.log、web.log日志采集到hdfs中目录如下:
/source/logs/access/20160101/**
/source/logs/nginx/20160101/**
/source/logs/web/20160101/**
配置文件如下:
# Name the components on this agent
a1.sources = r1 r2 r3
a1.sinks = k1
a1.channels = c1

# Describe/configure the source
a1.sources.r1.type = exec
a1.sources.r1.command = tail -F /root/log/access.log
a1.sources.r1.interceptors = i1
a1.sources.r1.interceptors.i1.type = static
a1.sources.r1.interceptors.i1.key = type
a1.sources.r1.interceptors.i1.value = access

a1.sources.r2.type = exec
a1.sources.r2.command = tail -F /root/log/nginx.log
a1.sources.r2.interceptors = i2
a1.sources.r2.interceptors.i2.type = static
a1.sources.r2.interceptors.i2.key = type
a1.sources.r2.interceptors.i2.value = nginx

a1.sources.r3.type = exec
a1.sources.r3.command = tail -F /root/log/web.log
a1.sources.r3.interceptors = i3
a1.sources.r3.interceptors.i3.type = static
a1.sources.r3.interceptors.i3.key = type
a1.sources.r3.interceptors.i3.value = web

# Describe the sink
a1.sinks.k1.type = avro
a1.sinks.k1.hostname = node2
a1.sinks.k1.port = 41414

# Use a channel which buffers events in memory
a1.channels.c1.type = memory
a1.channels.c1.capacity = 2000000
a1.channels.c1.transactionCapacity = 100000

# Bind the source and sink to the channel
a1.sources.r1.channels = c1
a1.sources.r2.channels = c1
a1.sources.r3.channels = c1
a1.sinks.k1.channel = c1
测试:
while true ; do echo 'access  access....' >>/root/log/access.log;done

while true ; do echo 'nginx  nginx....' >>/root/log/nginx.log;done

while true ; do echo 'web  web....' >>/root/log/web.log;done
分别向三种类型的文件写入数据,观察hdfs中是否有对应的目录生成。