一、链路聚合
简介:
链路聚合(Link Aggregation)是一个计算机网络术语,指将多个物理端口汇聚在一起,形成一个逻辑端口,以实现出/入流量吞吐量在各成员端口的负荷分担,交换机根据用户配置的端口负荷分担策略决定网络封包从 哪个成员端口发送到对端的交换机。当交换机检测到其中一个成员端口的链路发生故障时,就停止在此端口上发送封包,并根据负荷分担策略在剩下的链路中重新计 算报文的发送端口,故障端口恢复后再次担任收发端口。链路聚合在增加链路带宽、实现链路传输弹性和工程冗余等方面是一项很重要的技术。
作用:
1、增加网络带宽
2、提高网络连接的可靠性
BOND和TEAM两种链路聚合的区别
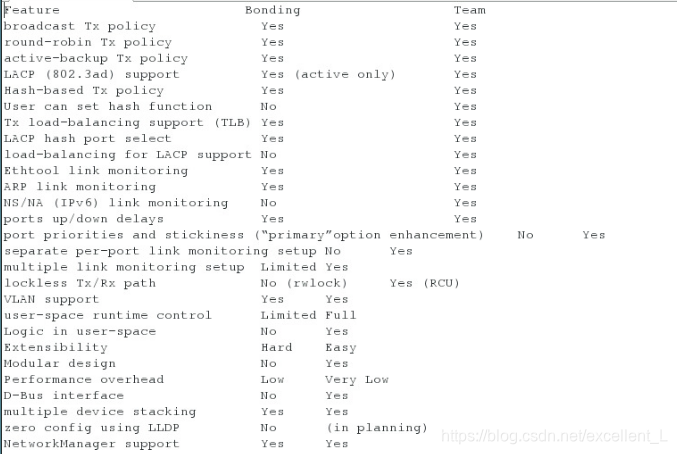
team网络支持负载均衡,bond不支持负载均衡
team网络支持ipv6,bond不支持ipv6
team网络支持hash加密,bond不支持hash加密
二、bond链路聚合
网卡bond是通过把多张网卡绑定为一个逻辑网卡,实现本地网卡的冗余,带宽扩容和负载均衡。
1. 命令方式设置网络
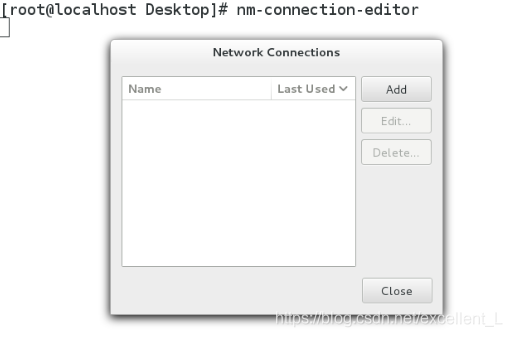
编辑nm-connection-editor 删除之前的所有网络配置
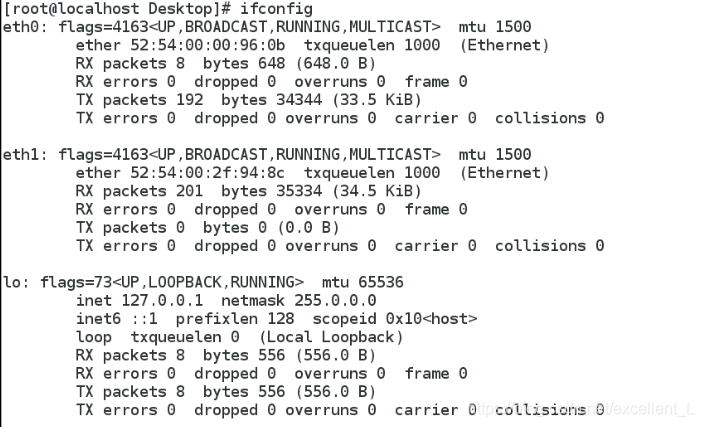
执行ifconfig 查看
编辑nmcli connection add con-name bond0 ifname bond0 type bond mode active-backup ip4 172.25.254.203/24 建立bond0接口

为聚合连接提供配置(连接名 -- bond0,类型 -- bond,运行器 -- active-backup轮询式,IP地址 -- 172.25.254.203/24)
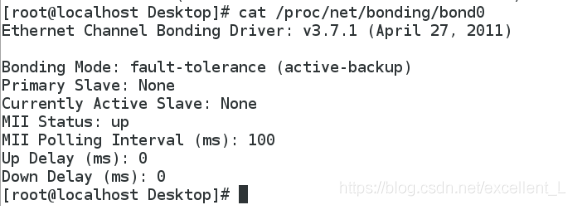
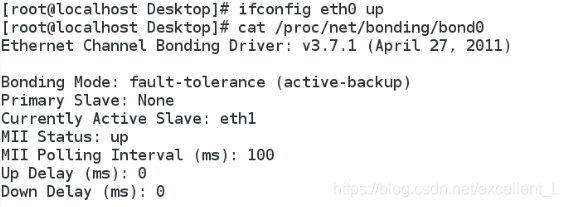
cat /proc/net/bonding/bond0 查看bond0状态
编辑nmcli connection add con-name eth0 ifname eth0 type bond-slave master bond0 添加eth0设备与bond0接口建立连接

编辑nmcli connection add con-name eth1 ifname eth1 type bond-slave master bond0 添加eth1设备与bond0接口建立连接(作为备用)

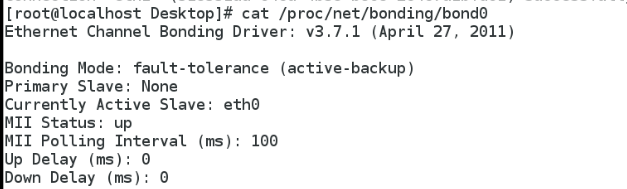
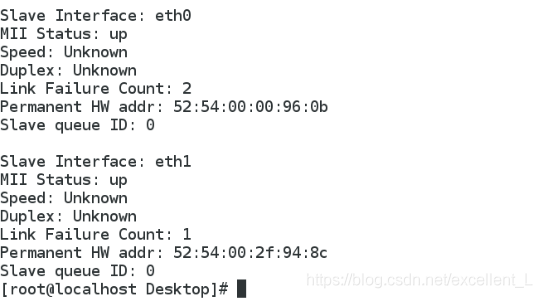
cat /proc/net/bonding/bond0 查看bond0接口信息

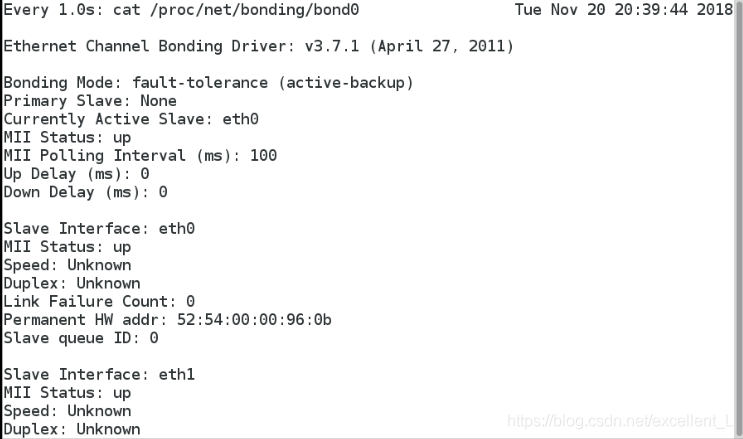
监控命令watch -n 1 cat /proc/net/bonding/bond0
![]()
在真机ping 172.25.254.203 成功

当网卡eth0损坏,那么eth1顶替eth0为bond0连接工作
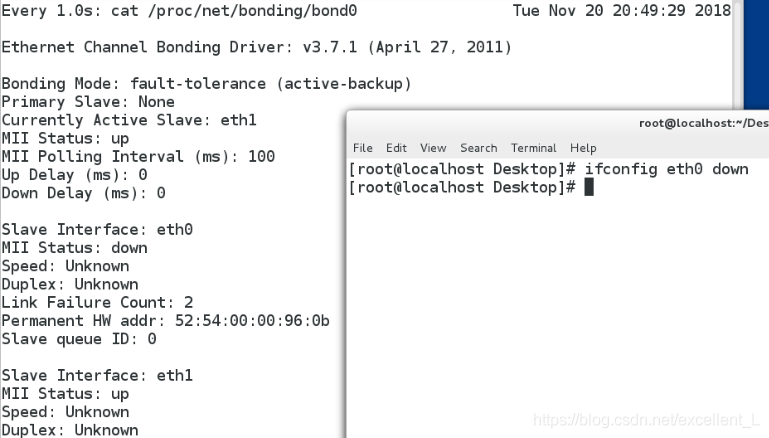
当我们修复好eth0网卡,为bond0连接工作的还是eth1,而eth0则是备用网卡,只有在eth1出现问题eth0才会顶替eth1为bond0工作
当eth0与eth1同时损坏则主机ping 172.25.254.203 不通
![]()

2. 文本方式设置网络
nm-connection-editor 删除之前的所有网络

编辑cd /etc/sysconfig/network-scripts/进入网络配置目录
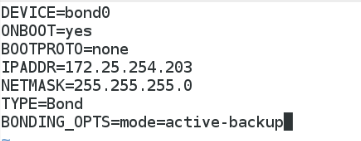
编辑vim ifcfg-bond0
![]()
写入内容
DEVICE=bond0
ONBOOT=yes
BOOTPROTO=none
IPADDR=172.25.254.203
NETMASK=255.255.255.0
TYPE=Bond
BONDING_OPTS=mode=active-backup
编辑vim ifcfg-eth0
![]()
写入内容
DEVICE=eth0
ONBOOT=yes
BOOTPROTO=none
MASTER=bond0

编辑vim ifcfg-eth1
![]()
写入内容
DEVICE=eth1
ONBOOT=yes
BOOTPROTO=none
MASTER=bond0

编辑systemctl restart network 重新启动网络
![]()
cat /proc/net/bonding/bond0 查看
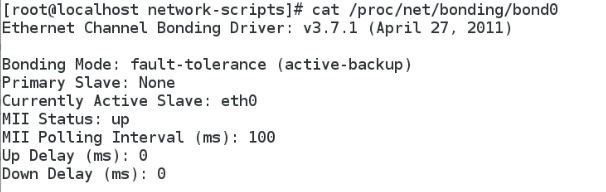

在真机里ping 172.25.254.203 成功

三、TEAM链路聚合
在 linux 中, centos7之前都是使用bond机制来实现多网络绑定同一个IP 地址,来对网络提供访问,并按不同的模式来负载均衡或者轮回接替管理处理数据。而到了contos7之后,提供了一种强大的工具,nmcli工具命令,使用此工具,将会根据命令参数的配置来重新生成特定的配置文件来供网络接口使用,方便而又灵活。在linux不再使用bond机制定义,而是使用网路组 team 机制,把 team 组当作一个设备。
team 网络的设置
1. 命令方式设置网络
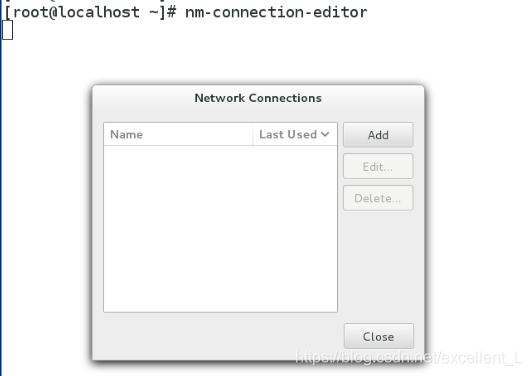
nm-connection-editor 删除之前的所有网络
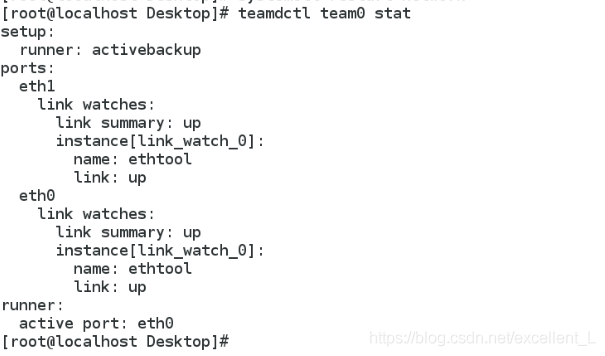
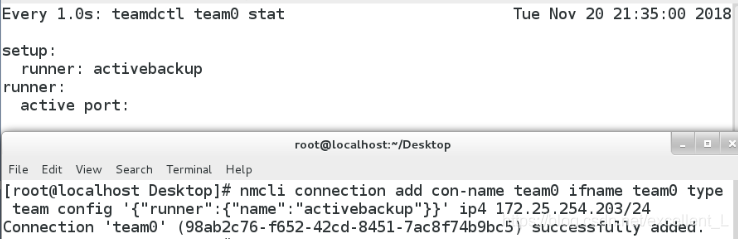
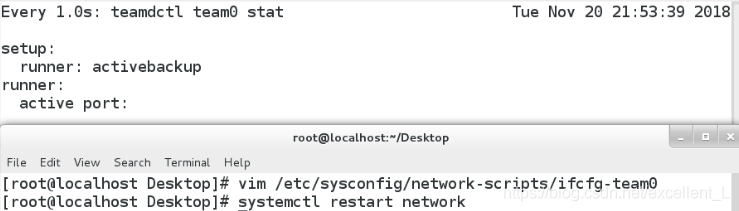
用监控命令监控 watch -n 1 teamdctl team0 stat
![]()
另外开启一个shell执行
编辑nmcli connection add con-name team0 ifname team0 type team config '{"runner":{"name":"activebackup"}}' ip4 172.25.254.203/24
真机ping 172.25.254.203 不通 没有建立连接

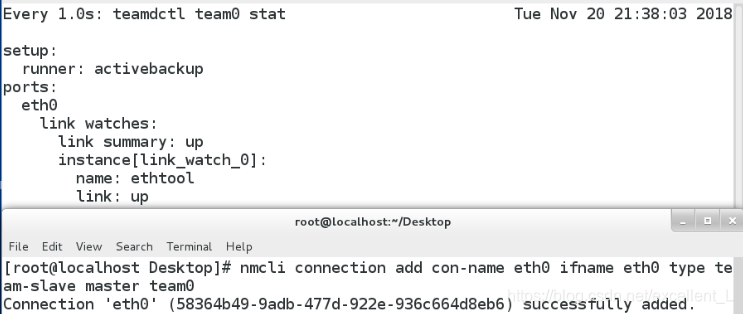
编辑nmcli connection add con-name eth0 ifname eth0 type team-slave master team0 添加eth0设备与team0接口建立连接
编辑nmcli connection add con-name eth1 ifname eth1 type team-slave master team0 添加eth1设备与team1接口建立连接(作为备用)
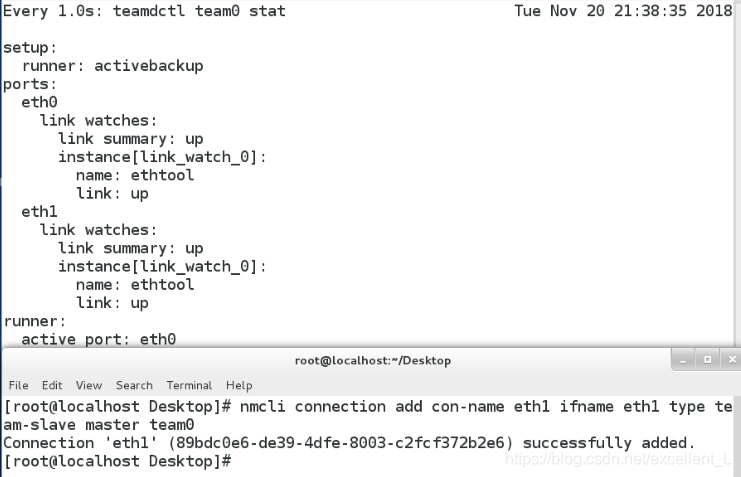
teamdctl team0 stat查看team0 状态信息

真机ping 172.25.254.203 成功

2.文本方式设置team网络
删除之前的所有网络进行配置
nmcli connection delete team0 删除team0
nmcli connection show
nmcli connection delete eth0 删除eth0
nmcli connection delete eth1 删除eth1
nmcli connection show 查看

编辑vim /etc/sysconfig/network-scripts/ifcfg-team0
![]()
写入内容
DEVICE=team0
TEAM_CONFIG="{\"runner\":{\"name\":\"activebackup\"}}"
DEVICETYPE=team
BOOTPROTO=none
IPADDR=172.25.254.203
PREFIX=24
NAME=team0
0NBOOT=yes
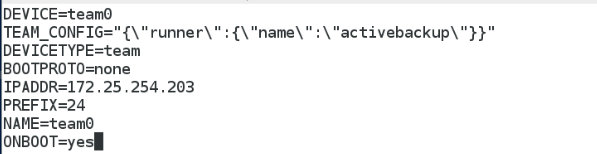
systemctl restart network重新启动网络
真机ping 172.25.254.203 失败,没有建立连接

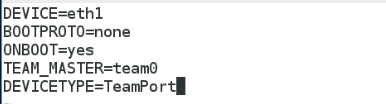
vim /etc/sysconfig/network-scripts/ifcfg-eth0
写入内容
BOOTPROTO=none
DEVICE=eth0
ONBOOT=yes
TEAM_MASTER=team0
DEVICETYPE=TeamPort

systemctl restart network重新启动网络

编辑vim /etc/sysconfig/network-scripts/ifcfg-eth1
写入内容
BOOTPROTO=none
DEVICE=eth1
ONBOOT=yes
TEAM_MASTER=team0
DEVICETYPE=TeamPort
systemctl restart network重新启动网络

真机ping 172.25.254.203 成功

编辑teamdctl team0 stat 查看