使用场景: 一个Spring Boot服务根据不同的业务逻辑需要对不同的数据库进行操作。
一、举例说明
假设需要处理的两个数据库是test1、test2,那么必须要有的是:
- 两个数据库的配置参数(写在配置文件
application.properties)。 - 两个数据库的
DataSource实例,代码中用来处理两个数据库连接的代码。 - 两个数据库表对应的相应的
JavaBean。 - 操作(DML)两个数据库的
Repository。 - 将以上提到的配置、实例等整合到一起,分别对不同数据库进行事务管理配置,也必须有两部分。
二、代码逻辑
上面提到的必要条件都是“两个”,那么就必须要有区分,这样才能保证操作一个数据库表时不会影响到另外一个数据库中的表。下面整理一下Spring boot是如何对每部分进行区分的。
- 配置文件中数据库参数是利用前缀来区分不同的配置。
DataSource实例是利用前缀去创建相应的实例,并且为每个DataSource使用不同的beanName。- 不同数据库表对应的
JavaBean是通过包名来划分的。(也可以通过类名划分)。 Repository也是通过包名划分的。(也可以通过类名划分)- 通过装配相对应的bean、包名、配置来实现相对应的整合。
三、代码逻辑
继续上面提的test1、test2数据库,假设test1中只有一个user1表,test2中只有一个user2表,完成多数据源的代码实现。
第1步: application.properties配置文件入下:
#test1数据库的配置
test1.spring.datasource.jdbcUrl = jdbc:mysql://192.168.1.105:3306/test1?createDatabaseIfNotExist=true&useUnicode=true&characterEncoding=UTF-8
test1.spring.datasource.username = mysql
test1.spring.datasource.password = mysql
test1.spring.datasource.driverClassName = com.mysql.jdbc.Driver

#test2数据库的配置
test2.spring.datasource.jdbcUrl = jdbc:mysql://192.168.1.105:3306/test2?createDatabaseIfNotExist=true&useUnicode=true&characterEncoding=UTF-8
test2.spring.datasource.username = mysql
test2.spring.datasource.password = mysql
test2.spring.datasource.driverClassName = com.mysql.jdbc.Driver
配置文件中要注意:
jdbcUrl可以写成jdbc-url,不能写成jdbc.url或url。driverClassName可以写成driver-class-name,不能写成driver.class.name
第2步: DataSource实例的创建,这个实例需要写在一个类里面,实例创建时,要用到配置文件中的不同数据参数的前缀,创建相应的实例。
DataSourceConfig代码如下:
package com.xyh.test.config;

import com.zaxxer.hikari.HikariDataSource;
import org.springframework.beans.factory.annotation.Qualifier;
import org.springframework.boot.autoconfigure.jdbc.DataSourceProperties;
import org.springframework.boot.context.properties.ConfigurationProperties;
import org.springframework.boot.jdbc.DataSourceBuilder;
import org.springframework.context.annotation.Bean;
import org.springframework.context.annotation.Configuration;
import org.springframework.context.annotation.Primary;

import javax.sql.DataSource;

@Configuration
public class DataSourceConfig {

    /**
     * 创建test1的DataSource实例
     * @return
     */
    @Primary //配置一个主连接
    @Bean(name = "test1DataSource")
    @Qualifier("test1DataSource")
    @ConfigurationProperties(prefix="test1.spring.datasource")
    public DataSource test1DataSource() {
        return DataSourceBuilder.create().build();
    }

    /**
     * 创建test2的DataSource实例
     * @return
     */
    @Bean(name = "test2DataSource")
    @Qualifier("test2DataSource")
    @ConfigurationProperties(prefix="test2.spring.datasource")
    public DataSource test2aryDataSource() {
        return DataSourceBuilder.create().build();
    }

}
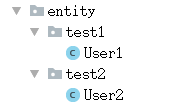
第3步: 创建数据库表对应的JavaBean,test1和test2数据库中的表分别放在相应名称的包下。
User1代码如下:
package com.xyh.test.entity.test1;

import org.hibernate.annotations.GenericGenerator;

import javax.persistence.Column;
import javax.persistence.Entity;
import javax.persistence.GeneratedValue;
import javax.persistence.Id;

@Entity
public class User1 {

    @Id
    @Column(length = 32, nullable = true)
    @GenericGenerator(name = "sys_uuid", strategy = "uuid")
    @GeneratedValue(generator = "sys_uuid")
    private String id;
    private String name;

	//……省略get/set方法
}
User2代码如下:

package com.xyh.test.entity.test1;

import org.hibernate.annotations.GenericGenerator;

import javax.persistence.Column;
import javax.persistence.Entity;
import javax.persistence.GeneratedValue;
import javax.persistence.Id;

@Entity
public class User1 {

    @Id
    @Column(length = 32, nullable = true)
    @GenericGenerator(name = "sys_uuid", strategy = "uuid")
    @GeneratedValue(generator = "sys_uuid")
    private String id;
    private String name;

	//……省略get/set方法
}
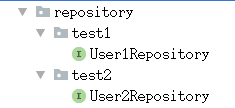
第4步: 创建操作对应数据库的Repository,与JavaBean的分包方式一致。
User1Repository的代码如下:
package com.xyh.test.repository.test1;

import com.xyh.test.entity.test1.User1;
import org.springframework.data.jpa.repository.JpaRepository;

public interface User1Repository extends JpaRepository<User1,String> {
}
User2Repository的代码如下:
package com.xyh.test.repository.test2;

import com.xyh.test.entity.test2.User2;
import org.springframework.data.jpa.repository.JpaRepository;

public interface User2Repository extends JpaRepository<User2,String> {

}
第5步: 整合配置和Bean、配置事务的配置类,test1对应的类是Test1DataSourceConfig,test2对应的类是Test2DataSourceConfig,前面几步对JavaBean和repository进行分包,都是在这个类中进行配置区分的。
Test1DataSourceConfig代码如下:
package com.xyh.test.config;

import org.springframework.beans.factory.annotation.Autowired;
import org.springframework.beans.factory.annotation.Qualifier;
import org.springframework.boot.autoconfigure.orm.jpa.HibernateSettings;
import org.springframework.boot.autoconfigure.orm.jpa.JpaProperties;
import org.springframework.boot.orm.jpa.EntityManagerFactoryBuilder;
import org.springframework.context.annotation.Bean;
import org.springframework.context.annotation.Configuration;
import org.springframework.context.annotation.Primary;
import org.springframework.data.jpa.repository.config.EnableJpaRepositories;
import org.springframework.orm.jpa.JpaTransactionManager;
import org.springframework.orm.jpa.LocalContainerEntityManagerFactoryBean;
import org.springframework.transaction.PlatformTransactionManager;
import org.springframework.transaction.annotation.EnableTransactionManagement;

import javax.persistence.EntityManager;
import javax.sql.DataSource;
import java.util.Map;

@Configuration
@EnableTransactionManagement
@EnableJpaRepositories(
        entityManagerFactoryRef = "entityManagerFactoryTest1",
        transactionManagerRef = "transactionManagerTest1",
        basePackages = {"com.xyh.test.repository.test1"})//设置repository所在位置
public class Test1DataSourceConfig {


    @Autowired(required=false)//required=true表示bean必须存在,否则注入失败,默认为true
    @Qualifier("test1DataSource")
    private DataSource test1DataSource;


    @Primary
    @Bean(name = "entityManagerTest1")
    public EntityManager entityManager(EntityManagerFactoryBuilder builder) {
        return entityManagerFactoryTest1(builder).getObject().createEntityManager();
    }


    @Autowired
    private JpaProperties jpaProperties;


    private Map<String, Object> getVendorProperties() {
        return jpaProperties.getHibernateProperties(new HibernateSettings());
    }

    @Primary
    @Bean(name = "entityManagerFactoryTest1")
    public LocalContainerEntityManagerFactoryBean entityManagerFactoryTest1(EntityManagerFactoryBuilder builder) {
        return builder
                .dataSource(test1DataSource)
                .packages("com.xyh.test.entity.test1")//设置实体类所在位置
                .persistenceUnit("test1PersistenceUnit")
                .properties(getVendorProperties())
                .build();
    }

    @Primary
    @Bean(name = "transactionManagerTest1")
    PlatformTransactionManager transactionManagerSecondary(EntityManagerFactoryBuilder builder) {
        return new JpaTransactionManager(entityManagerFactoryTest1(builder).getObject());
    }

}
Test2DataSourceConfig代码如下:
package com.xyh.test.config;

import org.springframework.beans.factory.annotation.Qualifier;
import org.springframework.boot.autoconfigure.orm.jpa.HibernateSettings;
import org.springframework.boot.autoconfigure.orm.jpa.JpaProperties;
import org.springframework.boot.orm.jpa.EntityManagerFactoryBuilder;
import org.springframework.context.annotation.Bean;
import org.springframework.context.annotation.Configuration;
import org.springframework.data.jpa.repository.config.EnableJpaRepositories;
import org.springframework.orm.jpa.JpaTransactionManager;
import org.springframework.orm.jpa.LocalContainerEntityManagerFactoryBean;
import org.springframework.transaction.PlatformTransactionManager;
import org.springframework.transaction.annotation.EnableTransactionManagement;

import javax.annotation.Resource;
import javax.persistence.EntityManager;
import javax.sql.DataSource;
import java.util.Map;


@Configuration
@EnableTransactionManagement
@EnableJpaRepositories(
        entityManagerFactoryRef = "entityManagerFactoryTest2",
        transactionManagerRef = "transactionManagerTest2",
        basePackages = {"com.xyh.test.repository.test2"}) //repository类的包
public class Test2DataSourceConfig {

    @Resource
    @Qualifier("test2DataSource")
    private DataSource test2DataSource;


    @Bean(name = "entityManagerTest2")
    public EntityManager entityManager(EntityManagerFactoryBuilder builder) {
        return entityManagerFactoryTest2(builder).getObject().createEntityManager();
    }

    @Resource
    private JpaProperties jpaProperties;

    private Map<String, Object> getVendorProperties() {
        return jpaProperties.getHibernateProperties(new HibernateSettings());
    }

    /**
     * 设置实体类所在位置
     */
    @Bean(name = "entityManagerFactoryTest2")
    public LocalContainerEntityManagerFactoryBean entityManagerFactoryTest2(EntityManagerFactoryBuilder builder) {
        return builder
                .dataSource(test2DataSource)
                .packages("com.xyh.test.entity.test2")//javabean的包
                .persistenceUnit("test2PersistenceUnit")
                .properties(getVendorProperties())
                .build();
    }

    @Bean(name = "transactionManagerTest2")
    public PlatformTransactionManager transactionManagerTest2(EntityManagerFactoryBuilder builder) {
        return new JpaTransactionManager(entityManagerFactoryTest2(builder).getObject());
    }

}
四、测试
写一个controller,然后分别注入不同的Repository,调用相应save方法,可以看到相应的数据库表增加了一条记录。
@RestController
@EnableConfigurationProperties
public class IndexController {

    @Autowired
    private User1Repository user1Repository;

    @Autowired
    private User2Repository user2Repository;

    @RequestMapping("/")
    public String index(){

        User1 user1 = new User1();
        user1.setName("user1Name");
        user1Repository.save(user1);

        User2 user2 = new User2();
        user2.setName("user2Name");

        user2Repository.save(user2);
        return "hello world";
    }
}