版权声明:本文为博主原创文章,未经博主允许不得转载。 https://blog.csdn.net/qq_31063463/article/details/83073739
1. 开发环境和本项目用到的框架
接着上一篇Spring boot+Security OAuth2 爬坑日记(1)授权码模式博客中的内容,上篇介绍了基本的开发环境,系统以及jdk版本等,本篇再来详细介绍下项目中用到的框架和相关类库。
| 框架/类库/数据库 | 版本号 |
|---|---|
| java | 11(Mac)/ 8(Win10) |
| spring-boot | 2.0.5.RELEASE |
| spring-security | 5.0.8.RELEASE |
| spring-security-oauth2 | 2.3.3.RELEASE |
| mybatis-plus | 3.0.4 |
| 数据库连接池(druid) | 1.1.11 |
| swagger-ui | 2.9.2 |
| hibernate-validator | 6.0.13.Final |
| MySQL | 5.7.22 MySQL Community Server |
| Redis | 4.0.10 |
通过上述版本发现spring系列的版本都是最新的发布版本,网上示例基本不多,使用必然会出现很多坑;当然有坑之后爬坑才能进步。可能有的人奇怪我为什么用两个版本,公司用肯定用java8,在自己的机器里肯定用最新版来试水咯。。不说了老板让我修复赶紧修复bug,不然今天不能下班。。。。。。。。。。
上篇博客中我们的客户端信息都是保存在内存中的,本篇将客户端信息存储于数据库中;废话不多说,开始撸码!!!!!!!!
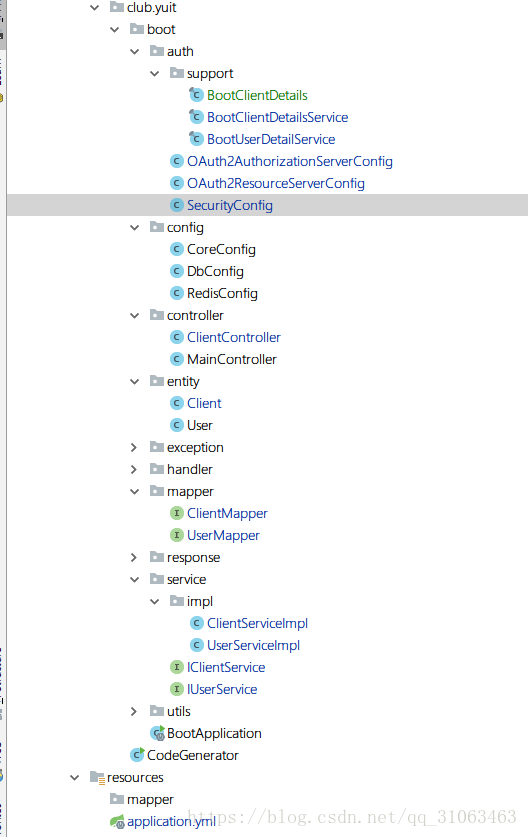
2. 项目结构
3. 自定义BootClientDetailsService和BootClientDetails并配置
新建类 BootClientDetailsService 实现ClientDetailsService 接口,覆盖loadClientByClientId(String clientId)方法,将其声明为spring组件,方便后面配置使用
@Component
public final class BootClientDetailsService implements ClientDetailsService {

    @Autowired
    private IClientService clientService;

    @Override
    public ClientDetails loadClientByClientId(String clientId) throws ClientRegistrationException {

        Client client = this.clientService.findClientByClientId(clientId);

        if(client==null){
            throw new ClientRegistrationException("客户端不存在");
        }

        return new BootClientDetails(client);
    }

}
@Data
public final class BootClientDetails implements ClientDetails {

    private Client client;

    public BootClientDetails(Client client) {
        this.client = client;
    }

    public BootClientDetails() {
    }

    @Override
    public String getClientId() {
        return client.getClientId();
    }

    @Override
    public Set<String> getResourceIds() {
        return client.getResourceIds()!=null?
                transformStringToSet(client.getResourceIds(),String.class):null;
    }

    @Override
    public boolean isSecretRequired() {
        return client.getIsSecretRequired();
    }

    @Override
    public String getClientSecret() {
        return client.getClientSecret();
    }

    @Override
    public boolean isScoped() {
        return client.getIsScoped();
    }

    @Override
    public Set<String> getScope() {
        return client.getScope()!=null?
                transformStringToSet(client.getScope(),String.class):null;
    }

    @Override
    public Set<String> getAuthorizedGrantTypes() {
        return client.getAuthorizedGrantTypes()!=null?
                transformStringToSet(client.getAuthorizedGrantTypes(),String.class):null;
    }

    @Override
    public Set<String> getRegisteredRedirectUri() {
        return client.getRegisteredRedirectUri()!=null?
                transformStringToSet(client.getRegisteredRedirectUri(),String.class):null;
    }

    @Override
    public Collection<GrantedAuthority> getAuthorities() {
        return (client.getAuthorities()!=null&&client.getAuthorities().trim().length()>0)?
                AuthorityUtils.commaSeparatedStringToAuthorityList(client.getAuthorities()):null;
    }

    @Override
    public Integer getAccessTokenValiditySeconds() {
        return client.getAccessTokenValiditySeconds();
    }

    @Override
    public Integer getRefreshTokenValiditySeconds() {
        return client.getRefreshTokenValiditySeconds();
    }

    @Override
    public boolean isAutoApprove(String scope) {
        return client.getIsAutoApprove();
    }

    @Override
    public Map<String, Object> getAdditionalInformation() {
        return null;
    }
}
将我们定义的 BootClientDetailsService配置在OAuth2AuthorizationServerConfig中
@Configuration
@EnableAuthorizationServer
public class OAuth2AuthorizationServerConfig extends AuthorizationServerConfigurerAdapter {

    @Autowired
    private AuthenticationManager authenticationManager;

    @Autowired
    private PasswordEncoder passwordEncoder;

    @Autowired
    private BootClientDetailsService clientDetailsService;


    @Override
    public void configure(AuthorizationServerSecurityConfigurer security) throws Exception {
        // 允许表单登录
       security.allowFormAuthenticationForClients();
    }

    @Override
    public void configure(ClientDetailsServiceConfigurer clients) throws Exception {

       // String secret = passwordEncoder.encode("123qwe");

        clients.withClientDetails(clientDetailsService);
                /*// 客户端存储信息存储于内存中
                .inMemory()
                // 客户端名称
                .withClient("client")
                // 跳转uri,可配置多个
                .redirectUris("http://localhost")
                // 权限
               // .authorities("ROLE_USER")
                // 客户端 secret
                .secret(secret)
                // 授权模式
                .authorizedGrantTypes("refresh_token","authorization_code");*/
    }

    @Override
    public void configure(AuthorizationServerEndpointsConfigurer endpoints) throws Exception {
        endpoints
                .tokenStore(new InMemoryTokenStore())
                .authenticationManager(authenticationManager);
    }
}
4. 创建注册客户端的接口ClientController
@RestController
@RequestMapping("client")
public class ClientController {

    @Autowired
    private IClientService clientService;

    @Autowired
    private PasswordEncoder passwordEncoder;

    @PostMapping("/register")
    public BaseResponse clientRegistered(@RequestBody @Valid Client client){

        client.setClientSecret(passwordEncoder.encode(client.getClientSecret()));

       int i= clientService.insert(client);
       return HttpResponse.baseResponse(200);
    }

}
完成客户端注册接口后,将客户端注册接口开放,不需要认证就能访问
    @Override
    public void configure(HttpSecurity http) throws Exception {
        http.formLogin().and()
                .authorizeRequests()
                .antMatchers("/login","/oauth/*","/client/register")
                .permitAll()
                .antMatchers
                        ("/swagger-ui.html/**","/webjars/**",
                        "/swagger-resources/**","/v2/api-docs/**",
                        "/swagger-resources/configuration/ui/**","/swagger-resources/configuration/security/**",
                        "/images/**")
                .permitAll()
                .anyRequest()
                .authenticated()
                .and().csrf().disable();
    }
5. 测试
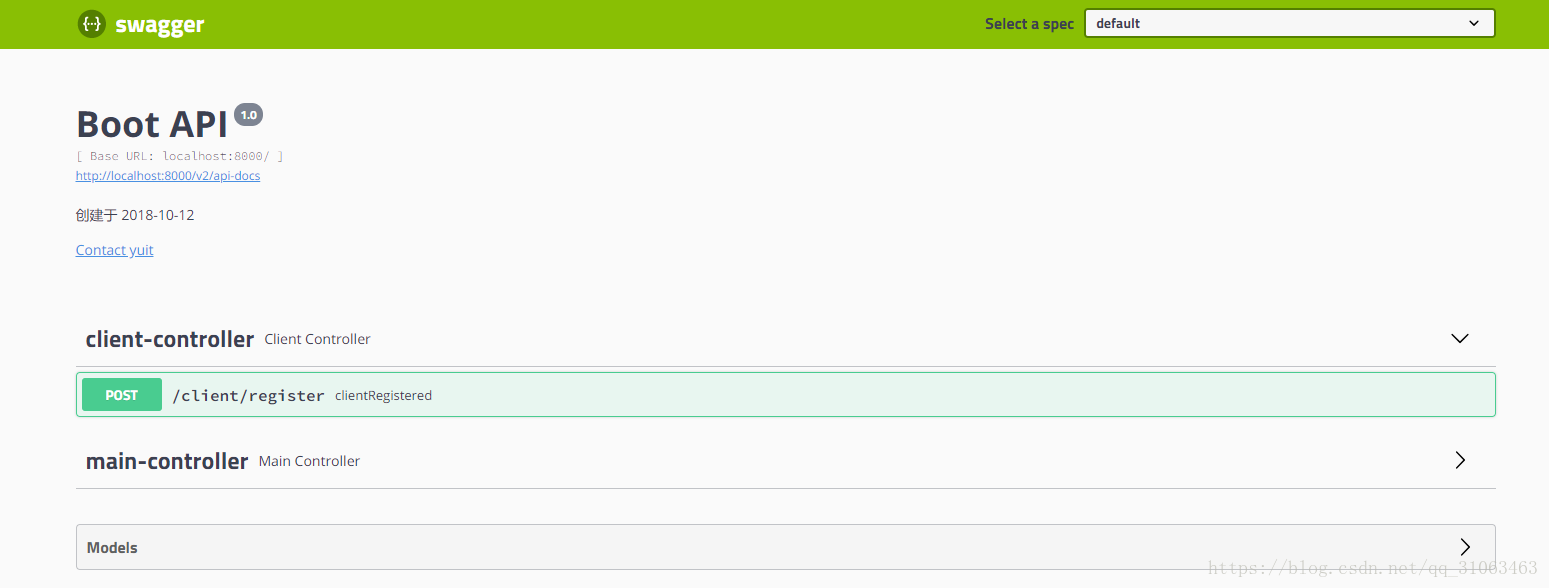
项目中已经集成好了swagger-ui,项目启动后直接访问http://localhost:8000/swagger-ui.html,出现如下页面
通过swagger-ui注册客户端,请求参数如下
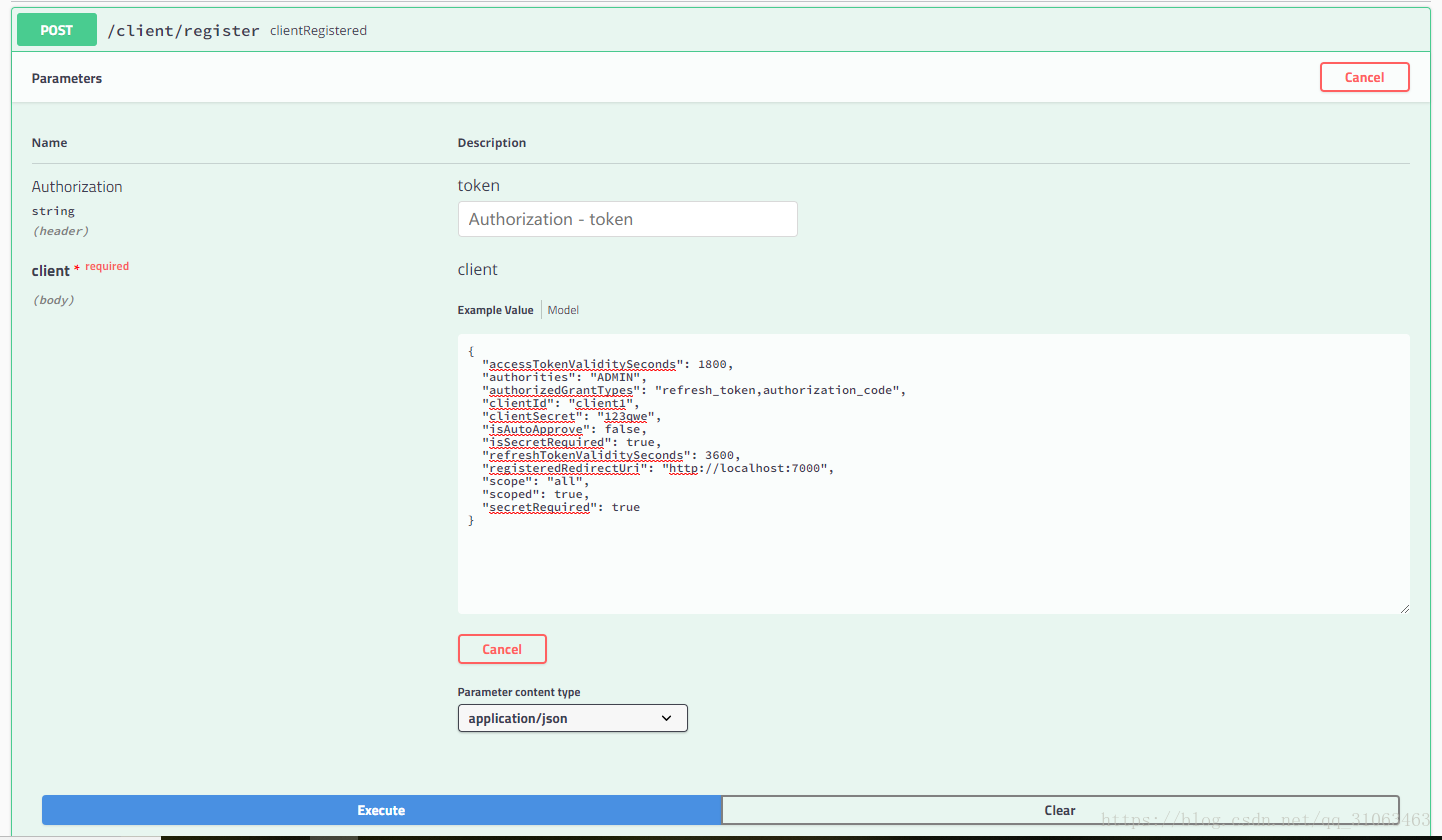
{
  "accessTokenValiditySeconds": 1800,
  "authorities": "ADMIN",
  "authorizedGrantTypes": "refresh_token,authorization_code",
  "clientId": "client1",
  "clientSecret": "123qwe",
  "isAutoApprove": false,
  "isSecretRequired": true,
  "refreshTokenValiditySeconds": 3600,
  "registeredRedirectUri": "http://localhost:7000",
  "scope": "all",
  "scoped": true,
  "secretRequired": true
}
客户端注册成功后就可以使用该客户端的信息申请授权,申请授权的步骤和Spring boot+Security OAuth2 爬坑日记(1)授权码模式中的一样,这里不再赘述
源码地址 Github
微信公众号:
