目录
文章目录
Placement API 简介
Placement API 在 Newton 版本被引入 Nova,主要用于跟踪记录 Resource Provider 的 Inventory 和 Usage,使用不同的 Resource Classes 来划分资源类型,使用不同的 Resource Traits 来标记资源特征。
问题描述
在云中,用户会使用多种多样的资源。某些资源类型由计算节点提供(e.g. CPU,内存,PCI 设备和本地临时磁盘)。但是,在整个 OpenStack 资源体系中也经常存在不是由计算节点提供的外部资源类型,例如:Ceph、NFS 提供的存储服务,SDN 提供的网络服务。以往,Nova 只能处理由计算节点提供的资源。nova resource tracker 假定了所有资源均来自计算节点,因此在周期性上报资源的实时使用状态时,Nova 所做的只是单纯对数据库中的计算节点清单进行资源总量和使用量的求和统计。显然,这导致了许多合理的需求无法得到满足。
- 作为使用共享存储解决方案的用户,我会希望 Nova 和 Horizon 能够正确报告磁盘资源的总量和使用量信息。
- 作为高级的 Neutron 用户,我预期会使用外部的第三方路由网络功能,希望 Nova 能够掌握和使用特定的网络端口与特定的子网池相关联,确保虚拟机能够在该子网池上启动。
- 作为高级的 Cinder 用户,我希望当我在 nova boot 命令中指定了 cinder volume-id 后 Nova 能够知道哪一些计算节点与 Request Volume 所在的 Cinder 存储池相关联。
可见,当 Resources Provider 变得多样时,就会需求一种简单且统一的管理方法,让管理员和程序可以简单便捷的使用、管理、监控系统资源,这就是 Placement API。在 Ocata 版本,用户可以自主选择是否启用 Placement API 来辅助 nova-scheduler service 进行 compute node 调度,并以此替代 nova-scheduler service 中的 RAMFilter、CoreFilter 和 DiskFilter。但在 Pike 版本,这种可选机制被关闭了,用户必须启用 Placement API 服务,否则 nova-compute service 无法正常启动。可见 Placement API 是统一资源管理的未来。
Placement API 被设计成独立的 REST API 和 DB Models,拥有着专属的 Endpoint 和 DB tables。
Endpoint URL:
[root@control01 ~]# openstack catalog list
...

| placement   | placement      | RegionOne                                                                   |
|             |                |   internal: http://172.18.22.215:8780                                       |
|             |                | RegionOne                                                                   |
|             |                |   public: http://172.18.22.215:8780                                         |
|             |                | RegionOne                                                                   |
|             |                |   admin: http://172.18.22.215:8780
...12345678910
DB tables:
MariaDB [(none)]> use nova_api;
Reading table information for completion of table and column names
You can turn off this feature to get a quicker startup with -A

Database changed
MariaDB [nova_api]> show tables;
+------------------------------+
| Tables_in_nova_api           |
+------------------------------+
| aggregate_hosts              |
| aggregate_metadata           |
| aggregates                   |
| allocations                  |
| build_requests               |
| cell_mappings                |
| consumers                    |
| flavor_extra_specs           |
| flavor_projects              |
| flavors                      |
| host_mappings                |
| instance_group_member        |
| instance_group_policy        |
| instance_groups              |
| instance_mappings            |
| inventories                  |
| key_pairs                    |
| migrate_version              |
| placement_aggregates         |
| project_user_quotas          |
| projects                     |
| quota_classes                |
| quota_usages                 |
| quotas                       |
| request_specs                |
| reservations                 |
| resource_classes             |
| resource_provider_aggregates |
| resource_provider_traits     |
| resource_providers           |
| traits                       |
| users                        |
+------------------------------+
Placement API 的基本对象概念
Resource Provider:资源提供者,实际提供资源的实体,例如:Compute Node、Storage Pool、IP Pool
Resource Class:资源种类,即资源的类型,Placement API 为 ComputeNode 定义了下列 5 种 resource classes,同时也提供了 custom resource classes 的接口。
- DISK_GB
- MEMORY_MB
- VCPU
- PCI devices
- NUMA topologies
Inventory:资源清单,资源提供者所拥有的资源清单,例如:Compute Node 拥有的 vCPU、Disk、RAM 等 inventories。
Provider Aggregate:资源聚合,类似 HostAggregate 的概念
Traits:资源特征,不同资源提供者可能会具有不同的资源特征。Traits 作为资源提供者特征的描述,它不能够被消费,但在某些 Workflow 或者会需要这些信息。例如:标识可用的 Disk 具有 SSD 特征,有助于 Scheduler 灵活匹配 instance boot 请求。
Resource Allocations:资源分配状况,包含了 Resource Class、Resource Provider 以及 Consumer 的映射关系。记录消费者使用了该类型资源的数量。
Placement API 的 DB tables
在 nova_api database 中也实现了相应的数据模型:
resource_providers:存放资源提供者inventories:存在资源提供者的资源清单resource_classes:存在资源种类resource_provider_aggregates:存放资源聚合,实际上是资源提供者和主机聚合的映射关系traits:存放自定义的特征描述类型resource_provider_traits:存在资源提供者和特征描述的对应关系allocations:存放消费者使用了哪一个资源提供者的哪几种资源种类及容量
Resource Provider 的资源清单记录:
MariaDB [nova_api]> desc inventories;
+----------------------+----------+------+-----+---------+----------------+
| Field                | Type     | Null | Key | Default | Extra          |
+----------------------+----------+------+-----+---------+----------------+
| created_at           | datetime | YES  |     | NULL    |                |
| updated_at           | datetime | YES  |     | NULL    |                |
| id                   | int(11)  | NO   | PRI | NULL    | auto_increment |
| resource_provider_id | int(11)  | NO   | MUL | NULL    |                |
| resource_class_id    | int(11)  | NO   | MUL | NULL    |                |
| total                | int(11)  | NO   |     | NULL    |                |  总大小
| reserved             | int(11)  | NO   |     | NULL    |                |  保留大小
| min_unit             | int(11)  | NO   |     | NULL    |                |  最小分配单位
| max_unit             | int(11)  | NO   |     | NULL    |                |  最大分配单位
| step_size            | int(11)  | NO   |     | NULL    |                |  步长
| allocation_ratio     | float    | NO   |     | NULL    |                |  超分比
+----------------------+----------+------+-----+---------+----------------+
1234567891011121314151617
每个 compute node 都会自动生成 3 条 inventories 记录 0,1,2 分别对应 3 种默认的资源种类 CPU(s)、RAM(MB) 和 DISK(GB):
MariaDB [nova_api]> select * from resource_providers;
+---------------------+---------------------+-----+--------------------------------------+------------------------------------------------------+------------+----------+
| created_at          | updated_at          | id  | uuid                                 | name                                                 | generation | can_host |
+---------------------+---------------------+-----+--------------------------------------+------------------------------------------------------+------------+----------+
| 2018-05-03 09:07:01 | 2018-07-02 07:03:57 |   1 | e367ded8-9501-42b1-a18d-e7f3bab233c6 | domain-c69.22bebe01-eb68-4a5c-839d-11398df43232      |        252 |     NULL |

MariaDB [nova_api]> select * from inventories;
+---------------------+---------------------+----+----------------------+-------------------+--------+----------+----------+----------+-----------+------------------+
| created_at          | updated_at          | id | resource_provider_id | resource_class_id | total  | reserved | min_unit | max_unit | step_size | allocation_ratio |
+---------------------+---------------------+----+----------------------+-------------------+--------+----------+----------+----------+-----------+------------------+
| 2018-05-03 09:07:07 | 2018-07-02 07:03:57 |  1 |                    1 |                 0 |     42 |        0 |        1 |       42 |         1 |                2 |
| 2018-05-03 09:07:07 | 2018-07-02 07:03:57 |  2 |                    1 |                 1 | 407562 |     2048 |        1 |   407562 |         1 |                1 |
| 2018-05-03 09:07:07 | 2018-07-02 07:03:57 |  3 |                    1 |                 2 |    736 |        2 |        1 |      736 |         1 |                1 |
1234567891011121314
存放消费者使用了哪一个资源提供者的哪几种资源种类及容量:
# e.g. 消费者(虚拟机 648bda64-1d7a-44d2-ba38-20c84959dabe)使用了资源提供者 97 的 1CPU/256M RAM/1G DISK 资源

MariaDB [nova_api]> select * from allocations;
+---------------------+------------+-----+----------------------+--------------------------------------+-------------------+------+
| created_at          | updated_at | id  | resource_provider_id | consumer_id                          | resource_class_id | used |
+---------------------+------------+-----+----------------------+--------------------------------------+-------------------+------+
| 2018-05-23 10:40:49 | NULL       |  97 |                   97 | 648bda64-1d7a-44d2-ba38-20c84959dabe |                 0 |    1 |
| 2018-05-23 10:40:49 | NULL       |  98 |                   97 | 648bda64-1d7a-44d2-ba38-20c84959dabe |                 1 |  256 |
| 2018-05-23 10:40:49 | NULL       |  99 |                   97 | 648bda64-1d7a-44d2-ba38-20c84959dabe |                 2 |    1 |123456789
存放为消费者分配了多少该类型的资源数量:
MariaDB [nova_api]> select * from allocations;
+---------------------+------------+----+----------------------+--------------------------------------+-------------------+------+
| created_at          | updated_at | id | resource_provider_id | consumer_id                          | resource_class_id | used |
+---------------------+------------+----+----------------------+--------------------------------------+-------------------+------+
| 2018-08-01 10:52:15 | NULL       |  7 |                    1 | f8d55035-389c-47b8-beea-02f00f25f5d9 |                 0 |    1 |
| 2018-08-01 10:52:15 | NULL       |  8 |                    1 | f8d55035-389c-47b8-beea-02f00f25f5d9 |                 1 |  512 |
| 2018-08-01 10:52:15 | NULL       |  9 |                    1 | f8d55035-389c-47b8-beea-02f00f25f5d9 |                 2 |    1 |
+---------------------+------------+----+----------------------+--------------------------------------+-------------------+------+

# consumer_id 消费者
# resource_class_id 资源类型
# resource_provider_id 资源提供者
# used 分配的数量
# 上述记录表示为虚拟机分配了 vCPU 1颗,RAM 512MB,Disk 1GB
Placement API 的 CLI
OS Client Placement Plugin Usage:Placement Plugin 是 openstackclient 的插件模块,让 openstack 指令扩展 Placemet API 的相关子命令。
官方文档:(https://docs.openstack.org/osc-placement/latest/cli/index.html#)
安装:
pip install python-openstackclient
pip install osc-placement12
使用示例:
(plm_dev) [root@localhost ~]# openstack resource provider list
+--------------------------------------+-----------+------------+
| uuid                                 | name      | generation |
+--------------------------------------+-----------+------------+
| 6d89387f-bc6e-44ca-93ce-fb5cafb73985 | localhost |          2 |
+--------------------------------------+-----------+------------+

(plm_dev) [root@localhost ~]# openstack resource provider inventory list 6d89387f-bc6e-44ca-93ce-fb5cafb73985
+----------------+------------------+----------+----------+-----------+----------+-------+
| resource_class | allocation_ratio | max_unit | reserved | step_size | min_unit | total |
+----------------+------------------+----------+----------+-----------+----------+-------+
| VCPU           |             16.0 |        4 |        0 |         1 |        1 |     4 |
| MEMORY_MB      |              1.5 |    16118 |      512 |         1 |        1 | 16118 |
| DISK_GB        |              1.0 |       49 |        0 |         1 |        1 |    49 |
+----------------+------------------+----------+----------+-----------+----------+-------+

(plm_dev) [root@localhost ~]# openstack resource provider usage show 6d89387f-bc6e-44ca-93ce-fb5cafb73985
+----------------+-------+
| resource_class | usage |
+----------------+-------+
| VCPU           |     0 |
| MEMORY_MB      |     0 |
| DISK_GB        |     0 |
+----------------+-------+
Placemet API 的实现与分析
WSGI
WSGI(Web Server Gateway Interface,Web 服务器网关接口),WSGI 并非指代一个具体的编程调用接口,而是指代一种编程规范(e.g. 其中一条原则就是将 Web 系统抽象为 Web Server + Web Middleware + Web Application 三个层次),这种规范能够让不同的协议之间互相通信,故称之为 “网关”。实现了 WSGI 规范的程序称为 WSGI 组件,常见的 WSGI 组件有 wsgi_mod,可与 Apache Web Server 组合使用。简单来说,WSGI 定义了 Web Server 如何与 Python Web Application 进行交互的规则,让 Python Web Application 可以依附于 Web Server 之上接收和响应客户端的请求。OpenStack 一般会使用 Apache + wsgi_mod 的组合来支撑 Web 框架。
Placement API 的 Web Application
在了解了 WSGI 之后,我们应该可以理解为什么 Placement API 在操作系统上启动的是 httpd Daemon 而不是 nova-placement-api service 了。因为 Placement API 实际的 Web Application 是依靠 WSGI 组件运行于 Apache Web Server 之上的。
NOTE:需要注意的是,为了便于调试,Placement API 同时支持使用内置的小型 Web Server 来启动 Web Application,运行指令 nova-placement-api --config-file /etc/nova/nova.conf 即可启动。
于此,我们通常只需要关系 Placement API 的 Web Application 实现即可。通过 setup.cfg 我们可以找到 Placement API 的程序入口。
wsgi_scripts =
    nova-placement-api = nova.api.openstack.placement.wsgi:init_application
在 nova.api.openstack.placement.wsgi 模块我们可以找到 Placement API Web Application 的生成函数。
def init_application():
    # initialize the config system
    conffile = _get_config_file()
    _parse_args([], default_config_files=[conffile])
    db_api.configure(conf.CONF)

    # initialize the logging system
    setup_logging(conf.CONF)

    # dump conf at debug if log_options
    if conf.CONF.log_options:
        conf.CONF.log_opt_values(
            logging.getLogger(__name__),
            logging.DEBUG)

    # build and return our WSGI app
    return deploy.loadapp(conf.CONF)
深入阅读代码,我们不难发现 Placement API Web Application 的 URL Routes、HTTP Method 以及 View function 三者的 Mapping 在 nova.api.openstack.placement.handler:make_map 实现。
ROUTE_DECLARATIONS = {
    '/': {
        'GET': root.home,
    },
    # NOTE(cdent): This allows '/placement/' and '/placement' to
    # both work as the root of the service, which we probably want
    # for those situations where the service is mounted under a
    # prefix (as it is in devstack). While weird, an empty string is
    # a legit key in a dictionary and matches as desired in Routes.
    '': {
        'GET': root.home,
    },
    '/resource_classes': {
        'GET': resource_class.list_resource_classes,
        'POST': resource_class.create_resource_class
    },
    '/resource_classes/{name}': {
        'GET': resource_class.get_resource_class,
        'PUT': resource_class.update_resource_class,
        'DELETE': resource_class.delete_resource_class,
    },
    '/resource_providers': {
        'GET': resource_provider.list_resource_providers,
        'POST': resource_provider.create_resource_provider
    },
    '/resource_providers/{uuid}': {
        'GET': resource_provider.get_resource_provider,
        'DELETE': resource_provider.delete_resource_provider,
        'PUT': resource_provider.update_resource_provider
    },

    ...
最终,所有的 Placement API REST resources 都被封装到了 nova.api.openstack.placement.handlers 包下,每一个模块就代表一种 resource,模块内也实现了相应的视图函数。
╭─mickeyfan@localhost  ~/Projects/nova/nova/api/openstack/placement/handlers  ‹stable/rocky›
╰─$ ll
total 224
-rw-r--r--  1 mickeyfan  staff      0 10  7 12:08 __init__.py
-rw-r--r--  1 mickeyfan  staff   5543 10  7 12:08 aggregate.py
-rw-r--r--  1 mickeyfan  staff  22649 10  7 12:08 allocation.py
-rw-r--r--  1 mickeyfan  staff  11961 10  7 12:08 allocation_candidate.py
-rw-r--r--  1 mickeyfan  staff  18328 10  7 12:08 inventory.py
-rw-r--r--  1 mickeyfan  staff   8744 10  7 12:08 resource_class.py
-rw-r--r--  1 mickeyfan  staff  11798 10  7 12:08 resource_provider.py
-rw-r--r--  1 mickeyfan  staff   2406 10  7 12:08 root.py
-rw-r--r--  1 mickeyfan  staff  10105 10  7 12:08 trait.py
-rw-r--r--  1 mickeyfan  staff   5200 10  7 12:08 usage.py
Placement API 在创建虚拟机时的调度过程
首先我们先通过几幅流程图来大致了解一下 Placement API 在创建虚拟机过程中的调度过程。
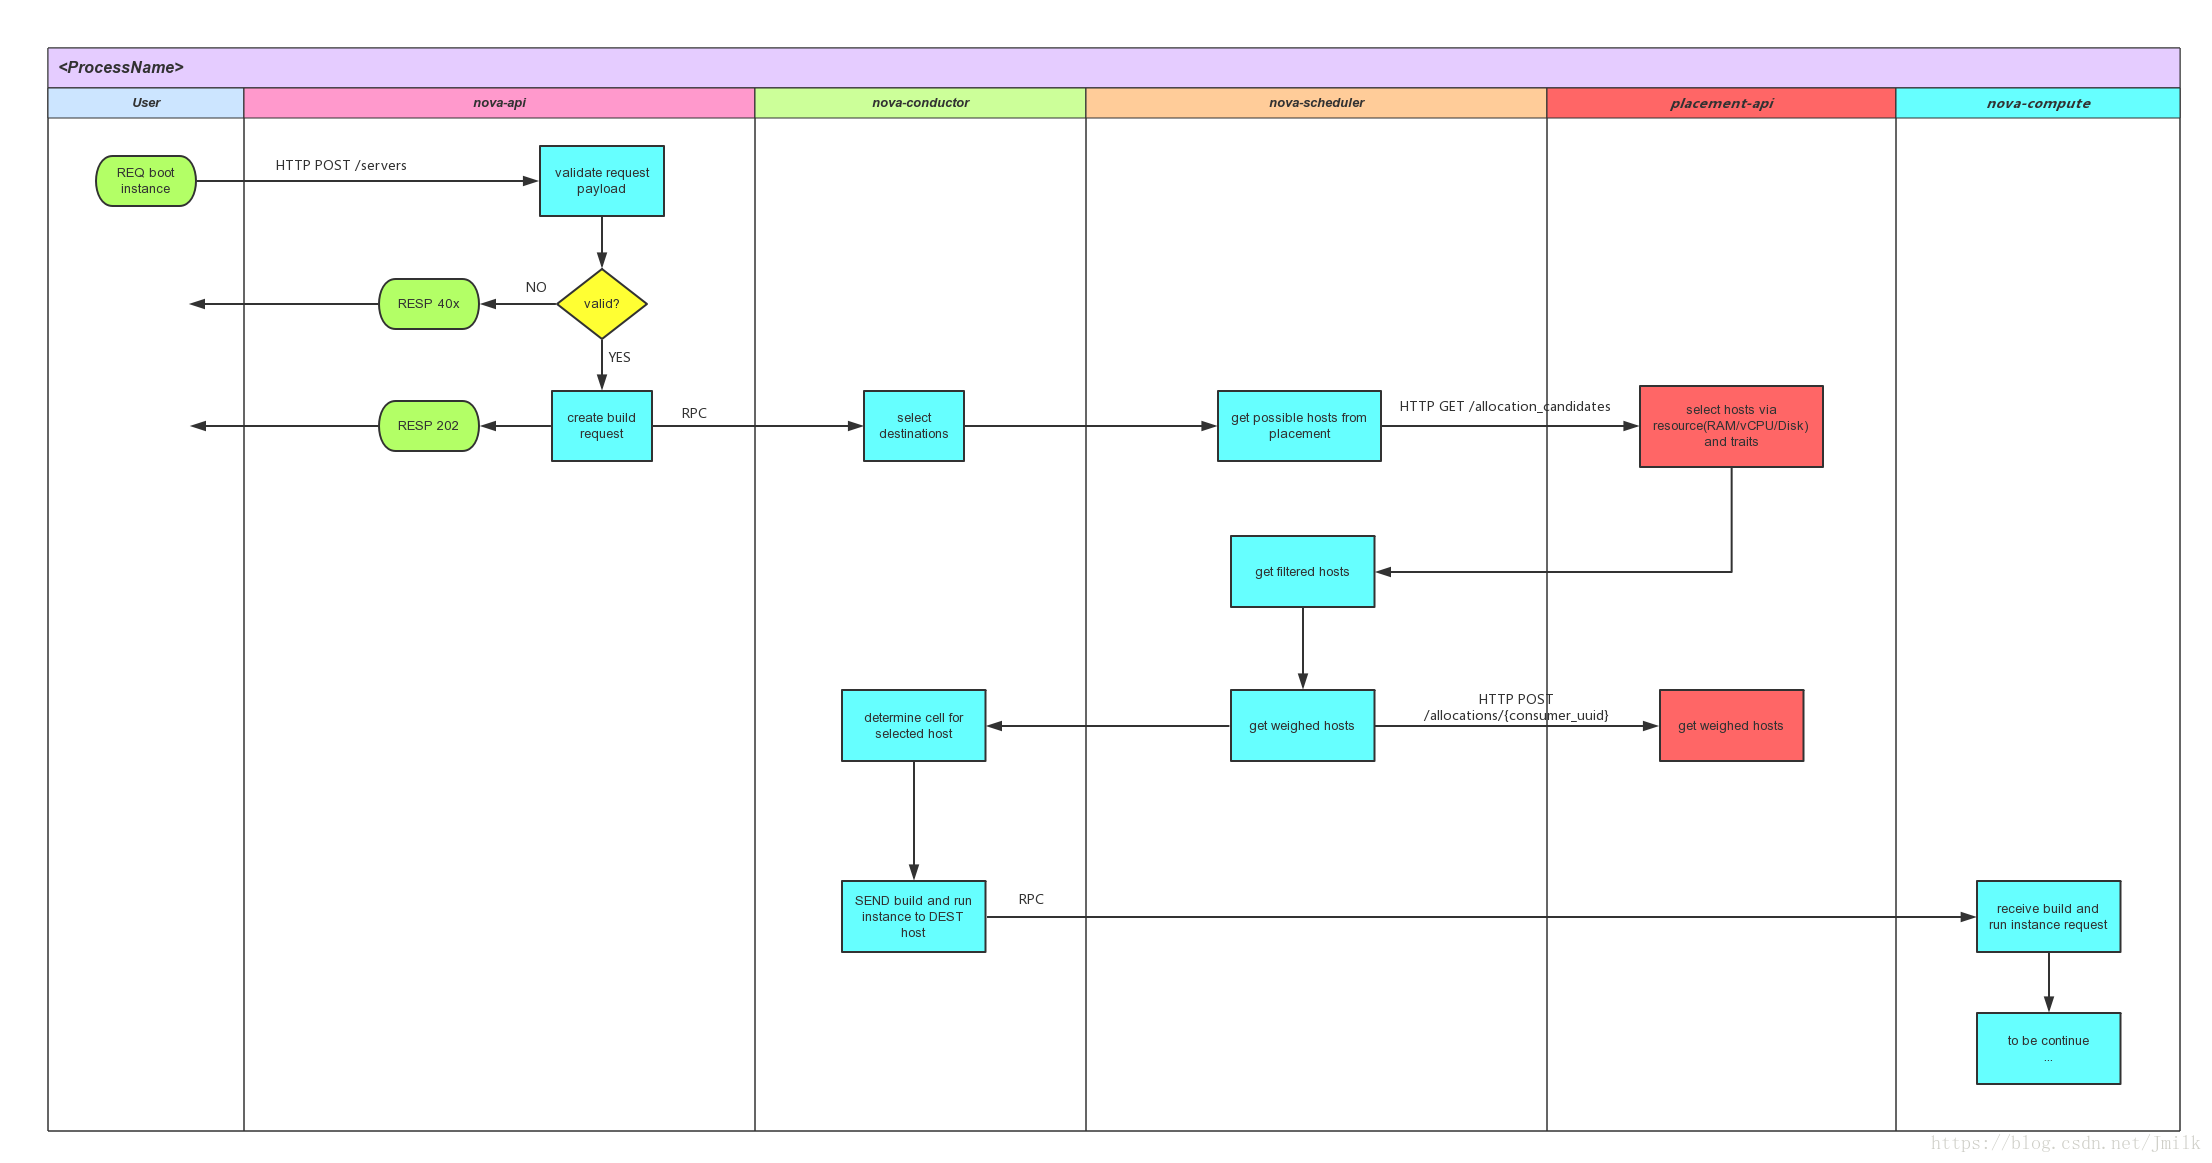
从上图可见,Placement API 在创建虚拟机的流程中主要参与了与 nova-scheduler 的交互并返回可用的 hosts 清单,以此作为切入口,继续通过下列的 UML 图深入 Placement API 的调用实现细节。

对于上面的整个流程,我们主要关心 nova-scheduler 与 Placement API 交互的 Step 8 和 Step 28。
其中 Step 8 是 select_destinations 做的第一件事情,即向 placement-api service 获取一组 Allocation Candidates(分配候选人)。Allocation Candidates 的定义是能够满足待创建虚拟机资源需求的 Resource Provider,获取 Allocation Candidates 的实现实际上是一系列复杂的数据库级联查询与过滤操作,完整的 REQ URL 示例如下:
GET /allocation_candidates?resources=VCPU:1,MEMORY_MB:2048,DISK_GB:100
显然,URL Resources Params 就是虚拟机所需要的 vCPU、RAM 和 Disk 资源。在最新版本的 Placement API 中还实现了 required 和 member_of params,分别支持 Resource Traits 和 Resource Aggregate 特性,使 DEST hosts 的获取更加灵活。
返回给 nova-scheduler 的 JSON object with a list of allocation requests and a JSON object of provider summary objects 的数据结构如下,主要关注 allocation_requests 和 provider_summaries 属性,两者在往后的 Scheduler Filters 逻辑中也发挥着重要的作用。
{
  "allocation_requests": [
    <ALLOCATION_REQUEST_1>,
    ...
    <ALLOCATION_REQUEST_N>
  ],
  "provider_summaries": {
    <COMPUTE_NODE_UUID_1>: <PROVIDER_SUMMARY_1>,
    ...
    <COMPUTE_NODE_UUID_N>: <PROVIDER_SUMMARY_N>,
  }
}
- allocation_requests:包含了 resource provider uuid 以及各 resource provider 分配的资源数量清单。
"allocation_requests": [
    {
      "allocations": [
        {
          "resource_provider": {
            "uuid": "30742363-f65e-4012-a60a-43e0bec38f0e"
          },
          "resources": {
            "VCPU: 1,
            "MEMORY_MB": 2048,
            "DISK_GB": 100
          }
        }
      ]
    },
    {
      "allocations": [
        {
          "resource_provider": {
            "uuid": "a4eb85f2-c903-4cc7-b7ff-5d423fc3523d"
          },
          "resources": {
            "VCPU: 1,
            "MEMORY_MB": 2048,
            "DISK_GB": 100
          }
        }
      ]
    },
    {
      "allocations": [
        {
          "resource_provider": {
            "uuid": "d1cfddcc-f2f8-4da4-bf9a-1d1f2ace7a94"
          },
          "resources": {
            "VCPU: 1,
            "MEMORY_MB": 2048,
            "DISK_GB": 100
          }
        }
      ]
    }
  ],
- provider_summaries:包含了 compute node uuid 及其各项资源的总量和使用量信息。
"provider_summaries": {
    "30742363-f65e-4012-a60a-43e0bec38f0e": {
      "resources": {
        "DISK_GB": {
          "capacity": 1000,
          "used": 100
        },
        "MEMORY_MB": {
          "capacity": 294912,
          "used": 2560
        },
        "VCPU": {
          "capacity": 24,
          "used": 40
        }
      }
    },
    "a4eb85f2-c903-4cc7-b7ff-5d423fc3523d": {
      "resources": {
        "DISK_GB": {
          "capacity": 1000,
          "used": 0
        },
        "MEMORY_MB": {
          "capacity": 294912,
          "used": 65536
        },
        "VCPU": {
          "capacity": 384,
          "used": 16
        }
      }
    },
    "d1cfddcc-f2f8-4da4-bf9a-1d1f2ace7a94": {
      "resources": {
        "DISK_GB": {
          "capacity": 1000,
          "used": 0
        },
        "MEMORY_MB": {
          "capacity": 294912,
          "used": 2560
        },
        "VCPU": {
          "capacity": 384,
          "used": 0
        }
      }
    }
  }
nova-scheduler 在获得了 Allocation Candidates 之后会进一步通过 Filtered 和 Weighed 机制最终确定目标主机,然后再根据 allocation requests 和 provider summaries 的数据扣除目标主机对应的 resource provider 的资源使用量。这些就是 Step 28: POST /allocations/{consumer_uuid} 所做的事情,我们再回顾一下 allocations tables 的内容:
MariaDB [nova_api]> select * from allocations;
+---------------------+------------+----+----------------------+--------------------------------------+-------------------+------+
| created_at          | updated_at | id | resource_provider_id | consumer_id                          | resource_class_id | used |
+---------------------+------------+----+----------------------+--------------------------------------+-------------------+------+
| 2018-08-01 10:52:15 | NULL       |  7 |                    1 | f8d55035-389c-47b8-beea-02f00f25f5d9 |                 0 |    1 |
| 2018-08-01 10:52:15 | NULL       |  8 |                    1 | f8d55035-389c-47b8-beea-02f00f25f5d9 |                 1 |  512 |
| 2018-08-01 10:52:15 | NULL       |  9 |                    1 | f8d55035-389c-47b8-beea-02f00f25f5d9 |                 2 |    1 |
+---------------------+------------+----+----------------------+--------------------------------------+-------------------+------+

# consumer_id 消费者
# resource_class_id 资源类型
# resource_provider_id 资源提供者
# used 分配的数量
# 上述记录表示为虚拟机分配了 vCPU 1颗,RAM 512MB,Disk 1GB
显然,其中的 Consumer 消费者就是我们要创建的虚拟机。
Others
Placement Aggregate 功能测试
Placement Aggregate 功能由 member_of query parameter 支持,e.g. GET /resource_providers?member_of=。我们主要关注通过应用 member_of query parameter 实现获取 Placement Aggregate 下属的 Resource Provider 这一特性。下面步骤是手动测试该功能的过程:
Step1. 手动创建 table placement_aggregates 的记录
MariaDB [nova_api]> insert into placement_aggregates (id, uuid) values (1, "aju-test-agg");

MariaDB [nova_api]> select * from placement_aggregates;
+------------+------------+----+-------------+
| created_at | updated_at | id | uuid        |
+------------+------------+----+-------------+
| NULL       | NULL       |  1 | aju-tst-agg |
+------------+------------+----+-------------+
Step2. 手动创建 resource_provider_aggregates 的记录,建立 placement_aggregates 和 resouurce_providers 的关联性
MariaDB [nova_api]> insert into resource_provider_aggregates (resource_provider_id, aggregate_id) values (1, 1);

MariaDB [nova_api]> insert into resource_provider_aggregates (resource_provider_id, aggregate_id) values (132, 1);

MariaDB [nova_api]> select * from resource_provider_aggregates ;
+------------+------------+----------------------+--------------+
| created_at | updated_at | resource_provider_id | aggregate_id |
+------------+------------+----------------------+--------------+
| NULL       | NULL       |                    1 |            1 |
| NULL       | NULL       |                  132 |            1 |
+------------+------------+----------------------+--------------+

MariaDB [nova_api]> select * from resource_providers;
+---------------------+---------------------+-----+--------------------------------------+--------------------------------------------------------+------------+----------+
| created_at          | updated_at          | id  | uuid                                 | name                                                   | generation | can_host |
+---------------------+---------------------+-----+--------------------------------------+--------------------------------------------------------+------------+----------+
| 2018-08-01 07:47:26 | 2018-09-05 07:07:52 |   1 | fa3e12c8-d372-49ce-a17c-475bf6f66655 | domain-c12.dbe0e7b7-4da7-47c4-ac5a-456baff587e7        |        112 |     NULL |
| 2018-08-13 06:12:49 | 2018-08-13 06:12:49 | 132 | 386b0d94-a17a-413e-a056-abbf7c5cd136 | host-15.dbe0e7b7-4da7-47c4-ac5a-456baff587e7           |          1 |     NULL |
+---------------------+---------------------+-----+--------------------------------------+--------------------------------------------------------+------------+----------+
Step3. 使用 curl 发送请求
curl -i "http://172.18.22.221:8000/resource_providers?resources=VCPU:1,MEMORY_MB:512,DISK_GB:5&member_of=in:aju-tst-agg" \
-X GET \
-H 'Content-type: application/json' \
-H 'Accept: application/json' \
-H 'X-Auth-Project-Id: admin' \
-H 'OpenStack-API-Version: placement 1.4' \
-H 'X-Auth-Token:e2e2438411f144c09429ce70f577f15d'
NOTE:Placement API Microversion 大于 1.3 才支持 member_of query parameter。
响应:
{
	"resource_providers": [{
		"generation": 112,
		"uuid": "fa3e12c8-d372-49ce-a17c-475bf6f66655",
		"links": [{
			"href": "/resource_providers/fa3e12c8-d372-49ce-a17c-475bf6f66655",
			"rel": "self"
		}, {
			"href": "/resource_providers/fa3e12c8-d372-49ce-a17c-475bf6f66655/inventories",
			"rel": "inventories"
		}, {
			"href": "/resource_providers/fa3e12c8-d372-49ce-a17c-475bf6f66655/usages",
			"rel": "usages"
		}],
		"name": "domain-c12.dbe0e7b7-4da7-47c4-ac5a-456baff587e7"
	}, {
		"generation": 1,
		"uuid": "386b0d94-a17a-413e-a056-abbf7c5cd136",
		"links": [{
			"href": "/resource_providers/386b0d94-a17a-413e-a056-abbf7c5cd136",
			"rel": "self"
		}, {
			"href": "/resource_providers/386b0d94-a17a-413e-a056-abbf7c5cd136/inventories",
			"rel": "inventories"
		}, {
			"href": "/resource_providers/386b0d94-a17a-413e-a056-abbf7c5cd136/usages",
			"rel": "usages"
		}],
		"name": "host-15.dbe0e7b7-4da7-47c4-ac5a-456baff587e7"
	}]
}
Traits 功能测试
我们主要关注通过应用 required query parameter 实现获取具有指定 Traits 特征的 Resource Providers 这一特性。
- 查看所有的 Traits
curl -i "http://172.18.22.221:8000/traits" \
-X GET \
-H 'Content-type: application/json' \
-H 'Accept: application/json' \
-H 'X-Auth-Project-Id: admin' \
-H 'OpenStack-API-Version: placement 1.6' \
-H 'X-Auth-Token:e2e2438411f144c09429ce70f577f15d'
- 创建自定义 traits
curl -i "http://172.18.22.221:8000/traits/CUSTOM_AJU_TEST_AGG" \
-X PUT \
-H 'Content-type: application/json' \
-H 'Accept: application/json' \
-H 'X-Auth-Project-Id: admin' \
-H 'OpenStack-API-Version: placement 1.6' \
-H 'X-Auth-Token:e2e2438411f144c09429ce70f577f15d'
- 为 Resource Provider 设定自定义 traits
curl -i "http://172.18.22.221:8000/resource_providers/386b0d94-a17a-413e-a056-abbf7c5cd136/traits" \
-X PUT \
-H 'Content-type: application/json' \
-H 'Accept: application/json' \
-H 'X-Auth-Project-Id: admin' \
-H 'OpenStack-API-Version: placement 1.6' \
-H 'X-Auth-Token:e2e2438411f144c09429ce70f577f15d' \
-d '{"resource_provider_generation": 1, "traits": ["CUSTOM_AJU_TEST_AGG"]}'

RESP:
{"traits": ["CUSTOM_AJU_TEST_AGG"], "resource_provider_generation": 2}
- 查询 Resource Provider 的 traits
curl -i "http://172.18.22.221:8000/resource_providers/386b0d94-a17a-413e-a056-abbf7c5cd136/traits" \
-X GET \
-H 'Content-type: application/json' \
-H 'Accept: application/json' \
-H 'X-Auth-Project-Id: admin' \
-H 'OpenStack-API-Version: placement 1.6' \
-H 'X-Auth-Token:e2e2438411f144c09429ce70f577f15d'

RESP:
{"traits": ["CUSTOM_AJU_TEST_AGG"], "resource_provider_generation": 2}
- list allocation cadidates
curl -i "http://localhost.localdomain:8000/allocation_candidates?resources=VCPU:1,MEMORY_MB:512,DISK_GB:5" \
-X GET \
-H 'Content-type: application/json' \
-H 'Accept: application/json' \
-H "X-Auth-Project-Id: admin" \
-H 'OpenStack-API-Version: placement 1.10' \
-H 'X-Auth-Token:gAAAAABblx-u8wz_ZYq61OmAWTDR4A8LiCCjVhpGGu1GYY9buKQSw4McZdeU5-ZS1s555vsfoC8Zclk4v8BcwiC47VrTI6H89wnrYnN1Pk-VFdJQP4LoKxfj2tj9IIyNF5-E9DyxBKEVxVwKk3T876YTZYuHxe1udZV7V2g8WzKgLaoxvC2bo6c'

RESP:
{
	"provider_summaries": {
		"b296d963-4210-4622-b2cb-c6a288cfdd7b": {
			"resources": {
				"VCPU": {
					"used": 0,
					"capacity": 64
				},
				"MEMORY_MB": {
					"used": 0,
					"capacity": 23409
				},
				"DISK_GB": {
					"used": 0,
					"capacity": 49
				}
			}
		}
	},
	"allocation_requests": [{
		"allocations": [{
			"resource_provider": {
				"uuid": "b296d963-4210-4622-b2cb-c6a288cfdd7b"
			},
			"resources": {
				"VCPU": 1,
				"MEMORY_MB": 512,
				"DISK_GB": 5
			}
		}]
	}]
}
- list allocation cadidates filter by traits
curl -i "http://localhost.localdomain:8000/allocation_candidates?resources=VCPU:1,MEMORY_MB:512,DISK_GB:5&required=CUSTOM_AJU_TEST_AGG" \
-X GET \
-H 'Content-type: application/json' \
-H 'Accept: application/json' \
-H "X-Auth-Project-Id: admin" \
-H 'OpenStack-API-Version: placement 1.17' \
-H 'X-Auth-Token:gAAAAABblx-u8wz_ZYq61OmAWTDR4A8LiCCjVhpGGu1GYY9buKQSw4McZdeU5-ZS1s555vsfoC8Zclk4v8BcwiC47VrTI6H89wnrYnN1Pk-VFdJQP4LoKxfj2tj9IIyNF5-E9DyxBKEVxVwKk3T876YTZYuHxe1udZV7V2g8WzKgLaoxvC2bo6c'

RESP:
{
	"provider_summaries": {
		"b296d963-4210-4622-b2cb-c6a288cfdd7b": {
			"traits": ["CUSTOM_AJU_TEST_AGG"],
			"resources": {
				"VCPU": {
					"used": 0,
					"capacity": 64
				},
				"MEMORY_MB": {
					"used": 0,
					"capacity": 23409
				},
				"DISK_GB": {
					"used": 0,
					"capacity": 49
				}
			}
		}
	},
	"allocation_requests": [{
		"allocations": {
			"b296d963-4210-4622-b2cb-c6a288cfdd7b": {
				"resources": {
					"VCPU": 1,
					"MEMORY_MB": 512,
					"DISK_GB": 5
				}
			}
		}
	}]
}
NOTE:要到 R 版才支持 ‘‘required’’ Query 参数,过滤指定 Traits 的 Resource Provider。
最后
自此,Placement API 的作用、特性以及 Placement API 如何参与到虚拟机创建逻辑并完成资源管理的流程就介绍完毕了。最后贴出 Placement API 的官方文档,里面有关系 Placement API 30 多个小版本的区别描述,这里就不再赘述了。