为什么要使用缓存
在我们所编写的应用中,很多请求总是会一遍遍地去获取一些相同的数据,因为这些数据是无状态的,所以当请求任务完成后,就会立马丢掉所获取的数据,在这些数据中,有些是需要时间去数据库获取,或者远程接口调用获取,或执行复杂运算得到。如果这部分数据变化不那么频繁,或者压根不会变化,那我们何必要每次都去加载呢。
在web应用中,缓存是一门必备的技能,只要有需要优化的地方,我们首先会想到的就是使用缓存来提升性能。缓存技术也随着web技术的不断进步而不断演变,从本地缓存,到集群缓存、分布式缓存。
常用的缓存框架
常用的缓存框架有:Ehcache、Redis、Memcache等,这些框架都能帮助我们很好的实现数据缓存,具体各个框架的区别可参考:URL,这里我使用的是Redis3.2框架,并使用 Redis 官方首选的 Java 客户端开发包Jedis2.8。
Redis安装配置
Redis的安装很简单,网上有很多教程,这里说下配置:
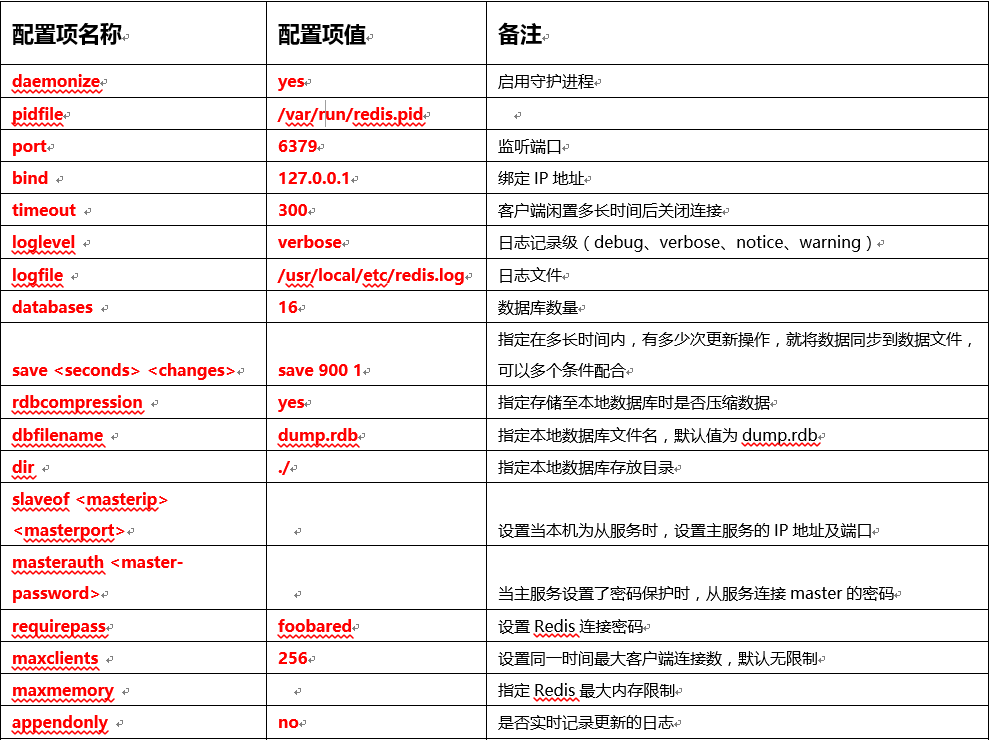
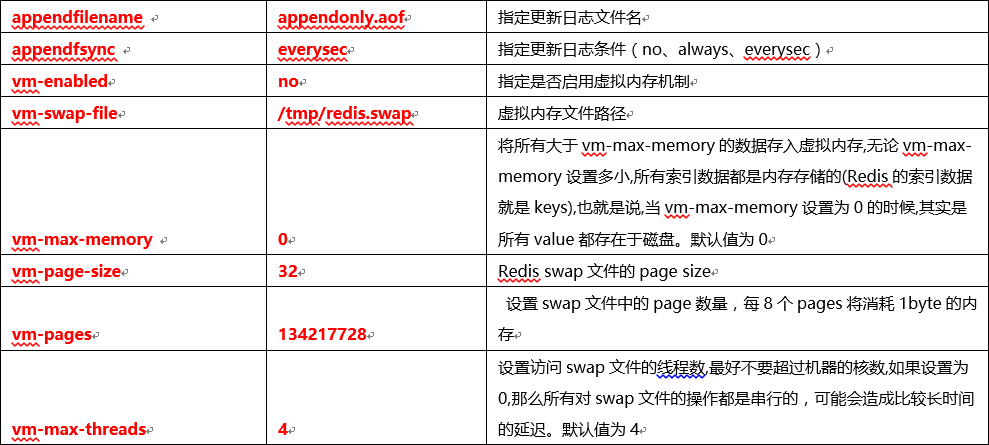
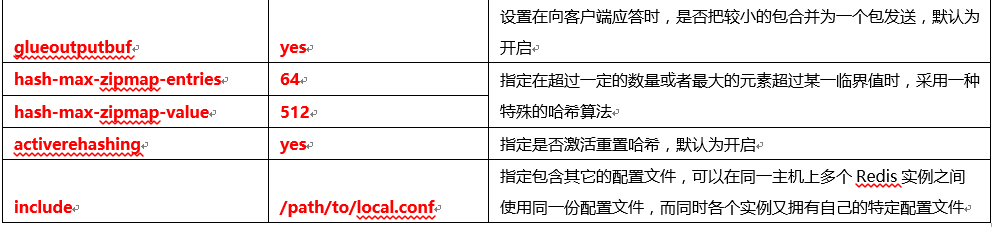
1、 redis.conf配置文件,Redis启动的时候需要一个redis.conf配置文件,主要有以下配置项:
2、 单机多实例
cp redis.conf,命名为redis6380.conf;
vim redis6380.conf,编辑以下几个参数:port : 6380;pidfile : /var/run/redis6380.pid;
启动:redis-server /user/local/etc/redis.conf,redis-server /user/local/etc/redis6380.conf,分别启动两个redis实例,查看是否启动:ps –ef|grpe redis

3、 主从配置
Redis的主从配置和切换非常简单,只要在slave实例中配置slaveof 主服务IP 主服务端口 :slaveof 192.168.1.106 6379 ,如果主服务设置了密码,配置 masterauth 主服务密码:masterauth newdoone
4、 集群配置
暂未实践
Spring集成Jedis配置
Redis服务安装好并启动后,我们需要通过Jedis客户端来连接并操作Redis实现数据缓存。我们使用Spring集成Jedis。由于Jedis的版本差异,Spring集成Jedis的配置会存在差异,如不同版本属性存在差异,属性名称可能也不一样。我们安装Redis最新版本3.2,Jedis使用2.8.1版本,Spring使用最新4.3版本。以下介绍几种配置方式:
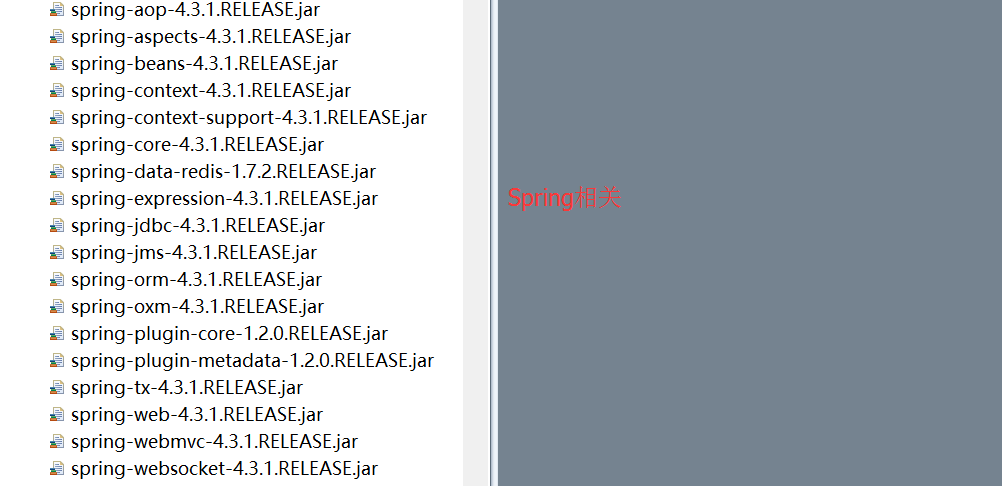
1、涉及jar:


2、redis连接配置:
# Redis settings
#redis.host=192.168.1.106
redis.host=134.64.42.14
redis.port=6379
redis.pass=newdoone
redis.timeout=2000
#redis2实例
redis.host2=134.64.42.30
#redis.host2=192.168.1.106
redis.port2=6380
redis.pass2=newdoone
redis.timeout2=2000

#一个pool最多有多少个状态为idle(空闲)的jedis实例
redis.maxIdle=300
#一个pool可分配多少个jedis实例
redis.maxActive=2048
#当borrow一个jedis实例时,最大的等待时间,如果超过等待时间,则直接抛出JedisConnectionException
redis.maxWait=1500
#在borrow一个jedis实例时,是否提前进行validate操作;如果为true,则得到的jedis实例均是可用的
redis.testOnBorrow=true
#连接耗尽时是否阻塞, false报异常,ture阻塞直到超时, 默认true
redis.blockWhenExhausted=false
redis.testOnReturn=false
3、Spring集成单机配置:
如果是单台服务器单个Redis实例,可使用以下配置,在需要操作的地方注入RedisTemplate进行操作,可直接set、get对象和设置有效期等。
    <!-- 单机配置  BENGIN-->
    <bean id="poolConfig" class="redis.clients.jedis.JedisPoolConfig">
        <property name="maxIdle" value="${redis.maxIdle}" />
        <property name="maxWaitMillis" value="${redis.maxWait}" />
        <property name="testOnBorrow" value="${redis.testOnBorrow}" />
    </bean>
    <bean id="connectionFactory"
        class="org.springframework.data.redis.connection.jedis.JedisConnectionFactory">
        <property name="poolConfig" ref="poolConfig" />
        <property name="port" value="${redis.port}" />
        <property name="hostName" value="${redis.host}" />
        <property name="password" value="${redis.password}" />
        <property name="timeout" value="${redis.timeout}"></property>
    </bean>
    <bean id="redisTemplate" class="org.springframework.data.redis.core.RedisTemplate">
        <property name="connectionFactory" ref="connectionFactory" />
        <property name="keySerializer">
            <bean
                class="org.springframework.data.redis.serializer.StringRedisSerializer" />
        </property>
        <property name="valueSerializer">
            <bean
                class="org.springframework.data.redis.serializer.JdkSerializationRedisSerializer" />
        </property>
    </bean>
   <!-- 单机配置  END-->
4、Spring集成多机配置:
有时一台Redis服务未必能满足扩张的业务需求,而Redis在3.x版本前是不支持服务端集群的,所以Jedis通过采用一致性哈稀分片算法(Shard),将不同的key分配到不同的redis server上,以达到横向扩展的目的。
<!-- 分片池  BEGIN-->
   <bean id="shardedJedisPool" class="redis.clients.jedis.ShardedJedisPool">
        <constructor-arg index="0" ref="jedisPoolConfig"/>
        <constructor-arg index="1">
            <list>
                <bean class="redis.clients.jedis.JedisShardInfo">
                    <constructor-arg index="0" value="${redis.host}"/>
                    <constructor-arg index="1" value="${redis.port}" type="int"/>
                    <constructor-arg index="2" value="${redis.timeout}" type="int"/>
                    <property name="password" value="${redis.pass}"/>
                </bean>
                <bean class="redis.clients.jedis.JedisShardInfo">
                    <constructor-arg index="0" value="${redis.host2}"/>
                    <constructor-arg index="1" value="${redis.port2}" type="int"/>
                    <constructor-arg index="2" value="${redis.timeout2}" type="int"/>
                    <property name="password" value="${redis.pass2}"/>
                </bean>
            </list>
        </constructor-arg>
    </bean>
    <!-- 连接池配置 最大空闲数、最大连接数、最长等待时间、连接是否可用 -->
    <bean id="jedisPoolConfig" class="redis.clients.jedis.JedisPoolConfig">
        <property name="maxTotal" value="${redis.maxActive}" />
        <property name="maxIdle" value="${redis.maxIdle}" />
        <property name="maxWaitMillis" value="${redis.maxWait}"/>
        <property name="testOnBorrow" value="${redis.testOnBorrow}" />
        <property name="testOnReturn" value="${redis.testOnReturn}"/>
        <property name="blockWhenExhausted" value="${redis.blockWhenExhausted}"/>
    </bean>
    <!-- 分片池  END-->
5、redis3.x集群配置:
Redis3.x开始支持服务端集群配置,在安装完Redis服务后,需要在服务端进行集群配置,再通过Spring配置加载jedisCluster,在需要的地方注入jedisCluster完成操作。由于暂未实践此场景,这里就不作介绍了。
Spring基于注解的缓存技术
Spring在3.1版本中引入了基于注解的缓存技术Spring Cache,它本质上不是一个具体的缓存实现方案(例如EHCache 或者 OSCache),而是一个对缓存使用的抽象,通过在既有代码中添加少量它定义的各种 annotation,即能够达到缓存方法的返回对象的效果。其特点总结如下:
• 通过少量的配置 annotation 注释即可使得既有代码支持缓存
• 支持开箱即用 Out-Of-The-Box,即不用安装和部署额外第三方组件即可使用缓存
• 支持 Spring Express Language,能使用对象的任何属性或者方法来定义缓存的 key 和 condition
• 支持 AspectJ,并通过其实现任何方法的缓存支持
• 支持自定义 key 和自定义缓存管理者,具有相当的灵活性和扩展性
使用方法也很简单,在第四步的配置中增加以下配置:
<!-- 开启spring cache注解功能-->
<cache:annotation-driven cache-manager="redisCacheManager"/>
<!-- Spring Cache缓存管理器 BEGIN -->
<bean id="cacheManager" class="org.springframework.data.redis.cache.RedisCacheManager">
    <constructor-arg name="template" ref="redisTemplate" />
</bean>
然后在方法上增加@Cacheable、@CachePut、@CacheEvict注解,可以轻松的实现缓存,但有一个弊端,貌似不能针对不同的业务自定义有效期。
自定义注解的Spring AspectJ AOP的缓存实现
【参考:http://blog.csdn.net/zhanngle/article/details/41077423】
在上面第四步中,我们通过Spring的集成配置,可以获取到操作Redis的相关对象,如:RedisTemplate、shardedJedisPool、jedisCluster,接下来就是使用这些对象进行缓存操作了,我们使用自定义注解,通过shardedJedisPool对象操作实现多个Redis服务的扩展使用:
1、 操作工具类
点击下载
2、 序列化和反序列化工具类
由于shardedJedisPool原子接口只能set/get String类型,我们通过序列化工具来实现对对象的set和get,使用Protobuff插件序列化/反序列化
/**
 *
 */
package com.doone.commplat.utils.serialize;

import java.util.Map;
import java.util.concurrent.ConcurrentHashMap;

import org.springframework.objenesis.Objenesis;
import org.springframework.objenesis.ObjenesisStd;

import com.dyuproject.protostuff.LinkedBuffer;
import com.dyuproject.protostuff.ProtobufIOUtil;
import com.dyuproject.protostuff.Schema;
import com.dyuproject.protostuff.runtime.RuntimeSchema;

/**
 * @author: pengl
 * @Date:2016年7月22日 下午2:55:11
 * @Description:Protobuff插件序列化
 */
public class ProtobuffSerializationUtil {
    private static Map<Class<?>, Schema<?>> cachedSchema = new ConcurrentHashMap<Class<?>, Schema<?>>();
    private static Objenesis objenesis = new ObjenesisStd(true);

    private static <T> Schema<T> getSchema(Class<T> clazz) {
        @SuppressWarnings("unchecked")
        Schema<T> schema = (Schema<T>) cachedSchema.get(clazz);
        if (schema == null) {
            schema = RuntimeSchema.getSchema(clazz);
            if (schema != null) {
                cachedSchema.put(clazz, schema);
            }
        }
        return schema;
    }

    /**
     * 序列化
     *
     * @param obj
     * @return
     */
    public static <T> byte[] serializer(T obj) {
        @SuppressWarnings("unchecked")
        Class<T> clazz = (Class<T>) obj.getClass();
        LinkedBuffer buffer = LinkedBuffer
                .allocate(LinkedBuffer.DEFAULT_BUFFER_SIZE);
        try {
            Schema<T> schema = getSchema(clazz);
            return ProtobufIOUtil.toByteArray(obj, schema, buffer);
        } catch (Exception e) {
            throw new IllegalStateException(e.getMessage(), e);
        } finally {
            buffer.clear();
        }
    }

    /**
     * 反序列化
     *
     * @param data
     * @param clazz
     * @return
     */
    public static <T> T deserializer(byte[] data, Class<T> clazz) {
        try {
            T obj = objenesis.newInstance(clazz);
            Schema<T> schema = getSchema(clazz);
            ProtobufIOUtil.mergeFrom(data, obj, schema);
            return obj;
        } catch (Exception e) {
            throw new IllegalStateException(e.getMessage(), e);
        }
    }
}
3、 自定义注解(RedisCacheable/ RedisCacheKey)
/**
 *
 */
package com.doone.commplat.utils.annotation;

import java.lang.annotation.ElementType;
import java.lang.annotation.Retention;
import java.lang.annotation.RetentionPolicy;
import java.lang.annotation.Target;

/**
 * @author: pengl
 * @Date:2016年7月11日 下午3:52:04
 * @Description:自定义Redis缓存集成注解
 */
@Retention(RetentionPolicy.RUNTIME)
@Target({ElementType.METHOD})
public @interface RedisCacheable {
    public enum KeyMode{
        DEFAULT,    //只有加了@CacheKey的参数,才加入key后缀中
        BASIC,      //只有基本类型参数,才加入key后缀中,如:String,Integer,Long,Short,Boolean
        ALL,        //所有参数都加入key后缀
        BEAN,       //bean的属性加入KEY后缀
        MAP;        //Map的属性加入KEY后缀
    }

    public String key() default "";     //缓存key
    public KeyMode keyMode() default KeyMode.DEFAULT;       //key的后缀模式
    public int expire() default 7200;      //缓存多少秒,默认2个小时
}
/**
 *
 */
package com.doone.commplat.utils.annotation;

import java.lang.annotation.ElementType;
import java.lang.annotation.Retention;
import java.lang.annotation.RetentionPolicy;
import java.lang.annotation.Target;

/**
 * @author: pengl
 * @Date:2016年7月11日 下午4:00:23
 * @Description:
 */
@Retention(RetentionPolicy.RUNTIME)
@Target({ElementType.PARAMETER})
public @interface RedisCacheKey {

}
4、 创建Aop拦截器的处理类
/**
 *
 */
package com.doone.commplat.utils.aop;

import java.lang.annotation.Annotation;
import java.lang.reflect.Field;
import java.util.Map;

import org.aspectj.lang.ProceedingJoinPoint;
import org.aspectj.lang.annotation.Around;
import org.aspectj.lang.annotation.Aspect;
import org.aspectj.lang.reflect.MethodSignature;
import org.springframework.beans.factory.annotation.Autowired;
import org.springframework.stereotype.Component;
import org.springframework.util.ReflectionUtils;

import com.doone.commplat.utils.annotation.RedisCacheKey;
import com.doone.commplat.utils.annotation.RedisCacheable;
import com.doone.commplat.utils.annotation.RedisCacheable.KeyMode;
import com.doone.commplat.utils.redis.RedisUtil;

/**
 * @author: pengl
 * @Date:2016年7月11日 下午3:53:15
 * @Description:拦截@RedisCacheable注解
 */
@Aspect
@Component
public class RedisCacheableAspect {
    @Autowired
    private RedisUtil redisUtil;

    @Around("@annotation(cache)")
    public Object cached(final ProceedingJoinPoint pjp,RedisCacheable cache) throws Throwable {

        String key = getCacheKey(pjp, cache);
        String signature = pjp.getSignature().toLongString();
        String returnType = signature.split(" ")[1];
        Object value = redisUtil.get(key,Class.forName(returnType));    //从缓存获取数据
        if(value != null) {
            return value;
        }
        value = pjp.proceed();      //跳过缓存,到后端查询数据

        if(value == null)
            return value;

        if(cache.expire()<=0) {      //如果没有设置过期时间,则无限期缓存
            redisUtil.set(key, value);
        } else {                    //否则设置缓存时间
            redisUtil.set(key, value, cache.expire());
        }
        return value;
    }

    /**
     * 获取缓存的key值
     * @param pjp
     * @param cache
     * @return
     */
    private String getCacheKey(ProceedingJoinPoint pjp,RedisCacheable cache) {

        StringBuilder buf=new StringBuilder();
        buf.append(pjp.getSignature().getDeclaringTypeName()).append(".").append(pjp.getSignature().getName());
        String keyStr = cache.key();
        if(!(cache.keyMode()==KeyMode.BEAN)){
            if(keyStr.length()>0) {
                buf.append(".").append(keyStr);
            }

        }

        Object[] args=pjp.getArgs();
        if(cache.keyMode()==KeyMode.DEFAULT) {
            Annotation[][] pas=((MethodSignature)pjp.getSignature()).getMethod().getParameterAnnotations();
            for(int i=0;i<pas.length;i++) {
                for(Annotation an:pas[i]) {
                    if(an instanceof RedisCacheKey) {
                        buf.append(".").append(args[i].toString());
                        break;
                    }
                }
            }
        } else if(cache.keyMode()==KeyMode.BASIC) {
            for(Object arg:args) {
                if(arg instanceof String) {
                    buf.append(".").append(arg);
                } else if(arg instanceof Integer || arg instanceof Long || arg instanceof Short) {
                    buf.append(".").append(arg.toString());
                } else if(arg instanceof Boolean) {
                    buf.append(".").append(arg.toString());
                }
            }
        } else if(cache.keyMode()==KeyMode.ALL) {
            for(Object arg:args) {
                buf.append(".").append(arg.toString());
            }
        } else if(cache.keyMode()==KeyMode.BEAN) {
            if(keyStr.length()>0) {
                Object target = args[0];
                Field field = ReflectionUtils.findField(target.getClass(), keyStr);
                ReflectionUtils.makeAccessible(field);
                Object value = ReflectionUtils.getField(field, target);
                buf.append("#").append(value);
            }
        } else if(cache.keyMode()==KeyMode.MAP) {
            if(keyStr.length()>0) {
                Map target = (Map)args[0];
                buf.append("#").append(target.get(keyStr));
            }
        }

        return buf.toString();
    }
}
5、 测试
编写一个从数据库获取数据的方法,使用自定义的缓存注解:
@RedisCacheable(expire=300,keyMode=RedisCacheable.KeyMode.BEAN,key="logid")
    public ExceptionLogBean getLogInfo2(ExceptionLogBean exceptionLogBean){
        return exceptionLogService.selectLogByLogid(exceptionLogBean);
    }
测试方法:
@org.junit.Test
    public void testRedis2() throws UnsupportedEncodingException{
        RedisDemo redisDemo = (RedisDemo)SpringBeanUtil.getBean("redisDemo");
        ExceptionLogBean par = new ExceptionLogBean();
        par.setLogid(4);
        ExceptionLogBean exceptionLogBean = redisDemo.getLogInfo2(par);
        _logger.info(dateUtil.parseDate(exceptionLogBean.getCreatedate(),"yyyy-MM-dd HH:mm:ss"));
    }
通过控制台打印的SQL日志可以看到,第一次执行时,是从数据库查询获取,这时我们查看通过redis-cli查看KEY *,端口为6379的redis实例中出现了缓存:


再执行一次,控制台未打印SQL日志,直接打印了结果值,说明是从缓存中获取的值,再将logid分别改为1,2,3执行三次,通过redis-cli可以看到两个实例分别存储了两个缓存:

