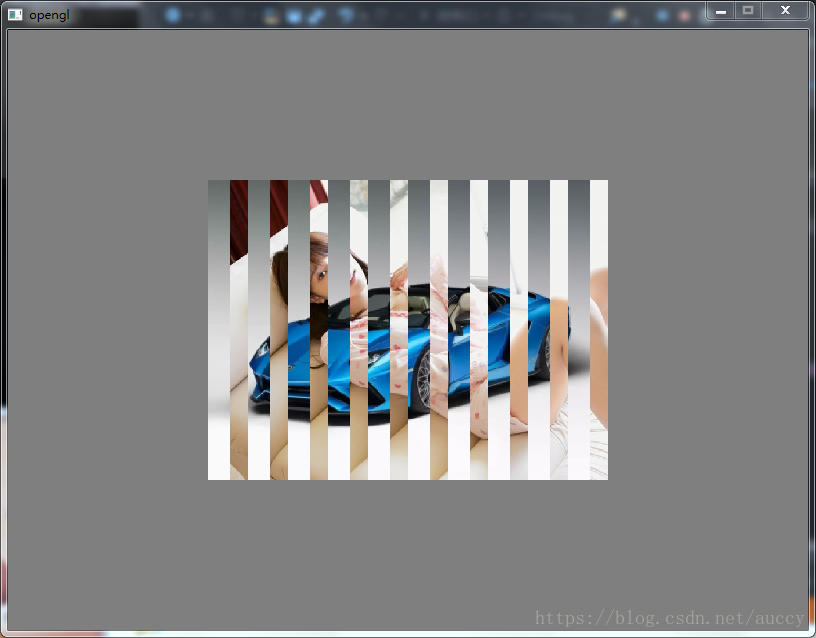
百叶窗的实现原理:设置窗页宽度,2张纹理间隔采样。
顶点着色器:
#version 330 core
layout (location = 0) in vec3 aPos;
layout (location = 1) in vec3 aColor;
layout (location = 2) in vec2 aTexCoord;

out vec2 TexCoord;
out vec4 FragColor;

void main()
{
	gl_Position = vec4(aPos, 1.0);
	TexCoord = vec2(aTexCoord.x, 1-aTexCoord.y);
	FragColor=vec4(1.0);
}
片段着色器:
#version 330 core

uniform sampler2D texture0;
uniform sampler2D texture1;
uniform float unitWidth;
//窗页宽度 范围0-1
uniform float offset;
//显示窗页的编译系数 范围0-1
in vec4 FragColor;
in vec2 TexCoord;

out vec4 color;

void main()
{
     float modPixel = mod(TexCoord[0], unitWidth);
     float showPixel = offset* unitWidth;
     if (modPixel < showPixel)
     {
          color = FragColor * texture2D(texture1, TexCoord);
     }
     else
     {
          color = FragColor * texture2D(texture0, TexCoord);
     }
}
完整代码:
#include "stdio.h"
#include <GL/glew.h>
#include <GLFW/glfw3.h>
#include <soil/SOIL.h>
#include <glm/glm.hpp>
#include <glm/gtc/matrix_transform.hpp>
#include <glm/gtc/type_ptr.hpp>

#include <iostream>
#include "wrapperWindow.h"
#include "wrapperShader.h"
#include "data.h"
#include <windows.h>

const int design_w = 800;
const int design_h = 600;

int main()
{
	GLFWwindow *window = wrapperWindow(design_w, design_h).getWindow();

	auto m_shader = wrapperShader::createWithFilePath("blinds.vsh", "blinds.fsh");
	int arr_group_nun = 8;
	unsigned int indices[] = { // 注意索引从0开始!
		0, 1, 3, // 第一个三角形
		1, 2, 3  // 第二个三角形
	};

	GLuint vao, vbo,ebo;
	glGenVertexArrays(1, &vao);
	glBindVertexArray(vao);
	glGenBuffers(1, &vbo);
	glBindBuffer(GL_ARRAY_BUFFER, vbo);
	glBufferData(GL_ARRAY_BUFFER, sizeof(rectArr), rectArr, GL_STATIC_DRAW);

	glGenBuffers(1, &ebo);
	glBindBuffer(GL_ELEMENT_ARRAY_BUFFER, ebo);
	glBufferData(GL_ELEMENT_ARRAY_BUFFER, sizeof(indices), indices, GL_STATIC_DRAW);

	glVertexAttribPointer(0, 3, GL_FLOAT, GL_FALSE, arr_group_nun* sizeof(GLfloat), (GLvoid *)0);
	glEnableVertexAttribArray(0);

	glVertexAttribPointer(2, 2, GL_FLOAT, GL_FALSE, arr_group_nun* sizeof(GLfloat), (GLvoid *)(6 * sizeof(GLfloat)));
	glEnableVertexAttribArray(2);
	glBindVertexArray(0);
	//--
	int w = 0, h = 0;
	GLuint texture0,texture1;
	glGenTextures(1, &texture0);
	glBindTexture(GL_TEXTURE_2D, texture0);

	unsigned char * img = SOIL_load_image("1.jpg", &w, &h, 0, SOIL_LOAD_RGB);
	//加载图片
	glTexImage2D(GL_TEXTURE_2D, 0, GL_RGB, w, h, 0, GL_RGB, GL_UNSIGNED_BYTE, img);
	//加载的图片数据 生成纹理
	glGenerateMipmap(GL_TEXTURE_2D);
	SOIL_free_image_data(img);

	glGenTextures(1, &texture1);
	glBindTexture(GL_TEXTURE_2D, texture1);
	img = SOIL_load_image("car.jpg", &w, &h, 0, SOIL_LOAD_RGB);
	glTexImage2D(GL_TEXTURE_2D, 0, GL_RGB, w, h, 0, GL_RGB, GL_UNSIGNED_BYTE, img);
	glGenerateMipmap(GL_TEXTURE_2D);
	SOIL_free_image_data(img);

	glBindTexture(GL_TEXTURE_2D, 0);

	SYSTEMTIME now;
	int ratio = 400;
	while (!glfwWindowShouldClose(window))
	{
		glfwPollEvents();

		glClearColor(0.5f, 0.5f, 0.5f, 1.0f);
		glClear(GL_COLOR_BUFFER_BIT | GL_DEPTH_BUFFER_BIT);

		m_shader.useShaderProgram();
		m_shader.set1i("texture0", 0);
		m_shader.set1i("texture1", 1);

		glBindVertexArray(vao);
		glActiveTexture(GL_TEXTURE0);
		//激活纹理单元
		glBindTexture(GL_TEXTURE_2D, texture0);
		//绑定纹理单元
		glActiveTexture(GL_TEXTURE1);
		glBindTexture(GL_TEXTURE_2D, texture1);

		m_shader.set1f("unitWidth", 0.1);
		//设置窗页宽度
		GetSystemTime(&now);
		int sur = now.wMilliseconds %ratio;
		float offset = sur*1.0 / ratio;
		m_shader.set1f("offset", 1-offset);
		//根据时间设置偏移系数
		glDrawElements(GL_TRIANGLES, 6, GL_UNSIGNED_INT, 0);
		glBindVertexArray(0);

		glfwSwapBuffers(window);
	}
	glDeleteBuffers(1, &vao);
	glDeleteBuffers(1, &vbo);
	glDeleteBuffers(1, &ebo);
	glfwTerminate();
	return 0;
}
效果图: