从一个bug说起,前阵子拿Nexus 6P(Android 8.0)进行通知推送的测试,发现无法弹出通知栏。
项目跑在Android 8.0模拟器上弹出了Toast:
Developer warning for package “xxx.xxx.xxx”
Failed to post notification on channel “12345”
See log for more details
然后查看log,system_process显示一条error log:
NotificationService: No Channel found for pkg=xxx.xxx.xxx, channelId=12345, id=12345, tag=null, opPkg=xxx.xxx.xxx, callingUid=10085, userId=0, incomingUserId=0, notificationUid=10085, notification=Notification…
跟进NotificationManager的notify方法,调用了NotificationManagerService的enqueueNotificationWithTag将通知入队,最后在NotificationManagerService的enqueueNotificationInternal方法中发现了error log的踪迹,截取代码片如下图:

见图可知,是由于此条通知没有查找到应用中对应的NotificationChannel的原因,而无法弹出来。那NotificationChannel是个什么鬼,查阅官文得知,这是Android O新增的通知渠道,其允许您为要显示的每种通知类型创建用户可自定义的渠道。用户界面将通知渠道称之为通知类别。
先贴出我猜到坑的错误代码:
/**
 * 错误示例
 */
public static void showNotificationWrong(Context context) {
    int notificationId = 0x1234;
    NotificationCompat.Builder builder = new NotificationCompat.Builder(context, Integer.toString(notificationId));

    builder.setSmallIcon(android.R.drawable.stat_notify_chat);

    NotificationManagerCompat notificationManagerCompat = NotificationManagerCompat.from(context);
    notificationManagerCompat.notify(notificationId, builder.build());
}
这里的NotificationCompat及NotificationManagerCompat来自官方提供的兼容库:
com.android.support:appcompat-v7:26.1.0
想着最新的Compat库兼容应该做得是最好的,然后错就错在这句代码:
NotificationCompat.Builder(context, Integer.toString(notificationId));
一眼看到Builder构造函数的第二个参数,传的是id,就直接把notificationId传进去了,其实细看传的是channelId,我这里把channelId和notificationId概念搞混了。channelId传null,或者只有一个参数的Builder的构造方法,都不会出现错误,修正代码如下:
NotificationCompat.Builder builder = new NotificationCompat.Builder(context, null);

//或者
NotificationCompat.Builder builder = new NotificationCompat.Builder(context);
原理就是:NotificationChannel是Android O新增的特性,为了兼容老代码,如果channelId为null的话,Android O会把通知归到“Other Channel”上。
PS:将targetSdkVersion提到26以上的话,就必须设置channel了,不能为null。
bug解了,现在来“肢解”下Android O的通知栏。
1. 从通知栏的使用出发
如下图,通过传统方式弹出通知后,我们可以通过侧滑通知,拉出通知的设置选项。

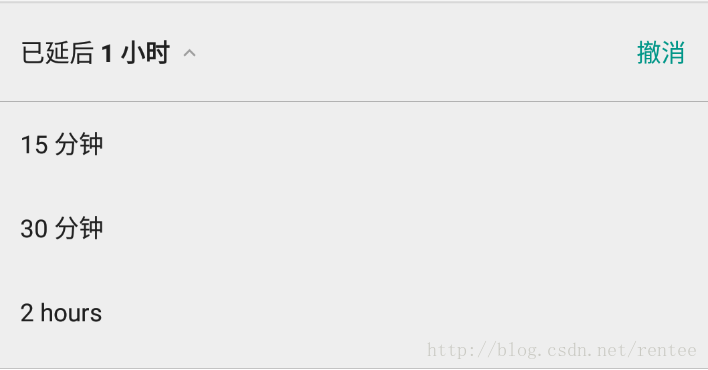
第一个像时钟一样的按键,可以设置这条通知的延时展示,点击之后,你可以选择这条通知需要延时的时间。如图:
第二个设置键,则可以对通知展示的设置,见图:
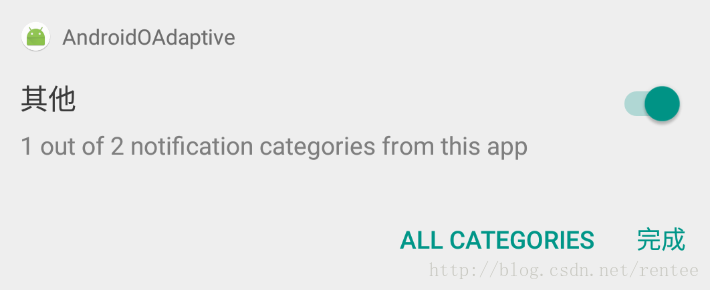
这张图显示的“其他”代表此条通知的渠道是“其他”,下面的描述含义是:来自此应用的2个通知类别(Channel)中的1个,旁边的开关即代表你可以对此类别进行开关。
点击下方的ALL CATEGORIES按键,则进入应用通知的设置页,如图:
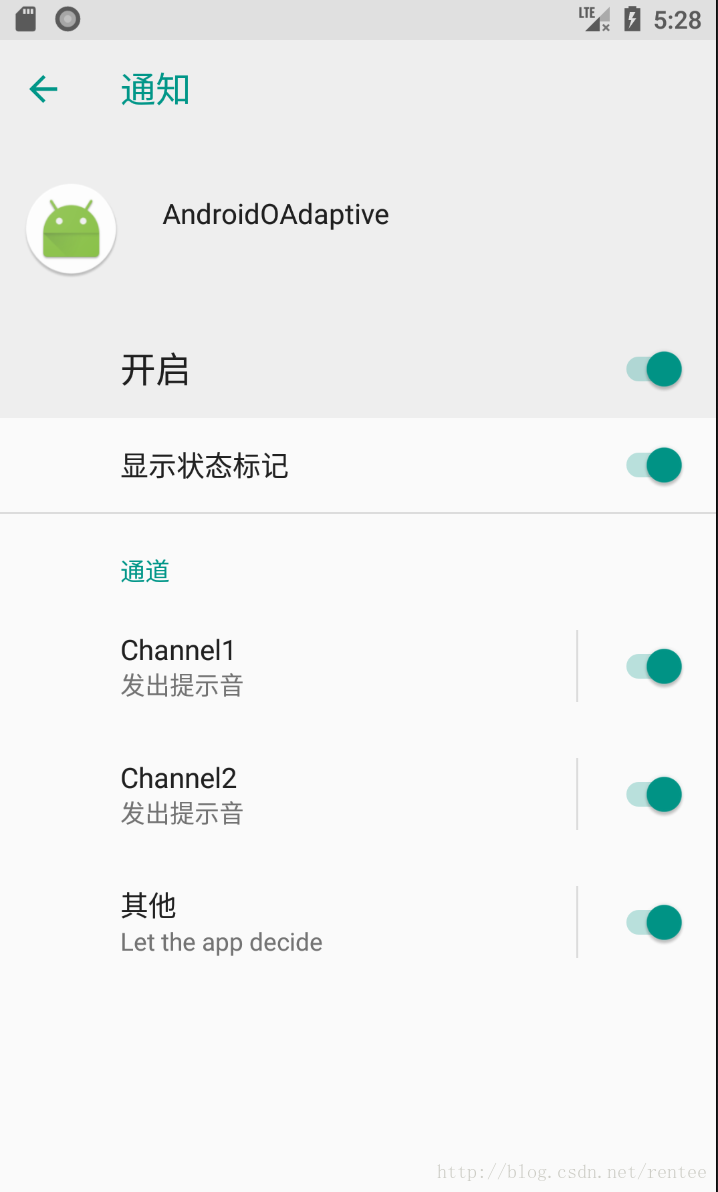
这里,就可以对应用每个类别(Channel)的通知的打开关闭,重要程度,桌面图标是否展示小红点(虽然不是红色的)做一些设置。
2.新的重要特性:NotificationChannel
(1)创建NotificationChannel
如果你需要发送属于某个自定义渠道的通知,你需要在发送通知前创建自定义通知渠道,示例如下:
//ChannelId为"1",ChannelName为"Channel1"
NotificationChannel channel = new NotificationChannel("1",
                "Channel1", NotificationManager.IMPORTANCE_DEFAULT);
channel.enableLights(true); //是否在桌面icon右上角展示小红点
channel.setLightColor(Color.GREEN); //小红点颜色
channel.setShowBadge(true); //是否在久按桌面图标时显示此渠道的通知
notificationManager.createNotificationChannel(channel);
(2)向NotificationChannel发送通知
public static void showChannel1Notification(Context context) {
    int notificationId = 0x1234;
    Notification.Builder builder = new Notification.Builder(context,"1"); //与channelId对应
    //icon title text必须包含,不然影响桌面图标小红点的展示
    builder.setSmallIcon(android.R.drawable.stat_notify_chat)
            .setContentTitle("xxx")
            .setContentText("xxx")
            .setNumber(3); //久按桌面图标时允许的此条通知的数量
    NotificationManager notificationManager = (NotificationManager) context.getSystemService(Context.NOTIFICATION_SERVICE);
    notificationManager.notify(notificationId, builder.build());
}
(3)删除NotificationChannel
NotificationChannel mChannel = mNotificationManager.getNotificationChannel(id);
mNotificationManager.deleteNotificationChannel(mChannel);
demo github:
https://github.com/OptimusPrimeRen/Android-O-Adaptive.git