FT5x06原厂芯片资料下载https://download.csdn.net/download/jerrygou/10653027
FT5x06驱动完整代码下载https://download.csdn.net/download/jerrygou/10653022
一、电容触控芯片FT5x06
TQ210的电容触摸屏控制芯片是FT5x06。
FT5x06引出了6根脚,分别是VCC、GND、I2CSDA、I2CSCL、INT和RESET,虽然INT脚不是必须的,但是开发高效省资源的触屏驱动程序往往都采用中断方式,下面是GT811的引脚图:
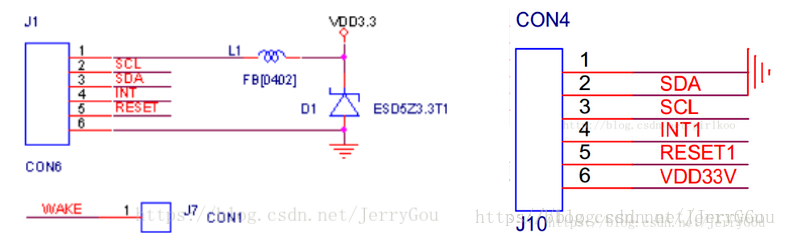
使用万能表实际测量了一下触控模块的各个引脚,实际线序是GND、SDA、SDL、INT、RESET和VDD。
LXpwmTout3连接到了FT5x06的RESET脚上,然后与GPIO0_3链接,XEINT14连接到FT5x06的INT脚上,与GPIO1_6链接,因此,需要将GPIO0_3配置为终端输入引脚,GPIO1_6配置为输出引脚。
二、 I2C驱动编写
I2C驱动也是基于总线结构的,不过分为两种,一种是Legacy方式,另一种是New Style方式,其中,Legacy方式在新内核中已经不支持了,不过韦东山老师的视频中还是分析的Legacy方式,New Style方式你可以自己用Source Insight追踪分析一下,具体的可以参考下面的代码。
ft5x06_touch.c
/*
 * driver/input/touchscreen/ft5x06_touch.c
 */
#include <linux/delay.h>
#include <linux/slab.h>
#include <linux/i2c.h>
#include <linux/input.h>
#include <linux/interrupt.h>
#include <linux/irq.h>
#include <linux/io.h>
#include <linux/platform_device.h>
#include <mach/gpio.h>
#include <plat/gpio-cfg.h>
#include <linux/kernel.h>
#include <linux/module.h>
#include <linux/time.h>
#include <linux/input.h>
#include <linux/device.h>
#include <linux/hrtimer.h>


#define FT5X06_I2C_BUS		(2)
#define FT5X06_I2C_ADDRESS	(0x38)

#define SCREEN_MAX_WIDTH	(800)
#define SCREEN_MAX_HEIGHT	(480)

#define TOUCH_MAX_WIDTH	    (800)
#define TOUCH_MAX_HEIGHT    (480)

#define K_BACK				(KEY_BACK & KEY_MAX)
#define K_MENU				(KEY_MENU & KEY_MAX)
#define K_HOME				(KEY_HOME & KEY_MAX)
#define K_SEARCH			(KEY_SEARCH & KEY_MAX)

struct point_node
{
	unsigned int x;
	unsigned int y;
};

struct ft5x06_ts_data {
	struct workqueue_struct * wq;
	struct work_struct work;
	struct i2c_client * client;
	struct input_dev * input_dev;

	struct point_node node[5];
};

typedef enum
{
	ERR_OK,
	ERR_MODE,
    ERR_READID,
    ERR_ERASE,
    ERR_STATUS,
    ERR_ECC,
    ERR_DL_ERASE_FAIL,
    ERR_DL_PROGRAM_FAIL,
    ERR_DL_VERIFY_FAIL
} E_UPGRADE_ERR_TYPE;

typedef unsigned char					FTS_BYTE;
typedef unsigned short					FTS_WORD;
typedef unsigned int					FTS_DWRD;
typedef unsigned char					FTS_BOOL;

#define FTS_NULL						0x0
#define FTS_TRUE						0x1
#define FTS_FALSE						0x0

#define FTS_PACKET_LENGTH				128

static int ft5x06_read_coordinates(struct i2c_client * client, uint8_t * buf, uint8_t len)
{
	struct i2c_msg msgs[2];
	uint8_t msgbuf[1] = { 0x0 };
	int ret;

	msgs[0].flags = !I2C_M_RD;
	msgs[0].addr = client->addr;
	msgs[0].len = 1;
	msgs[0].buf = &msgbuf[0];

	msgs[1].flags = I2C_M_RD;
	msgs[1].addr = client->addr;
	msgs[1].len = len;
	msgs[1].buf = &buf[0];

	ret = i2c_transfer(client->adapter, msgs, 2);
	return ret;
}

static void ft5x06_ts_work_func(struct work_struct * work)
{
	struct ft5x06_ts_data * ts = container_of(work, struct ft5x06_ts_data, work);
	uint8_t buf[32] = { 0 };
	unsigned int X, Y;
	unsigned int x, y, event, id;
	int i;

	ft5x06_read_coordinates(ts->client, buf, 32);

	for(i = 0; i < 5; i++)
	{
		X = (buf[i*6 + 3])<<8 | buf[i*6 + 4];
		Y = (buf[i*6 + 5])<<8 | buf[i*6 + 6];

		x = X & 0xfff;
		y = Y & 0xfff;

		event = (X >> 14) & 0x3;    //触摸点所发生的事件
		id = (Y >> 12) & 0xf;       //触摸点ID

		/* Remove Muti finger */
         if(id >= 0 && id <= 4) //五点触摸
		//if(id == 0)   //一点触摸
		{
			ts->node[id].x = x;
			ts->node[id].y = y;
            printk("[%d]event: event = %4d\n", id, event);

			if((event == 0) || (event == 0x02)) //按下或接触
			{
                //上报触屏事件
				input_report_abs(ts->input_dev, ABS_X, ts->node[id].x); //X坐标
				input_report_abs(ts->input_dev, ABS_Y, ts->node[id].y); //Y坐标
				input_report_abs(ts->input_dev, ABS_Z, 0);
				input_report_abs(ts->input_dev, ABS_PRESSURE, 1);
				input_sync(ts->input_dev);

				//printk("[%d]down: x = %4d, y = %4d\n", id, ts->node[id].x, ts->node[id].y);
			}
			else if(event == 0x01)  //抬起
			{
				//input_report_abs(ts->input_dev, ABS_X, ts->node[id].x);
				//input_report_abs(ts->input_dev, ABS_Y, ts->node[id].y);
				input_report_abs(ts->input_dev, ABS_Z, 0);
				//input_report_key(ts->input_dev, BTN_TOUCH, 0);
				input_report_abs(ts->input_dev, ABS_PRESSURE, 0);
				input_sync(ts->input_dev);

				//printk("[%d]up: x = %4d, y = %4d\n", id, ts->node[id].x, ts->node[id].y);
			}
		}
	}

	input_sync(ts->input_dev);  //同步用于告诉input core子系统报告结束
	enable_irq(ts->client->irq);
}

static irqreturn_t ft5x06_ts_irq_handler(int irq, void * dev_id)
{
	struct ft5x06_ts_data * ts = dev_id;

	disable_irq_nosync(ts->client->irq);
	queue_work(ts->wq, &ts->work);

	return IRQ_HANDLED;
}

static int ft5x06_ts_probe(struct i2c_client * client, const struct i2c_device_id * id)
{
	int ret;
	struct ft5x06_ts_data * ts;

	//检测适配器是否支持I2C_FUNC_I2C通讯方式
	if (!i2c_check_functionality(client->adapter, I2C_FUNC_SMBUS_WORD_DATA))
		return -ENODEV;

	ts = kzalloc(sizeof(*ts), GFP_KERNEL);	//(注:GFP_KERNEL是内核内存分配时最常用的,无内存可用时可引起休眠)
	if(!ts)
		return -ENOMEM;

	ts->wq = create_workqueue("ft5x06_wq");	//创建工作queue
	if(!ts->wq)
	{
		kfree(ts);
		return -ENOMEM;
	}

	INIT_WORK(&ts->work, ft5x06_ts_work_func);	//创建工作,关联工作函数
	ts->client = client;
	i2c_set_clientdata(client, ts);

	ts->input_dev = input_allocate_device();	//分配一个设备结构体,并初始化
	if (ts->input_dev == NULL)
	{
		destroy_workqueue(ts->wq);	//释放工作queue
		kfree(ts);
		return -ENOMEM;
	}

	ts->input_dev->name = client->name;
	ts->input_dev->phys = "input/ts";
	ts->input_dev->id.bustype = BUS_I2C;
	ts->input_dev->id.vendor = 0xDEAD;
	ts->input_dev->id.product = 0xBEEF;
	ts->input_dev->id.version = 10427;

    set_bit(EV_SYN, ts->input_dev->evbit);
    set_bit(EV_KEY, ts->input_dev->evbit);
    set_bit(EV_ABS, ts->input_dev->evbit);
    set_bit(ABS_X,  ts->input_dev->absbit);
    set_bit(ABS_Y,  ts->input_dev->absbit);
    set_bit(ABS_Z,  ts->input_dev->absbit);
    set_bit(BTN_TOUCH, ts->input_dev->keybit);
	set_bit(BTN_2, ts->input_dev->keybit);

    set_bit(K_BACK, ts->input_dev->keybit);
    set_bit(K_MENU, ts->input_dev->keybit);
    set_bit(K_HOME, ts->input_dev->keybit);
    set_bit(K_SEARCH, ts->input_dev->keybit);

	//设置范围参数
    input_set_abs_params(ts->input_dev, ABS_MT_WIDTH_MAJOR, 0, 255, 0, 0);
    input_set_abs_params(ts->input_dev, ABS_MT_TOUCH_MAJOR, 0, 255, 0, 0);
	//表示:X轴范围是0到SCREEN_MAX_WIDTH,数据误差是-4到+4,中心平滑位置是0 .
    input_set_abs_params(ts->input_dev, ABS_MT_POSITION_X, 0, SCREEN_MAX_WIDTH, 0, 0);
    input_set_abs_params(ts->input_dev, ABS_MT_POSITION_Y, 0, SCREEN_MAX_HEIGHT, 0, 0);
    input_set_abs_params(ts->input_dev, ABS_PRESSURE, 0, 1, 0, 0);

    ret = input_register_device(ts->input_dev);	//注册到输入型子系统
	if(ret)
	{
		destroy_workqueue(ts->wq);
		kfree(ts);
		return ret;
	}

	irq_set_irq_type(client->irq, IRQ_TYPE_EDGE_FALLING);	//下降沿触发
	ret = request_irq(client->irq, ft5x06_ts_irq_handler, IRQ_TYPE_EDGE_FALLING, client->name, ts);
	if(ret)
	{
		destroy_workqueue(ts->wq);
		kfree(ts);
		return ret;
	}

	return 0;
}

static int ft5x06_ts_remove(struct i2c_client *client)
{
	struct ft5x06_ts_data * ts = i2c_get_clientdata(client);
	printk("==ft5x06_ts_remove=\n");

	free_irq(client->irq, ts);
	i2c_set_clientdata(client, NULL);
	input_unregister_device(ts->input_dev);
	if(ts->input_dev)
		kfree(ts->input_dev);
	kfree(ts);

	return 0;
}

static const struct i2c_device_id ft5x06_ts_id[] = {
	{ "Louis210-ts", 0},
	{ }
};

MODULE_DEVICE_TABLE(i2c, ft5x06_ts_id);

static struct i2c_driver ft5x06_ts_driver = {
	.driver        = {
		.name    = "Louis210_ts",
		.owner = THIS_MODULE,
	},
	.probe		= ft5x06_ts_probe,
	.remove		= ft5x06_ts_remove,
	.id_table	= ft5x06_ts_id,
};

module_i2c_driver(ft5x06_ts_driver);

MODULE_AUTHOR("LouisGou");
MODULE_DESCRIPTION("Louis210 ft5x06 Touchscreen Driver");
MODULE_LICENSE("GPL");
这并不是完整的代码,一方面是没有做异常处理,另一方面是没有上报消息,只是简单的驱动了TQ210的触摸屏部分,如果您需要拿去自己略作修改即可使用。
三、 注册TS的I2C模块设备
注册TS的I2C模块很简单,在Linux内核文件arch/arm/mach-s5pv210/mach-Louis210.c文件的I2C通道2结构体中加入TS的I2C地址,也就是0x53,添加后如下
void Louis210_ft5x06_cfg_gpio(struct platform_device *dev)
{
	int err;

	s3c_gpio_cfgall_range(S5PV210_GPD1(0), 2,
			      S3C_GPIO_SFN(2), S3C_GPIO_PULL_UP);

	err = gpio_request(S5PV210_GPH1(6), "GPH1");
	if (err)
		printk(KERN_ERR "#### failed to GPH1(6) for gt801 interrupt\n");

	s3c_gpio_setpull(S5PV210_GPH1(6), S3C_GPIO_PULL_NONE);
	s3c_gpio_cfgpin(S5PV210_GPH1(6),S3C_GPIO_SFN(0xf));
	gpio_free(S5PV210_GPH1(6));

	err = gpio_request(S5PV210_GPD0(3), "GPD0");
	if (err)
		printk(KERN_ERR "#### failed to GPH1(6) for gt801 interrupt\n");

	s3c_gpio_setpull(S5PV210_GPD0(3), S3C_GPIO_PULL_NONE);
	s3c_gpio_cfgpin(S5PV210_GPD0(3),S3C_GPIO_SFN(0x1));
	gpio_direction_output(S5PV210_GPD0(3), 0);
	gpio_free(S5PV210_GPD0(3));
}

static struct s3c2410_platform_i2c Louis_ft5x06_pdata __initdata = {
   .flags        = 0,
   .slave_addr    = 0xaa>>1,
   .frequency    = 1000*100,
   .sda_delay    =  10,
   .cfg_gpio = Louis210_ft5x06_cfg_gpio,
};

static struct i2c_board_info smdkv210_i2c_devs2[] __initdata = {
	/* To Be Updated */
	{ I2C_BOARD_INFO("Louis210-ts", 0x38),
	  .irq = IRQ_EINT(14),
	  .platform_data  = &Louis_ft5x06_pdata,
	},
};
运行结果:


四、tslib测试教程(ubuntu)
编译好的tslib文件https://download.csdn.net/download/jerrygou/10640507
1. 安装git
sudo apt-get install git2. 下载最新的tslib
git clone https://github.com/kergoth/tslib3. 安装auto
sudo apt-get install autoconf automake libtool4. 编译tslib(配置成make.sh脚本)
#!/bin/sh
./autogen.sh
mkdir tmp
echo "ac_cv_func_malloc_0_nonnull=yes" >arm-linux.cache
./configure --host=arm-linux --cache-file=arm-linux.cache --prefix=$(pwd)/tmp
make
make install
如果报错:
../src/.libs/libts.so: undefined reference to `EVIOCGPROP'
collect2: ld returned 1 exit status
Makefile:579: recipe for target 'ts_test' failed
修改tslib.h文件,添加
#define EVIOCGPROP(len) _IOC(_IOC_READ, 'E', 0x09, len) /* get device properties */5. 安装tslib
cd tmp
cp * /nfsroot/rootfs -rfd
6. 配置tslib
修改 /etc/ts.conf
将行
# module_raw input
改为:
module_raw input
(实际上就是去掉高行的#号和第一个空格)
7. 配置tslib运行环境变量(添加至/rootfs/etc/profile文件中)
export TSLIB_TSDEVICE=/dev/input/event0  //这里需要根据自己的event位置进行修改,新内核在/dev/input/event*
export TSLIB_CALIBFILE=/etc/pointercal
export TSLIB_CONFFILE=/etc/ts.conf
export TSLIB_PLUGINDIR=/lib/ts
export TSLIB_CONSOLEDEVICE=none
export TSLIB_FBDEVICE=/dev/fb0
8. 校正(电容屏实际上不需要校正,仅为了测试触屏驱动)
运行ts_calibrate,并根据提示进行校正
如果报错 ts_setup: No such file or directory等类似错误,这是因为上一步环境变量配置失败,需要重新设置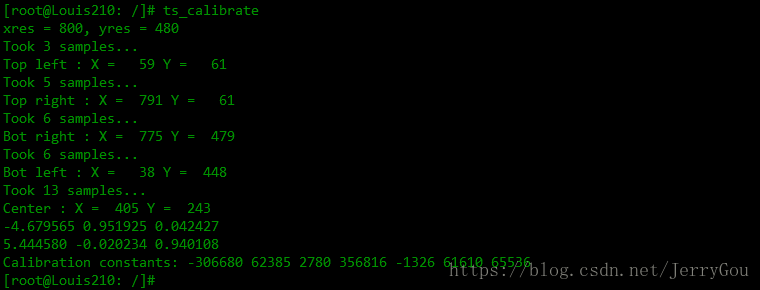
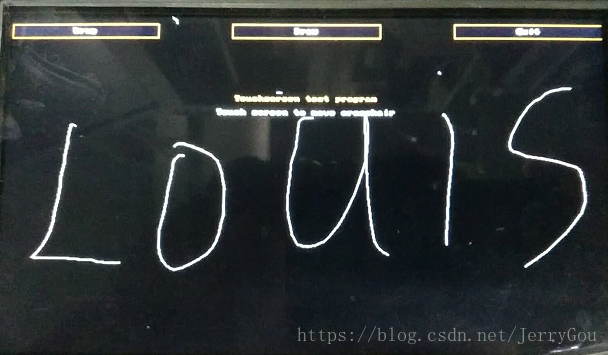
9. 自由画图
运行ts_test,点击draw按钮,可以自由画图,效果如下图。
五、小结
本文中列举的代码是简单的实现了触摸坐标获取,没有实现触摸消息上报等操作,这些操作需要自己来实现。
六、触摸屏驱动测试
#include <stdio.h>
#include <sys/types.h>
#include <sys/stat.h>
#include <fcntl.h>
#include <stdlib.h>
#include <sys/mman.h>
#include <sys/ioctl.h>
#include <unistd.h>
#include <signal.h>
#include <linux/fb.h>
#include <stdbool.h>
#include <stdio.h>
#include <stdlib.h>
#include <sys/types.h>
#include <sys/stat.h>
#include <fcntl.h>
#include <errno.h>
#include <linux/input.h>

int main(int argc, char** argv)
{
    int tsfd;
    int key_value, count;
    struct input_event ev_key;

    printf("hello tq210\n");

    tsfd = open("/dev/input/event0", O_RDWR);
    if (tsfd == -1) {
        perror("open device error");
        exit(-1);
    }
    printf("open device %d\n", tsfd);

    for(;;){
        count = read(tsfd, &ev_key, sizeof(struct input_event));

        if(EV_KEY == ev_key.type)
            printf("type:EV_KEY, code:0x%x, value:0x%x\n", ev_key.type, ev_key.code, ev_key.value);
        else if(EV_ABS == ev_key.type)
            printf("type:EV_ABS, code:0x%x, value:0x%x\n", ev_key.type, ev_key.code, ev_key.value);
        else if(EV_SYN == ev_key.type)
            printf("[ ... syn event]\n");

    }

    close(tsfd);
    return 0;
}
七、报错
运行报错:tslib: Selected device is not a touchscreen (must support ABS and KEY event types)
两种情况:一种内核未加入触摸屏的支持,另一种情况是将TSLIB_TSDEVICE=/dev/input/event0
改为 TSLIB_TSDEVICE=/dev/input/event1

解决办法:
1)内核加入触摸屏的支持
内核和文件系统编译时加入触摸屏支持:
一、内核配置支持触摸屏

Device Drivers  --->
    Input device support  --->
        (800) Horizontal screen resolution
        (480) Vertical screen resolution
        <*> Event interface
        [*] Touchscreens --->
            <*> Louis210 FT5216 touchscreen driver