Ssh免密登录
sshd服务
sshd简介:
SSH 密钥为登录 Linux 服务器提供了更好且安全的机制。运行 ssh-keygen 后,将会生成公私密钥对。你可以将公钥放置到任意服务器,从持有私钥的客户端连接到服务器的时,会用它来解锁。两者匹配时,系统无需密码就能解除锁定。
官方维护文档:https://www.ssh.com/ssh/
参考文档:https://www.cnblogs.com/ioveNature/p/7919115.html
https://www.cnblogs.com/panblack/p/Secure_ssh_trust_connection.html
一、服务器上创建用户:
在服务器上创建普通用户,为每个人都分配一个自己的用户。
# groupadd dd

# useradd -g dd dd1

[root@localhost ~]# passwd dd1

Changing password for user dd1.

New password:

BAD PASSWORD: The password is shorter than 7 characters

Retype new password:

passwd: all authentication tokens updated successfully.
# 这个密码管理员管理好,不用给其他人。稍后,用户是通过他们的公钥+口令登录的。不需要知道服务器用户的密码。
二、windows上生成密钥免密连接服务器:
Xshell配置免密登录:
参考:
https://www.cnblogs.com/ioveNature/p/7919115.html
秘钥生成
生成公钥
工具 -> 新建用户秘钥生成向导 ->
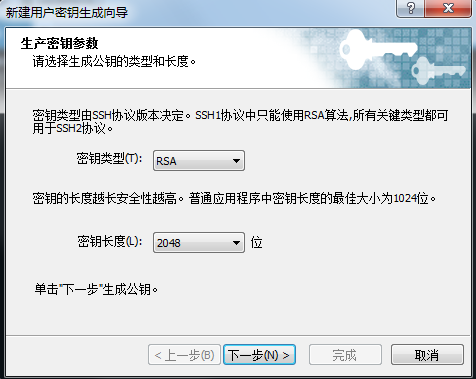
下一步 ->
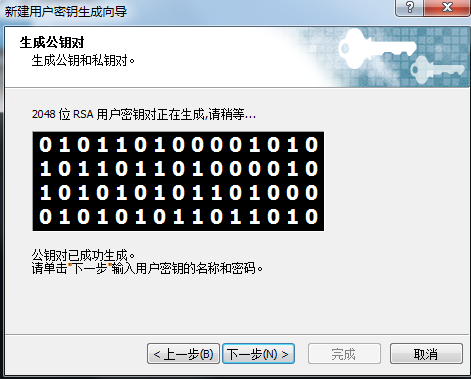
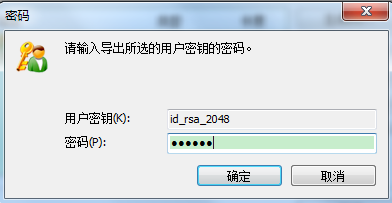
点击下一步,输入密码:

点击下一步
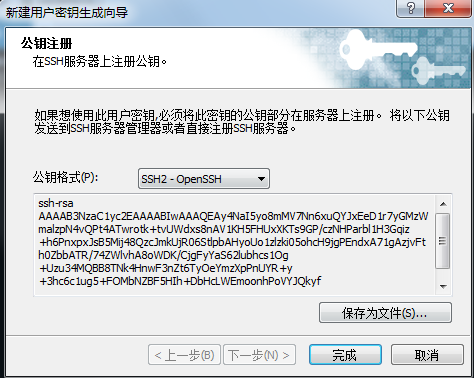
点击保存为文件,完成。
生成私钥
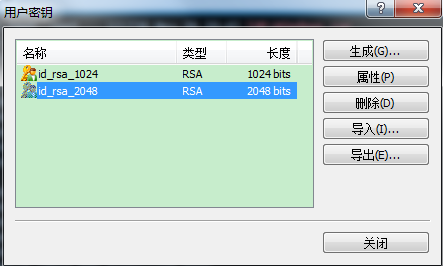
工具 -> 用户秘钥管理者
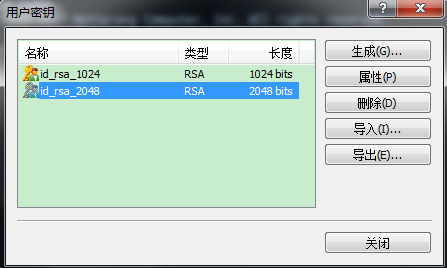
选中秘钥类型 -> 导出
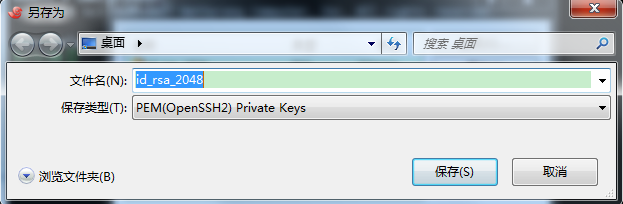
保存,输入之前设置的秘钥保护密码,生成私钥
至此,生成了一对 公钥-私钥 对。

在服务器上添加公钥权限
- 上传公钥到服务器的/root/.ssh目录下
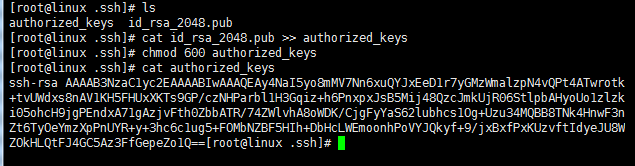
- 执行命令cat id_rsa_2048.pub >> authorized_keys 与 chmod 600 authorized_keys
- 然后执行 cat authorized_keys即可看到公钥内容已经添加到文件中去了。
在XShell中登录
- 文件-> 新建

名称没有太大限制。随意填写,这里填写的是rsa-test。
接着填写主机的IP地址,也就是所要连接的服务器的IP地址。
- 填写 用户身份验证 信息
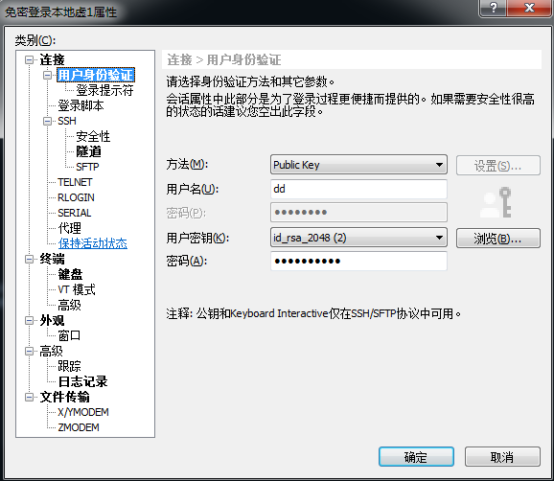
这里的密码为前面所设置的秘钥的保密码,用户名为服务器的账号用户名。
在多终端的XShell上进行登录
如果在另外一台电脑上连接这个服务器账号,则除了前面一步的配置之外,还需要手动添加私钥。具体方法为:
工具-> 用户秘钥管理者
选择 导入,然后选择私钥之后选择打开即可正常连接。

备注
如果是服务器管理员,上面有多个用户账号,则需要为每一个用户进行添加权限,这时候除了前面的公钥信息之外,还要绑定用户名。
参考
Securecry上配置免密登录:
参考:https://blog.csdn.net/wangquannetwork/article/details/46062675
三、linux上生成密钥对免密连接服务器:
1、切换成对应的用户
# su dd
2、使用ssh-keygen生成key,注释可以加邮件,
[dd@localhost ~]$ ssh-keygen -t rsa -C "php key"

Generating public/private rsa key pair.

Enter file in which to save the key (/home/dd/.ssh/id_rsa):  # 要求输入密钥保存位置

Enter passphrase (empty for no passphrase):  # 输入密钥口令

Enter same passphrase again:  # 确认密钥口令

Your identification has been saved in /home/dd/.ssh/id_rsa.

Your public key has been saved in /home/dd/.ssh/id_rsa.pub.

The key fingerprint is:

cc:67:bb:e7:44:e4:f0:f9:d3:c3:20:98:bd:55:f1:35 php key

The key's randomart image is:

+--[ RSA 2048]----+

|               E.|

|                =|

|          . .  ..|

|       o  += ..  |

|        Sooo=o   |

|         o o+.o. |

|          ... oo.|

|           o.  ..|

|          .o.    |

+-----------------+

[dd@localhost ~]$ ls /home/dd/.ssh/ -a

.  ..  authorized_keys  id_rsa  id_rsa.pub
3、使用ssh-copy-id把本机的公钥文件发送到目标服务器192.168.188.129上。
[dd@localhost ~]$ ssh-copy-id -i ~/.ssh/id_rsa [email protected]

/bin/ssh-copy-id: INFO: attempting to log in with the new key(s), to filter out any that are already installed

/bin/ssh-copy-id: INFO: 1 key(s) remain to be installed -- if you are prompted now it is to install the new keys

[email protected]'s password: #要求输入对方主机dd1的密码


Number of key(s) added: 1


Now try logging into the machine, with:   "ssh '[email protected]'"

and check to make sure that only the key(s) you wanted were added.
注意:这里会暴露192.168.188.129上用户dd1的密码。
避免暴露密码方法:
a、使用rsync将公钥文件传输过去
b、将id_rsa的内容复制出来,然后追加到192.168.188.129里的authorized_keys里。
4、设置.ssh/权限
在linux操作主机上设置:
# [dd@localhost ~]$ chmod 700 ~/.ssh/

# [dd@localhost ~]$ chmod 600 ~/.ssh/*

# [dd@localhost .ssh]$ ll

total 16

-rw------- 1 dd dd  381 Aug 30 16:04 authorized_keys

-rw------- 1 dd dd 1766 Aug 30 17:29 id_rsa

-rw------- 1 dd dd  389 Aug 30 17:29 id_rsa.pub

-rw------- 1 dd dd  354 Aug 30 18:24 known_hosts
在linux服务器上设置:
# [root@localhost ~]$ chmod 700 /home/dd1/.ssh/

# [root@localhost ~]$ chmod 600 /home/dd1/.ssh/*

# [root@localhost ~]# ll /home/dd1/.ssh/

total 8

-rw-------. 1 dd1 dd 389 Aug 30 20:52 authorized_keys

-rw-------. 1 dd1 dd 354 Aug 31 09:57 known_hosts
5、这时候连接,就能够正常了。
[dd@localhost .ssh]$ ssh [email protected]

Enter passphrase for key '/home/dd/.ssh/id_rsa':  # 需要输入密钥口令

Last login: Thu Aug 30 20:11:42 2018

[dd1@localhost ~]$

# 如果在ssh-keygen生成密钥时,没有输入密钥口令,而是一路回车,那么这里用ssh连接的时候也不会要求输入口令了。但是这样很不安全,因为如果别人把你的私钥文件拿去了,他也就不用密码登录了,服务器就是他的了。(如果没有口令,想要增加,建议把之前的删掉,重新开始弄。)

# 如果在ssh-keygen生成密钥时,输入了密钥口令,那么在这里用ssh连接的时候,就需要输入就需要输入口令。(推荐)
参考: https://www.cnblogs.com/panblack/p/Secure_ssh_trust_connection.html
缺陷:
但是这样很麻烦,虽然不用输入服务器密码了,但是需要输入口令,很不利于以后的自动化运维,所以我们还需要配置一下ssh-agent。
6、ssh-agent代理。
启动代理守护进程:
[dd@localhost .ssh]$ eval `ssh-agent`

Agent pid 26506
将私钥添加到代理守护进程:
[dd@localhost .ssh]$ ssh-add

Enter passphrase for /home/dd/.ssh/id_rsa:

Identity added: /home/dd/.ssh/id_rsa (/home/dd/.ssh/id_rsa)
试试连接目标主机:
[dd@localhost .ssh]$ ssh [email protected]

Last login: Thu Aug 30 20:52:41 2018 from 192.168.188.128

[dd1@localhost ~]$
OK了!
这时候,我们在本机去连接服务器192.168.188.129就不在需要密码和口令了。
四、在服务器上关闭密码连接。
在192.168.188.129服务器上设置:
[root@localhost .ssh]# vim /etc/ssh/sshd_config

RSAAuthentication yes

PubkeyAuthentication yes  # 公钥认证默认也是yes的,但是注释了,关闭要改为no

AuthorizedKeysFile %h/.ssh/authorized_keys


#为了安全性,可以修改SSH端口

Port 222


#禁用root账户登录,非必要,但为了安全性,请配置

PermitRootLogin no


#有了证书登录了,就禁用密码登录吧,密码登录改为no,安全要紧

PasswordAuthentication no