Spring JDBC
Spring JDBC简介
我们早期都有过直接使用JDBC访问数据库的经历,开发者需要编写获取数据库连接,处理异常,释放资源,数据操作等代码。即使很简单的数据库操作,都需要很繁琐的编写。Spring JDBC通过模板和回调机制大大降低了JDBC的繁琐程度,我们仅需编写那些必不可少的数据操作代码就可以完成操作。
Spring模板和回调机制
在直接使用JDBC时。我们需要处理获取连接,处理异常、释放资源等整个流程。Spring为支持的持久化技术提供了模板访问的方式,我们只需要提供具体的操作数据代码即可,可以大幅度提高开发效率。
Spring将相同的数据访问流程固定到模板类中,例如,获取连接、释放资源等等。将数据库操作中固定和变化的部分分开,同时保证模板类线程安全,以便多个线程共享同一模块实例。固定的部分在模板类中已经写好,变化的部分通过回调接口开放出来,用于具体的数据访问和结果处理操作。
Spring为各种支持的持久化技术都提供了简化操作的模板和回调。例如为传统的JDBC提供了JdbcTemplate模块类,为Hibernate提供了HibernateTemplate模板类等等很多。我们直接使用即可。
Spring JDBC入门例子
不论使用任何持久化技术,都必须拥有数据库连接。在Spring中,我们需要配置数据库连接池来获取连接。我们的代码中都统一使用c3p0连接池。
首先我们要先导包,我们需要导入spring的核心四个包和jdbc包和tx包(事务操作),然后还需要导入c3p0包和数据库驱动等
- 1
- 2
我们创建一个数据库和数据表来进行演示
CREATE DATABASE springdb;
USE springdb;
CREATE TABLE USER(
id INT PRIMARY KEY AUTO_INCREMENT,
username VARCHAR(50),
PASSWORD VARCHAR(50)
);
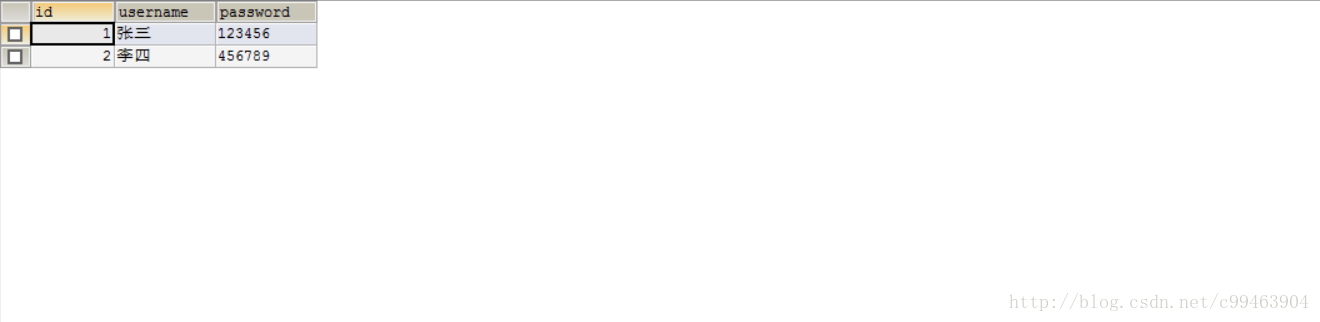
INSERT INTO USER(username,PASSWORD) VALUES('张三','123456');
- 1
- 2
- 3
- 4
- 5
- 6
- 7
- 8
- 9
- 10
我们来演示一下怎么使用JdbcTemplate
public class TestJdbc {
    @Test
    public void test() throws Exception{
        //创建c3p0连接池,并设置相应的数据库参数
        ComboPooledDataSource datasource=new ComboPooledDataSource();
        datasource.setDriverClass("com.mysql.jdbc.Driver");
        datasource.setJdbcUrl("jdbc:mysql://localhost:3306/springdb");
        datasource.setUser("root");
        datasource.setPassword("123456");

        //创建JdbcTemplate对数据库进行操作
        JdbcTemplate template=new JdbcTemplate(datasource);
        String sql="insert into user(username,password) values(?,?)";
        template.update(sql, "李四","456789");
    }

}
- 1
- 2
- 3
- 4
- 5
- 6
- 7
- 8
- 9
- 10
- 11
- 12
- 13
- 14
- 15
- 16
- 17
- 18
- 19
详解JdbcTemplate
JdbcTemplate模板类几乎可以完成任何数据访问的操作,并且非常方便简介。我们上面的例子都是手动通过API 来创建连接池,来创建JdbcTemplate,我们完全可以使用我们学习的IoC来使用配置文件来替代那些操作,这也是我们所提倡的。
使用配置文件
我们在Dao中使用Jdbctemplate,JdbcTemplate直接在配置文件中配置好,直接在Dao中注入即可。
- 1
- 2
//我们先创建一个实体类
public class User {
    private int id;
    private String username;
    private String password;
    public int getId() {
        return id;
    }
    public void setId(int id) {
        this.id = id;
    }
    public String getUsername() {
        return username;
    }
    public void setUsername(String username) {
        this.username = username;
    }
    public String getPassword() {
        return password;
    }
    public void setPassword(String password) {
        this.password = password;
    }
    @Override
    public String toString() {
        return "User [id=" + id + ", username=" + username + ", password=" + password + "]";
    }

}
- 1
- 2
- 3
- 4
- 5
- 6
- 7
- 8
- 9
- 10
- 11
- 12
- 13
- 14
- 15
- 16
- 17
- 18
- 19
- 20
- 21
- 22
- 23
- 24
- 25
- 26
- 27
- 28
- 29
//创建Dao来对数据进行操作
public class UserDao {
    //提供JdbcTemplate和set方法来进行注入
    private JdbcTemplate template;

    public void setTemplate(JdbcTemplate template) {
        this.template = template;
    }

    //更新方法
    public void update(User user){
        String sql="update  user set username=?,password=?  where id=?";
        Object []params={user.getUsername(),user.getPassword(),user.getId()};
        template.update(sql, params);
    }
}
- 1
- 2
- 3
- 4
- 5
- 6
- 7
- 8
- 9
- 10
- 11
- 12
- 13
- 14
- 15
- 16
<!--编写配置文件-->
<?xml version="1.0" encoding="UTF-8"?>
<beans xmlns="http://www.springframework.org/schema/beans"
    xmlns:xsi="http://www.w3.org/2001/XMLSchema-instance"
    xmlns:context="http://www.springframework.org/schema/context"
    xmlns:aop="http://www.springframework.org/schema/aop"
    xsi:schemaLocation="
        http://www.springframework.org/schema/beans http://www.springframework.org/schema/beans/spring-beans.xsd
        http://www.springframework.org/schema/context http://www.springframework.org/schema/context/spring-context.xsd
        http://www.springframework.org/schema/aop http://www.springframework.org/schema/aop/spring-aop.xsd">

<!--配置连接池-->
<bean id="datasource" class="com.mchange.v2.c3p0.ComboPooledDataSource">
    <property name="driverClass" value="com.mysql.jdbc.Driver"></property>
    <property name="jdbcUrl" value="jdbc:mysql://localhost:3306/springdb"></property>
    <property name="user" value="root"></property>
    <property name="password" value="123456"></property>
</bean>

<!--实例JdbcTemplate,并且通过dataSource属性注入连接池-->
<bean id="jdbctemplate" class="org.springframework.jdbc.core.JdbcTemplate">
    <property name="dataSource" ref="datasource"></property>
</bean>

<!--实例化Dao,并注入JdbcTemplate-->
<bean id="userdao" class="com.spring.jdbc.UserDao">
    <property name="template" ref="jdbctemplate"></property>
</bean>
</beans>
- 1
- 2
- 3
- 4
- 5
- 6
- 7
- 8
- 9
- 10
- 11
- 12
- 13
- 14
- 15
- 16
- 17
- 18
- 19
- 20
- 21
- 22
- 23
- 24
- 25
- 26
- 27
- 28
- 29
//我们来测试一下
public class TestJdbc {
@Test
public void test() throws Exception{
ApplicationContext ac=new ClassPathXmlApplicationContext("bean.xml");
UserDao userdao=(UserDao) ac.getBean("userdao");
User user=new User();
user.setId(1);
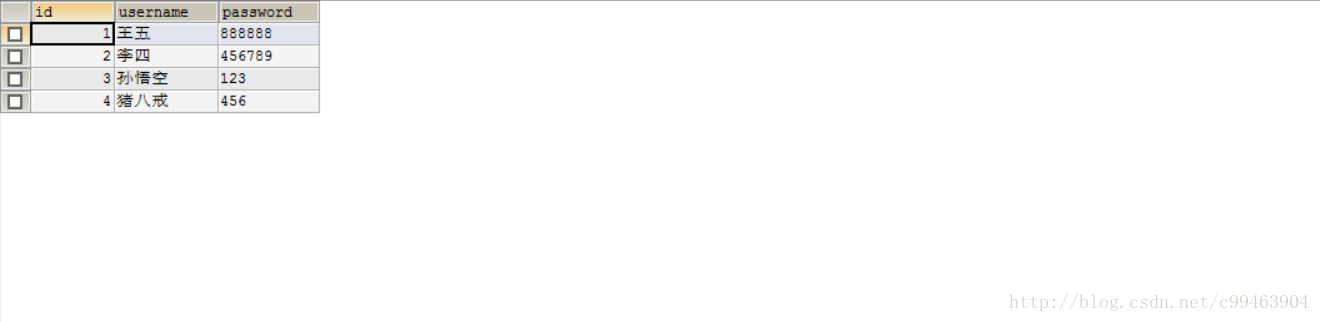
user.setUsername("王五");
user.setPassword("888888");
userdao.update(user);
}
}
- 1
- 2
- 3
- 4
- 5
- 6
- 7
- 8
- 9
- 10
- 11
- 12
- 13

使用属性文件配置数据库信息
数据库的配置信息有可能需要经常改动,所以一般将数据库配置信息放在属性文件中。
//创建一个属性文件,名为jdbc.properties

driverClass=com.mysql.jdbc.Driver
jdbcUrl=jdbc:mysql://localhost:3306/springdb
user=root
password=123456
- 1
- 2
- 3
- 4
- 5
- 6
<!--引入属性文件,以${xxx}的方式引入属性-->
<context:property-placeholder location="jdbc.properties"/>
<bean id="datasource" class="com.mchange.v2.c3p0.ComboPooledDataSource">
    <property name="driverClass" value="${driverClass}"></property>
    <property name="jdbcUrl" value="${jdbcUrl}"></property>
    <property name="user" value="${user}"></property>
    <property name="password" value="${password}"></property>
</bean>
- 1
- 2
- 3
- 4
- 5
- 6
- 7
- 8
JdbcDaoSupport
我们的Dao层使用JdbcTemplate都需要提供一个JdbcTemplate属性和set方法来进行注入,而Spring为我们提供了一个父类JdbcDaoSupport,已经帮我们做好了这些操作。
//我们的Dao继承JdbcDaoSupport
public class UserDao extends JdbcDaoSupport{

    public void update(User user){
        String sql="update  user set username=?,password=?  where id=?";
        Object []params={user.getUsername(),user.getPassword(),user.getId()};
        this.getJdbcTemplate().update(sql, params);
    }
}
- 1
- 2
- 3
- 4
- 5
- 6
- 7
- 8
- 9
//更改配置文件
<?xml version="1.0" encoding="UTF-8"?>
<beans xmlns="http://www.springframework.org/schema/beans"
    xmlns:xsi="http://www.w3.org/2001/XMLSchema-instance"
    xmlns:context="http://www.springframework.org/schema/context"
    xmlns:aop="http://www.springframework.org/schema/aop"
    xsi:schemaLocation="
        http://www.springframework.org/schema/beans http://www.springframework.org/schema/beans/spring-beans.xsd
        http://www.springframework.org/schema/context http://www.springframework.org/schema/context/spring-context.xsd
        http://www.springframework.org/schema/aop http://www.springframework.org/schema/aop/spring-aop.xsd">

<bean id="datasource" class="com.mchange.v2.c3p0.ComboPooledDataSource">
    <property name="driverClass" value="com.mysql.jdbc.Driver"></property>
    <property name="jdbcUrl" value="jdbc:mysql://localhost:3306/springdb"></property>
    <property name="user" value="root"></property>
    <property name="password" value="123456"></property>
</bean>

<!--只需要将连接池给它,父类会自动帮我们创建JdbcTemplate-->
<bean id="userdao" class="com.spring.jdbc.UserDao">
    <property name="dataSource" ref="datasource"></property>
</bean>
</beans>
- 1
- 2
- 3
- 4
- 5
- 6
- 7
- 8
- 9
- 10
- 11
- 12
- 13
- 14
- 15
- 16
- 17
- 18
- 19
- 20
- 21
- 22
- 23
批量更改数据
如果需要一次性插入或更新多条记录,我们可以使用JdbcTemplate提供的批量操作的方法。
int[] batchUpdate(String []sql):多条不带参数的sql语句组成一个数组,该方法以批量方式执行这些sql语句,底层使用JDBC提供的批量操作的API。
int[] batchUpdate(String sql,BatchPreparedStatementSetter pss):使用本方法对带参sql语句进行多次数据更新操作,通过BatchPreparedStatementSetter回调接口进行批量参数的绑定工作。该接口定义了两个方法。
-int getBatchSize():指定本批次的大小 -void setValues(PreparedStatement ps,int i):为给定的PreparedStatement设置参数- 1
- 2
- 3
//我们为我们的Dao添加一个添加班级的操作,一次性插入多个User
public void addClass(final List<User> l){
        String sql="insert into user(username,password) values(?,?)";
        //执行批量操作
        template.batchUpdate(sql, new BatchPreparedStatementSetter() {

            //绑定插入的参数
            public void setValues(PreparedStatement ps, int index) throws SQLException {
                User user=l.get(index);
                ps.setString(1, user.getUsername());
                ps.setString(2, user.getPassword());
            }

            public int getBatchSize() {
                return l.size();
            }
        });
    }
- 1
- 2
- 3
- 4
- 5
- 6
- 7
- 8
- 9
- 10
- 11
- 12
- 13
- 14
- 15
- 16
- 17
- 18
//我们来进行测试一下
public class TestJdbc {
    @Test
    public void test() throws Exception{
        ApplicationContext ac=new ClassPathXmlApplicationContext("bean.xml");
        UserDao userdao=(UserDao) ac.getBean("userdao");
        List<User> list=new ArrayList<User>();
        User user1=new User();
        user1.setUsername("孙悟空");
        user1.setPassword("123");
        User user2=new User();
        user2.setUsername("猪八戒");
        user2.setPassword("456");
        list.add(user1);
        list.add(user2);
        userdao.addClass(list);
    }
}
- 1
- 2
- 3
- 4
- 5
- 6
- 7
- 8
- 9
- 10
- 11
- 12
- 13
- 14
- 15
- 16
- 17
- 18
- 19
查询所有数据
    //Spring提供了RowMapper<T>接口来处理结果集,有很多实现类,我们使用BeanPropertyRowMapper
    public List<User> selectAll(){
        String sql="select * from user";
        return template.query(sql,BeanPropertyRowMapper.newInstance(User.class));
    }
- 1
- 2
- 3
- 4
- 5
//我们测试一下
public class TestJdbc {
    @Test
    public void test() throws Exception{
        ApplicationContext ac=new ClassPathXmlApplicationContext("bean.xml");
        UserDao userdao=(UserDao) ac.getBean("userdao");
        List<User> list=userdao.selectAll();
        for(User u:list){
            System.out.println(u);
        }
    }
}
- 1
- 2
- 3
- 4
- 5
- 6
- 7
- 8
- 9
- 10
- 11
- 12

NamedParameterJdbcTemplate
在JdbcTemplate中,我们只能使用?占位符来声明sql语句参数,使用索引来绑定参数,如果我们uyao新增一个占位符,可能会导致很多问题。这种编程模式被认为是弱稳定的。
NamedParameterJdbcTemplate模板类支持命名参数绑定的功能。
SqlParameterSource接口用来提供参数 ,有两个实现类
BeanPropertySqlParameterSource:该类将JavaBean对象封装成参数,以便通过javaBean属性名和SQL语句中命名参数匹配的方式绑定参数。
MapSqlParameterSource:该实现类内部通过一个Map存储参数。
//我们创建一个Dao类
public class StudentDao {
    //提供NamedParameterJdbcTemplate,以便注入
    private NamedParameterJdbcTemplate template;

    public void setTemplate(NamedParameterJdbcTemplate template) {
        this.template = template;
    }

    public void addStudent(User user){
        //使用命名参数,格式是:javaBean属性名
        String sql="insert into user(username,password) values(:username,:password)";
        //提供参数
        SqlParameterSource sps=new BeanPropertySqlParameterSource(user);
        template.update(sql, sps);
    }
}
- 1
- 2
- 3
- 4
- 5
- 6
- 7
- 8
- 9
- 10
- 11
- 12
- 13
- 14
- 15
- 16
- 17
- 18
<!--配置文件-->
<?xml version="1.0" encoding="UTF-8"?>
<beans xmlns="http://www.springframework.org/schema/beans"
    xmlns:xsi="http://www.w3.org/2001/XMLSchema-instance"
    xmlns:context="http://www.springframework.org/schema/context"
    xmlns:aop="http://www.springframework.org/schema/aop"
    xsi:schemaLocation="
        http://www.springframework.org/schema/beans http://www.springframework.org/schema/beans/spring-beans.xsd
        http://www.springframework.org/schema/context http://www.springframework.org/schema/context/spring-context.xsd
        http://www.springframework.org/schema/aop http://www.springframework.org/schema/aop/spring-aop.xsd">

<context:property-placeholder location="jdbc.properties"/>
<bean id="datasource" class="com.mchange.v2.c3p0.ComboPooledDataSource">
    <property name="driverClass" value="${driverClass}"></property>
    <property name="jdbcUrl" value="${jdbcUrl}"></property>
    <property name="user" value="${user}"></property>
    <property name="password" value="${password}"></property>
</bean>

<bean id="template" class="org.springframework.jdbc.core.namedparam.NamedParameterJdbcTemplate">
    <constructor-arg ref="datasource"></constructor-arg>
</bean>
<bean id="studentdao" class="com.spring.jdbc.StudentDao">
    <property name="template" ref="template"></property>
</bean>
</beans>
- 1
- 2
- 3
- 4
- 5
- 6
- 7
- 8
- 9
- 10
- 11
- 12
- 13
- 14
- 15
- 16
- 17
- 18
- 19
- 20
- 21
- 22
- 23
- 24
- 25
- 26
//我们测试一下
public class TestJdbc {
@Test
public void test() throws Exception{
ApplicationContext ac=new ClassPathXmlApplicationContext("bean.xml");
StudentDao studentdao=(StudentDao) ac.getBean("studentdao");
User user=new User();
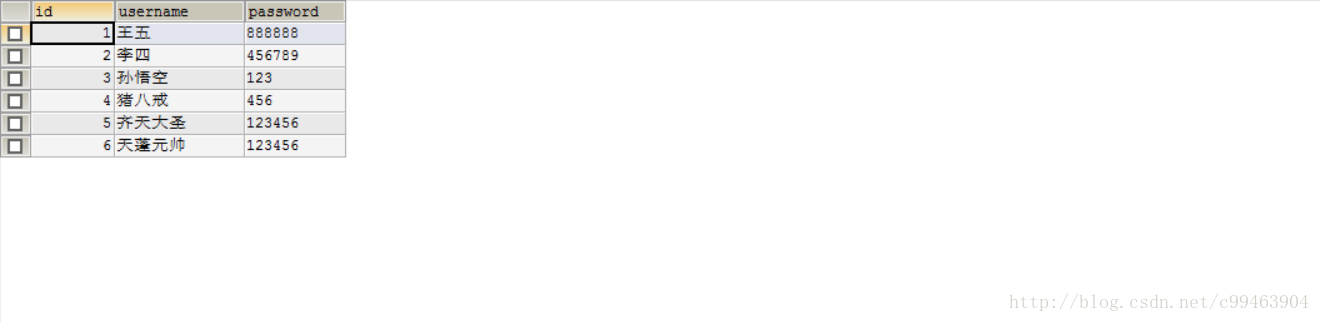
user.setUsername("天蓬元帅");
user.setPassword("123456");
studentdao.addStudent(user);
}
}
- 1
- 2
- 3
- 4
- 5
- 6
- 7
- 8
- 9
- 10
- 11
- 12
- 13
- 14
Spring在org.springframework.jdbc.object包中提供了若干个类,试图以更面向对象过的方式访问数据库,但从操作难易度和使用效果上看,我们看不到它的优势,基本算是很鸡肋的功能。Spring的Jdbc只要能用上述的一些基本操作即可,毕竟有许多专业的orm框架,例如Hibernate和Mybatis等。
Spring的事务操作
实际开发中,Spring的事务管理基本上是被使用最多的功能,Spring的提供了灵活方便的事务管理功能。
事务的基础知识和可能遇到的数据并发问题还有数据隔离级别等知识在我的印象中已经写了两三次,可以从以前的博文中进行学习,这里就不再进行叙述。
JDBC对事务的支持
//下面是传统的JDBC事务操作的代码

    Connection conn;
    try{
        conn=DriverManager.getConnection();
        //开启事务
        conn.setAutoCommit(false);
        ....
        ....
        //提交事务
        conn.commit();
    }catch(Exception e){
        //回滚事务
        conn.rollback();
    }finally{
        ....
    }
- 1
- 2
- 3
- 4
- 5
- 6
- 7
- 8
- 9
- 10
- 11
- 12
- 13
- 14
- 15
- 16
- 17
我们讲一个以前没讲过的小知识点,从JDBC3.0以后,引入了一个保存点特性,Savepoint接口允许将事务分割成多个阶段,用户可以指定回滚到事务特定的保存点。而以前的版本中,只要回滚就只能回滚到开始事务的点,这个保存点特性可以解决很多实际问题,在发生特定问题时,回滚到指定的保存点,我们来演示一下。
    Connection conn;
    Savepoint s;
    try{
        conn=DriverManager.getConnection();
        //开启事务
        conn.setAutoCommit(false);
        执行A操作;
        执行B操作;
        //设置保存点
        s=conn.setSavepoint("savapoint");
        执行C操作
        执行D操作
        //提交事务
        conn.commit();
    }catch(Exception e){
        //判断是在AB操作时发生异常还是CD操作时发生异常
        if(s!=null){
            //回滚到保存点,并提交保存点之前的事务
            conn.rollback(s);
            conn.commit();
        }else{
            conn.rollback();
        }
    }finally{
        ....
    }
- 1
- 2
- 3
- 4
- 5
- 6
- 7
- 8
- 9
- 10
- 11
- 12
- 13
- 14
- 15
- 16
- 17
- 18
- 19
- 20
- 21
- 22
- 23
- 24
- 25
- 26
Spring事务管理介绍
Spring为事务管理提供了一致的编程模板,不管选择Spring JDBC、Hibernate、Mybatis,Spring都让我们可以用统一的编程模板进行事务管理。
Spring为我们提供了事务模板类,通过事务模板类就可以通过编程方式实现事务管理,而无需关注资源获取、释放、异常处理等操作。
Spring事务管理的亮点在于声明式事务管理,Spring允许通过声明方式,在IoC配置中指定事务的边界和事务属性,Spring自动在指定的事务边界上应用事务属性。
Spring事务管理主要包括三个接口
PlatformTransactionManager: 事务管理器。Spring使用事务管理器来管理事务的提交回滚等。
TransactionDefinition:事务属性。用来描述事务的隔离级别、超时时间、是否为只读事务等事务属性。我们配置事务属性,Spring会将事务封装到该对象实例。
TransactionStatus:事务状态。用来记录事务的具体运行状态。例如事务是否有保存点,事务是否结束等。
PlatformTransactionManager详解
PlatformTransactionManager定义了三个接口方法
TransactionStatus getTransaction(TransactionDefinition definition):该方法通过事务详情属性获得一个事务,并用TransactionStatus描述这个事务的状态
commit(TransactionStatus status):根据事务的状态提交事务,如果事务状态已经被标识为rollback-only,该方法执行回滚事务的操作
rollback(TransactionStatus status):根据状态回滚事务,commit()方法抛出异常时,该方法会被隐式调用
Spring为不同的持久化框架提供了PlatformTransactionManager接口的实现类。

TransactionStatus详解
**TransactionStatus代表一个事务的具体运行状态。事务管理器通过该接口获取事务的运行期的状态信息。
该接口继承SavepointManager接口**。
SavepointManager接口拥有以下的方法
Object createSavepoint():创建一个保存点对象。
void rollbackToSavepoint(Object savepoint):回滚到指定的保存点
void releaseSavepoint(Object savepoint):释放一个保存点。如果事务提交,所有保存点会自动释放。
TransactionStatus扩展了SavepointManager并提供了以下的方法
boolean hasSavepoint():判断当前的事务是否有保存点。
boolean isNewTransaction():判断当前的事务是否是一个新的事务。
boolean isCompleted():判断当前事务是否已经结束:已经提交或者回滚
boolean isRollbackOnly():判断当前事务是否已经被标识为rollback-only
void setRollbackOnly():将当前事务设置为rollback-only,通过该标识通知事务管理器只能进行事务回滚。
TransactionDefinition详解
TransactionDefinition定义了Spring的事务属性。
事务隔离:事务隔离级别。在TransactionDefinition接口中定义了4个隔离级别。 分别是ISOLATION_READ_UNCOMMITTED,ISOLATION_READ_COMMITTED,ISOLATION_REPEATABLE_READ,ISOLATION_SERIALIZABLE。
事务传播:后面详解。
事务超时:超时时间,事务运行超过指定时间时,事务将会回滚。
只读状态。只读状态,不能修改任何数据。
TransactionDefinition接口中定义的方法
int getPropagationBehavior(); 获得传播行为
int getIsolationLevel(); 获得隔离级别
int getTimeout(); 获得超时时间
boolean isReadOnly(); 是否是只读状态
String getName(); 获取事务详情名称
事务传播行为
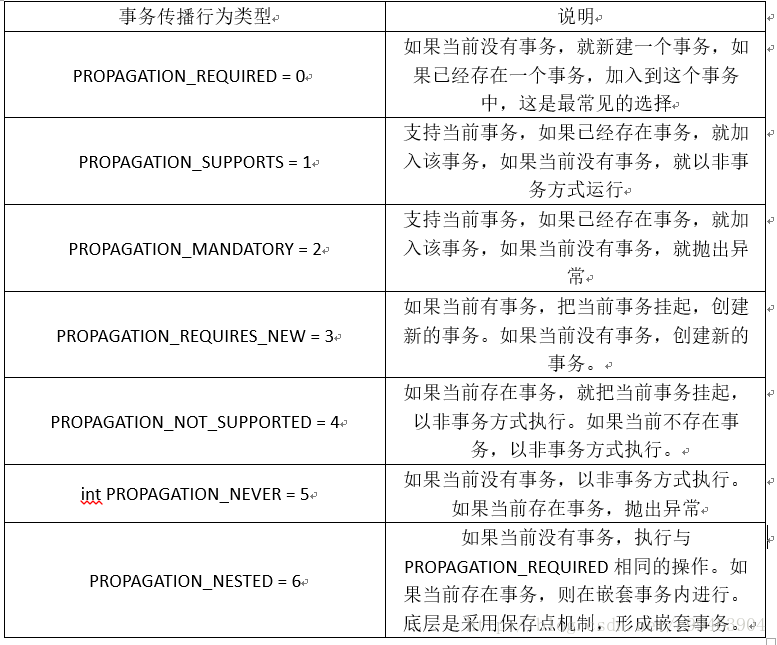
当我们进行开发时,事务一般都是设置在Service层,如果我们调用基于Spring的service方法时,它将运行于Spring管理的事务环境中,如果该Service方法中中除了调用Dao层的方法,在内部还调用了其他的Service方法来共同完成一个完整的业务操作,事务传播行为就是控制当前的事务如何传播到被调用的其他Service方法中。
Spring在TransactionDefinition接口中规定了七种类型的事务传播行为。
Spring的编程式的事务管理
实际应用中,很少需要通过编程来进行事务管理。Spring为编程式事务管理提供了模板类TransactionTemplate,TransactionTemplate是线程安全的,因此我们可以在业务类中共享TransactionTemplate进行事务管理。
TracsactionTemplate有两个主要的方法
void setTransactionManager(PlatformTransactionManager transactionManager):设置事务管理器
Object execute(TransactionCallback action):在TransactionCallback回调接口中定义需要以事务方式组织的数据访问逻辑。简单的说需要以事务方式处理的代码放在这里面。
- TransactionCallback接口中只有一个方法 :Object doInTransaction(TransactionStatus status).如果操作不会返回任何结果,可以使用TransactionCallback的子接口TransactionCallbackWithoutResult.
我们来演示一个银行转账的例子。
//先创建数据库及要操作的数据表
CREATE DATABASE bank;
USE bank;
CREATE TABLE account(
    id  INT PRIMARY KEY AUTO_INCREMENT,
    username VARCHAR(50),
    money INT
);

INSERT INTO account(username,money) VALUES('张三',1000);
INSERT INTO account(username,money) VALUES('李四',1000);
- 1
- 2
- 3
- 4
- 5
- 6
- 7
- 8
- 9
- 10
- 11
//创建Dao层,Dao层应该有两个方法,一个是给收款人加钱,一个给付款人减钱
public class BankDao extends JdbcDaoSupport{
    //给收款人加钱的方法
    public void addMoney(String payee,Integer money){
        String sql="update account set money=money+? where username=?";
        this.getJdbcTemplate().update(sql, money,payee);
    }
    //给付款人减钱的方法
    public void reduceMoney(String payer,Integer money){
        String sql="update account set money=money-? where username=?";
        this.getJdbcTemplate().update(sql, money,payer);
    }

}
- 1
- 2
- 3
- 4
- 5
- 6
- 7
- 8
- 9
- 10
- 11
- 12
- 13
- 14
- 15
//在Service层使用编程式事务进行转账操作
public class BankService {
    private BankDao dao;
    private TransactionTemplate template;
    public void setDao(BankDao dao) {
        this.dao = dao;
    }
    public void setTemplate(TransactionTemplate template) {
        this.template = template;
    }

    //转账方法
    public void transfer(String payee,String payer,Integer money){
        //因为没有返回结果,将转账的具体逻辑放在TransactionCallbackWithoutResult接口中
        template.execute(new TransactionCallbackWithoutResult() {
            protected void doInTransactionWithoutResult(TransactionStatus status) {
                dao.addMoney(payee, money);
                dao.reduceMoney(payer, money);
            }
        });
    }
}
- 1
- 2
- 3
- 4
- 5
- 6
- 7
- 8
- 9
- 10
- 11
- 12
- 13
- 14
- 15
- 16
- 17
- 18
- 19
- 20
- 21
- 22
<!--编写配置文件-->
<?xml version="1.0" encoding="UTF-8"?>
<beans xmlns="http://www.springframework.org/schema/beans"
    xmlns:xsi="http://www.w3.org/2001/XMLSchema-instance"
    xmlns:context="http://www.springframework.org/schema/context"
    xmlns:aop="http://www.springframework.org/schema/aop"
    xsi:schemaLocation="
        http://www.springframework.org/schema/beans http://www.springframework.org/schema/beans/spring-beans.xsd
        http://www.springframework.org/schema/context http://www.springframework.org/schema/context/spring-context.xsd
        http://www.springframework.org/schema/aop http://www.springframework.org/schema/aop/spring-aop.xsd">
<!--加载数据库配置文件-->
<context:property-placeholder location="jdbc.properties"/>
<!--设置连接池配置-->
<bean id="datasource" class="com.mchange.v2.c3p0.ComboPooledDataSource">
    <property name="driverClass" value="${driverClass}"></property>
    <property name="jdbcUrl" value="${jdbcUrl}"></property>
    <property name="user" value="${user}"></property>
    <property name="password" value="${password}"></property>
</bean>
<!--实例TransactionTemplate模板类,需要一个事务管理器-->
<bean id="template" class="org.springframework.transaction.support.TransactionTemplate">
    <property name="transactionManager" ref="transactionManager"></property>
</bean>
<!--实例事务管理器,需要一个数据源-->
<bean id="transactionManager" class="org.springframework.jdbc.datasource.DataSourceTransactionManager">
    <property name="dataSource" ref="datasource"></property>
</bean>
<!--实例bankDao,需要数据源-->
<bean id="bankDao" class="com.spring.transa.BankDao">
    <property name="dataSource" ref="datasource"></property>
</bean>
<!--实例bankService,需要注入两个参数-->
<bean id="bankService" class="com.spring.transa.BankService">
    <property name="template" ref="template"></property>
    <property name="dao" ref="bankDao"></property>
</bean>
</beans>
- 1
- 2
- 3
- 4
- 5
- 6
- 7
- 8
- 9
- 10
- 11
- 12
- 13
- 14
- 15
- 16
- 17
- 18
- 19
- 20
- 21
- 22
- 23
- 24
- 25
- 26
- 27
- 28
- 29
- 30
- 31
- 32
- 33
- 34
- 35
- 36
- 37
//测试一下
public class TestDemo {
    @Test
    public void test(){
        ApplicationContext ac=new ClassPathXmlApplicationContext("applicationContext.xml");
        BankService service=(BankService) ac.getBean("bankService");
        service.transfer("张三", "李四", 200);
    }
}
- 1
- 2
- 3
- 4
- 5
- 6
- 7
- 8
- 9
- 10
使用XML配置声明式事务
大多数Spring用户选择声明式事务管理的功能,这种方式对代码的侵入性最小,让事务管理的代码完全从业务代码中移除,非常符合非侵入式轻量级容器的概念。Spring的声明式事务管理是通过AOP实现的,通过配置信息,Spring负责将事务管理增强逻辑动态织入到业务方法中。
使用原始的TransactionProxyFactoryBean
Spring早期版本中,用户必须通过TransactionProxyFactoryBean代理类对需要进行事务管理的业务类进行代理,在Spring3.0以后,这种方式已经不被推荐,但是我们可以了解一下,有助于我们理解Spring声明式事务的内部工作原理。 、
//我们还使用上面的转账例子
public class BankService {
    private BankDao dao;

    public void setDao(BankDao dao) {
        this.dao = dao;
    }

    public void transfer(String payee,String payer,Integer money){
                dao.addMoney(payee, money);
                //我们故意让抛出一个异常
                int i=1/0;
                dao.reduceMoney(payer, money);
            }
    }
- 1
- 2
- 3
- 4
- 5
- 6
- 7
- 8
- 9
- 10
- 11
- 12
- 13
- 14
- 15
- 16
<!--使用TransactionProxyFactoryBean配置-->
<?xml version="1.0" encoding="UTF-8"?>
<beans xmlns="http://www.springframework.org/schema/beans"
    xmlns:xsi="http://www.w3.org/2001/XMLSchema-instance"
    xmlns:context="http://www.springframework.org/schema/context"
    xmlns:aop="http://www.springframework.org/schema/aop"
    xsi:schemaLocation="
        http://www.springframework.org/schema/beans http://www.springframework.org/schema/beans/spring-beans.xsd
        http://www.springframework.org/schema/context http://www.springframework.org/schema/context/spring-context.xsd
        http://www.springframework.org/schema/aop http://www.springframework.org/schema/aop/spring-aop.xsd">

<!--加载数据库配置文件-->
<context:property-placeholder location="jdbc.properties"/>
<bean id="datasource" class="com.mchange.v2.c3p0.ComboPooledDataSource">
    <property name="driverClass" value="${driverClass}"></property>
    <property name="jdbcUrl" value="${jdbcUrl}"></property>
    <property name="user" value="${user}"></property>
    <property name="password" value="${password}"></property>
</bean>

<!--配置事务管理器-->
<bean id="transactionManager" class="org.springframework.jdbc.datasource.DataSourceTransactionManager">
    <property name="dataSource" ref="datasource"></property>
</bean>
<!--配置Dao-->
<bean id="bankDao" class="com.spring.transa.BankDao">
    <property name="dataSource" ref="datasource"></property>
</bean>
<!--配置Service-->
<bean id="bankService" class="com.spring.transa.BankService">
    <property name="dao" ref="bankDao"></property>
</bean>

<!--配置代理类-->
<bean id="proxyBankService" class="org.springframework.transaction.interceptor.TransactionProxyFactoryBean">
    <!--目标类-->
    <property name="target" ref="bankService"></property>
    <!--事务管理器-->
    <property name="transactionManager" ref="transactionManager"></property>
    <!--事务属性,通过键值对的方式配置事务属性信息-->
    <property name="transactionAttributes">
        <props>
        <!--key为要进行事务管理的方法名,可以用*匹配所有方法-->
        <!--Value为属性值,格式为PROPAGATION(传播行为),ISOLATION(隔离级别 可选),readOnly(是否只读  可选),-Exceptions(发生这些异常回滚事务 可选),+Exceptions(发生这些异常照样提交事务 可选)-->
            <prop key="transfer">PROPAGATION_REQUIRED,+Exception</prop>
        </props>
    </property>
</bean>
</beans>
- 1
- 2
- 3
- 4
- 5
- 6
- 7
- 8
- 9
- 10
- 11
- 12
- 13
- 14
- 15
- 16
- 17
- 18
- 19
- 20
- 21
- 22
- 23
- 24
- 25
- 26
- 27
- 28
- 29
- 30
- 31
- 32
- 33
- 34
- 35
- 36
- 37
- 38
- 39
- 40
- 41
- 42
- 43
- 44
- 45
- 46
- 47
- 48
- 49
//进行测试
public class TestDemo {
    @Test
    public void test(){
        ApplicationContext ac=new ClassPathXmlApplicationContext("applicationContext.xml");
        BankService service=(BankService) ac.getBean("proxyBankService");
        service.transfer("张三", "李四", 200);
    }
}
- 1
- 2
- 3
- 4
- 5
- 6
- 7
- 8
- 9
- 10

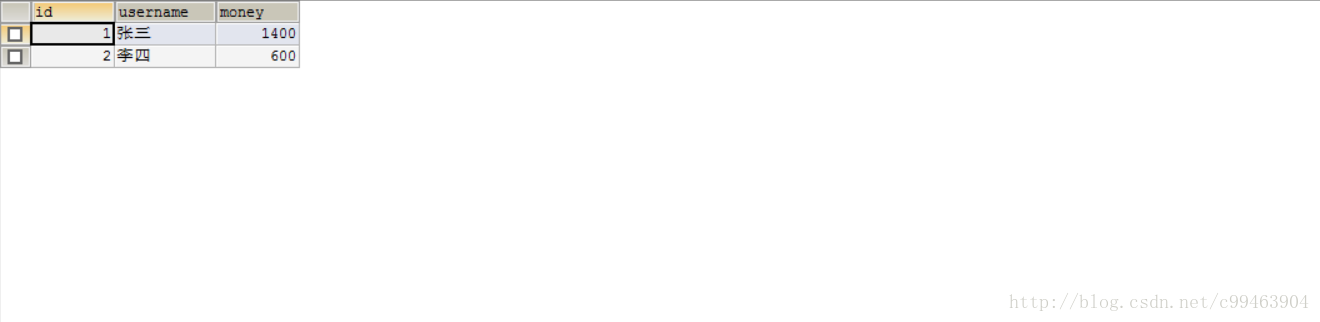
我们可以看到,虽然出现了异常,但还是提交了事务。这就是我们设置的+Exception的作用
基于tx/aop命名空间的配置
使用TransactionProxyFactoryBean代理工厂类为业务类添加事务支持,有一些很明显的缺点,例如需要对每一个需要事务支持的业务类进行单独配置等。这一切的缺点是因为低版本Spring中没有引入强大的AOP切面表达式造成的,Spring引入AspectJ后,这一切自然就迎刃而解。
Spring在XML配置中,提供了tx命名空间,以明确的结构方式定义事务相关信息,配置aop提供的切面定义,事务配置得到了大大的简化。这也是开发中最常用的事务管理的方法
//我们还使用前面的银行转账的例子,都不需要改变
//注意的是配置文件需要引入tx和aop命名空间
<?xml version="1.0" encoding="UTF-8"?>
<beans xmlns="http://www.springframework.org/schema/beans"
    xmlns:xsi="http://www.w3.org/2001/XMLSchema-instance"
    xmlns:context="http://www.springframework.org/schema/context"
    xmlns:aop="http://www.springframework.org/schema/aop"
    xmlns:tx="http://www.springframework.org/schema/tx"         //引入tx命名空间
    xsi:schemaLocation="
        http://www.springframework.org/schema/beans http://www.springframework.org/schema/beans/spring-beans.xsd
        http://www.springframework.org/schema/context http://www.springframework.org/schema/context/spring-context.xsd
        http://www.springframework.org/schema/aop http://www.springframework.org/schema/aop/spring-aop.xsd

        //指定tx xsd文件位置
         http://www.springframework.org/schema/tx       http://www.springframework.org/schema/tx/spring-tx.xsd">

<context:property-placeholder location="jdbc.properties"/>
<bean id="datasource" class="com.mchange.v2.c3p0.ComboPooledDataSource">
    <property name="driverClass" value="${driverClass}"></property>
    <property name="jdbcUrl" value="${jdbcUrl}"></property>
    <property name="user" value="${user}"></property>
    <property name="password" value="${password}"></property>
</bean>

<!--定义事务管理器-->
<bean id="transactionManager" class="org.springframework.jdbc.datasource.DataSourceTransactionManager">
    <property name="dataSource" ref="datasource"></property>
</bean>
<!--定义Dao-->
<bean id="bankDao" class="com.spring.transa.BankDao">
    <property name="dataSource" ref="datasource"></property>
</bean>
<!--定义Service-->
<bean id="bankService" class="com.spring.transa.BankService">
    <property name="dao" ref="bankDao"></property>
</bean>

<!--定义事务增强,需要指定id和事务管理器-->
<tx:advice id="txadvice" transaction-manager="transactionManager">
    <!--配置事务属性-->
    <tx:attributes>
        <tx:method name="transfer" propagation="REQUIRED" isolation="DEFAULT"/>
    </tx:attributes>
</tx:advice>
<!--定义aop切面,使用AspectJ表达式定义切点-->
<aop:config>
    <aop:advisor pointcut="execution(* com.spring.transa.BankService.*(..))"  advice-ref="txadvice"/>
</aop:config>
</beans>
- 1
- 2
- 3
- 4
- 5
- 6
- 7
- 8
- 9
- 10
- 11
- 12
- 13
- 14
- 15
- 16
- 17
- 18
- 19
- 20
- 21
- 22
- 23
- 24
- 25
- 26
- 27
- 28
- 29
- 30
- 31
- 32
- 33
- 34
- 35
- 36
- 37
- 38
- 39
- 40
- 41
- 42
- 43
- 44
- 45
- 46
- 47
- 48
- 49
//我们测试一下
public class TestDemo {
    @Test
    public void test(){
        ApplicationContext ac=new ClassPathXmlApplicationContext("applicationContext.xml");
        BankService service=(BankService) ac.getBean("bankService");
        service.transfer("张三", "李四", 200);
    }
}
- 1
- 2
- 3
- 4
- 5
- 6
- 7
- 8
- 9
- 10

使用注解配置声明式事务
除了基于XML的事务配置之外,Spring还提供了基于注解的事务配置,使用@Transactional对需要使用注解的类或方法进行标注,在容器中配置基于注解的事务增强驱动,即可启用基于注解的声明式事务。
//对整个类使用注解,也可以对单独的方法使用注解
//一般来说,我们只需要使用默认的事务属性即可,如果需要,直接使用以下格式
//@Transactional(propagation=Propagation.REQUIRED,isolation=Isolation.DEFAULT)
@Transactional
public class BankService {
    private BankDao dao;

    public void setDao(BankDao dao) {
        this.dao = dao;
    }

    public void transfer(String payee,String payer,Integer money){
                dao.addMoney(payee, money);
                int i=1/0;
                dao.reduceMoney(payer, money);
            }
    }
- 1
- 2
- 3
- 4
- 5
- 6
- 7
- 8
- 9
- 10
- 11
- 12
- 13
- 14
- 15
- 16
- 17
- 18
<?xml version="1.0" encoding="UTF-8"?>
<beans xmlns="http://www.springframework.org/schema/beans"
    xmlns:xsi="http://www.w3.org/2001/XMLSchema-instance"
    xmlns:context="http://www.springframework.org/schema/context"
    xmlns:aop="http://www.springframework.org/schema/aop"
    xmlns:tx="http://www.springframework.org/schema/tx"
    xsi:schemaLocation="
        http://www.springframework.org/schema/beans http://www.springframework.org/schema/beans/spring-beans.xsd
        http://www.springframework.org/schema/context http://www.springframework.org/schema/context/spring-context.xsd
        http://www.springframework.org/schema/aop http://www.springframework.org/schema/aop/spring-aop.xsd
         http://www.springframework.org/schema/tx http://www.springframework.org/schema/tx/spring-tx.xsd">

<context:property-placeholder location="jdbc.properties"/>
<bean id="datasource" class="com.mchange.v2.c3p0.ComboPooledDataSource">
    <property name="driverClass" value="${driverClass}"></property>
    <property name="jdbcUrl" value="${jdbcUrl}"></property>
    <property name="user" value="${user}"></property>
    <property name="password" value="${password}"></property>
</bean>

<bean id="transactionManager" class="org.springframework.jdbc.datasource.DataSourceTransactionManager">
    <property name="dataSource" ref="datasource"></property>
</bean>
<bean id="bankDao" class="com.spring.transa.BankDao">
    <property name="dataSource" ref="datasource"></property>
</bean>
<bean id="bankService" class="com.spring.transa.BankService">
    <property name="dao" ref="bankDao"></property>
</bean>

<!--注解驱动,对添加@Transactional注解的Bean织入事务管理,peoxy-target-class属性如果为true,使用CGLib-->
<tx:annotation-driven transaction-manager="transactionManager"/>
</beans>
- 1
- 2
- 3
- 4
- 5
- 6
- 7
- 8
- 9
- 10
- 11
- 12
- 13
- 14
- 15
- 16
- 17
- 18
- 19
- 20
- 21
- 22
- 23
- 24
- 25
- 26
- 27
- 28
- 29
- 30
- 31
- 32
- 33
        <link rel="stylesheet" href="https://csdnimg.cn/release/phoenix/template/css/markdown_views-ea0013b516.css">
            </div>
Spring JDBC
Spring JDBC简介
我们早期都有过直接使用JDBC访问数据库的经历,开发者需要编写获取数据库连接,处理异常,释放资源,数据操作等代码。即使很简单的数据库操作,都需要很繁琐的编写。Spring JDBC通过模板和回调机制大大降低了JDBC的繁琐程度,我们仅需编写那些必不可少的数据操作代码就可以完成操作。
Spring模板和回调机制
在直接使用JDBC时。我们需要处理获取连接,处理异常、释放资源等整个流程。Spring为支持的持久化技术提供了模板访问的方式,我们只需要提供具体的操作数据代码即可,可以大幅度提高开发效率。
Spring将相同的数据访问流程固定到模板类中,例如,获取连接、释放资源等等。将数据库操作中固定和变化的部分分开,同时保证模板类线程安全,以便多个线程共享同一模块实例。固定的部分在模板类中已经写好,变化的部分通过回调接口开放出来,用于具体的数据访问和结果处理操作。
Spring为各种支持的持久化技术都提供了简化操作的模板和回调。例如为传统的JDBC提供了JdbcTemplate模块类,为Hibernate提供了HibernateTemplate模板类等等很多。我们直接使用即可。
Spring JDBC入门例子
不论使用任何持久化技术,都必须拥有数据库连接。在Spring中,我们需要配置数据库连接池来获取连接。我们的代码中都统一使用c3p0连接池。
首先我们要先导包,我们需要导入spring的核心四个包和jdbc包和tx包(事务操作),然后还需要导入c3p0包和数据库驱动等
- 1
- 2
我们创建一个数据库和数据表来进行演示
CREATE DATABASE springdb;
USE springdb;
CREATE TABLE USER(
    id INT PRIMARY KEY AUTO_INCREMENT,
    username VARCHAR(50),
    PASSWORD VARCHAR(50)
);

INSERT INTO USER(username,PASSWORD) VALUES('张三','123456');
- 1
- 2
- 3
- 4
- 5
- 6
- 7
- 8
- 9
- 10
我们来演示一下怎么使用JdbcTemplate
public class TestJdbc {
    @Test
    public void test() throws Exception{
        //创建c3p0连接池,并设置相应的数据库参数
        ComboPooledDataSource datasource=new ComboPooledDataSource();
        datasource.setDriverClass("com.mysql.jdbc.Driver");
        datasource.setJdbcUrl("jdbc:mysql://localhost:3306/springdb");
        datasource.setUser("root");
        datasource.setPassword("123456");

        //创建JdbcTemplate对数据库进行操作
        JdbcTemplate template=new JdbcTemplate(datasource);
        String sql="insert into user(username,password) values(?,?)";
        template.update(sql, "李四","456789");
    }

}
- 1
- 2
- 3
- 4
- 5
- 6
- 7
- 8
- 9
- 10
- 11
- 12
- 13
- 14
- 15
- 16
- 17
- 18
- 19
详解JdbcTemplate
JdbcTemplate模板类几乎可以完成任何数据访问的操作,并且非常方便简介。我们上面的例子都是手动通过API 来创建连接池,来创建JdbcTemplate,我们完全可以使用我们学习的IoC来使用配置文件来替代那些操作,这也是我们所提倡的。
使用配置文件
我们在Dao中使用Jdbctemplate,JdbcTemplate直接在配置文件中配置好,直接在Dao中注入即可。
- 1
- 2
//我们先创建一个实体类
public class User {
    private int id;
    private String username;
    private String password;
    public int getId() {
        return id;
    }
    public void setId(int id) {
        this.id = id;
    }
    public String getUsername() {
        return username;
    }
    public void setUsername(String username) {
        this.username = username;
    }
    public String getPassword() {
        return password;
    }
    public void setPassword(String password) {
        this.password = password;
    }
    @Override
    public String toString() {
        return "User [id=" + id + ", username=" + username + ", password=" + password + "]";
    }

}
- 1
- 2
- 3
- 4
- 5
- 6
- 7
- 8
- 9
- 10
- 11
- 12
- 13
- 14
- 15
- 16
- 17
- 18
- 19
- 20
- 21
- 22
- 23
- 24
- 25
- 26
- 27
- 28
- 29
//创建Dao来对数据进行操作
public class UserDao {
    //提供JdbcTemplate和set方法来进行注入
    private JdbcTemplate template;

    public void setTemplate(JdbcTemplate template) {
        this.template = template;
    }

    //更新方法
    public void update(User user){
        String sql="update  user set username=?,password=?  where id=?";
        Object []params={user.getUsername(),user.getPassword(),user.getId()};
        template.update(sql, params);
    }
}
- 1
- 2
- 3
- 4
- 5
- 6
- 7
- 8
- 9
- 10
- 11
- 12
- 13
- 14
- 15
- 16
<!--编写配置文件-->
<?xml version="1.0" encoding="UTF-8"?>
<beans xmlns="http://www.springframework.org/schema/beans"
    xmlns:xsi="http://www.w3.org/2001/XMLSchema-instance"
    xmlns:context="http://www.springframework.org/schema/context"
    xmlns:aop="http://www.springframework.org/schema/aop"
    xsi:schemaLocation="
        http://www.springframework.org/schema/beans http://www.springframework.org/schema/beans/spring-beans.xsd
        http://www.springframework.org/schema/context http://www.springframework.org/schema/context/spring-context.xsd
        http://www.springframework.org/schema/aop http://www.springframework.org/schema/aop/spring-aop.xsd">

<!--配置连接池-->
<bean id="datasource" class="com.mchange.v2.c3p0.ComboPooledDataSource">
    <property name="driverClass" value="com.mysql.jdbc.Driver"></property>
    <property name="jdbcUrl" value="jdbc:mysql://localhost:3306/springdb"></property>
    <property name="user" value="root"></property>
    <property name="password" value="123456"></property>
</bean>

<!--实例JdbcTemplate,并且通过dataSource属性注入连接池-->
<bean id="jdbctemplate" class="org.springframework.jdbc.core.JdbcTemplate">
    <property name="dataSource" ref="datasource"></property>
</bean>

<!--实例化Dao,并注入JdbcTemplate-->
<bean id="userdao" class="com.spring.jdbc.UserDao">
    <property name="template" ref="jdbctemplate"></property>
</bean>
</beans>
- 1
- 2
- 3
- 4
- 5
- 6
- 7
- 8
- 9
- 10
- 11
- 12
- 13
- 14
- 15
- 16
- 17
- 18
- 19
- 20
- 21
- 22
- 23
- 24
- 25
- 26
- 27
- 28
- 29
//我们来测试一下
public class TestJdbc {
    @Test
    public void test() throws Exception{
        ApplicationContext ac=new ClassPathXmlApplicationContext("bean.xml");
        UserDao userdao=(UserDao) ac.getBean("userdao");
        User user=new User();
        user.setId(1);
        user.setUsername("王五");
        user.setPassword("888888");
        userdao.update(user);
    }
}
- 1
- 2
- 3
- 4
- 5
- 6
- 7
- 8
- 9
- 10
- 11
- 12
- 13
使用属性文件配置数据库信息
数据库的配置信息有可能需要经常改动,所以一般将数据库配置信息放在属性文件中。
//创建一个属性文件,名为jdbc.properties

driverClass=com.mysql.jdbc.Driver
jdbcUrl=jdbc:mysql://localhost:3306/springdb
user=root
password=123456
- 1
- 2
- 3
- 4
- 5
- 6
<!--引入属性文件,以${xxx}的方式引入属性-->
<context:property-placeholder location="jdbc.properties"/>
<bean id="datasource" class="com.mchange.v2.c3p0.ComboPooledDataSource">
    <property name="driverClass" value="${driverClass}"></property>
    <property name="jdbcUrl" value="${jdbcUrl}"></property>
    <property name="user" value="${user}"></property>
    <property name="password" value="${password}"></property>
</bean>
- 1
- 2
- 3
- 4
- 5
- 6
- 7
- 8
JdbcDaoSupport
我们的Dao层使用JdbcTemplate都需要提供一个JdbcTemplate属性和set方法来进行注入,而Spring为我们提供了一个父类JdbcDaoSupport,已经帮我们做好了这些操作。
//我们的Dao继承JdbcDaoSupport
public class UserDao extends JdbcDaoSupport{

    public void update(User user){
        String sql="update  user set username=?,password=?  where id=?";
        Object []params={user.getUsername(),user.getPassword(),user.getId()};
        this.getJdbcTemplate().update(sql, params);
    }
}
- 1
- 2
- 3
- 4
- 5
- 6
- 7
- 8
- 9
//更改配置文件
<?xml version="1.0" encoding="UTF-8"?>
<beans xmlns="http://www.springframework.org/schema/beans"
    xmlns:xsi="http://www.w3.org/2001/XMLSchema-instance"
    xmlns:context="http://www.springframework.org/schema/context"
    xmlns:aop="http://www.springframework.org/schema/aop"
    xsi:schemaLocation="
        http://www.springframework.org/schema/beans http://www.springframework.org/schema/beans/spring-beans.xsd
        http://www.springframework.org/schema/context http://www.springframework.org/schema/context/spring-context.xsd
        http://www.springframework.org/schema/aop http://www.springframework.org/schema/aop/spring-aop.xsd">

<bean id="datasource" class="com.mchange.v2.c3p0.ComboPooledDataSource">
    <property name="driverClass" value="com.mysql.jdbc.Driver"></property>
    <property name="jdbcUrl" value="jdbc:mysql://localhost:3306/springdb"></property>
    <property name="user" value="root"></property>
    <property name="password" value="123456"></property>
</bean>

<!--只需要将连接池给它,父类会自动帮我们创建JdbcTemplate-->
<bean id="userdao" class="com.spring.jdbc.UserDao">
    <property name="dataSource" ref="datasource"></property>
</bean>
</beans>
- 1
- 2
- 3
- 4
- 5
- 6
- 7
- 8
- 9
- 10
- 11
- 12
- 13
- 14
- 15
- 16
- 17
- 18
- 19
- 20
- 21
- 22
- 23
批量更改数据
如果需要一次性插入或更新多条记录,我们可以使用JdbcTemplate提供的批量操作的方法。
int[] batchUpdate(String []sql):多条不带参数的sql语句组成一个数组,该方法以批量方式执行这些sql语句,底层使用JDBC提供的批量操作的API。
int[] batchUpdate(String sql,BatchPreparedStatementSetter pss):使用本方法对带参sql语句进行多次数据更新操作,通过BatchPreparedStatementSetter回调接口进行批量参数的绑定工作。该接口定义了两个方法。
-int getBatchSize():指定本批次的大小 -void setValues(PreparedStatement ps,int i):为给定的PreparedStatement设置参数- 1
- 2
- 3
//我们为我们的Dao添加一个添加班级的操作,一次性插入多个User
public void addClass(final List<User> l){
        String sql="insert into user(username,password) values(?,?)";
        //执行批量操作
        template.batchUpdate(sql, new BatchPreparedStatementSetter() {

            //绑定插入的参数
            public void setValues(PreparedStatement ps, int index) throws SQLException {
                User user=l.get(index);
                ps.setString(1, user.getUsername());
                ps.setString(2, user.getPassword());
            }

            public int getBatchSize() {
                return l.size();
            }
        });
    }
- 1
- 2
- 3
- 4
- 5
- 6
- 7
- 8
- 9
- 10
- 11
- 12
- 13
- 14
- 15
- 16
- 17
- 18
//我们来进行测试一下
public class TestJdbc {
    @Test
    public void test() throws Exception{
        ApplicationContext ac=new ClassPathXmlApplicationContext("bean.xml");
        UserDao userdao=(UserDao) ac.getBean("userdao");
        List<User> list=new ArrayList<User>();
        User user1=new User();
        user1.setUsername("孙悟空");
        user1.setPassword("123");
        User user2=new User();
        user2.setUsername("猪八戒");
        user2.setPassword("456");
        list.add(user1);
        list.add(user2);
        userdao.addClass(list);
    }
}
- 1
- 2
- 3
- 4
- 5
- 6
- 7
- 8
- 9
- 10
- 11
- 12
- 13
- 14
- 15
- 16
- 17
- 18
- 19
查询所有数据
    //Spring提供了RowMapper<T>接口来处理结果集,有很多实现类,我们使用BeanPropertyRowMapper
    public List<User> selectAll(){
        String sql="select * from user";
        return template.query(sql,BeanPropertyRowMapper.newInstance(User.class));
    }
- 1
- 2
- 3
- 4
- 5
//我们测试一下
public class TestJdbc {
    @Test
    public void test() throws Exception{
        ApplicationContext ac=new ClassPathXmlApplicationContext("bean.xml");
        UserDao userdao=(UserDao) ac.getBean("userdao");
        List<User> list=userdao.selectAll();
        for(User u:list){
            System.out.println(u);
        }
    }
}
- 1
- 2
- 3
- 4
- 5
- 6
- 7
- 8
- 9
- 10
- 11
- 12
NamedParameterJdbcTemplate
在JdbcTemplate中,我们只能使用?占位符来声明sql语句参数,使用索引来绑定参数,如果我们uyao新增一个占位符,可能会导致很多问题。这种编程模式被认为是弱稳定的。
NamedParameterJdbcTemplate模板类支持命名参数绑定的功能。
SqlParameterSource接口用来提供参数 ,有两个实现类
BeanPropertySqlParameterSource:该类将JavaBean对象封装成参数,以便通过javaBean属性名和SQL语句中命名参数匹配的方式绑定参数。
MapSqlParameterSource:该实现类内部通过一个Map存储参数。
//我们创建一个Dao类
public class StudentDao {
    //提供NamedParameterJdbcTemplate,以便注入
    private NamedParameterJdbcTemplate template;

    public void setTemplate(NamedParameterJdbcTemplate template) {
        this.template = template;
    }

    public void addStudent(User user){
        //使用命名参数,格式是:javaBean属性名
        String sql="insert into user(username,password) values(:username,:password)";
        //提供参数
        SqlParameterSource sps=new BeanPropertySqlParameterSource(user);
        template.update(sql, sps);
    }
}
- 1
- 2
- 3
- 4
- 5
- 6
- 7
- 8
- 9
- 10
- 11
- 12
- 13
- 14
- 15
- 16
- 17
- 18
<!--配置文件-->
<?xml version="1.0" encoding="UTF-8"?>
<beans xmlns="http://www.springframework.org/schema/beans"
    xmlns:xsi="http://www.w3.org/2001/XMLSchema-instance"
    xmlns:context="http://www.springframework.org/schema/context"
    xmlns:aop="http://www.springframework.org/schema/aop"
    xsi:schemaLocation="
        http://www.springframework.org/schema/beans http://www.springframework.org/schema/beans/spring-beans.xsd
        http://www.springframework.org/schema/context http://www.springframework.org/schema/context/spring-context.xsd
        http://www.springframework.org/schema/aop http://www.springframework.org/schema/aop/spring-aop.xsd">

<context:property-placeholder location="jdbc.properties"/>
<bean id="datasource" class="com.mchange.v2.c3p0.ComboPooledDataSource">
    <property name="driverClass" value="${driverClass}"></property>
    <property name="jdbcUrl" value="${jdbcUrl}"></property>
    <property name="user" value="${user}"></property>
    <property name="password" value="${password}"></property>
</bean>

<bean id="template" class="org.springframework.jdbc.core.namedparam.NamedParameterJdbcTemplate">
    <constructor-arg ref="datasource"></constructor-arg>
</bean>
<bean id="studentdao" class="com.spring.jdbc.StudentDao">
    <property name="template" ref="template"></property>
</bean>
</beans>
- 1
- 2
- 3
- 4
- 5
- 6
- 7
- 8
- 9
- 10
- 11
- 12
- 13
- 14
- 15
- 16
- 17
- 18
- 19
- 20
- 21
- 22
- 23
- 24
- 25
- 26
//我们测试一下
public class TestJdbc {

    @Test
    public void test() throws Exception{
        ApplicationContext ac=new ClassPathXmlApplicationContext("bean.xml");
        StudentDao studentdao=(StudentDao) ac.getBean("studentdao");
        User user=new User();
        user.setUsername("天蓬元帅");
        user.setPassword("123456");
        studentdao.addStudent(user);
    }

}
- 1
- 2
- 3
- 4
- 5
- 6
- 7
- 8
- 9
- 10
- 11
- 12
- 13
- 14
Spring在org.springframework.jdbc.object包中提供了若干个类,试图以更面向对象过的方式访问数据库,但从操作难易度和使用效果上看,我们看不到它的优势,基本算是很鸡肋的功能。Spring的Jdbc只要能用上述的一些基本操作即可,毕竟有许多专业的orm框架,例如Hibernate和Mybatis等。
Spring的事务操作
实际开发中,Spring的事务管理基本上是被使用最多的功能,Spring的提供了灵活方便的事务管理功能。
事务的基础知识和可能遇到的数据并发问题还有数据隔离级别等知识在我的印象中已经写了两三次,可以从以前的博文中进行学习,这里就不再进行叙述。
JDBC对事务的支持
//下面是传统的JDBC事务操作的代码

    Connection conn;
    try{
        conn=DriverManager.getConnection();
        //开启事务
        conn.setAutoCommit(false);
        ....
        ....
        //提交事务
        conn.commit();
    }catch(Exception e){
        //回滚事务
        conn.rollback();
    }finally{
        ....
    }
- 1
- 2
- 3
- 4
- 5
- 6
- 7
- 8
- 9
- 10
- 11
- 12
- 13
- 14
- 15
- 16
- 17
我们讲一个以前没讲过的小知识点,从JDBC3.0以后,引入了一个保存点特性,Savepoint接口允许将事务分割成多个阶段,用户可以指定回滚到事务特定的保存点。而以前的版本中,只要回滚就只能回滚到开始事务的点,这个保存点特性可以解决很多实际问题,在发生特定问题时,回滚到指定的保存点,我们来演示一下。
    Connection conn;
    Savepoint s;
    try{
        conn=DriverManager.getConnection();
        //开启事务
        conn.setAutoCommit(false);
        执行A操作;
        执行B操作;
        //设置保存点
        s=conn.setSavepoint("savapoint");
        执行C操作
        执行D操作
        //提交事务
        conn.commit();
    }catch(Exception e){
        //判断是在AB操作时发生异常还是CD操作时发生异常
        if(s!=null){
            //回滚到保存点,并提交保存点之前的事务
            conn.rollback(s);
            conn.commit();
        }else{
            conn.rollback();
        }
    }finally{
        ....
    }
- 1
- 2
- 3
- 4
- 5
- 6
- 7
- 8
- 9
- 10
- 11
- 12
- 13
- 14
- 15
- 16
- 17
- 18
- 19
- 20
- 21
- 22
- 23
- 24
- 25
- 26
Spring事务管理介绍
Spring为事务管理提供了一致的编程模板,不管选择Spring JDBC、Hibernate、Mybatis,Spring都让我们可以用统一的编程模板进行事务管理。
Spring为我们提供了事务模板类,通过事务模板类就可以通过编程方式实现事务管理,而无需关注资源获取、释放、异常处理等操作。
Spring事务管理的亮点在于声明式事务管理,Spring允许通过声明方式,在IoC配置中指定事务的边界和事务属性,Spring自动在指定的事务边界上应用事务属性。
Spring事务管理主要包括三个接口
PlatformTransactionManager: 事务管理器。Spring使用事务管理器来管理事务的提交回滚等。
TransactionDefinition:事务属性。用来描述事务的隔离级别、超时时间、是否为只读事务等事务属性。我们配置事务属性,Spring会将事务封装到该对象实例。
TransactionStatus:事务状态。用来记录事务的具体运行状态。例如事务是否有保存点,事务是否结束等。
PlatformTransactionManager详解
PlatformTransactionManager定义了三个接口方法
TransactionStatus getTransaction(TransactionDefinition definition):该方法通过事务详情属性获得一个事务,并用TransactionStatus描述这个事务的状态
commit(TransactionStatus status):根据事务的状态提交事务,如果事务状态已经被标识为rollback-only,该方法执行回滚事务的操作
rollback(TransactionStatus status):根据状态回滚事务,commit()方法抛出异常时,该方法会被隐式调用
Spring为不同的持久化框架提供了PlatformTransactionManager接口的实现类。
TransactionStatus详解
**TransactionStatus代表一个事务的具体运行状态。事务管理器通过该接口获取事务的运行期的状态信息。
该接口继承SavepointManager接口**。
SavepointManager接口拥有以下的方法
Object createSavepoint():创建一个保存点对象。
void rollbackToSavepoint(Object savepoint):回滚到指定的保存点
void releaseSavepoint(Object savepoint):释放一个保存点。如果事务提交,所有保存点会自动释放。
TransactionStatus扩展了SavepointManager并提供了以下的方法
boolean hasSavepoint():判断当前的事务是否有保存点。
boolean isNewTransaction():判断当前的事务是否是一个新的事务。
boolean isCompleted():判断当前事务是否已经结束:已经提交或者回滚
boolean isRollbackOnly():判断当前事务是否已经被标识为rollback-only
void setRollbackOnly():将当前事务设置为rollback-only,通过该标识通知事务管理器只能进行事务回滚。
TransactionDefinition详解
TransactionDefinition定义了Spring的事务属性。
事务隔离:事务隔离级别。在TransactionDefinition接口中定义了4个隔离级别。 分别是ISOLATION_READ_UNCOMMITTED,ISOLATION_READ_COMMITTED,ISOLATION_REPEATABLE_READ,ISOLATION_SERIALIZABLE。
事务传播:后面详解。
事务超时:超时时间,事务运行超过指定时间时,事务将会回滚。
只读状态。只读状态,不能修改任何数据。
TransactionDefinition接口中定义的方法
int getPropagationBehavior(); 获得传播行为
int getIsolationLevel(); 获得隔离级别
int getTimeout(); 获得超时时间
boolean isReadOnly(); 是否是只读状态
String getName(); 获取事务详情名称
事务传播行为
当我们进行开发时,事务一般都是设置在Service层,如果我们调用基于Spring的service方法时,它将运行于Spring管理的事务环境中,如果该Service方法中中除了调用Dao层的方法,在内部还调用了其他的Service方法来共同完成一个完整的业务操作,事务传播行为就是控制当前的事务如何传播到被调用的其他Service方法中。
Spring在TransactionDefinition接口中规定了七种类型的事务传播行为。
Spring的编程式的事务管理
实际应用中,很少需要通过编程来进行事务管理。Spring为编程式事务管理提供了模板类TransactionTemplate,TransactionTemplate是线程安全的,因此我们可以在业务类中共享TransactionTemplate进行事务管理。
TracsactionTemplate有两个主要的方法
void setTransactionManager(PlatformTransactionManager transactionManager):设置事务管理器
Object execute(TransactionCallback action):在TransactionCallback回调接口中定义需要以事务方式组织的数据访问逻辑。简单的说需要以事务方式处理的代码放在这里面。
- TransactionCallback接口中只有一个方法 :Object doInTransaction(TransactionStatus status).如果操作不会返回任何结果,可以使用TransactionCallback的子接口TransactionCallbackWithoutResult.
我们来演示一个银行转账的例子。
//先创建数据库及要操作的数据表
CREATE DATABASE bank;
USE bank;
CREATE TABLE account(
    id  INT PRIMARY KEY AUTO_INCREMENT,
    username VARCHAR(50),
    money INT
);

INSERT INTO account(username,money) VALUES('张三',1000);
INSERT INTO account(username,money) VALUES('李四',1000);
- 1
- 2
- 3
- 4
- 5
- 6
- 7
- 8
- 9
- 10
- 11
//创建Dao层,Dao层应该有两个方法,一个是给收款人加钱,一个给付款人减钱
public class BankDao extends JdbcDaoSupport{
    //给收款人加钱的方法
    public void addMoney(String payee,Integer money){
        String sql="update account set money=money+? where username=?";
        this.getJdbcTemplate().update(sql, money,payee);
    }
    //给付款人减钱的方法
    public void reduceMoney(String payer,Integer money){
        String sql="update account set money=money-? where username=?";
        this.getJdbcTemplate().update(sql, money,payer);
    }

}
- 1
- 2
- 3
- 4
- 5
- 6
- 7
- 8
- 9
- 10
- 11
- 12
- 13
- 14
- 15
//在Service层使用编程式事务进行转账操作
public class BankService {
    private BankDao dao;
    private TransactionTemplate template;
    public void setDao(BankDao dao) {
        this.dao = dao;
    }
    public void setTemplate(TransactionTemplate template) {
        this.template = template;
    }

    //转账方法
    public void transfer(String payee,String payer,Integer money){
        //因为没有返回结果,将转账的具体逻辑放在TransactionCallbackWithoutResult接口中
        template.execute(new TransactionCallbackWithoutResult() {
            protected void doInTransactionWithoutResult(TransactionStatus status) {
                dao.addMoney(payee, money);
                dao.reduceMoney(payer, money);
            }
        });
    }
}
- 1
- 2
- 3
- 4
- 5
- 6
- 7
- 8
- 9
- 10
- 11
- 12
- 13
- 14
- 15
- 16
- 17
- 18
- 19
- 20
- 21
- 22
<!--编写配置文件-->
<?xml version="1.0" encoding="UTF-8"?>
<beans xmlns="http://www.springframework.org/schema/beans"
    xmlns:xsi="http://www.w3.org/2001/XMLSchema-instance"
    xmlns:context="http://www.springframework.org/schema/context"
    xmlns:aop="http://www.springframework.org/schema/aop"
    xsi:schemaLocation="
        http://www.springframework.org/schema/beans http://www.springframework.org/schema/beans/spring-beans.xsd
        http://www.springframework.org/schema/context http://www.springframework.org/schema/context/spring-context.xsd
        http://www.springframework.org/schema/aop http://www.springframework.org/schema/aop/spring-aop.xsd">
<!--加载数据库配置文件-->
<context:property-placeholder location="jdbc.properties"/>
<!--设置连接池配置-->
<bean id="datasource" class="com.mchange.v2.c3p0.ComboPooledDataSource">
    <property name="driverClass" value="${driverClass}"></property>
    <property name="jdbcUrl" value="${jdbcUrl}"></property>
    <property name="user" value="${user}"></property>
    <property name="password" value="${password}"></property>
</bean>
<!--实例TransactionTemplate模板类,需要一个事务管理器-->
<bean id="template" class="org.springframework.transaction.support.TransactionTemplate">
    <property name="transactionManager" ref="transactionManager"></property>
</bean>
<!--实例事务管理器,需要一个数据源-->
<bean id="transactionManager" class="org.springframework.jdbc.datasource.DataSourceTransactionManager">
    <property name="dataSource" ref="datasource"></property>
</bean>
<!--实例bankDao,需要数据源-->
<bean id="bankDao" class="com.spring.transa.BankDao">
    <property name="dataSource" ref="datasource"></property>
</bean>
<!--实例bankService,需要注入两个参数-->
<bean id="bankService" class="com.spring.transa.BankService">
    <property name="template" ref="template"></property>
    <property name="dao" ref="bankDao"></property>
</bean>
</beans>
- 1
- 2
- 3
- 4
- 5
- 6
- 7
- 8
- 9
- 10
- 11
- 12
- 13
- 14
- 15
- 16
- 17
- 18
- 19
- 20
- 21
- 22
- 23
- 24
- 25
- 26
- 27
- 28
- 29
- 30
- 31
- 32
- 33
- 34
- 35
- 36
- 37
//测试一下
public class TestDemo {
    @Test
    public void test(){
        ApplicationContext ac=new ClassPathXmlApplicationContext("applicationContext.xml");
        BankService service=(BankService) ac.getBean("bankService");
        service.transfer("张三", "李四", 200);
    }
}
- 1
- 2
- 3
- 4
- 5
- 6
- 7
- 8
- 9
- 10
使用XML配置声明式事务
大多数Spring用户选择声明式事务管理的功能,这种方式对代码的侵入性最小,让事务管理的代码完全从业务代码中移除,非常符合非侵入式轻量级容器的概念。Spring的声明式事务管理是通过AOP实现的,通过配置信息,Spring负责将事务管理增强逻辑动态织入到业务方法中。
使用原始的TransactionProxyFactoryBean
Spring早期版本中,用户必须通过TransactionProxyFactoryBean代理类对需要进行事务管理的业务类进行代理,在Spring3.0以后,这种方式已经不被推荐,但是我们可以了解一下,有助于我们理解Spring声明式事务的内部工作原理。 、
//我们还使用上面的转账例子
public class BankService {
    private BankDao dao;

    public void setDao(BankDao dao) {
        this.dao = dao;
    }

    public void transfer(String payee,String payer,Integer money){
                dao.addMoney(payee, money);
                //我们故意让抛出一个异常
                int i=1/0;
                dao.reduceMoney(payer, money);
            }
    }
- 1
- 2
- 3
- 4
- 5
- 6
- 7
- 8
- 9
- 10
- 11
- 12
- 13
- 14
- 15
- 16
<!--使用TransactionProxyFactoryBean配置-->
<?xml version="1.0" encoding="UTF-8"?>
<beans xmlns="http://www.springframework.org/schema/beans"
    xmlns:xsi="http://www.w3.org/2001/XMLSchema-instance"
    xmlns:context="http://www.springframework.org/schema/context"
    xmlns:aop="http://www.springframework.org/schema/aop"
    xsi:schemaLocation="
        http://www.springframework.org/schema/beans http://www.springframework.org/schema/beans/spring-beans.xsd
        http://www.springframework.org/schema/context http://www.springframework.org/schema/context/spring-context.xsd
        http://www.springframework.org/schema/aop http://www.springframework.org/schema/aop/spring-aop.xsd">

<!--加载数据库配置文件-->
<context:property-placeholder location="jdbc.properties"/>
<bean id="datasource" class="com.mchange.v2.c3p0.ComboPooledDataSource">
    <property name="driverClass" value="${driverClass}"></property>
    <property name="jdbcUrl" value="${jdbcUrl}"></property>
    <property name="user" value="${user}"></property>
    <property name="password" value="${password}"></property>
</bean>

<!--配置事务管理器-->
<bean id="transactionManager" class="org.springframework.jdbc.datasource.DataSourceTransactionManager">
    <property name="dataSource" ref="datasource"></property>
</bean>
<!--配置Dao-->
<bean id="bankDao" class="com.spring.transa.BankDao">
    <property name="dataSource" ref="datasource"></property>
</bean>
<!--配置Service-->
<bean id="bankService" class="com.spring.transa.BankService">
    <property name="dao" ref="bankDao"></property>
</bean>

<!--配置代理类-->
<bean id="proxyBankService" class="org.springframework.transaction.interceptor.TransactionProxyFactoryBean">
    <!--目标类-->
    <property name="target" ref="bankService"></property>
    <!--事务管理器-->
    <property name="transactionManager" ref="transactionManager"></property>
    <!--事务属性,通过键值对的方式配置事务属性信息-->
    <property name="transactionAttributes">
        <props>
        <!--key为要进行事务管理的方法名,可以用*匹配所有方法-->
        <!--Value为属性值,格式为PROPAGATION(传播行为),ISOLATION(隔离级别 可选),readOnly(是否只读  可选),-Exceptions(发生这些异常回滚事务 可选),+Exceptions(发生这些异常照样提交事务 可选)-->
            <prop key="transfer">PROPAGATION_REQUIRED,+Exception</prop>
        </props>
    </property>
</bean>
</beans>
- 1
- 2
- 3
- 4
- 5
- 6
- 7
- 8
- 9
- 10
- 11
- 12
- 13
- 14
- 15
- 16
- 17
- 18
- 19
- 20
- 21
- 22
- 23
- 24
- 25
- 26
- 27
- 28
- 29
- 30
- 31
- 32
- 33
- 34
- 35
- 36
- 37
- 38
- 39
- 40
- 41
- 42
- 43
- 44
- 45
- 46
- 47
- 48
- 49
//进行测试
public class TestDemo {
    @Test
    public void test(){
        ApplicationContext ac=new ClassPathXmlApplicationContext("applicationContext.xml");
        BankService service=(BankService) ac.getBean("proxyBankService");
        service.transfer("张三", "李四", 200);
    }
}
- 1
- 2
- 3
- 4
- 5
- 6
- 7
- 8
- 9
- 10
我们可以看到,虽然出现了异常,但还是提交了事务。这就是我们设置的+Exception的作用
基于tx/aop命名空间的配置
使用TransactionProxyFactoryBean代理工厂类为业务类添加事务支持,有一些很明显的缺点,例如需要对每一个需要事务支持的业务类进行单独配置等。这一切的缺点是因为低版本Spring中没有引入强大的AOP切面表达式造成的,Spring引入AspectJ后,这一切自然就迎刃而解。
Spring在XML配置中,提供了tx命名空间,以明确的结构方式定义事务相关信息,配置aop提供的切面定义,事务配置得到了大大的简化。这也是开发中最常用的事务管理的方法
//我们还使用前面的银行转账的例子,都不需要改变
//注意的是配置文件需要引入tx和aop命名空间
<?xml version="1.0" encoding="UTF-8"?>
<beans xmlns="http://www.springframework.org/schema/beans"
    xmlns:xsi="http://www.w3.org/2001/XMLSchema-instance"
    xmlns:context="http://www.springframework.org/schema/context"
    xmlns:aop="http://www.springframework.org/schema/aop"
    xmlns:tx="http://www.springframework.org/schema/tx"         //引入tx命名空间
    xsi:schemaLocation="
        http://www.springframework.org/schema/beans http://www.springframework.org/schema/beans/spring-beans.xsd
        http://www.springframework.org/schema/context http://www.springframework.org/schema/context/spring-context.xsd
        http://www.springframework.org/schema/aop http://www.springframework.org/schema/aop/spring-aop.xsd

        //指定tx xsd文件位置
         http://www.springframework.org/schema/tx       http://www.springframework.org/schema/tx/spring-tx.xsd">

<context:property-placeholder location="jdbc.properties"/>
<bean id="datasource" class="com.mchange.v2.c3p0.ComboPooledDataSource">
    <property name="driverClass" value="${driverClass}"></property>
    <property name="jdbcUrl" value="${jdbcUrl}"></property>
    <property name="user" value="${user}"></property>
    <property name="password" value="${password}"></property>
</bean>

<!--定义事务管理器-->
<bean id="transactionManager" class="org.springframework.jdbc.datasource.DataSourceTransactionManager">
    <property name="dataSource" ref="datasource"></property>
</bean>
<!--定义Dao-->
<bean id="bankDao" class="com.spring.transa.BankDao">
    <property name="dataSource" ref="datasource"></property>
</bean>
<!--定义Service-->
<bean id="bankService" class="com.spring.transa.BankService">
    <property name="dao" ref="bankDao"></property>
</bean>

<!--定义事务增强,需要指定id和事务管理器-->
<tx:advice id="txadvice" transaction-manager="transactionManager">
    <!--配置事务属性-->
    <tx:attributes>
        <tx:method name="transfer" propagation="REQUIRED" isolation="DEFAULT"/>
    </tx:attributes>
</tx:advice>
<!--定义aop切面,使用AspectJ表达式定义切点-->
<aop:config>
    <aop:advisor pointcut="execution(* com.spring.transa.BankService.*(..))"  advice-ref="txadvice"/>
</aop:config>
</beans>
- 1
- 2
- 3
- 4
- 5
- 6
- 7
- 8
- 9
- 10
- 11
- 12
- 13
- 14
- 15
- 16
- 17
- 18
- 19
- 20
- 21
- 22
- 23
- 24
- 25
- 26
- 27
- 28
- 29
- 30
- 31
- 32
- 33
- 34
- 35
- 36
- 37
- 38
- 39
- 40
- 41
- 42
- 43
- 44
- 45
- 46
- 47
- 48
- 49
//我们测试一下
public class TestDemo {
    @Test
    public void test(){
        ApplicationContext ac=new ClassPathXmlApplicationContext("applicationContext.xml");
        BankService service=(BankService) ac.getBean("bankService");
        service.transfer("张三", "李四", 200);
    }
}
- 1
- 2
- 3
- 4
- 5
- 6
- 7
- 8
- 9
- 10
使用注解配置声明式事务
除了基于XML的事务配置之外,Spring还提供了基于注解的事务配置,使用@Transactional对需要使用注解的类或方法进行标注,在容器中配置基于注解的事务增强驱动,即可启用基于注解的声明式事务。
//对整个类使用注解,也可以对单独的方法使用注解
//一般来说,我们只需要使用默认的事务属性即可,如果需要,直接使用以下格式
//@Transactional(propagation=Propagation.REQUIRED,isolation=Isolation.DEFAULT)
@Transactional
public class BankService {
    private BankDao dao;

    public void setDao(BankDao dao) {
        this.dao = dao;
    }

    public void transfer(String payee,String payer,Integer money){
                dao.addMoney(payee, money);
                int i=1/0;
                dao.reduceMoney(payer, money);
            }
    }
- 1
- 2
- 3
- 4
- 5
- 6
- 7
- 8
- 9
- 10
- 11
- 12
- 13
- 14
- 15
- 16
- 17
- 18
<?xml version="1.0" encoding="UTF-8"?>
<beans xmlns="http://www.springframework.org/schema/beans"
    xmlns:xsi="http://www.w3.org/2001/XMLSchema-instance"
    xmlns:context="http://www.springframework.org/schema/context"
    xmlns:aop="http://www.springframework.org/schema/aop"
    xmlns:tx="http://www.springframework.org/schema/tx"
    xsi:schemaLocation="
        http://www.springframework.org/schema/beans http://www.springframework.org/schema/beans/spring-beans.xsd
        http://www.springframework.org/schema/context http://www.springframework.org/schema/context/spring-context.xsd
        http://www.springframework.org/schema/aop http://www.springframework.org/schema/aop/spring-aop.xsd
         http://www.springframework.org/schema/tx http://www.springframework.org/schema/tx/spring-tx.xsd">

<context:property-placeholder location="jdbc.properties"/>
<bean id="datasource" class="com.mchange.v2.c3p0.ComboPooledDataSource">
    <property name="driverClass" value="${driverClass}"></property>
    <property name="jdbcUrl" value="${jdbcUrl}"></property>
    <property name="user" value="${user}"></property>
    <property name="password" value="${password}"></property>
</bean>

<bean id="transactionManager" class="org.springframework.jdbc.datasource.DataSourceTransactionManager">
    <property name="dataSource" ref="datasource"></property>
</bean>
<bean id="bankDao" class="com.spring.transa.BankDao">
    <property name="dataSource" ref="datasource"></property>
</bean>
<bean id="bankService" class="com.spring.transa.BankService">
    <property name="dao" ref="bankDao"></property>
</bean>

<!--注解驱动,对添加@Transactional注解的Bean织入事务管理,peoxy-target-class属性如果为true,使用CGLib-->
<tx:annotation-driven transaction-manager="transactionManager"/>
</beans>
- 1
- 2
- 3
- 4
- 5
- 6
- 7
- 8
- 9
- 10
- 11
- 12
- 13
- 14
- 15
- 16
- 17
- 18
- 19
- 20
- 21
- 22
- 23
- 24
- 25
- 26
- 27
- 28
- 29
- 30
- 31
- 32
- 33
        <link rel="stylesheet" href="https://csdnimg.cn/release/phoenix/template/css/markdown_views-ea0013b516.css">
            </div>