二, 实现
2.1 Sync的成员变量
2.2 构造器
2.3 lock()
2.4 ReadLock.lock()流程图
| 关系简介 |
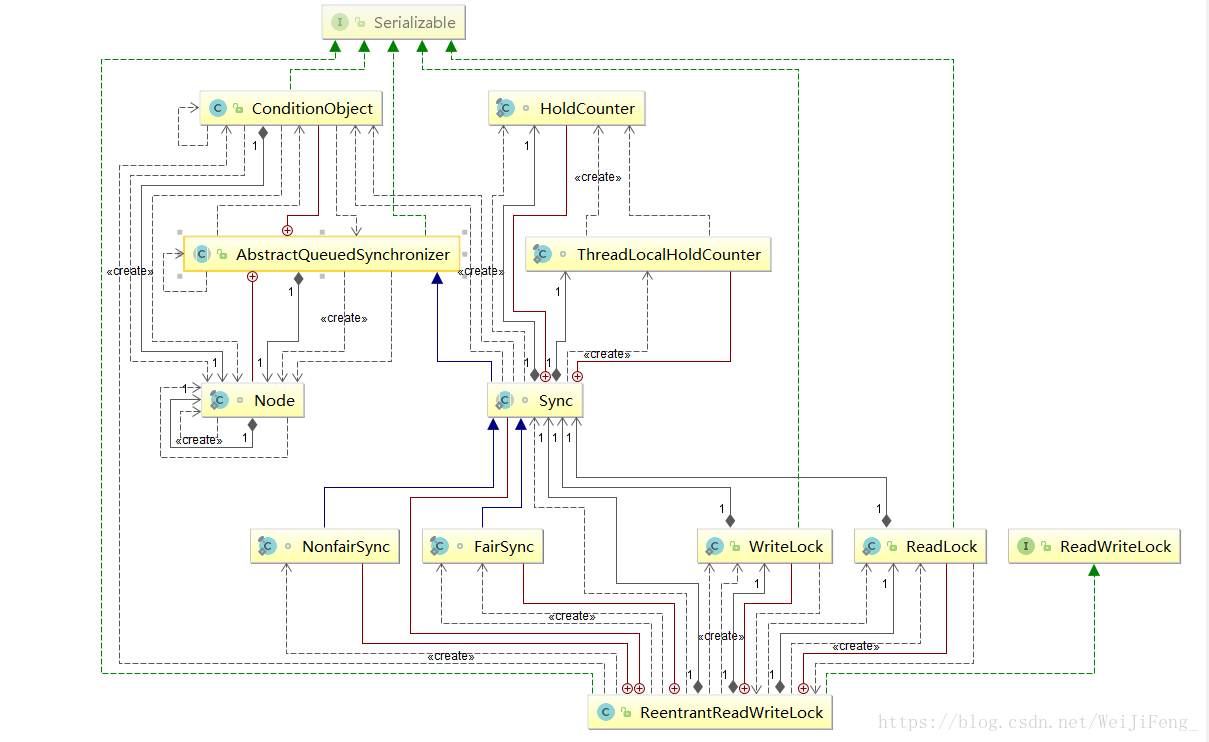
在这个关系很乱的UML图中,我们可以发现ReentrantReadWriteLock实现了ReadWriteLock接口,内部类有Sync(锁的实现),NonfairSync,FairSync公平锁与非公平锁,WriteLock和ReadLock读锁与写锁。还引用了AQS来管理阻塞队列。
所以我们可以大致知道加锁方式有公平的读写锁,还有不公平的读写锁。同时有读写,那就可能会发生资源竞争。在资源竞争产生的情况只有读和写,写和写之间会产生资源 竞争,读和读没有什么竞争压力。
那就还要保存锁的状态,ReentrantReadWriteLock保存锁的状态是采用高低位进行记录的。高16位来记录读锁(共享锁)的state,低16记录写锁(独占锁)的state。
| Sync的成员变量 |
        //读写锁用state记录两种锁的状态
        // 高16位来记录读锁(共享锁)的state,低16记录写锁(独占锁)的state
        //读锁占用的位数
        static final int SHARED_SHIFT   = 16;
        //每次让读锁状态加1, 则让state加1<<16
        static final int SHARED_UNIT    = (1 << SHARED_SHIFT);
        //最大可重入数,也就是int_MAX
        static final int MAX_COUNT      = (1 << SHARED_SHIFT) - 1;
        //写锁标记,作getState&EXCLUSIVE_MASK 大于1就是重入了
        static final int EXCLUSIVE_MASK = (1 << SHARED_SHIFT) - 1;

        //获取读锁的重入数
        static int sharedCount(int c)    { return c >>> SHARED_SHIFT; }
        //获取写锁的重入数
        static int exclusiveCount(int c) { return c & EXCLUSIVE_MASK; }
举个例子:比如,现在当前,申请读锁的线程数为13个,写锁1个,那state怎么表示?
上文说过,用一个32位的int类型的高16位表示读锁线程数,13的二进制为 1101,那state的二进制表示为
00000000 00001101 00000000 00000001,十进制数为851969, 接下在具体获取锁时,需要根据这个851968这个值得出上文中的 13 与 1。要算成13,只需要将state 无符号向右移位16位置,得出00000000 00001101,就出13,根据851969要算成低16位置,只需要用该00000000 00001101 00000000 00000001 & 111111111111111(15位),就可以得出00000001,就是利用了1&1得1,1&0得0这个技巧。
| 构造器 |
    /**
     * 默认为非公平锁
     */
    public MyReentrantReadWriteLock() {
        this(false);
    }

    /**
     * @param fair true为公平锁,false 为非公平锁
     */
    public MyReentrantReadWriteLock(boolean fair) {
        sync = fair ? new MyReentrantReadWriteLock.FairSync() : new MyReentrantReadWriteLock.NonfairSync();
        readerLock = new MyReentrantReadWriteLock.ReadLock(this);//读锁
        writerLock = new MyReentrantReadWriteLock.WriteLock(this);//写锁
    }
| Lock中核心——lock() |
  private final MyReentrantReadWriteLock.ReadLock readerLock;

  private final MyReentrantReadWriteLock.WriteLock writerLock;

  public MyReentrantReadWriteLock.WriteLock writeLock() { return writerLock; }
  public MyReentrantReadWriteLock.ReadLock  readLock()  { return readerLock; }
读写锁分别有自己的lock
我们先看看写锁的lock()
        public void lock() {
            sync.acquire(1);
        }
调用了AQS获取锁的方式,AQS的acquire我在ReentrantLock详细分析了
https://blog.csdn.net/WeiJiFeng_/article/details/81390935
我们再看看读锁的lock()
        public void lock() {
            sync.acquireShared(1);
        }
在进一层
public final void acquireShared(int arg) {
if (tryAcquireShared(arg) < 0)
doAcquireShared(arg);
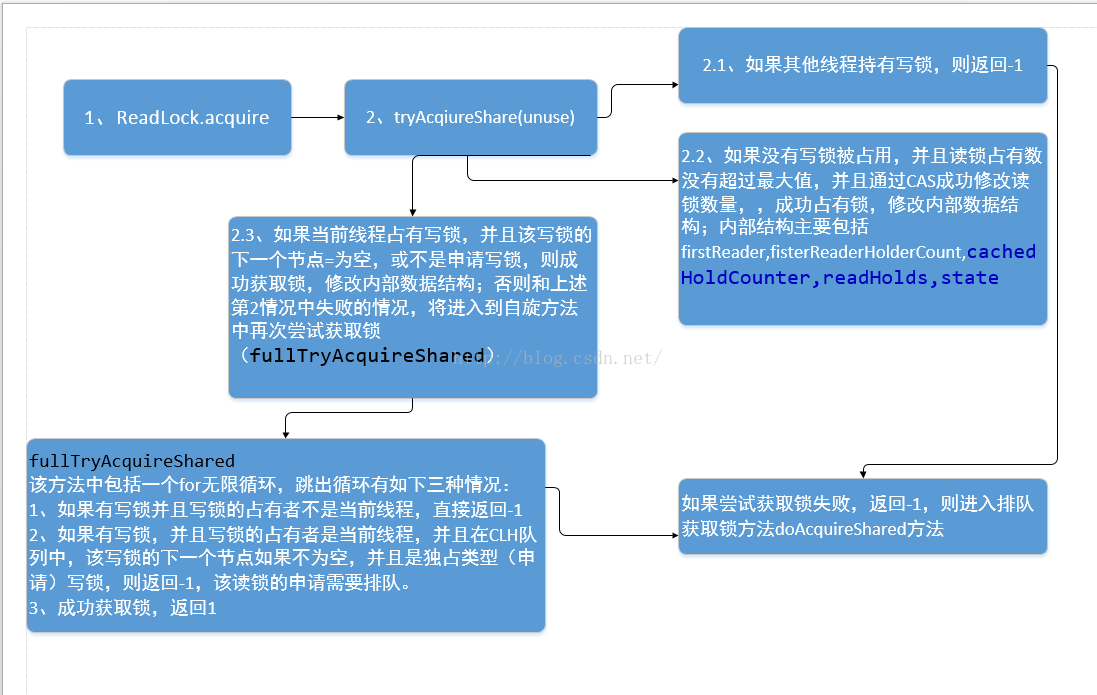
}首先尝试获取共享锁
        protected final int tryAcquireShared(int unused) {
            //获取当前线程引用
            Thread current = Thread.currentThread();
            //获取当前线程锁的状态
            int c = getState();

            //如果该线程持有写锁,或者获得锁的不是当前线程,都是获取锁失败
            if (exclusiveCount(c) != 0 &&
                    getExclusiveOwnerThread() != current)
                return -1;
            //获取读锁的重入计数器
            int r = sharedCount(c);

            //进入该代码块条件是
            //1,没有写锁被占用时,尝试通过一次CAS去获取锁时,成功获取共享锁
            //2,当前线程占有写锁,并且没有有其他写锁在当前线程的下一个节点等待获取写锁
            if (!readerShouldBlock() &&//读是否应该被阻塞,
                    r < MAX_COUNT &&//读不应该阻塞,共享锁状态是否合法
                    compareAndSetState(c, c + SHARED_UNIT)) {//同时合法那就尝试一次CAS操作获取共享锁

                //获取成功,且该线程是第一次获取到共享锁
                if (r == 0) {
                    firstReader = current;
                    firstReaderHoldCount = 1;
                } else if (firstReader == current) {
                    firstReaderHoldCount++;
                } else {
                    MyReentrantReadWriteLock.Sync.HoldCounter rh = cachedHoldCounter;
                    if (rh == null || rh.tid != getThreadId(current))
                        cachedHoldCounter = rh = readHolds.get();
                    else if (rh.count == 0)
                        readHolds.set(rh);
                    rh.count++;
                }
                return 1;
            }
            return fullTryAcquireShared(current);
        }
对于readerShouldBlock这个公平锁和非公平锁有区别
在公平锁中:
    final boolean readerShouldBlock() {
        return hasQueuedPredecessors();
    }
    public final boolean hasQueuedPredecessors() {

        //获取阻塞队列头尾
        MyAbstractQueueSync.Node t = tail; // Read fields in reverse initialization order
        MyAbstractQueueSync.Node h = head;
        MyAbstractQueueSync.Node s;
        //如果阻塞队列中没有被阻塞的线程,就不用阻塞
        //如果阻塞队列的队头是当前线程,且阻塞队列的下一个线程不是当前线程也不用阻塞
        return h != t &&
                ((s = h.next) == null || s.thread != Thread.currentThread());
    }
在非公平锁中:
    final boolean readerShouldBlock() {
        return apparentlyFirstQueuedIsExclusive();
    }
    final boolean apparentlyFirstQueuedIsExclusive() {
        MyAbstractQueueSync.Node h, s;
        return (h = head) != null &&//如果head为null,不阻塞
                (s = h.next)  != null && // head不为null,head的下一个节点为null,也不阻塞
                !s.isShared()         &&//如果锁不是共享锁,不阻塞
                s.thread != null; //head的下一个节点线程为null也不阻塞
    }
我们回到进入判断条件的代码
 if (r == 0) {
     firstReader = current;
     firstReaderHoldCount = 1;
 } else if (firstReader == current) {
     firstReaderHoldCount++;
 } else {
     MyReentrantReadWriteLock.Sync.HoldCounter rh = cachedHoldCounter;
     if (rh == null || rh.tid != getThreadId(current))
          cachedHoldCounter = rh = readHolds.get();
     else if (rh.count == 0)
         readHolds.set(rh);
         rh.count++;
     }
     return 1;
 }
以及我们在介绍Sync成员变量未提到的几个成员变量
    private transient MyReentrantReadWriteLock.Sync.ThreadLocalHoldCounter readHolds;
    private transient MyReentrantReadWriteLock.Sync.HoldCounter cachedHoldCounter;
    private transient Thread firstReader = null;
    private transient int firstReaderHoldCount;
上述这4个变量,其实就是完成一件事情,将获取读锁的线程放入线程本地变量(ThreadLocal),方便从整个上 下文,根据当前线程获取持有锁的次数信息。其实 firstReader,firstReaderHoldCount ,cachedHoldCounter 这三个变量就是为readHolds变量服务的,是一个优化手段,尽量减少直接使用readHolds.get方法的次数,firstReader与firstReadHoldCount保存第一个获取读锁的线程,也就是readHolds中并不会保存第一个获取读锁的线程;cachedHoldCounter 缓存的是最后一个获取线程的HolderCount信息,该变量主要是在如果当前线程多次获取读锁时,减少从readHolds中获取HoldCounter的次数。
我们再次回到没有进入判断条件的代码
        return fullTryAcquireShared(current);

        final int fullTryAcquireShared(Thread current) {

            MyReentrantReadWriteLock.Sync.HoldCounter rh = null;
            for (;;) {
                //还是获取锁的状态
                int c = getState();
                if (exclusiveCount(c) != 0) {
                    if (getExclusiveOwnerThread() != current)
                        //如果当前线程不是写锁的持有者,直接退出
                        return -1;
                } else if (readerShouldBlock()) {//重入锁不需要阻塞
                    //当前线程就是第一个获取读锁的线程,那么此时当然是重入锁。
                    if (firstReader == current) {
                        // assert firstReaderHoldCount > 0;
                    } else {
                        if (rh == null) {
                            rh = cachedHoldCounter;
                            if (rh == null || rh.tid != getThreadId(current)) {
                                rh = readHolds.get();
                                if (rh.count == 0)
                                    //线程阻塞之前,清空readHolds
                                    readHolds.remove();
                            }
                        }
                        if (rh.count == 0)
                            return -1;
                    }
                }
                if (sharedCount(c) == MAX_COUNT)
                    throw new Error("Maximum lock count exceeded");
                //CAS再一次尝试获取锁
                if (compareAndSetState(c, c + SHARED_UNIT)) {
                    if (sharedCount(c) == 0) {
                        firstReader = current;
                        firstReaderHoldCount = 1;
                    } else if (firstReader == current) {
                        firstReaderHoldCount++;
                    } else {
                        if (rh == null)
                            rh = cachedHoldCounter;
                        if (rh == null || rh.tid != getThreadId(current))
                            rh = readHolds.get();
                        else if (rh.count == 0)
                            readHolds.set(rh);
                        rh.count++;
                        cachedHoldCounter = rh; // cache for release
                    }
                    return 1;
                }
            }
        }
大回头到acquireShared
    public final void acquireShared(int arg) {
        if (tryAcquireShared(arg) < 0)
            doAcquireShared(arg);
    }
尝试获取共享锁失败之后,则要进入 doAcquireShared了
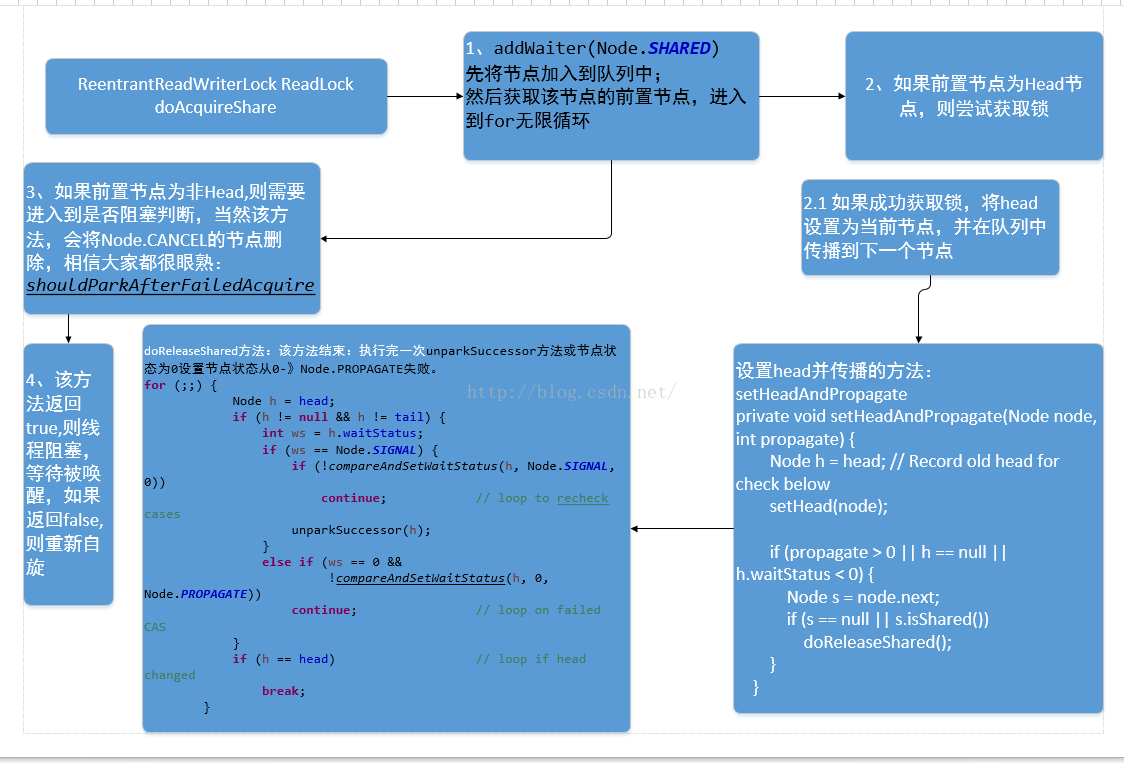
    private void doAcquireShared(int arg) {
        //没有获取到锁的线程加入到阻塞队列中
        final MyAbstractQueueSync.Node node = addWaiter(MyAbstractQueueSync.Node.SHARED);
        //设置入队是否成功获取锁的标志
        boolean failed = true;
        try {
            //是否需要挂起
            boolean interrupted = false;
            for (;;) {
                //获取刚刚加入这个阻塞队列的线程的前置节点引用
                final MyAbstractQueueSync.Node p = node.predecessor();
                if (p == head) {
                    //如果这个线程的前置节点呆在阻塞线程的头,那么乐观的尝试再一次获取锁
                    //万一上一个持有锁的线程,在刚刚释放了锁呢
                    int r = tryAcquireShared(arg);
                    //r == 1 获取到锁
                    //r == -1 要老实写入队列
                    if (r >= 0) {
                        //设置头并且释放共享锁
                        setHeadAndPropagate(node, r);
                        p.next = null; // help GC
                        if (interrupted)
                            selfInterrupt();
                        failed = false;
                        return;
                    }
                }
                //是否需要挂起
                if (shouldParkAfterFailedAcquire(p, node) &&
                        parkAndCheckInterrupt())
                    interrupted = true;
            }
        } finally {
            if (failed)
                cancelAcquire(node);
        }
    }
挂起也是借助AQS操作,最开始看的ReentrantLock的源码,在那里有详细介绍,doAcquireShared和acquireQueued实现有相近之处:在 acquireQueued之后有详细介绍线程是否需要挂起。
https://blog.csdn.net/WeiJiFeng_/article/details/81390935
设置头并且释放共享锁
    /**
     * @param node 要设置为头的节点
     * @param propagate 固定参数1
     */
    private void setHeadAndPropagate(MyAbstractQueueSync.Node node, int propagate) {
        //获取队列头的引用
        MyAbstractQueueSync.Node h = head; // Record old head for check below
        //set 头为传入的节点
        setHead(node);
        if (propagate > 0 || //如果读锁获取成功
                h == null || //或者头部节点为空
                h.waitStatus < 0 || //或者SIGNAL小于0
                (h = head) == null || h.waitStatus < 0) {
            //刚获取读锁的线程的引用
            MyAbstractQueueSync.Node s = node.next;
            //如果刚 获取读锁的线程下一个节点为空
            //或者 下一个是共享锁的申请
            //去队列中传播唤醒线程
            //是读锁获取的节点,一个获取成功,可以继续下一个读锁的获取、
            //直到队列的节点要获取的是写锁的时候停止传播
            if (s == null || s.isShared())
                doReleaseShared();
        }
    }
private void doReleaseShared() {
for (;;) {
MyAbstractQueueSync.Node h = head;
if (h != null && h != tail) {//把阻塞队列从头到尾做个遍历
//获取当前遍历节点的等待状态
int ws = h.waitStatus;
//如果ws == -1,挂起态
if (ws == MyAbstractQueueSync.Node.SIGNAL) {
//cas操作将挂起态转为等待状态
if (!compareAndSetWaitStatus(h, MyAbstractQueueSync.Node.SIGNAL, 0))
//失败,阻塞着,循环的重新尝试cas操作
continue; // loop to recheck cases
//成功就唤醒该节点
unparkSuccessor(h);
}
//如果状态为0,则设置为Node.PROPAGATE传播状态
//该值然后会在什么时候变化呢?
// 在判断该节点的下一个节点是否需要阻塞时,会判断,如果状态不是Node.SIGNAL或取消状态,
// 为了保险起见,会将前置节点状态设置为Node.SIGNAL,然后再次判断,是否需要阻塞。
else if (ws == 0 &&
!compareAndSetWaitStatus(h, 0, MyAbstractQueueSync.Node.PROPAGATE))
//cas设置传播状态失败,阻塞
continue; // loop on failed CAS
}
//如果处理过一次 unparkSuccessor 方法后,头节点没有发生变化,就退出该方法
//那head在什么时候会改变呢?
// 当然在是抢占锁成功的时候,head节点代表获取锁的节点。
// 一旦获取锁成功,则又会进入setHeadAndPropagate方法,
// 当然又会触发doReleaseShared方法,传播特性应该就是表现在这里吧。
// 再想一下,同一时间,可以有多个多线程占有锁,那在锁释放时,写锁的释放比较简单,
// 就是从头部节点下的第一个非取消节点,唤醒线程即可,
// 为了在释放读锁的上下文环境中获取代表读锁的线程,将信息存入在 readHolds ThreadLocal变量中。
if (h == head) // loop if head changed
break;
}
}lock的源码到这里也分析完毕了,此时我们通过图示流程在来回顾一波ReadLock的lock过程:
尝试获取读锁过程
从阻塞队列中获取读锁的流程如下:
参考文章:
https://blog.csdn.net/prestigeding/article/details/53286756