首先了解ElasticSearch:是一个基于Lucene的搜索服务器。它提供了一个分布式多用户能力的全文搜索引擎,基于RESTful web接口。
jdk1.8
elasticsearch 2.1.1
spring boot 1.5.10
1.pom.xml添加elasticsearch的依赖
<!-- elasticsearch -->
		<dependency>
			<groupId>org.elasticsearch</groupId>
			<artifactId>elasticsearch</artifactId>

		</dependency>
		<dependency>
			<groupId>org.springframework.boot</groupId>
			<artifactId>spring-boot-starter-data-elasticsearch</artifactId>
		</dependency>

		<dependency>
			<groupId>org.springframework.data</groupId>
			<artifactId>spring-data-elasticsearch</artifactId>
		</dependency>
		<dependency>
			<groupId>com.fasterxml.jackson.core</groupId>
			<artifactId>jackson-databind</artifactId>
		</dependency>
		<dependency>
			<groupId>net.java.dev.jna</groupId>
			<artifactId>jna</artifactId>
		</dependency>
2.在application.properties添加配置信息
# elasticsearch
spring.data.elasticsearch.cluster-name=elasticsearch
spring.data.elasticsearch.cluster-nodes=127.0.0.1:9300
spring.data.elasticsearch.repositories.enable=true
注:这些配置的属性,最终会设置到org.springframework.boot.autoconfigure.data.elasticsearch.ElasticsearchProperties这个实体中
3.创建实体类entity
@Document(indexName="permission",type="accountinfo",shards=5,replicas=1,refreshInterval="-1")@Document
注解,即表明这个实体需要进行索引,默认情况下这个实体中所有的属性都会被建立索引、并且分词。
/**
 * indexName(索引名称):对应数据库名称
 * type:表名称
 */
@Document(indexName="permission",type="accountinfo",shards=5,replicas=1,refreshInterval="-1")
public class Account {
    @Id
    private String id;
    private String nickName;
    private String accountName;
    public String getId() {
        return id;
    }
    public void setId(String id) {
        this.id = id;
    }
    public String getNickName() {
        return nickName;
    }
    public void setNickName(String nickName) {
        this.nickName = nickName;
    }
    public String getAccountName() {
        return accountName;
    }
    public void setAccountName(String accountName) {
        this.accountName = accountName;
    }

}
注意:继承ElasticsearchRepository<实体类名称,主建类型>这个类
/**
 * 注意要继承ElasticsearchRepository
 * @author CMCC
 *
 */
@Component("elasticAccountInfoRepository")
public interface ElasticAccountInfoRepository extends ElasticsearchRepository<Account, String>{
    Account queryAccountInfoById(String id);
    Account save(Account c);
}
5.编写service
public interface ESAccountInfoService {
    Account queryAccountInfoById(String id);

    Account save(Account c);
}@Service("esAccountInfoServiceImpl")
@Transactional
public class ESAccountInfoServiceImpl implements ESAccountInfoService {
@Autowired
private ElasticAccountInfoRepository elasticAccountInfoRepository;
@Override
public Account queryAccountInfoById(String id) {
// TODO Auto-generated method stub
return elasticAccountInfoRepository.queryAccountInfoById(id);
}
public Account save(Account c) {
// TODO Auto-generated method stub
return elasticAccountInfoRepository.save(c);
}
}6.编写controller
@Controller
public class ESController {

    @Autowired
    private ESAccountInfoService esAccountInfoServiceImpl;

    @RequestMapping("/add")
    @ResponseBody
    public void add(){
	System.out.println("进入es添加方法");
	Account c  = new Account();
	c.setId("2");
	c.setNickName("小胖子");
	c.setAccountName("xiaopangzi");
	esAccountInfoServiceImpl.save(c);
    }
    @RequestMapping("/query")
    @ResponseBody
    public void query(){
	System.out.println("进入es查询方法");
	Account acount= esAccountInfoServiceImpl.queryAccountInfoById("2");
	System.out.println(acount.getAccountName());
    }}
7.访问controller方法
add方法:

query方法:

OK!以上便实现了增加跟查询!
下面安装 elasticsearch: (我是Windows系统,所以下面是Windows系统安装)
下面安装 elasticsearch: (我是Windows系统,所以下面是Windows系统安装)
ES依赖于java,所以先保证你安装好了jdk
1. 解压文件,配置环境变量 path : E:elasticsearch-2.1.1\bin
2.打开bin目录 双击执行 elasticsearch.bat
2.打开bin目录 双击执行 elasticsearch.bat

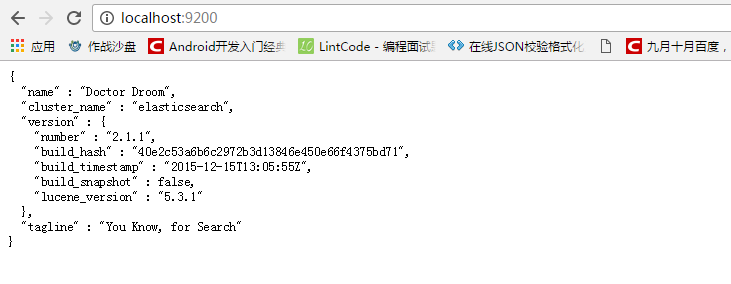
启动成功之后页面访问 http://localhost:9200/
9300端口: ES节点之间通讯使用 (tcp通讯端口,集群间和TCPClient都走的它)
9200端口: ES节点 和 外部 通讯使用(http协议的RESTful接口)
Java客户端连接的是9300接口,使用HTTP请求的方式连接的是9200端口(注意:这个是我在网上查询比较容易明白的解释)
over!文章中有什么不正确的还望大家指出!共同学习和成长
o