一丶Android动画分类:
- 补间动画:
 支持平移(Translate),旋转(Roate),缩放(Scale),不透明度(Alpha);
 只是显示的位置变动,View的实际位置未改变,例如View平移到其他地方了,但是点击事件仍在原处才能响应。
- 1
- 2
- 3
- 4
- 5
- 6
- 帧动画:
通过顺序播放一系列的图片从而产生动画效果的,它是一种渐进式动画。- 1
- 属性动画:
通过动态改变对象的属性从而达到动画的效果- 1
二、 补间动画
1、首先看下动画类的基类Animation的一些基本方法:
animation.setDuration(1000); //设置动画执行的时间
animation.setFillAfter(true); // true表示动画结束后停留在结束后的状态,false则回到开始时,默认false
animation.setStartOffset(2000);//动画开始前的延迟
animation.setInterpolator(new LinearInterpolator())  设置加速器
animation.setRepeatCount(Animation.INFINITE);//设置重复次数,INFINITE(-1)时为无限
animation.setRepeatMode(Animation.REVERSE);//设置重复模式,RESTART :0% --> 100% ,0%-->100%; REVERSE: 0-->100%-->0%
animation.setAnimationListener(new Animation.AnimationListener({...}); //设置动画的监听器- 1
- 2
- 3
- 4
- 5
- 6
- 7
Anmation的监听器:
new Animation.AnimationListener() {
    @Override
    public void onAnimationStart(Animation animation) {
        //动画开始
    }

    @Override
    public void onAnimationEnd(Animation animation) {
        //动画结束
    }

    @Override
    public void onAnimationRepeat(Animation animation) {
        //动画重复
    }
}- 1
- 2
- 3
- 4
- 5
- 6
- 7
- 8
- 9
- 10
- 11
- 12
- 13
- 14
- 15
- 16
2、补间动画有四个子类:TranslateAnimation ,ScaleAnimAtion,RoateAnimation,AlphaAnimation。
效果分别如下图所示:
2.1、TranslateAnimation 平移动画
--fromXValue : 缩放前X坐标的值
--toXValue : 缩放后X的值
--fromYValue : 缩放前y的值
--toYValue : 缩放后y的值
--pivotXType : 缩放X轴的参照类型( ABSOLUTE : 绝对位置(像素为单位,默认);RELATIVE_TO_SELF :相对于自己 ;RELATIVE_TO_PARENT :相对于父控件)
--pivotYType:缩放Y轴的参照类型

TranslateAnimation translateAnimation = new TranslateAnimation(Animation.RELATIVE_TO_SELF, 0, Animation.RELATIVE_TO_SELF, 2f,
        Animation.RELATIVE_TO_SELF, 0f, Animation.RELATIVE_TO_SELF, 0f);
translateAnimation.setDuration(1000);
translateAnimation.setRepeatCount(Animation.INFINITE);//设置重复次数,INFINITE(-1)时为无限
translateAnimation.setRepeatMode(Animation.REVERSE);//设置重复模式,RESTART :0% --> 100% ,0%-->100%; REVERSE: 0-->100%-->0%
mTvTranslate.startAnimation(translateAnimation);
- 1
- 2
- 3
- 4
- 5
- 6
- 7
- 8
- 9
- 10
- 11
- 12
- 13
- 14
2.2、RoateAnimation 旋转动画
--fromDegress :开始角度
--toDegress :结束角度
--pivotXType: X轴的参照类型( ABSOLUTE : 绝对位置(像素为单位,默认);RELATIVE_TO_SELF :相对于自己 ;RELATIVE_TO_PARENT :相对于父控件)
--pivotXValue:旋转X轴中心点
--pivotYType: Y轴的参照类型( ABSOLUTE : 绝对位置(像素为单位,默认);RELATIVE_TO_SELF :相对于自己 ;RELATIVE_TO_PARENT :相对于父控件)
--pivotYValue:旋转X轴中心点

RotateAnimation rotateAnimation = new RotateAnimation(0, 360, Animation.RELATIVE_TO_SELF,
        0.5f, Animation.RELATIVE_TO_SELF, 0.5f);
rotateAnimation.setDuration(600);
rotateAnimation.setRepeatCount(Animation.INFINITE);
rotateAnimation.setRepeatMode(Animation.REVERSE);
rotateAnimation.setInterpolator(new LinearInterpolator());
mTvRoate.startAnimation(rotateAnimation)- 1
- 2
- 3
- 4
- 5
- 6
- 7
- 8
- 9
- 10
- 11
- 12
- 13
- 14
2.3 ScaleAnimAtion 缩放动画
.
fromX : 缩放前X坐标的值
toX : 缩放后X的值
fromY : 缩放前y的值
toY : 缩放后y的值
pivotXType : 缩放X轴的参照类型( ABSOLUTE : 绝对位置(像素为单位,默认);RELATIVE_TO_SELF :相对于自己 ;RELATIVE_TO_PARENT :相对于父控件)
pivotXValue: 缩放的X轴中心点
pivotYType:缩放Y轴的参照类型
pivotYValue:缩放的Y轴中心点

ScaleAnimation scaleAnimation = new ScaleAnimation(0.5f, 1.2f, 0.5f, 1.2f,
        Animation.RELATIVE_TO_SELF, 0.5f, Animation.RELATIVE_TO_SELF, 0.5f);
scaleAnimation.setDuration(1000);
scaleAnimation.setRepeatCount(Animation.INFINITE);
scaleAnimation.setRepeatMode(Animation.REVERSE);
mTvSacle.startAnimation(scaleAnimation);- 1
- 2
- 3
- 4
- 5
- 6
- 7
- 8
- 9
- 10
- 11
- 12
- 13
- 14
- 15
2.4 AlphaAnimAtion 透明度动画
fromAlpha: 开始透明度
toAlpha : 结束透明度

AlphaAnimation alphaAnimation = new AlphaAnimation(0.1f, 1f);
alphaAnimation.setDuration(1200);
alphaAnimation.setRepeatCount(Animation.INFINITE);
alphaAnimation.setRepeatMode(Animation.REVERSE);
mTvAlpha.startAnimation(alphaAnimation);- 1
- 2
- 3
- 4
- 5
- 6
- 7
- 8
2.5 加载xml文件的动画
加载在res –anim - filename.xml文件:
<set xmlns:android="http://schemas.android.com/apk/res/android">
    <translate
        android:duration="2000"
        android:fromXDelta="0%"
        android:fromYDelta="0%"
        android:repeatCount="-1"
        android:repeatMode="reverse"
        android:toXDelta="200%"
        android:toYDelta="0"/>

    <rotate
        android:duration="2000"
        android:fromDegrees="0"
        android:pivotX="50%"
        android:pivotY="50%"
        android:repeatCount="-1"
        android:repeatMode="reverse"
        android:toDegrees="360"/>

    <scale
        android:duration="2000"
        android:fromXScale="50%"
        android:fromYScale="50%"
        android:pivotX="50%"
        android:pivotY="50%"
        android:repeatCount="-1"
        android:repeatMode="reverse"
        android:toXScale="120%"
        android:toYScale="120%"/>

    <alpha
        android:duration="2000"
        android:fromAlpha="1"
        android:repeatCount="-1"
        android:repeatMode="reverse"
        android:toAlpha="0.1"/>

</set>- 1
- 2
- 3
- 4
- 5
- 6
- 7
- 8
- 9
- 10
- 11
- 12
- 13
- 14
- 15
- 16
- 17
- 18
- 19
- 20
- 21
- 22
- 23
- 24
- 25
- 26
- 27
- 28
- 29
- 30
- 31
- 32
- 33
- 34
- 35
- 36
- 37
- 38
代码如下:
Animation animation = AnimationUtils.loadAnimation(this, R.anim.anim);
mTvGroup.startAnimation(animation);
- 1
- 2
- 3
三、帧动画
1、在res – drawable – filename.xml中把一系列图片写入到一个list中
<?xml version="1.0" encoding="utf-8"?>

<animation-list xmlns:android="http://schemas.android.com/apk/res/android">

    <item android:duration="300">
        <shape>
            <solid android:color="@android:color/holo_red_light"/>
        </shape>
    </item>

    <item android:duration="300">
        <shape>
            <solid android:color="@android:color/holo_green_light"/>
        </shape>
    </item>

    <item android:duration="300">
        <shape>
            <solid android:color="@android:color/holo_blue_light"/>
        </shape>
    </item>

</animation-list>- 1
- 2
- 3
- 4
- 5
- 6
- 7
- 8
- 9
- 10
- 11
- 12
- 13
- 14
- 15
- 16
- 17
- 18
- 19
- 20
- 21
- 22
- 23
2、加载:
mTvFrame.setBackgroundResource(R.drawable.animation_frame);
AnimationDrawable animationDrawable = (AnimationDrawable) mTvFrame.getBackground();
animationDrawable.start();- 1
- 2
- 3
3、注意:帧动画比较容易发生OOM,所以使用时避免使用尺寸较大或者大内存图片。
四、View动画的特殊使用场景
4.1 LayoutAnimation
LayoutAnimation 作用于ViewGroup,为ViewGroup指定一个动画,那么他的子View出场都会有这种效果。这种效果一般用于ListView或者RecyclerView上,每个item都具有这个出场动画。

4.1.1使用:
1、先创建子View动画 res –anim –filename.xml:
<?xml version="1.0" encoding="utf-8"?>
<set xmlns:android="http://schemas.android.com/apk/res/android"
     android:duration="500">
    <alpha
        android:fromAlpha="0.1"
        android:toAlpha="1"/>

    <translate
        android:fromXDelta="200%"
        android:toXDelta="0"/>
</set>- 1
- 2
- 3
- 4
- 5
- 6
- 7
- 8
- 9
- 10
- 11
4.1.2、创建LayoutAnimation的xml动画文件 res–>anim–> anim_layout.xml:
<layoutAnimation xmlns:android="http://schemas.android.com/apk/res/android"
                 android:animation="@anim/anim_normal"
                 android:animationOrder="normal"
                 android:delay="0.5">  <!--delay的作用是:假如anim_normal的执行效果是300ms,那么0.5表示每个元素需要延迟150ms执行入场-->
</layoutAnimation>- 1
- 2
- 3
- 4
- 5
4.1.3、在需要的ViewGroup中添加 android:layoutAnimation=”@anim/anim_normal”
<LinearLayout xmlns:android="http://schemas.android.com/apk/res/android"
              android:layout_width="match_parent"
              android:id="@+id/ll_root"
              android:layoutAnimation="@anim/anim_normal"
              android:layout_height="match_parent"
              android:orientation="vertical">


<TextView
    android:layout_width="match_parent"
    android:layout_height="60dp"
    android:background="@android:color/holo_red_light"
    android:gravity="center"
    android:text="子View1"
    android:textColor="@android:color/white"
    android:textSize="22sp"/>

</LinearLayout>- 1
- 2
- 3
- 4
- 5
- 6
- 7
- 8
- 9
- 10
- 11
- 12
- 13
- 14
- 15
- 16
- 17
- 18
4.1.4、当然,也可以通过代码来设置:
Animation animation = AnimationUtils.loadAnimation(getContext(), R.anim.anim_normal);
LayoutAnimationController controller = new LayoutAnimationController(animation);
controller.setOrder(LayoutAnimationController.ORDER_RANDOM);
controller.setDelay(0.5f);
mLlRoot.setLayoutAnimation(controller);- 1
- 2
- 3
- 4
- 5
setOrder: 设置子View动画的顺序,有三种:
normal : 顺序显示 ,排在前面的子View先开始播放入场动画;
reverse:逆向显示,排在后面的子View先开始播放入场动画
random:随机播放入场动画
setDelay:表示ziView动画的时间延迟,比如子元素入场动画的时间周期为300ms,那么0.5表示每个子元素都需要延迟150ms才能播放入场动画。第一个元素延迟150,那么第二个元素就延迟300.以此类推。
4.2 Activity的切换效果
Activity有默认的切换效果,但是这个效果我们也可以自定义,主要用到overridePendingTransition(int enterAnim,int exitAnim),但是这个方法必须在startActivity()或者finish()方法后调用才生效。
enterAnim : Activity被打开时,所需的动画资源id
existAnim: Activity被暂停时,所需的动画资源id。
当启动一个Activity时,可通过以下方式添加切换效果:
Intent intent = new Intent(this,TestActivity.class);
this.startActivity(intent);
overridePendingTransition(R.anim.anim_activity_enter, R.anim.anim_activity_exist);

//当Activity退出时,也可以为其指定自己的切换效果:
@Override
public void finish() {
    super.finish();
    overridePendingTransition(R.anim.anim_activity_enter, R.anim.anim_activity_exist);
}- 1
- 2
- 3
- 4
- 5
- 6
- 7
- 8
- 9
- 10
五、属性动画
属性动画是Android3.0加入的特性。那它和View动画有什么不同呢?
- View动画只能对View进行操作,而属性动画可以对任何对象做动画。
- 属性动画的效果也做了扩展,不在局限于View动画的平移,旋转等那四种效果。
- View动画只是改变了View的显示效果,而不会去改变它的属性,比如移动后的点击事件的触发。而属性动画是通过改变View的属性去实现动画效果的,所以也肯定能在移动后的位置接收到点击事件。
属性动画有 ValueAnimator ,ObjectAnimator, AnimatorSet.等概念。
5.1 ValueAnimator
5.1.1
先看看下面这个效果:
再来看看它的实现,他可不是for循环加sleep哦,它就是利用ValueAnimation实现的。
ValueAnimator mValueAnimator = ValueAnimator.ofInt(0, 10, -10); //它会由0逐渐变化到10,在逐渐变化到-10
mValueAnimator.setDuration(5000);  //设置这一个过程的时长
mValueAnimator.start();  //开始
//添加变化的回调,每次变化的值都可以通过回调的animation的getAnimatedValue()拿到
mValueAnimator.addUpdateListener(new ValueAnimator.AnimatorUpdateListener() {
    @Override
    public void onAnimationUpdate(ValueAnimator animation) {
        Log.d("====", animation.getAnimatedValue() + "");
        mTvValue.setText(String.valueOf(animation.getAnimatedValue()));
    }
});- 1
- 2
- 3
- 4
- 5
- 6
- 7
- 8
- 9
- 10
- 11
当然在适当时候要记得 销毁监听器,避免不必要错误。比如上面的回调setText,假如是在Fragement中,切换之后,mTvValue已销毁,回调时还setText就会报空指针错误,所以要在onDestoryView中remove所有listener:
@Override
public void onDestroyView() {
    super.onDestroyView();
    mValueAnimator.removeAllUpdateListeners();//移除所有的动画监听
}- 1
- 2
- 3
- 4
- 5
5.2.2 ValueAnimation经常用在我们的自定义View中。下面我们再来看看一下的栗子,一个雷达扫描的控件:
其实利用ValueAnimation非常简单 ,就是利用ValueAnination把0–360的值回调给保存到角度变量,然后让Canvas旋转改角度,在画圆:
/**
 * author: ZK.
 * date:   On 2018/1/19.
 */
public class ValueAnimationView extends View {

    private @ColorInt
    int shaderStartColor = Color.parseColor("#0519FF00");
    private @ColorInt
    int shaderEndColor = Color.parseColor("#AA19FF00");
    private int mWidth;
    private int mHeight;

    private boolean hasStartAnim = false;
    private int mRoateAngle;
    private Paint mPaint;


    public ValueAnimationView(Context context, @Nullable AttributeSet attrs) {
        super(context, attrs);
        initPaint();
    }

    private void initPaint() {
        mPaint = new Paint();
        Shader shader = new SweepGradient(0, 0, shaderStartColor, shaderEndColor);
        mPaint.setShader(shader);
        mPaint.setAntiAlias(true);
    }

    @Override
    protected void onSizeChanged(int w, int h, int oldw, int oldh) {
        super.onSizeChanged(w, h, oldw, oldh);
        mWidth = w;
        mHeight = h;
    }


    @Override
    protected void onDraw(Canvas canvas) {
        super.onDraw(canvas);
        canvas.translate(mWidth / 2, mHeight / 2);
        if (!hasStartAnim) {
            startAnim();
            hasStartAnim = true;
        } else {
            drawCircle(canvas);
        }
    }

    public void drawCircle(Canvas canvas) {
        canvas.rotate(mRoateAngle);
        canvas.drawCircle(0, 0, Math.min(mWidth, mHeight) / 2, mPaint);

    }

    private void startAnim() {
        ValueAnimator valueAnimator = ValueAnimator.ofInt(0, 360);
        valueAnimator.setInterpolator(new LinearInterpolator());
        valueAnimator.setDuration(2000);
        valueAnimator.setRepeatMode(ValueAnimator.RESTART);
        valueAnimator.setRepeatCount(ValueAnimator.INFINITE);
        valueAnimator.addUpdateListener(new ValueAnimator.AnimatorUpdateListener() {
            @Override
            public void onAnimationUpdate(ValueAnimator animation) {
                mRoateAngle = (int) animation.getAnimatedValue();
                invalidate();
            }
        });
        valueAnimator.start();
    }

}- 1
- 2
- 3
- 4
- 5
- 6
- 7
- 8
- 9
- 10
- 11
- 12
- 13
- 14
- 15
- 16
- 17
- 18
- 19
- 20
- 21
- 22
- 23
- 24
- 25
- 26
- 27
- 28
- 29
- 30
- 31
- 32
- 33
- 34
- 35
- 36
- 37
- 38
- 39
- 40
- 41
- 42
- 43
- 44
- 45
- 46
- 47
- 48
- 49
- 50
- 51
- 52
- 53
- 54
- 55
- 56
- 57
- 58
- 59
- 60
- 61
- 62
- 63
- 64
- 65
- 66
- 67
- 68
- 69
- 70
- 71
- 72
- 73
5.2 ObjectAnimtor
ObjectAnimation是对对象的属性做变化,从而产生动画的过程。它继承与ValueAnimaton。
下面我们用ObjectAnimation去实现TweenAnimation的四种效果:
//平移动画
float currentTranslateY = mTvObject.getTranslationY();
ObjectAnimator translateAnimtor = ObjectAnimator.ofFloat(mTvObject, "translationY",currentTranslateY,500,currentTranslateY );
translateAnimtor.setDuration(5000);

//旋转动画
ObjectAnimator rotationAnimtor = ObjectAnimator.ofFloat(mTvObject, "rotation", 0f, 360f);
rotationAnimtor.setDuration(5000);

//缩放动画
ObjectAnimator scaleAnimtor = ObjectAnimator.ofFloat(mTvObject,"scaleX",0.5f,1.5f,1f);
scaleAnimtor.setDuration(5000);

//透明度动画 ,在5秒内先让透明度从1变到0再变到1
ObjectAnimator alphaAnimtor = ObjectAnimator.ofFloat(mTvObject, "alpha", 1f, 0f, 1f);
alphaAnimtor.setDuration(5000);

translateAnimtor.start();
rotationAnimtor.start();
scaleAnimtor.start();
alphaAnimtor.start();- 1
- 2
- 3
- 4
- 5
- 6
- 7
- 8
- 9
- 10
- 11
- 12
- 13
- 14
- 15
- 16
- 17
- 18
- 19
- 20
- 21
然而,难道ObjectAnimator仅仅局限于此?那当然不是。
下面我们利用ObjectAnimator来 改变自定义的属性来实现上面的雷达效果:

/**
 * author: ZK.
 * date:   On 2018/1/19.
 */
public class ObjectAnimationView extends View {


    private @ColorInt
    int shaderStartColor = Color.parseColor("#0519FF00");
    private @ColorInt
    int shaderEndColor = Color.parseColor("#AA19FF00");
    private int mWidth;
    private int mHeight;

    private boolean hasStartAnim = false;
    private int mRoateAngle;
    private Paint mPaint;

    public ObjectAnimationView(Context context, @Nullable AttributeSet attrs) {
        super(context, attrs);
        initPaint();
    }


    private void initPaint() {
        mPaint = new Paint();
        Shader shader = new SweepGradient(0, 0, shaderStartColor, shaderEndColor);
        mPaint.setShader(shader);
        mPaint.setAntiAlias(true);
    }

    @Override
    protected void onSizeChanged(int w, int h, int oldw, int oldh) {
        super.onSizeChanged(w, h, oldw, oldh);
        mWidth = w;
        mHeight = h;
    }


    @Override
    protected void onDraw(Canvas canvas) {
        super.onDraw(canvas);
        canvas.translate(mWidth / 2, mHeight / 2);
        if (!hasStartAnim) {
            startAnim();
            hasStartAnim = true;
        } else {
            drawCircle(canvas);
        }
    }

    private void startAnim() {
        // "roateAngle" 一定要有 get,set方法。它变化的值会通过set方法回传
        ObjectAnimator objectAnimator = ObjectAnimator.ofInt(this, "roateAngle", 0, 360);
        objectAnimator.setDuration(2000);
        objectAnimator.setInterpolator(new LinearInterpolator());
        objectAnimator.setDuration(2000);
        objectAnimator.setRepeatMode(ValueAnimator.RESTART);
        objectAnimator.setRepeatCount(ValueAnimator.INFINITE);
        objectAnimator.start();

    }

    //自定义属性getter方法
    public int getRoateAngle() {
        return mRoateAngle;
    }

    //自定义属性的setter方法
    public void setRoateAngle(int roateAngle) {
        mRoateAngle = roateAngle;
        invalidate();
    }

    public void drawCircle(Canvas canvas) {
        canvas.rotate(mRoateAngle);
        canvas.drawCircle(0, 0, Math.min(mWidth, mHeight) / 2, mPaint);

    }
}- 1
- 2
- 3
- 4
- 5
- 6
- 7
- 8
- 9
- 10
- 11
- 12
- 13
- 14
- 15
- 16
- 17
- 18
- 19
- 20
- 21
- 22
- 23
- 24
- 25
- 26
- 27
- 28
- 29
- 30
- 31
- 32
- 33
- 34
- 35
- 36
- 37
- 38
- 39
- 40
- 41
- 42
- 43
- 44
- 45
- 46
- 47
- 48
- 49
- 50
- 51
- 52
- 53
- 54
- 55
- 56
- 57
- 58
- 59
- 60
- 61
- 62
- 63
- 64
- 65
- 66
- 67
- 68
- 69
- 70
- 71
- 72
- 73
- 74
- 75
- 76
- 77
- 78
- 79
- 80
- 81
5.3 AnimatorSet 组合动画
AnimatorSet内部使用了建造者模式。这个类通过play()方法并传入一个Animator对象将会返回一个Builder。这个Builder内部提供了以下四种方法:
- after(Animator anim) : 将现有动画插入到传入的动画之后;
- after(long delay) : 将现有动画延迟 指定毫秒执行;
- before(Animator anim) : 将现有动画插入到传入动画之前;
- with(Animator anim) : 将现有动画和传入的动画同时执行。
代码实现:
//平移动画,
float currentTranslateY = mTvAnimatorSet.getTranslationY();
ObjectAnimator translateAnimtor = ObjectAnimator.ofFloat(mTvAnimatorSet, "translationY", currentTranslateY, 500, currentTranslateY);

//旋转动画
ObjectAnimator rotationAnimtor = ObjectAnimator.ofFloat(mTvAnimatorSet, "rotation", 0f, 360f);

//缩放动画
ObjectAnimator scaleAnimtor = ObjectAnimator.ofFloat(mTvAnimatorSet, "scaleX", 0.5f, 1.5f, 1f);

//透明度动画 ,在5秒内先让透明度从1变到0再变到1
ObjectAnimator alphaAnimtor = ObjectAnimator.ofFloat(mTvAnimatorSet, "alpha", 1f, 0f, 1f);

AnimatorSet animatorSet = new AnimatorSet();
animatorSet.play(translateAnimtor).with(rotationAnimtor).with(scaleAnimtor).before(alphaAnimtor);
animatorSet.setDuration(3000);
animatorSet.start();
- 1
- 2
- 3
- 4
- 5
- 6
- 7
- 8
- 9
- 10
- 11
- 12
- 13
- 14
- 15
- 16
- 17
- 18
当然也可以用xml书写:首先在res文件夹下新建animtor文件夹,然后就可以在里面新建组合动画的xml文件。
res —> animtor –> anim_set.xml:
<?xml version="1.0" encoding="utf-8"?>
<set xmlns:android="http://schemas.android.com/apk/res/android"
     android:ordering="sequentially">

    <set
        android:ordering="together">

        <set android:ordering="sequentially">

            <objectAnimator
                android:duration="1500"
                android:propertyName="translationY"
                android:valueFrom="0"
                android:valueTo="500"
                android:valueType="floatType">
            </objectAnimator>


            <objectAnimator
                android:duration="1500"
                android:propertyName="translationY"
                android:valueFrom="500"
                android:valueTo="0"
                android:valueType="floatType">
            </objectAnimator>

        </set>


        <objectAnimator
            android:duration="3000"
            android:propertyName="rotation"
            android:valueFrom="0"
            android:valueTo="360"
            android:valueType="floatType">
        </objectAnimator>


        <set android:ordering="sequentially">

            <objectAnimator
                android:duration="1500"
                android:propertyName="scaleX"
                android:valueFrom="0.5"
                android:valueTo="1.5"
                android:valueType="floatType">
            </objectAnimator>

            <objectAnimator
                android:duration="1500"
                android:propertyName="scaleX"
                android:valueFrom="1.5"
                android:valueTo="1"
                android:valueType="floatType">
            </objectAnimator>

        </set>
    </set>

    <set
        android:ordering="sequentially">

        <objectAnimator
            android:duration="1500"
            android:propertyName="alpha"
            android:valueFrom="1"
            android:valueTo="0"
            android:valueType="floatType">
        </objectAnimator>

        <objectAnimator
            android:duration="1500"
            android:propertyName="alpha"
            android:valueFrom="0"
            android:valueTo="1"
            android:valueType="floatType">
        </objectAnimator>


    </set>

</set>- 1
- 2
- 3
- 4
- 5
- 6
- 7
- 8
- 9
- 10
- 11
- 12
- 13
- 14
- 15
- 16
- 17
- 18
- 19
- 20
- 21
- 22
- 23
- 24
- 25
- 26
- 27
- 28
- 29
- 30
- 31
- 32
- 33
- 34
- 35
- 36
- 37
- 38
- 39
- 40
- 41
- 42
- 43
- 44
- 45
- 46
- 47
- 48
- 49
- 50
- 51
- 52
- 53
- 54
- 55
- 56
- 57
- 58
- 59
- 60
- 61
- 62
- 63
- 64
- 65
- 66
- 67
- 68
- 69
- 70
- 71
- 72
- 73
- 74
- 75
- 76
- 77
- 78
- 79
- 80
- 81
- 82
然后java代码:
Animator animator = AnimatorInflater.loadAnimator(getContext(), R.animator.anim_set);
animator.setTarget(mTvAnimatorSet);
animator.start(); - 1
- 2
- 3
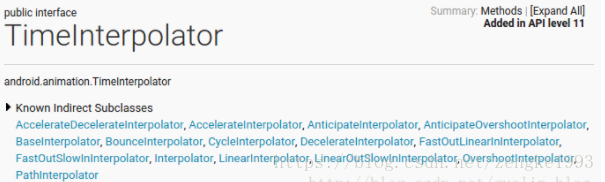
六、Inrerpolator 插值器 和 TypeEvaluator 估值器
Inrerpolator 这个的作用是控制动画变化的加速度,注意是加速度,比如你想你的动画执行速度是匀速还是加速就可以通过它来实现。
Android自带的Interpolator就包含 LinearInterpolator(匀速),AccelerateInterpolator(加速)等。
属性动画中新增了TimeInterpolator,并且新增了很多效果,如下图所示。
我们看下TimeInterpolator的源码:
public interface TimeInterpolator {

    /**
     * Maps a value representing the elapsed fraction of an animation to a value that represents
     * the interpolated fraction. This interpolated value is then multiplied by the change in
     * value of an animation to derive the animated value at the current elapsed animation time.
     *
     * @param input A value between 0 and 1.0 indicating our current point
     *        in the animation where 0 represents the start and 1.0 represents
     *        the end
     * @return The interpolation value. This value can be more than 1.0 for
     *         interpolators which overshoot their targets, or less than 0 for
     *         interpolators that undershoot their targets.
     */
    float getInterpolation(float input);
}- 1
- 2
- 3
- 4
- 5
- 6
- 7
- 8
- 9
- 10
- 11
- 12
- 13
- 14
- 15
- 16
这是一个接口,里面也很简单,只有一个getInterpolation(float input)方法,这个方法接收一个input的参数,这个参数的值会随着动画的变化而不停变化,但是它的变化是有规律的,就是根据设定的动画时长匀速增加,变化范围是0-1。也就是说当动画一开始的时候input的值是0,到动画结束的时候input的值是1,而中间的值则是随着动画运行的时长在0-1之间变化的。
TypeEvaluator 的作用是根据当前属性改变的百分比来计算改变的属性值,系统预置的由IntEvaluator(针对整型属性),FloatEvaluator(针对浮点型属性),ArgbEvaluator(针对Color属性)。
如下图所示(来自Android官方文档),表示的是一个匀速动画,采用了线性插值器和整型估值器,在40ms内,View的x属性从0变到40。 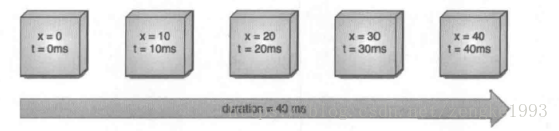
由于动画的默认刷新频率是10ms/帧,所以该动画将分为5帧进行。我们来考虑第三帧(x=20,t=20ms),当时间 t=20ms的时候,时间流逝的百分比是0.5(20/40 = 0.5),那x应该改变多少呢?这个就由插值器和估值算法来确定。拿线性插值器来说,时间过了一半,x的变换也应该是一半,即x的改变也是50%。因为它是线性插值器,是实现匀速动画的,看下源码:
public class LinearInterpolator extends BaseInterpolator implements NativeInterpolatorFactory {

    public LinearInterpolator() {
    }

    public LinearInterpolator(Context context, AttributeSet attrs) {
    }

    public float getInterpolation(float input) {
        return input;
    }
}- 1
- 2
- 3
- 4
- 5
- 6
- 7
- 8
- 9
- 10
- 11
- 12
显然,线性插值器的返回值和输入值是一样的,因此插值器返回的值是0.5,这意味着x的改变是0.5,这个线性插值器的工作就完成了。具体x变成了什么值,这个需要估值算法来确定,我们再来看看整型估值算法的源码:
public class IntEvaluator implements TypeEvaluator<Integer> {

    /**
     * This function returns the result of linearly interpolating the start and end values, with
     * <code>fraction</code> representing the proportion between the start and end values. The
     * calculation is a simple parametric calculation: <code>result = x0 + t * (v1 - v0)</code>,
     * where <code>x0</code> is <code>startValue</code>, <code>x1</code> is <code>endValue</code>,
     * and <code>t</code> is <code>fraction</code>.
     *
     * @param fraction   The fraction from the starting to the ending values
     * @param startValue The start value; should be of type <code>int</code> or
     *                   <code>Integer</code>
     * @param endValue   The end value; should be of type <code>int</code> or <code>Integer</code>
     * @return A linear interpolation between the start and end values, given the
     *         <code>fraction</code> parameter.
     */
    public Integer evaluate(float fraction, Integer startValue, Integer endValue) {
        int startInt = startValue;
        return (int)(startInt + fraction * (endValue - startInt));
    }
}
- 1
- 2
- 3
- 4
- 5
- 6
- 7
- 8
- 9
- 10
- 11
- 12
- 13
- 14
- 15
- 16
- 17
- 18
- 19
- 20
- 21
- 22
上面evaluate方法的三个参数分别是估值小数,也就是插值器传过来的值,后面两个对应是开始值和结束值。对应我们的例子分别是0.5、0、40.整型估值返回给我们的结果是20.这就是 t=20ms,x=20的由来。.
再看一下AccelerateDecelerateInterpolator加速插值器
@HasNativeInterpolator
public class AccelerateDecelerateInterpolator implements Interpolator, NativeInterpolatorFactory {
    public AccelerateDecelerateInterpolator() {
    }

    @SuppressWarnings({"UnusedDeclaration"})
    public AccelerateDecelerateInterpolator(Context context, AttributeSet attrs) {
    }

    public float getInterpolation(float input) {
        return (float)(Math.cos((input + 1) * Math.PI) / 2.0f) + 0.5f;
    }
}- 1
- 2
- 3
- 4
- 5
- 6
- 7
- 8
- 9
- 10
- 11
- 12
- 13
它是把input的值经过运算在返回出去,从而实现加速的效果。
因此我们要做出千奇百怪的动画效果,我们只要派生一个类实现插值器和估值器的接口,实现它的方法就可以了。自定义插值器需要实现Interpolator,或者TimeInterpolator,自定义估值算法需要实现TypeEvaluator。
在此,Android的动画全部介绍完。