对于istio流量管理我们通过灰度发布将流量转移到不同的服务上面,你可以去任意的配置。比如10%流量到新版本,90%到旧版本,这些是都可以去配置的。
1、创建命名空间并开启自动注入
[root@master ~]# kubectl create ns  bookinfo
namespace/bookinfo created
[root@master ~]# kubectl label namespace bookinfo istio-injection=enabled
namespace/bookinfo labeled
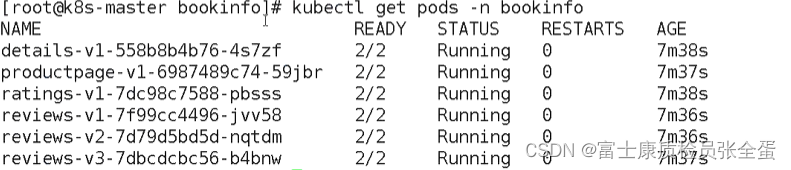
2、部署应用YAML
[root@master bookinfo]# kubectl apply -f platform/kube/bookinfo.yaml -n bookinfo
service/details created
serviceaccount/bookinfo-details created
deployment.apps/details-v1 created
service/ratings created
serviceaccount/bookinfo-ratings created
deployment.apps/ratings-v1 created
service/reviews created
serviceaccount/bookinfo-reviews created
deployment.apps/reviews-v1 created
deployment.apps/reviews-v2 created
deployment.apps/reviews-v3 created
service/productpage created
serviceaccount/bookinfo-productpage created
deployment.apps/productpage-v1 created

[root@master bookinfo]# pwd
/root/istio-1.8.2/samples/bookinfo
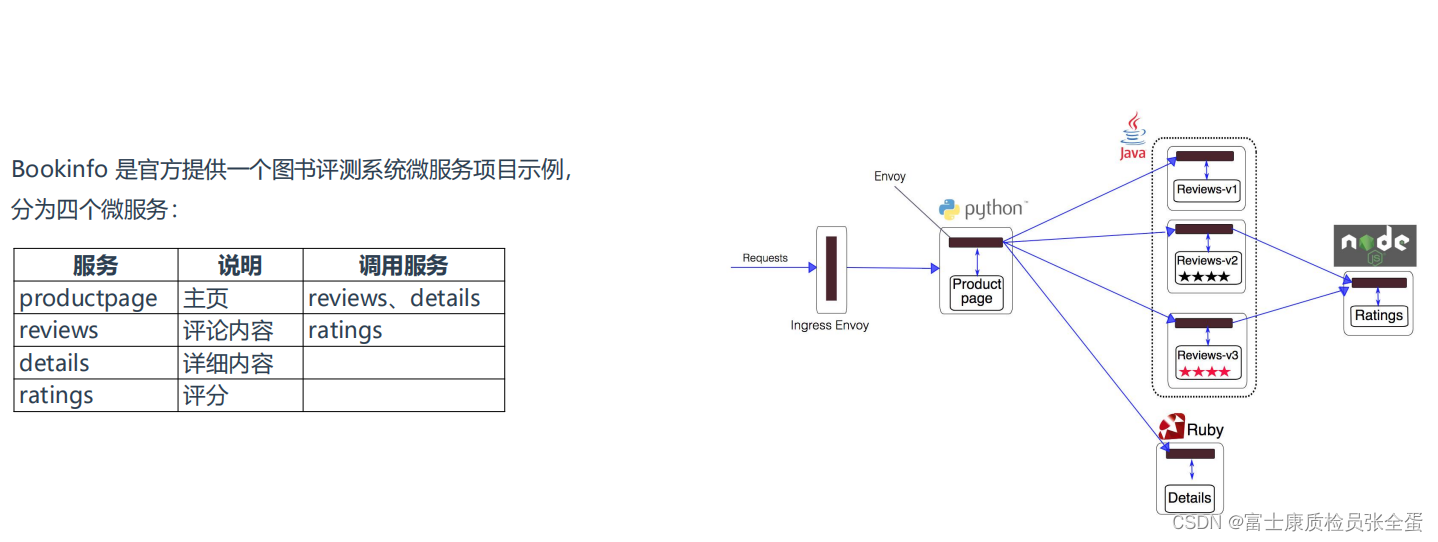
reviews 微服务部署 3 个版本,用于测试灰度发布效果:
•
v1 版本不会调用 ratings 服务
•
v2 版本会调用 ratings 服务,并使用 5个黑色五角星来显示评分信息(版本升级,流量过去一部分)
•
v3 版本会调用 ratings 服务,并使用5个红色五角星 来显示评分信息
3、创建Ingress网关(在ingress gateway创建入口,然后配置虚拟服务路由到具体服务)
[root@master bookinfo]# kubectl apply -f networking/bookinfo-gateway.yaml -n bookinfo
gateway.networking.istio.io/bookinfo-gateway created
virtualservice.networking.istio.io/bookinfo created

[root@master bookinfo]# kubectl get gateway -n bookinfo
NAME               AGE
bookinfo-gateway   5s

[root@master bookinfo]# kubectl describe gateway bookinfo-gateway  -n  bookinfo
  Selector:
    Istio:  ingressgateway
  Servers:
    Hosts:
      *
    Port:
      Name:      http
      Number:    80
      Protocol:  HTTP
Events:          <none>
[root@master ~]# kubectl get virtualservice -n bookinfo
NAME GATEWAYS HOSTS AGE
bookinfo [bookinfo-gateway] [*] 11h
[root@master ~]# kubectl describe virtualservice -n bookinfo
Spec:
Gateways:
bookinfo-gateway
Hosts:
*
Http:
Match:
Uri:
Exact: /productpage
Uri:
Prefix: /static
Uri:
Exact: /login
Uri:
Exact: /logout
Uri:
Prefix: /api/v1/products
Route:
Destination:
Host: productpage
Port:
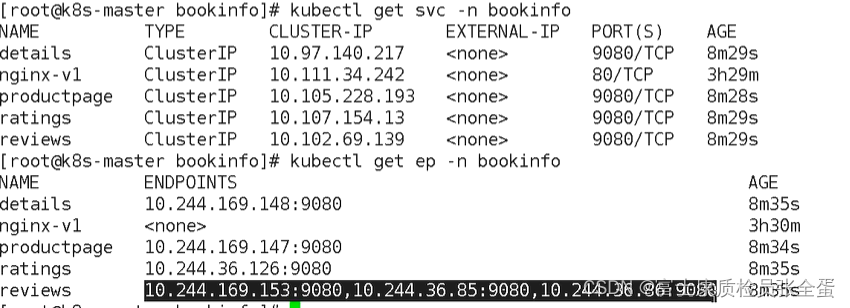
[root@master ~]# kubectl get svc -n bookinfo
NAME TYPE CLUSTER-IP EXTERNAL-IP PORT(S) AGE
details ClusterIP 10.233.55.211 <none> 9080/TCP 11h
productpage ClusterIP 10.233.32.73 <none> 9080/TCP 11h
ratings ClusterIP 10.233.9.73 <none> 9080/TCP 11h
reviews ClusterIP 10.233.29.140 <none> 9080/TCP 11h
4、确认网关和访问地址,访问应用页面
kubectl get pods -n istio-system 访问地址:http://192.168.31.62:31928/productpage
v1版本不带星

v2版本黑色星

v3版本
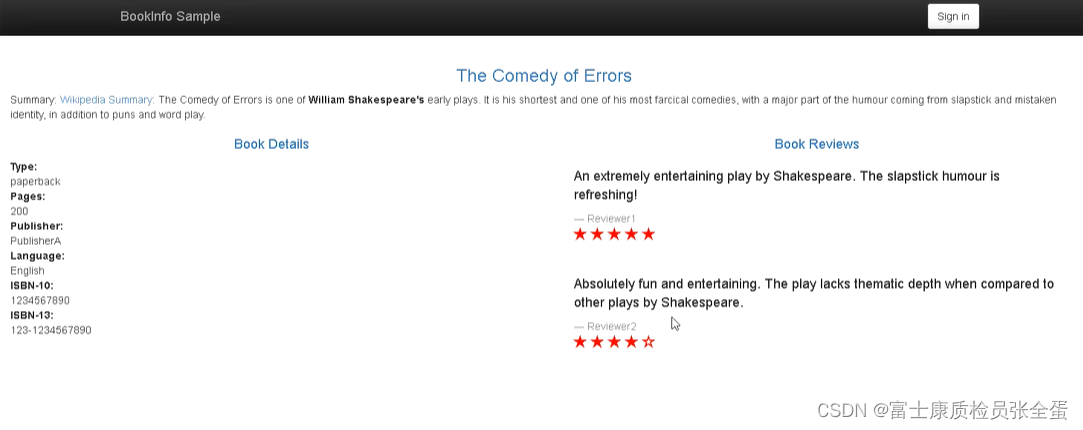
现在三个版本都提供服务。
灰度发布:基于权重的路由
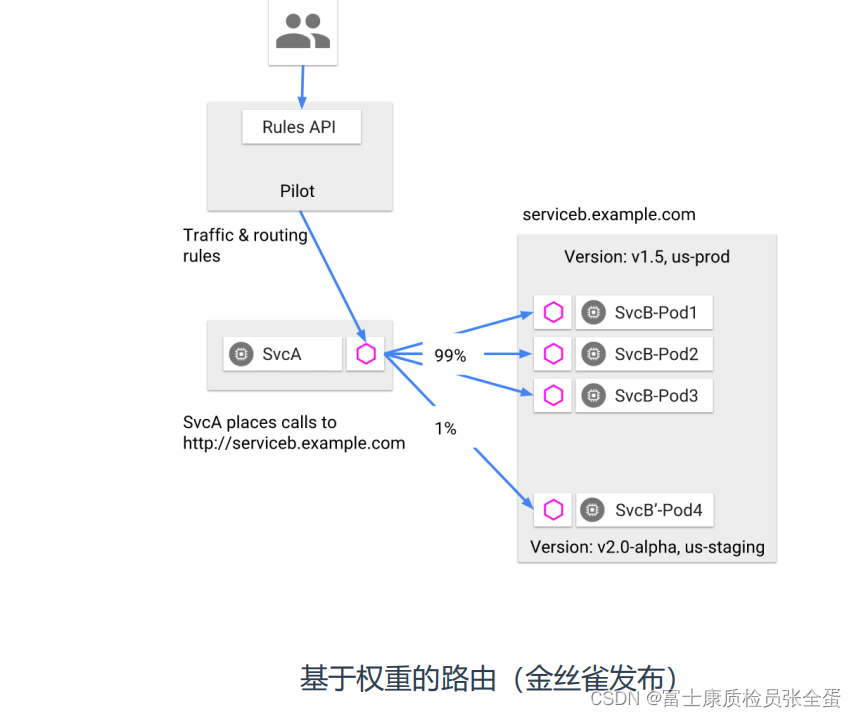
v1版本升级到v2版本,准备给其10%的流量,没有问题在扩大百分比。
上面部署之后流量都是均匀分配的。
任务:
1. 流量全部发送到reviews v1版本(不带五角星)
2. 将90%的流量发送到reviews v1版本,另外10%的流量发送到reviews v2版本(
5个黑色五角星), 最后完全切换到v2版本
3. 将50%的流量发送到v2版本,另外50%的流量发送到v3版本(
5个红色五角星)
kubectl apply -f networking/virtual-service-all-v1.yaml -n bookinfo
[root@master networking]# cat virtual-service-all-v1.yaml
apiVersion: networking.istio.io/v1alpha3
kind: VirtualService
metadata:
  name: productpage
spec:
  hosts:
  - productpage
  http:
  - route:
    - destination:
        host: productpage
        subset: v1
---
apiVersion: networking.istio.io/v1alpha3
kind: VirtualService
metadata:
  name: reviews
spec:
  hosts:
  - reviews
  http:
  - route:
    - destination:
        host: reviews
        subset: v1
---
apiVersion: networking.istio.io/v1alpha3
kind: VirtualService
metadata:
  name: ratings
spec:
  hosts:
  - ratings
  http:
  - route:
    - destination:
        host: ratings
        subset: v1
---
apiVersion: networking.istio.io/v1alpha3
kind: VirtualService
metadata:
  name: details
spec:
  hosts:
  - details
  http:
  - route:
    - destination:
        host: details
        subset: v1
---
只要在virtual里面看到的subset,它都会创建对应的
DestinationRule。
kubectl apply -f networking/destination-rule-all.yaml -n bookinfo
DestinationRule(目标规则):定义虚拟服务路由目标地址的真实地址,即子集(subset),支持多种负载均衡策略:
•
随机
•
权重
•
最小请求数
[root@master networking]# cat  destination-rule-all.yaml
apiVersion: networking.istio.io/v1alpha3
kind: DestinationRule
metadata:
  name: productpage
spec:
  host: productpage
  subsets:
  - name: v1
    labels:
      version: v1
---
apiVersion: networking.istio.io/v1alpha3
kind: DestinationRule
metadata:
  name: reviews
spec:
  host: reviews
  subsets:
  - name: v1
    labels:
      version: v1
  - name: v2
    labels:
      version: v2
  - name: v3
    labels:
      version: v3
kubectl apply -f virtual-service-reviews-80-20.yaml -n bookinfo
[root@master networking]# cat virtual-service-reviews-80-20.yaml
apiVersion: networking.istio.io/v1alpha3
kind: VirtualService
metadata:
  name: reviews
spec:
  hosts:
    - reviews
  http:
  - route:
    - destination:
        host: reviews
        subset: v1
      weight: 80
    - destination:
        host: reviews
        subset: v2
      weight: 20
kubectl apply -f networking/virtual-service-reviews-90-10.yaml -n bookinfo
[root@master networking]# cat virtual-service-reviews-90-10.yaml
apiVersion: networking.istio.io/v1alpha3
kind: VirtualService
metadata:
  name: reviews
spec:
  hosts:
    - reviews
  http:
  - route:
    - destination:
        host: reviews
        subset: v1
      weight: 90
    - destination:
        host: reviews
        subset: v2
      weight: 10
virtual-service-reviews-v3.yaml
[root@master networking]# cat  virtual-service-reviews-v3.yaml
apiVersion: networking.istio.io/v1alpha3
kind: VirtualService
metadata:
  name: reviews
spec:
  hosts:
    - reviews
  http:
  - route:
    - destination:
        host: reviews
        subset: v3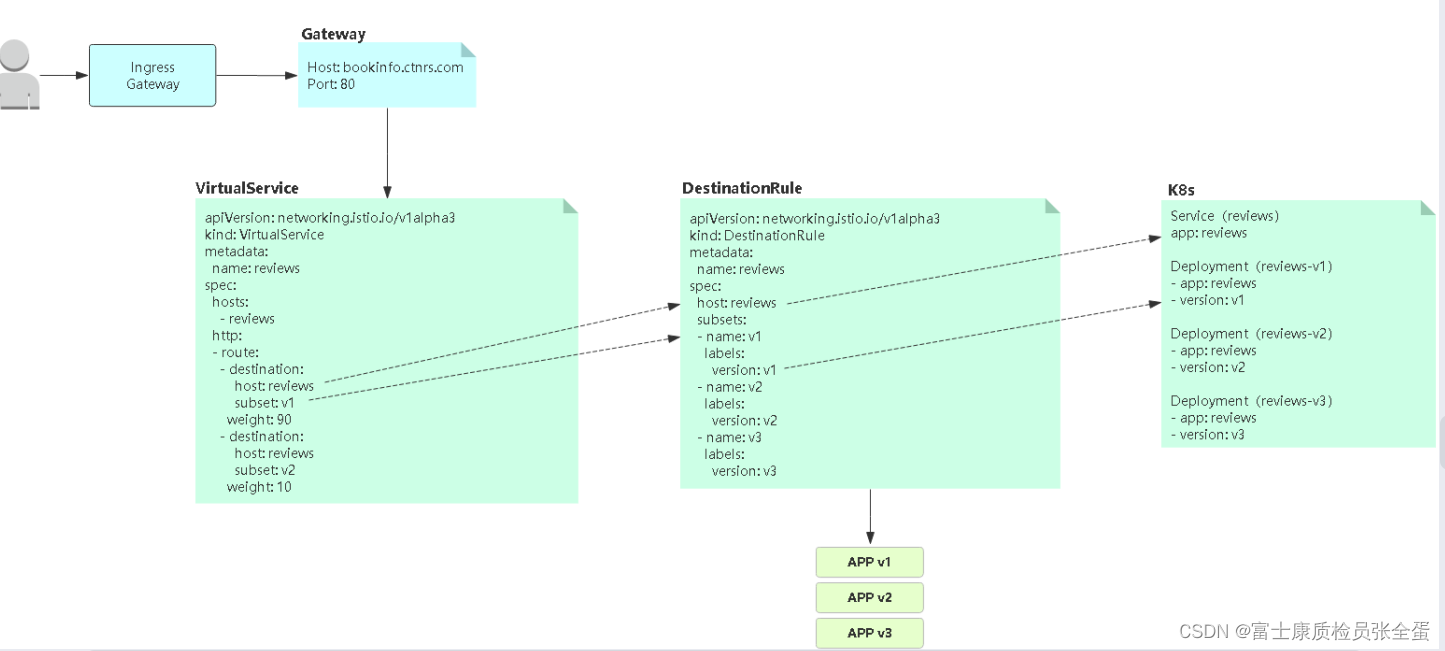
virtualservice:上面可以看到其实灰度发布一直调整的都是虚拟服务。根据权重转发到不同的子集上面,也就是destionationrule,subset hostname要匹配上。
destionationrule:主要将3个版本的reviews给匹配上,创建对应的子集subset,并且为其取名, 名字可以任意的去取名 v1 v2 v3 a b c,只要虚拟服务的subset和destionationrule 的subset对应上就行了,同时host也对应上。
在版本筛选上面它通过pod的标签去筛选,比如version。destionationrule就是通过版本号来创建subset子集。
- 将部署应用的deployment里面pod标签增加一个version: "v1",这也是istio实现灰度发布的重点,基于pod的标签,匹配到不同的版本,所以得对deployment部署的pod增加标签,标签可以自定义去设置,要规划好。
- 部署的deployment是要注入到istio里面
- 配置目标规则,destionationrule就可以根据服务版本去匹配了,去关联服务的版本。
- 创建虚拟服务,怎么分配流量,实现灰度发布。
灰度发布:基于请求内容的路由
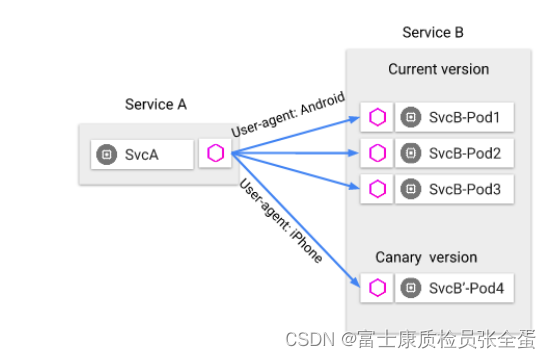
类似于a/b测试,针对某些用户去采样,而不是随机的找一部分。根据http携带的信息去完成流量的分配。
任务:
将特定用户的请求发送到reviews v2版本(5个黑色五角星),其他用户则不受影响(v3)
kubectl apply -f networking/virtual-service-reviews-jason-v2-v3.yaml -n bookinfo
[root@master networking]# cat virtual-service-reviews-jason-v2-v3.yaml
apiVersion: networking.istio.io/v1alpha3
kind: VirtualService
metadata:
  name: reviews
spec:
  hosts:
  - reviews
  http:
  - match:
    - headers:
        end-user:
          exact: jason
    route:
    - destination:
        host: reviews
        subset: v2


  - route:
    - destination:
        host: reviews
        subset: v3
这里有有层级关系,match下面包含了route,请求头里面包含了jason用户就转发到v2版本,下面route对应的是match,除了jason用户之外,其他的引流到v3版本。