文章目录
环境
unity : 2018.2.11f1, 2020.3.18f1
pipeline : BRP, URP
目的
备份,备忘
思路
一般次散射效果都是使用 光线追踪 来渲染的话,还原度会很高(也不是100精准,都是模拟,毕竟物质内的如何让光子偏移方向散射出来,这不是现代计算机,现代渲染架构能支撑得起的)
所以这个 假 次散射,相对 实时渲染效果的价值还是有的
具体思路:
- 导出模型的厚度图
- 将片段(像素)中的 观察位置方向 和 光源入射方向 做 dot
- 然后控制 dot 后的 pow, scale 来控制边缘,和 整体亮度
- 叠加到之前的颜色着色上即可
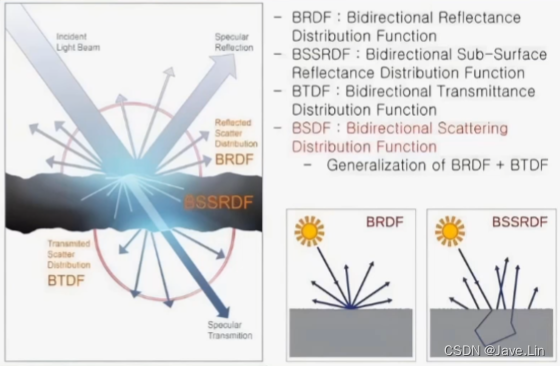
次表面散射原理
- 次表面散射:Subsurface Scattering,简写:SSS
- 次表面散射不是透明
- 次表面散射不是透射
- 次表面散射可以使用光线追踪实现
- 实时游戏中更多的是对次表面散射的“快速模拟”
SSS 包含:背光、扰动、扩散
背光
根据我们的 lambert 可以得到正面光照的 diffuse 效果 lambert = dot(L, N);,这是基于 表面(N)受正面光照的强度
那么要相对于我们的眼睛,透过物体的某个片段是,判断该片段是否在视角(V)、光源是背光的 back4L = dot(-L, V) 即可
背光强度扰动
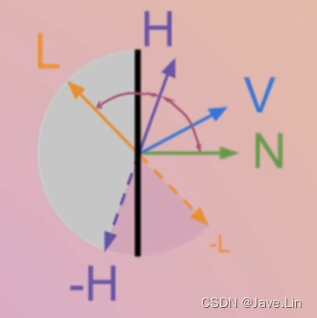
背光强度 = dot(V, -normalize(L+a * N) = dot(V, -H),其中 0<=a<=1 可以控制强度
如果为了性能考虑,可以省去:normalize,反正都是快速模拟,不用太精准
所以我们可以将公式修改为:背光强度 = dot(V, -(L+a * N) = dot(V, -H)
背光扩散
在扰动公式基础上调整为:背光强度 = saturate(dot(V, -(L + a * N))^p * s
现将 背光强度 clamp 到 [0~1] 之间,所以使用 saturate,然后再用 pow(x, p) 的 p 来控制边缘大小
因此:其中 0 < p 是控制扩展边缘大小,0 <= s <= +R 是控制背光整体强度值
Translucent shader 伪代码示例
#include "UnityCG.cginc"
#include "Lighting.cginc"
#include ....

...
uniform float _TIDistortion;
uniform float _TIPower;
uniform float _TIScale;
uniform float _TIIvAttenByDistance; // 1.0 / atten
...

fixed4 frag(...) : SV_Target
{


	// jave.lin : 原始光照颜色
	fixed4 albedo = tex2D(_MainTex, i.uv);
	fixed3 diffuse = lamert;
	fixed3 specular = blinn phong mode...;
	fixed3 ambient = ...;
	fixed4 finalColor;
	finalColor.rgb = lambert + blinn phong + ambient + ...;
	finalColor.a = 1;

	// jave.lin : Shadow map
	float shadowMapDepth = tex2D(_ShadowMap, i.shadowProjUV);
	float3 shadowMapDepth_positionShadowWS = ...;
	float3 shadowMapDepth_positionMainCamWS = ...;
	float distance_with_shadow = distance(i.positionWS.xyz - shadowMapDepth_positionMainCamWS);

	// jave.lin : 计算透光度
	float3 L = normalize(_WorldSpaceLightPos.xyz);
	float3 V = normalize(_WorldSpaceCameraPos.xyz - i.positionWS.xyz);
	float3 N = s.Normal;
	float3 TH = normalize(L + N * _TIDistortion);
	float translucentAtten = distance_with_shadow * _TIIvAttenByDistance;
	float translucentIntensity = pow(saturate(dot(V, -TH)), _TIPower) * _TIScale;
	translucentIntensity *= translucentAtten;

	// jave.lin : 叠加透光颜色
	finalColor.rgb += albedo.rgb * _LightColor.rgb * translucentIntensity;

	return finalColor;
}
添加采样厚度图 伪代码
在上面的代码基础上,添加一个图
#include "UnityCG.cginc"
#include "Lighting.cginc"
#include ....

...
uniform float _TIDistortion;
uniform float _TIPower;
uniform float _TIScale;
...

fixed4 frag(...) : SV_Target
{


	// jave.lin : 原始光照颜色
	fixed4 albedo = tex2D(_MainTex, i.uv);
	fixed3 diffuse = lamert;
	fixed3 specular = blinn phong mode...;
	fixed3 ambient = ...;
	fixed4 finalColor;
	finalColor.rgb = lambert + blinn phong + ambient + ...;
	finalColor.a = 1;

	// jave.lin : 厚度采样
	float thickness = tex2D(_TITicknessMap, i.uv).r; // 0~1 => TI弱~TI强

	// jave.lin : 计算透光度
	float3 L = normalize(_WorldSpaceLightPos.xyz);
	float3 V = normalize(_WorldSpaceCameraPos.xyz - i.positionWS.xyz);
	float3 N = s.Normal;
	float3 TH = normalize(L + N * _TIDistortion);
	float translucentIntensity = pow(saturate(dot(V, -TH)), _TIPower) * _TIScale;
	translucentIntensity *= thickness;

	// jave.lin : 叠加透光颜色
	finalColor.rgb += albedo.rgb * _LightColor.rgb * translucentIntensity;

	return finalColor;
}
考虑上 shadow map 距离的 伪代码
#include "UnityCG.cginc"
#include "Lighting.cginc"
#include ....

...
uniform float _TIDistortion;
uniform float _TIPower;
uniform float _TIScale;
uniform float _TIIvAttenByDistance; // 1.0 / atten
...

fixed4 frag(...) : SV_Target
{


	// jave.lin : 原始光照颜色
	fixed4 albedo = tex2D(_MainTex, i.uv);
	fixed3 diffuse = lamert;
	fixed3 specular = blinn phong mode...;
	fixed3 ambient = ...;
	fixed4 finalColor;
	finalColor.rgb = lambert + blinn phong + ambient + ...;
	finalColor.a = 1;

	// jave.lin : Shadow map
	float shadowMapDepth = tex2D(_ShadowMap, i.shadowProjUV);
	float3 shadowMapDepth_positionShadowWS = ...;
	float3 shadowMapDepth_positionMainCamWS = ...;
	float distance_with_shadow = distance(i.positionWS.xyz - shadowMapDepth_positionMainCamWS);

	// jave.lin : 厚度采样
	float thickness = tex2D(_TITicknessMap, i.uv).r; // 0~1 => TI弱~TI强

	// jave.lin : 计算透光度
	float3 L = normalize(_WorldSpaceLightPos.xyz);
	float3 V = normalize(_WorldSpaceCameraPos.xyz - i.positionWS.xyz);
	float3 N = s.Normal;
	float3 TH = normalize(L + N * _TIDistortion);
	float translucentAtten = distance_with_shadow * _TIIvAttenByDistance;
	float translucentIntensity = pow(saturate(dot(V, -TH)), _TIPower) * _TIScale;
	translucentIntensity *= translucentAtten * thickness;

	// jave.lin : 叠加透光颜色
	finalColor.rgb += albedo.rgb * _LightColor.rgb * translucentIntensity;

	return finalColor;
}
多光源下的 SSS
下面是以类似 URP 中的多光源遍历的方式 (BRP 中是区分 Pass 来绘制多光源的)
#include "UnityCG.cginc"
#include "Lighting.cginc"
#include ....

...
uniform float _TIDistortion;
uniform float _TIPower;
uniform float _TIScale;
uniform float _TIIvAttenByDistance; // 1.0 / atten
uniform float _TIAmbientScale;
...

fixed4 frag(...) : SV_Target
{


	fixed4 finalColor = 0;
	float3 V = normalize(_WorldSpaceCameraPos.xyz - i.positionWS.xyz);
	float3 N = normalize(i.normalWS);
	fixed3 ambient = ...;

	fixed4 albedo = tex2D(_MainTex, i.uv);
	// jave.lin : 厚度采样
	float thickness = tex2D(_TITicknessMap, i.uv).r; // 0~1 => TI弱~TI强

	for (int i = 0; i < _AvailidatedLightCount; ++i)
	{


		Light light = Lights[i];

		// jave.lin : 光源方向
		float3 L = light.dir;

		// jave.lin : 原始光照颜色
		fixed3 diffuse = lamert with N and L;
		fixed3 specular = blinn phong mode with V, N, L;
		finalColor.rgb = lambert + blinn phong + ...;

		// jave.lin : Shadow map - 这部分多光源的话,不同类型的 shadow map 是不同的
		// 点光源可能是:一个 cube map,或是 6 张 shadow map
		// spot, directional light 一张
		// 这里不光是
		float3 shadowSampleLocation = GetShadowMapSampleLocation(light);
		float shadowMapDepth = tex2D(GetShadowMap(light), i.shadowProjUV);
		float3 shadowMapDepth_positionShadowWS = ...;
		float3 shadowMapDepth_positionMainCamWS = ...;
		float distance_with_shadow = distance(i.positionWS.xyz - shadowMapDepth_positionMainCamWS);

		// jave.lin : 计算透光度
		float3 TH = normalize(L + N * _TIDistortion);
		float translucentAtten = distance_with_shadow * _TIIvAttenByDistance;
		float translucentIntensity = pow(saturate(dot(V, -TH)), _TIPower) * _TIScale;
		translucentIntensity *= translucentAtten * thickness;

		// jave.lin : 叠加透光颜色
		finalColor.rgb += albedo.rgb * light.color.rgb * translucentIntensity;
	}
	// jave.lin : 最后添加上 ambient 的计算
	finalColor.rgb += albedo.rgb * ambient * (_TIAmbientScale * thickness);

	finalColor.a = 1;

	return finalColor;
}
BRP 多光源效果
我们将 厚度值 放到 MRAT 贴图中的 a 通道
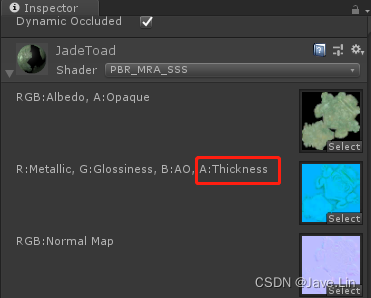
厚度值的显示
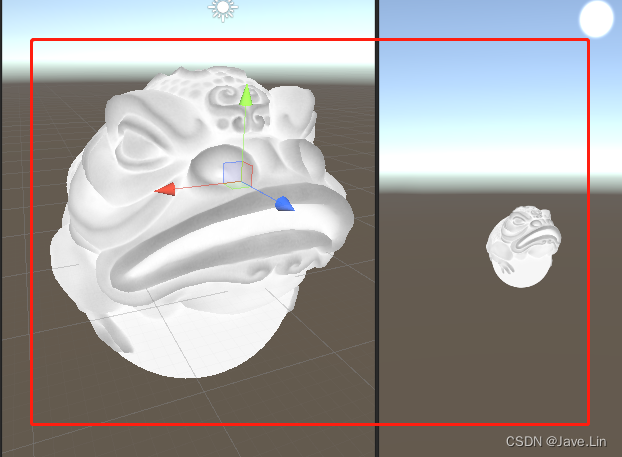
下面是 BRP 中的效果
URP 多光源效果
(后续补充)
(后续找个 皮肤的 素材来看效果)
用途
可以用于一些 散射透光强 的材质:
- 玉石
- 皮肤
- 浓稠不透明的液体
- 橡胶
- 等等。。。
Project
- TestRecovery_MRA_PBR_SSS_BRP_Unity_2018_2_11f1 - BRP
- yyy - URP 后续补充