资源下载地址:https://download.csdn.net/download/sheziqiong/85772306
资源下载地址:https://download.csdn.net/download/sheziqiong/85772306
智能门禁
这是《智能硬件设计》这门课的自选作业,要求利用树莓派设计一个有一定简单功能的智能硬件原型。我选择用树莓派构造一个智能门禁,并绘制出 3D 格式的外壳,通过 3D 打印机打印出,封装好整个树莓派及相关零件。
该智能门禁通过与访客的语音交互可以让访客选择提供的各种功能,具体实现的操作主要有三:
1.访客选择开门,摄像头会自动拍摄一张照片,对比库中已训练好的人像库,如通过,则开门。
2.访客选择留言,麦克风将自动录制一段语音,将留言播放给访客确认,并选择是否重新录制。
3.(彩蛋)访客选择跟门对话,实现实时的语音或文字&图片交流。
查看完整操作可直接跳到最后


实现具体功能前的基本操作
训练访客人像图库
首先需要建立一个针对访客的人像库,以便后期门禁将拍摄到的访客图像与库中已有人像做对比以决定是否开门。
NOTE: 这里借用了微软的认知服务(自行申请),具体调用的 API 是 Face verification,实现对已有的图像数据进行人脸识别训练。
在树莓派上安装 人脸识别的库:
pip3 install cognitive_face
开始对一个人像的训练之前,需要拍摄若干张照片并存入 Security-Door-based-on-raspberry-pi/faceRecognition/img/person 目录下,拍照指令为(宽:640px,高:480px):
raspistill -w 640 -h 480 -o 1.jpg
raspistill -w 640 -h 480 -o 2.jpg
raspistill -w 640 -h 480 -o 3.jpg
具体的训练过程如下(对代码中 KEY 做了留白,请自行去官网申请)(Security-Door-based-on-raspberry-pi/faceRecognition/trainFace.py):
NOTE: 代码中留白的 personGroupId 请自行定义一个值,该值是一个只由数字、小写字母、“-”、“_”组成的不超过 64 个字符长的字符串。只有在训练的时候定义不同的值,才能保证如果有建立多个人的人像库的需求时可以共用一个 key。
import cognitive_face as CF
import os
import json

def GetFileListFromDir(dir):
    l = []
    for p, d, f in os.walk(dir):
        for fname in f:
            l.append(os.path.join(p,fname))
    return l

def CheckGroupIdExistStatus(groupId):
    for info in CF.person_group.lists():
        if info['personGroupId'] == groupId:
            return True
    return False

# set Key
KEY = ""
CF.Key.set(KEY)

# create group and person

personGroupId = ""
# Valid format should be a string composed
# by numbers, English letters in lower case,
# '-', '_', and no longer than 64 characters.

if not CheckGroupIdExistStatus(personGroupId):
    CF.person_group.create(personGroupId,"Description about your group")
user1 = CF.person.create(personGroupId,"Descrption about the person")


# add face
friendImageDir = "img/person"
for fname in GetFileListFromDir(friendImageDir):
    CF.person.add_face(fname, personGroupId, user1['personId'])

# train
CF.person_group.train(personGroupId)


trainingStatus = "running"
while(True):
    trainingStatus = CF.person_group.get_status(personGroupId)
    if trainingStatus['status'] != "running":
        print(trainingStatus)
        break
访客敲门到门禁对访客的需要求作出反应之前
访客首先需要唤醒门禁,让门禁开始工作。门禁则需要提醒用户说出自己需要的服务并进行识别。
具体的逻辑为:
访客触动门禁——门禁连接的姿态传感器接收到振动——播放 welcome.wav(Security-Door-based-on-raspberry-pi/welcome.wav),提醒用户有三种选择(Security-Door-based-on-raspberry-pi/choice.wav)——开始闪绿灯,提醒访客正在录音,且灯闪频率会随录音终止时间的接近越来越快——访客给出反馈——对访客的命令做出识别(语音转文字)
NOTE: 这里依然用到了微软的认知服务(自行申请),通过调用微软的 speech-to-text API, 实现对用户发出需求的音频做出识别。
在树莓派上安装录音的必要工具包:
sudo apt-get update
sudo apt-get upgrade
sudo apt-get -y install alsa-utils alsa-tools alsa-tools-gui alsamixergui
在树莓派上安装语音识别的库:
pip3 install SpeechRecogniton
发光二极管(绿灯)接线:长的引脚接作为信号线的 BOARD_11,短的引脚接作为地线的 BOARD_39。
在树莓派上安装管教操作库:
sudo apt-get update
sudo apt-get -y install python-rpi.gpio
姿态传感器(ADXL345)接线:SCL:BOARD_5,SDA:BOARD_3,VCC:BOARD_2,GND:BOARD_39
在树莓派上安装姿态传感器的库:
sudo apt-get install python-smbus i2c-tools
sudo i2cdetect -y -a 1
具体的执行代码如下(对代码中 speech_key 做了留白,请自行去官网申请):
NOTE: 代码中留白的 personGroupId 请自行定义一个值,该值是一个只由数字、小写字母、“-”、“_”组成的不超过 64 个字符长的字符串。只有在训练的时候定义不同的值,才能保证如果有建立多个人的人像库的需求时可以共用一个 key。
import RPi.GPIO as GPIO
import os
import speech_recognition as sr
import wave
import time
import struct
import sys
import pigpio


def light(pin, times, delay1, delay2):
	GPIO.setmode(GPIO.BOARD)
	GPIO.setup(pin,GPIO.OUT)
	onoff = GPIO.LOW
	delay = delay2

	i = 0
	while i < times:
		if onoff == GPIO.LOW:
			onoff = GPIO.HIGH
			if delay > 0.12:
				delay1 -= 0.11
			delay = delay1
			i += 1
		else:
			onoff = GPIO.LOW
			delay = delay2
		GPIO.output(pin, onoff)
		time.sleep(delay)

	GPIO.output(pin, GPIO.LOW)

# if x^2 + y^2 + z^2 > threshold
# somebody knock the door
def knock(threshold):
	global buffer
	if sys.version > '3':
		buffer = memoryview
	BUS = 1
	ADXL345_I2C_ADDR = 0x53
	pi = pigpio.pi() # open local Pi
	h = pi.i2c_open(BUS, ADXL345_I2C_ADDR)
	if h >= 0: # Connected OK?
		# Initialise ADXL345.
		pi.i2c_write_byte_data(h, 0x2d, 0)  # POWER_CTL reset.
		pi.i2c_write_byte_data(h, 0x2d, 8)  # POWER_CTL measure.
		pi.i2c_write_byte_data(h, 0x31, 0)  # DATA_FORMAT reset.
		pi.i2c_write_byte_data(h, 0x31, 11) # DATA_FORMAT full res +/- 16g.
		read = 0
	#get initial pos
	(s, b) = pi.i2c_read_i2c_block_data(h, 0x32, 6)
	if s >= 0:
		(init_x,init_y,init_z) = struct.unpack('<3h', buffer(b))
	#loop until someone move the sensor
	while 1:
		(s, b) = pi.i2c_read_i2c_block_data(h, 0x32, 6)
		if s >= 0:
			(x,y,z) = struct.unpack('<3h', buffer(b))
		if (init_x - x)**2 + (init_y - y) ** 2 + (init_z - z) ** 2 >= threshold:
			break
		time.sleep(0.01)

knock(1000)

print("Welcome to our security door!")
os.system('aplay welcome.wav')
print("You have three choose:")
print("		1. Open the door")
print("		2. Talk with the door")
print("		3. Leave a message")
os.system('aplay choice.wav')

os.system('arecord --device=plughw:1,0 --format S16_LE --rate 16000 -d 5 -c1 oneOrTwo.wav&')#record one or two
# Countdown
light(11, 15, 1.11, 0.1)
audioFile = "oneOrTwo.wav"

# analysis your recording
r = sr.Recognizer()
with sr.AudioFile(audioFile) as source:
	audio = r.record(source)

speech_key = ""

try:
    speech_result = r.recognize_bing(audio, key=speech_key)
    print(speech_result.encode("utf-8"))
except sr.UnknownValueError:
    print("Microsoft Bing Voice Recognition could not understand audio")
except sr.RequestError as e:
	print("Could not request results from Microsoft Bing Voice Recognition service; {0}".format(e))
开门指令
如果访客选择了“Open the door”指令,摄像头将自动获取一张访客的照片,并判断是否给开门。
具体的逻辑为:
分析判断由前面访客的需求音频转换而成的文本中是否含有“Open”这一关键词——如有,则继续;如无,则程序结束——播放 photo.wav(Security-Door-based-on-raspberry-pi/photo.wav),提醒访客将要拍照——红灯频闪,提醒访客正在拍照倒计时,且灯闪频率会随正式开始拍照时间的接近越来越快——发出“咔擦”一声(Security-Door-based-on-raspberry-pi/yinxiao.wav),正式开始拍照——与已经训练好的库中的人像做对比,如果置信度达到 70%,则开门(这里抽象为舵机转动一定角度并停下)
NOTE: 这里继续使用微软的认知服务(自行申请),具体调用的 API 作为前面训练图像的延续依然是 Face verification,对应前面的图像训练过程进行分析检测并得出置信度。
发光二极管(红灯)接线:长的引脚接作为信号线的 BOARD_13,短的引脚接作为地线的 BOARD_39。
舵机的接线:橙色作为 PWM 波信号线接 BOARD_12,红色作为电源线接 BOARD_2,棕色作为地线接 BOARD_39。
具体的执行代码如下(对代码中 face_key 做了留白,请自行去官网申请):
NOTE: 代码中留白的 personGroupId 与前面训练时定义的值需保持相同。
import RPi.GPIO as GPIO
import os
import speech_recognition as sr
import wave
import time
import cognitive_face as CF
import os
import json

# control the steering gear
def open_door():
            GPIO.setup(12,GPIO.OUT)
            p = GPIO.PWM(12,50)
            p.start(0)
            global onoff,dc, dir
            onoff = GPIO.LOW
            dc = 10
            dir = 5
            for i in range(23):
                    dc += 5
                    p.ChangeDutyCycle( dc/10 )
                    time.sleep(0.1)

if "open" in speech_result or "Open" in speech_result:
	#Verify your face
	face_key = ""
	CF.Key.set(face_key)
	personGroupId = ""
	#Try to take a photo for you
	print("I will take a photo for you, please look at the camera:")
	os.system('aplay photo.wav')
	light(13, 6, 0.56, 0.1)
	os.system('sudo raspistill -o face_recognition.jpg -w 640 -h 480')
	os.system('aplay yinxiao.wav')
	testImageFile = "face_recognition.jpg"
	faces = CF.face.detect(testImageFile)

	if len(faces) != 1:
		print("There is no face or more than one face in your photo!")

	else:
		faceIds = [faces[0]['faceId']]
		res = CF.face.identify(faceIds, personGroupId)

		candidate = res[0]['candidates']
		if candidate == []:
			print("No candidates!")
		else:
			confidence = candidate[0]['confidence']
			print("Confidence: " + str(confidence))
			if confidence >= 0.7:
				print("Accept!")
				open_door()
			else:
				print("Permission Denied!")
留言指令
如果访客选择了“leave a message”指令,门禁将提醒访客开始留言,稍后播放后将确认访客是否需要重新录制。
具体的逻辑为:([]部分为循环)
分析判断由前面访客的需求音频转换而成的文本中是否含有“message”这一关键词——如有,则继续;如无,则程序结束——[播放 leave.wav(Security-Door-based-on-raspberry-pi/leave.wav),提醒访客将要拍照——绿灯频闪,提醒访客正在录音——录音结束,提醒访客确认留言(Security-Door-based-on-raspberry-pi/confirm.wav)——播放留言音频(Security-Door-based-on-raspberry-pi/message.wav)——提醒访客做出选择(Security-Door-based-on-raspberry-pi/save_or_delete.wav)——绿灯频闪,提醒访客正在录音——录音结束,分析判断由访客的选择音频转换而成的文本中是否含有“no”这一关键词——如有,则继续;如无,则告知访客留言已保存(Security-Door-based-on-raspberry-pi/remindsaved.wav]
具体代码如下(对代码中 speech_key 做了留白,请自行去官网申请):
import os
import speech_recognition as sr
import RPi.GPIO as GPIO
import time


if "message" in speech_result or "Message" in speech_result:
    print("I will take a record for you, please leave a message right now")
    os.system('aplay leave.wav')
    os.system('arecord --device=plughw:1,0 --format S16_LE --rate 16000 -d 5 -c1 message.wav&')#record one or two
    light(11, 15, 1.11, 0.1)
    print("please confirm your message")
    os.system('aplay confirm.wav')
    os.system('aplay message.wav')
    print("say yes to save the message or no to record again")
    os.system('aplay save_or_delete.wav')
    os.system('arecord --device=plughw:1,0 --format S16_LE --rate 16000 -d 5 -c1 decide.wav&')#record one or two
    light(11, 15, 1.11, 0.1)
    audioFile = "decide.wav"

    #analysis your recording
    r = sr.Recognizer()
    with sr.AudioFile(audioFile) as source:
            audio = r.record(source)

    speech_key = "34c7815245934e4a8e088956af4e62d7"

    try:
        confirm_result = r.recognize_bing(audio, key=speech_key)
        print(confirm_result.encode("utf-8"))
    except sr.UnknownValueError:
        print("Microsoft Bing Voice Recognition could not understand audio")
    except sr.RequestError as e:
            print("Could not request results from Microsoft Bing Voice Recognition service; {0}".format(e))
    while "no" in confirm_result or "No" in confirm_result:
        print("I will take a record for you, please leave a message right now")
        os.system('aplay leave.wav')
        os.system('arecord --device=plughw:1,0 --format S16_LE --rate 16000 -d 5 -c1 message.wav&')#record one or two
        light(11, 15, 1.11, 0.1)
        print("please confirm your message")
        os.system('aplay confirm.wav')
        os.system('aplay message.wav')
        print("say yes to save your message or no to record again")
        os.system('aplay save_or_delete.wav')
        os.system('arecord --device=plughw:1,0 --format S16_LE --rate 16000 -d 5 -c1 decide.wav&')#record one or two
        light(11, 15, 1.11, 0.1)
        audioFile = "decide.wav"

        #analysis your recording
        r = sr.Recognizer()
        with sr.AudioFile(audioFile) as source:
                audio = r.record(source)

        speech_key = "34c7815245934e4a8e088956af4e62d7"

        try:
            confirm_result = r.recognize_bing(audio, key=speech_key)
            print(confirm_result.encode("utf-8"))
        except sr.UnknownValueError:
            print("Microsoft Bing Voice Recognition could not understand audio")
        except sr.RequestError as e:
                print("Could not request results from Microsoft Bing Voice Recognition service; {0}".format(e))
    print("record has been successfully saved!")
    os.system('aplay remindsaved.wav')
与门语音(文字、图像)交互指令
文字、图像交互
如果访客选择了“talk with the door”指令,门禁将等待用户键入一定信息或图片,并作出实时的聊天反馈,包括文字、图像和语音。
具体的逻辑为
分析判断由前面访客的需求音频转换而成的文本中是否含有“talk”这一关键词——如有,则继续;如无,则程序结束——(首次使用时将输出一张微信二维码等待用户扫描并在树莓派上登陆)——用户输入文本信息或者图片——门禁给出应答(文字、图像或语音)
NOTE: 因为微软小冰暂未开放 API,所以这里利用 itchat 模块,并将消息发送给微信联系人中的小冰(微信端需要关注公众号“小冰”),同时获取小冰返回的信息,实现间接对微软小冰的调用。
NOTE: 收发信息和扫描二维码须需要借助显示器或者电脑端的 VNC Viewer。
在树莓派上安装微信相关的库:
pip3 install itchat
在树莓派上安装播放 MP3 格式的工具包:
sudo apt-get install mplayer2
具体代码如下:
import itchat
import sys
import os
from itchat.content import *
from PIL import Image
import threading

def send_message(message, userId):
	itchat.send(message, toUserName = userId)

def send_picture(userId):
	print("I will take a photo and send it to ice:")
	os.system("sudo raspistill -o try.jpg")
	file = "try.jpg"
	itchat.send_image(file, toUserName = userId)

def xiaoice(iceId):
	#make dirs for downloading pictures and recordings
	if not os.path.exists('./picture'):
		os.mkdir('./picture')

	if not os.path.exists('./recording'):
		os.mkdir('./recording')

	@itchat.msg_register([TEXT,PICTURE,RECORDING], isMpChat=True)
	def xiaobing(msg):
		#if xiao ice send two message at once, deal it with queue
		if msg['Type'] == 'Text': #if xiaoice send a short message, put it into the queue
			print("小冰:" + msg['Text'])

		if msg['Type'] == 'Picture':
			fileName = './picture/' + msg['FileName']
			with open(fileName, 'wb') as f: #download file
				f.write(msg['Text']())
			print("小冰发了一张图:")
			image = Image.open(fileName) #show this picture
			image.show()

		if msg['Type'] == 'Recording':
			fileName = './recording/' + msg['FileName']
			with open(fileName, 'wb') as f: # download file
				f.write(msg['Text']())
			print("小冰说了一句话")
			os.system('mplayer '+ fileName) # play this audio

		del msg
	itchat.run()

if "talk" in speech_result or "Talk" in speech_result:
	itchat.auto_login(enableCmdQR = 2, hotReload = True) #Login

	iceId = itchat.search_mps(name = "小冰")[0]['UserName']# get xiaoice's ID
	t = threading.Thread(target=xiaoice, args=(iceId,))
	t.start()
	while 1:
		line = sys.stdin.readline().strip()
		if line != "":
			if line == "send picture":
				send_picture(iceId)
			else:
				send_message(line, iceId)
		else:
			break
语音交互
门禁将等待用户语音输入一段话,并做出实时的语音回复。
NOTE: 这里调用了亚马逊 Alexa Voice Service 的 API,实现与访客之间较为智能、多功能的语音交互。(参考官方 DIY 教程)
NOTE: 收发信息和扫描二维码须需要借助显示器或者电脑端的 VNC Viewer。
获取官方 sample app zip:
cd Desktop
git clone https://github.com/ajot/alexa-avs-raspberry-pi.git
添加亚马逊开发者账号 AVS 相关信息(ProductID, ClientID, ClientSecret):
cd ~/Desktop/alexa-avs-sample-app
nano automated_install.sh
在 ProductID, ClientID, ClientSecret 三栏后面分别填入在官网申请的 AVS 中对应的信息:
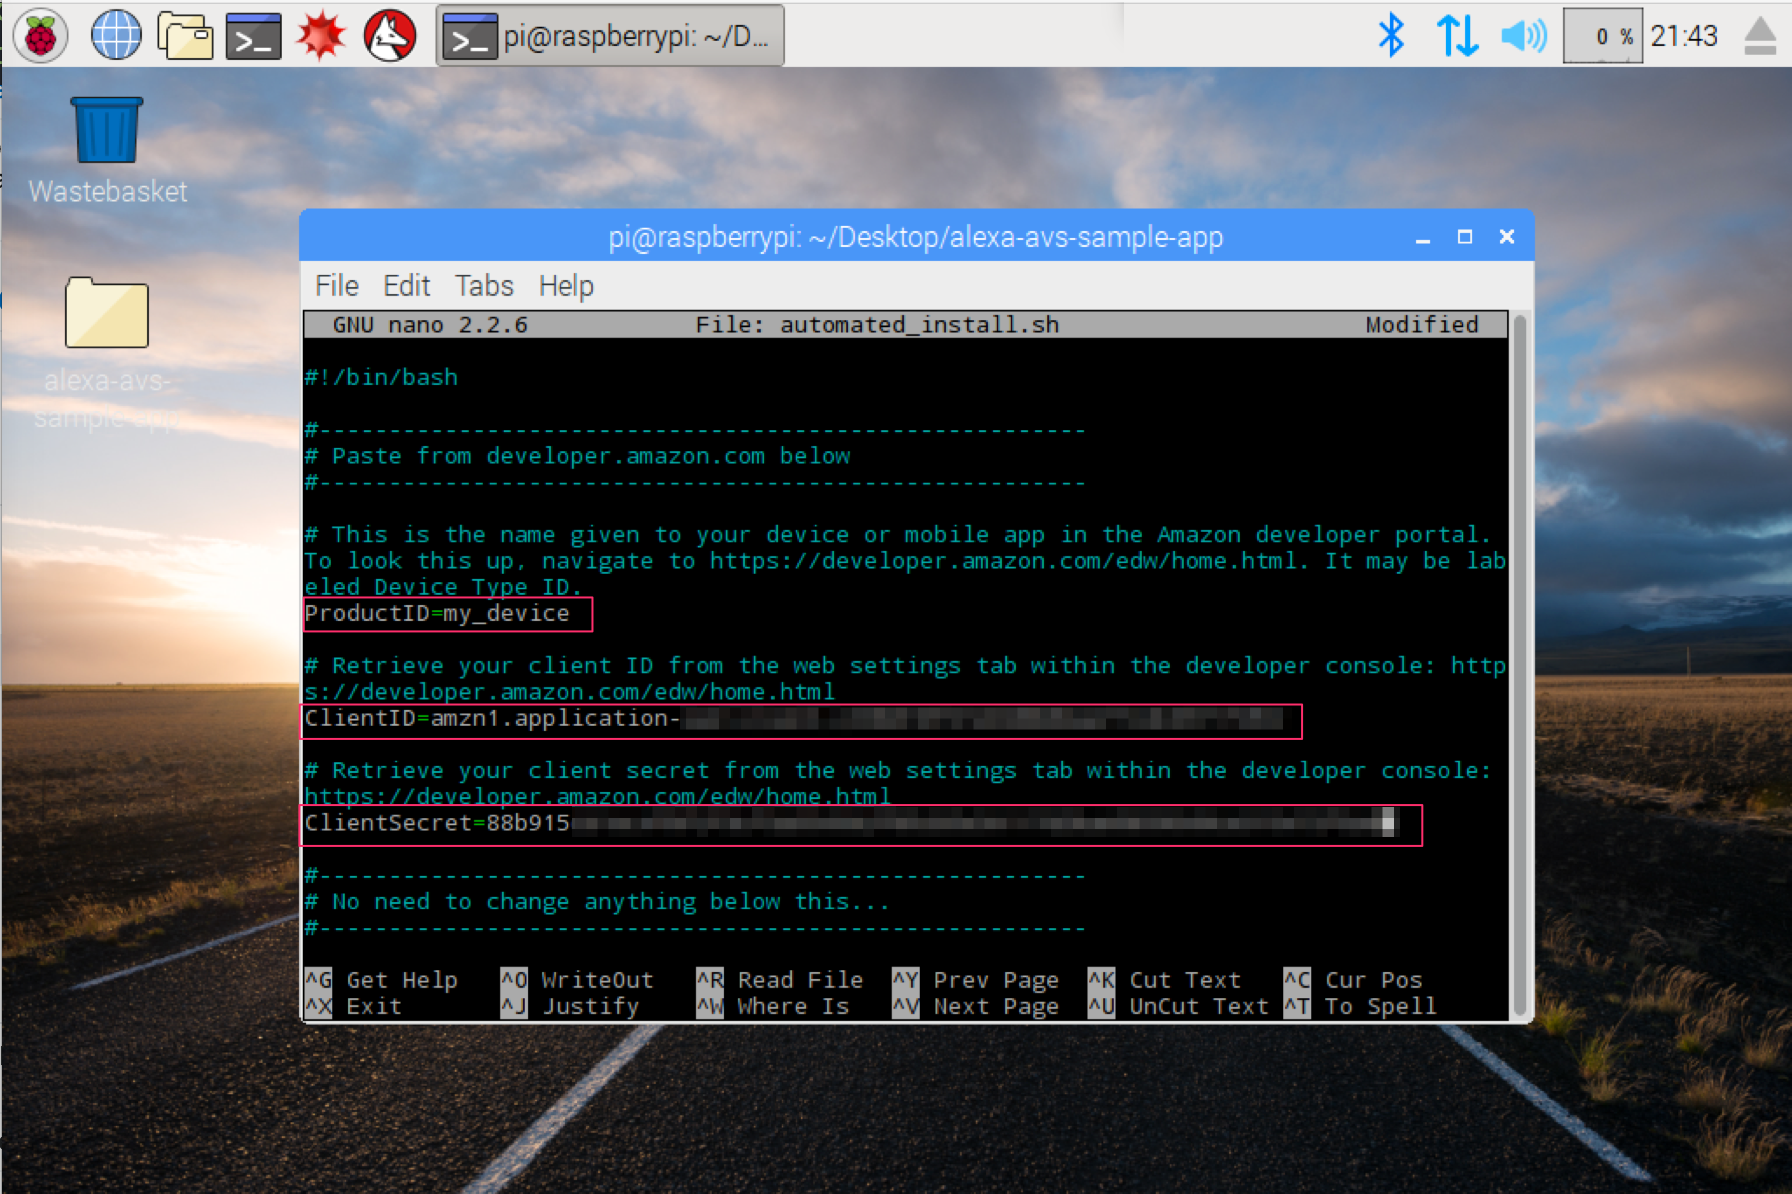
填写样例:
- ProductID=“RaspberryPi3”
- ClientID=“amzn.xxxxx.xxxxxxxxx”
- ClientSecret=“4e8cb14xxxxxxxxxxxxxxxxxxxxxxxxxxxxx6b4f9”
运行脚本:(仅需首次使用时运行,需要大概 20-30 分钟)
bash automated_install.sh
开启新的命令行,授权使用 AVS 服务:
cd ~/Desktop/alexa-avs-sample-app/samples/companionService && npm start
再开启另一个新的命令行,运行样例应用:
cd ~/Desktop/alexa-avs-sample-app/samples/javaclient && mvn exec:exec
完整的操作
安装相关的库
pip3 install cognitive_face
pip3 install SpeechRecognition
pip3 install itchat
安装相关工具包
sudo apt-get update
sudo apt-get upgrade
sudo apt-get -y install alsa-utils alsa-tools alsa-tools-gui alsamixergui
sudo apt-get -y install python-rpi.gpio
sudo apt-get install mplayer2
sudo apt-get install python-smbus i2c-tools
sudo i2cdetect -y -a 1
接线
发光二极管(绿灯)接线:长的引脚接作为信号线的 BOARD_11,短的引脚接作为地线的 BOARD_39。
姿态传感器(ADXL345)接线:SCL:BOARD_5,SDA:BOARD_3,VCC:BOARD_2,GND:BOARD_39。
发光二极管(红灯)接线:长的引脚接作为信号线的 BOARD_13,短的引脚接作为地线的 BOARD_39。
舵机的接线:橙色作为 PWM 波信号线接 BOARD_12,红色作为电源线接 BOARD_2,棕色作为地线接 BOARD_39。
训练访客人像图库
在 Security-Door-based-on-raspberry-pi/faceRecognition 目录下的 trainFace.py 中添加自定义的一个 personGroupld 的值,该值是一个只由数字、小写字母、“-”、“_”组成的不超过 64 个字符长的字符串。只有在训练的时候定义不同的值,才能保证如果有建立多个人的人像库的需求时可以共用一个 key。
cd Security-Door-based-on-raspberry-pi/faceRecognition/img/person
raspistill -w 640 -h 480 -o 1.jpg
raspistill -w 640 -h 480 -o 2.jpg
raspistill -w 640 -h 480 -o 3.jpg
cd ..
cd ..
python3 trainFace.py
NOTE: 对代码中的 KEY 做了留白,请自行去官网申请
主门禁程序执行
cd Security-Door-based-on-raspberry-pi
sudo pigpiod
python3 main.py
NOTE: 对代码中所有的 KEY 均做了留白,请自行去官网申请
NOTE: 代码中留白的 personGroupId 与前面训练时在 trainFace.py 中定义的值需保持相同。
调用亚马逊 Alexa Voice Service 实现与门禁语音交互
获取官方 sample app zip:
cd Desktop
git clone https://github.com/ajot/alexa-avs-raspberry-pi.git
添加亚马逊开发者账号 AVS 相关信息(ProductID, ClientID, ClientSecret):
cd ~/Desktop/alexa-avs-sample-app
nano automated_install.sh
在 ProductID, ClientID, ClientSecret 三栏后面分别填入在官网申请的 AVS 中对应的信息:

填写样例:
- ProductID=“RaspberryPi3”
- ClientID=“amzn.xxxxx.xxxxxxxxx”
- ClientSecret=“4e8cb14xxxxxxxxxxxxxxxxxxxxxxxxxxxxx6b4f9”
运行脚本:(仅需首次使用时运行,需要大概 20-30 分钟)
bash automated_install.sh
开启新的命令行,授权使用 AVS 服务:
cd ~/Desktop/alexa-avs-sample-app/samples/companionService && npm start
再开启另一个新的命令行,运行样例应用:
cd ~/Desktop/alexa-avs-sample-app/samples/javaclient && mvn exec:exec
3D 打印的外壳
给各接口预留了空位,包括:顶盖的摄像头、两个发光二极管,右侧的电源插口、外接 mini 音响的 3.5mm 接口,后方的网线插口、usb 麦克风接口,左侧的舵机与螺旋桨连接口、姿态传感器。
stl 文件:
盒身:Security-Door-based-on-raspberry-pi/model1.stl
盒盖:Security-Door-based-on-raspberry-pi/model2.stl
预览:
资源下载地址:https://download.csdn.net/download/sheziqiong/85772306
资源下载地址:https://download.csdn.net/download/sheziqiong/85772306