文章目录
1.Istio服务网格中的流量复制
在发布新版本前,测试同事会通过很多的测试工具对新版本的程序进行压测,虽然可以模拟出很多的流量,但是也不算是真实的流量请求,上线后还是不能保证其他问题的发生。
当需要用真实的线上流量进行新版本的测试,但是也不能真的让测试中的版本为线上用户提供服务,基于这种情况,Istio可以通过VirtualService虚拟服务将线上的真实访问流量复制一份到其他的环境。
Istio流量复制的技术被称为流量镜像,主要用于将线上真实的流量复制一份,然后通过Proxy代理程序根据策略处理请求,然后转发到某个版本的程序上,并不会影响真实的流量请求。
Istio流镜像是复制的Web的请求,如果有用户在数据库里写数据,这种请求也是会被复制的,因此在做流量镜像时,肯定是将线上环境的流量复制到测试环境进行使用,即使有数据提交的请求也不会影响线上用户。
Istio流量镜像的应用场景:
- 线上问题排查。
- 用真实的流量来验证新版本应用程序功能是否正常。
- 对真实流量请求进行压力测试。
- 收集真实流量数据进行分析。
之前学习Istio都是通过自带的测试项目,我们自己来部署一个项目到Istio做流量镜像的测试。
流量镜像的大致实现步骤:
- 在Istio中部署多个不同版本的程序,配置Service资源时同时挂上这些程序。
- 配置Istio的VirtualService资源,将所有线上的流量分配到V1的程序版本提供服务。
- 在VirtualService中配置流量镜像,复制V1版本的流量到V2版本的程序。
2.通过一组案例演示流量复制
2.1.在Istio中部署Nginx多个版本的项目
我们来创建多个不同版本的Nginx项目,V1版本用于线上真实环境,V2版本用于新功能的测试版本。
1)创建Nginx项目所在的Namespace并开启Sidecar自动注入
1.创建namespace
[root@k8s-master myproject]# kubectl create ns istio-project
namespace/istio-project created

2.开启Sidecar自动注入
[root@k8s-master myproject]# kubectl label ns istio-project istio-injection=enabled
namespace/istio-project labeled
2)在Istio中部署Nginx V1版本
Nginx V1版本为线上版本。
1.快速生成一个Nginx的Deployment资源编排文件
[root@k8s-master myproject]# kubectl create deployment nginx --image=nginx:1.15 --dry-run -o yaml > nginx-v1.yaml

2.配置资源编排文件
[root@k8s-master myproject]# vim nginx-v1.yaml
apiVersion: apps/v1
kind: Deployment
metadata:
  name: nginx-v1
  namespace: istio-project
  labels:
    app: nginx
spec:
  replicas: 1
  selector:
    matchLabels:
      app: nginx
      version: v1			#不同的版本通过标签来区分就行了
  template:
    metadata:
      labels:
        app: nginx
        version: v1
    spec:
      containers:
      - image: nginx:1.15
        name: nginx-v1


3.创建V1版本的Nginx程序
[root@k8s-master myproject]# kubectl apply -f nginx-v1.yaml
deployment.apps/nginx-v1 created
3)同样的方式部署Nginx V2版本
Nginx V2版本为新版本测试环节,将V2版本资源编排文件中的app标签值修改,防止V2测试版本接入到Service资源中为线上用户提供服务。
1.直接复制nginx-v1版本的编排文件
[root@k8s-master myproject]# cp nginx-v1.yaml nginx-v2.yaml

2.将nginx-v1标签修改为nginx-v2
[root@k8s-master myproject]# vim nginx-v2.yaml
apiVersion: apps/v1
kind: Deployment
metadata:
  name: nginx-v2
  namespace: istio-project
  labels:
    app: nginx
spec:
  replicas: 1
  selector:
    matchLabels:
      app: nginx
      version: v2
  template:
    metadata:
      labels:
        app: nginx
        version: v2
    spec:
      containers:
      - image: nginx:1.15
        name: nginx-v2

3.创建V2版本的程序
[root@k8s-master myproject]# kubectl apply -f nginx-v2.yaml
deployment.apps/nginx-v2 created
4)创建Nginx项目的Service资源
将两个版本的Nginx Pod资源都接入到Service资源中,虽然线上版本和测试版本都加入到了Service资源中,但是我们会在VirtualService资源中进行分流,不会影响线上的程序使用。
1.生成service资源的编排文件
[root@k8s-master myproject]# kubectl expose deployment nginx-v1 --port=80 --target-port=80 -n istio-project --dry-run -o yaml > nginx-service.yaml

2.配置资源编排文件
[root@k8s-master myproject]# vim nginx-service.yaml
apiVersion: v1
kind: Service
metadata:
  name: nginx
  namespace: istio-project
  labels:
    app: nginx
spec:
  ports:
  - port: 80
    protocol: TCP
    targetPort: 80
  selector:
    app: nginx
    version: v1

3.到目前为止Nginx项目以及在K8S集群中部署完成并且接入到了Istio中
[root@k8s-master myproject]# kubectl get all -n istio-project
NAME                            READY   STATUS    RESTARTS   AGE
pod/nginx-v1-69d9ddb5cb-httvf   2/2     Running   0          19m
pod/nginx-v2-744c97bc9-8nk6d    2/2     Running   0          19m

NAME            TYPE        CLUSTER-IP      EXTERNAL-IP   PORT(S)   AGE
service/nginx   ClusterIP   10.111.48.212   <none>        80/TCP    35s

NAME                       READY   UP-TO-DATE   AVAILABLE   AGE
deployment.apps/nginx-v1   1/1     1            1           19m
deployment.apps/nginx-v2   1/1     1            1           19m

NAME                                  DESIRED   CURRENT   READY   AGE
replicaset.apps/nginx-v1-69d9ddb5cb   1         1         1       19m
replicaset.apps/nginx-v2-744c97bc9    1         1         1       19m

4.查看Service资源关联的Pod资源
[root@k8s-master myproject]# kubectl get ep -n istio-project
NAME        ENDPOINTS                             AGE
nginx-svc   100.111.156.83:80,100.64.169.143:80   45s

#Service资源中分别将两个版本的程序进行了添加,但是用户的请求不会到达V2版本,具体实现我们会在VirtualService中进行配置。
2.2.创建Nginx项目的DestinationRule资源
1.编写资源编排文件
[root@k8s-master myproject]# vim nginx-destinationrule.yaml
apiVersion: networking.istio.io/v1alpha3
kind: DestinationRule
metadata:
  name: nginx-dr
  namespace: istio-project
spec:
  host: nginx-svc			#关联Nginx的Service资源
  subsets:
  - name: v1
    labels:
      version: v1
  - name: v2
    labels:
      version: v2

2.创建资源
[root@k8s-master myproject]# kubectl apply -f nginx-destinationrule.yaml
destinationrule.networking.istio.io/nginx-dr created

3.查看资源的状态
[root@k8s-master myproject]# kubectl get dr -n istio-project
NAME       HOST        AGE
nginx-dr   nginx-svc   3s
2.3.创建Nginx项目的Gateway资源
1.编排资源编排文件
[root@k8s-master myproject]# vim nginx-gateway.yaml
apiVersion: networking.istio.io/v1alpha3
kind: Gateway
metadata:
  name: nginx-gateway
  namespace: istio-project
spec:
  selector:
    istio: ingressgateway
  servers:
  - port:
      number: 80
      name: http
      protocol: HTTP
    hosts:
    - "*"

2.创建资源
[root@k8s-master myproject]# kubectl apply -f nginx-gateway.yaml
gateway.networking.istio.io/nginx-gateway created
2.4.创建Nginx项目的VirtualService资源
1.编写资源编排文件
[root@k8s-master myproject]# cat nginx-virtualservice.yaml
apiVersion: networking.istio.io/v1alpha3
kind: VirtualService
metadata:
  name: nginx-vs
  namespace: istio-project
spec:
  hosts:
  - "*"
  gateways:
  - nginx-gateway			#关联nginx的gateway
  http:
  - route:
    - destination:
        host: nginx-svc				#关联nginx的service资源
        subset: v1					#将所有的流量分发到V1版本的程序中
      weight: 100					#比例为100%
    mirror:								#定义流量镜像
      host: nginx-svc				#关联Nginx的Service资源
      subset: v2					#将流量复制到v2版本的程序上
    mirror_percent: 100				#流量复制的比例为100%全部复制
#最终的意思:所有线上的流量都有V1版本处理,同时复制一份请求到V2版本,不影响线上的使用
2.5.测试流量镜像的作用
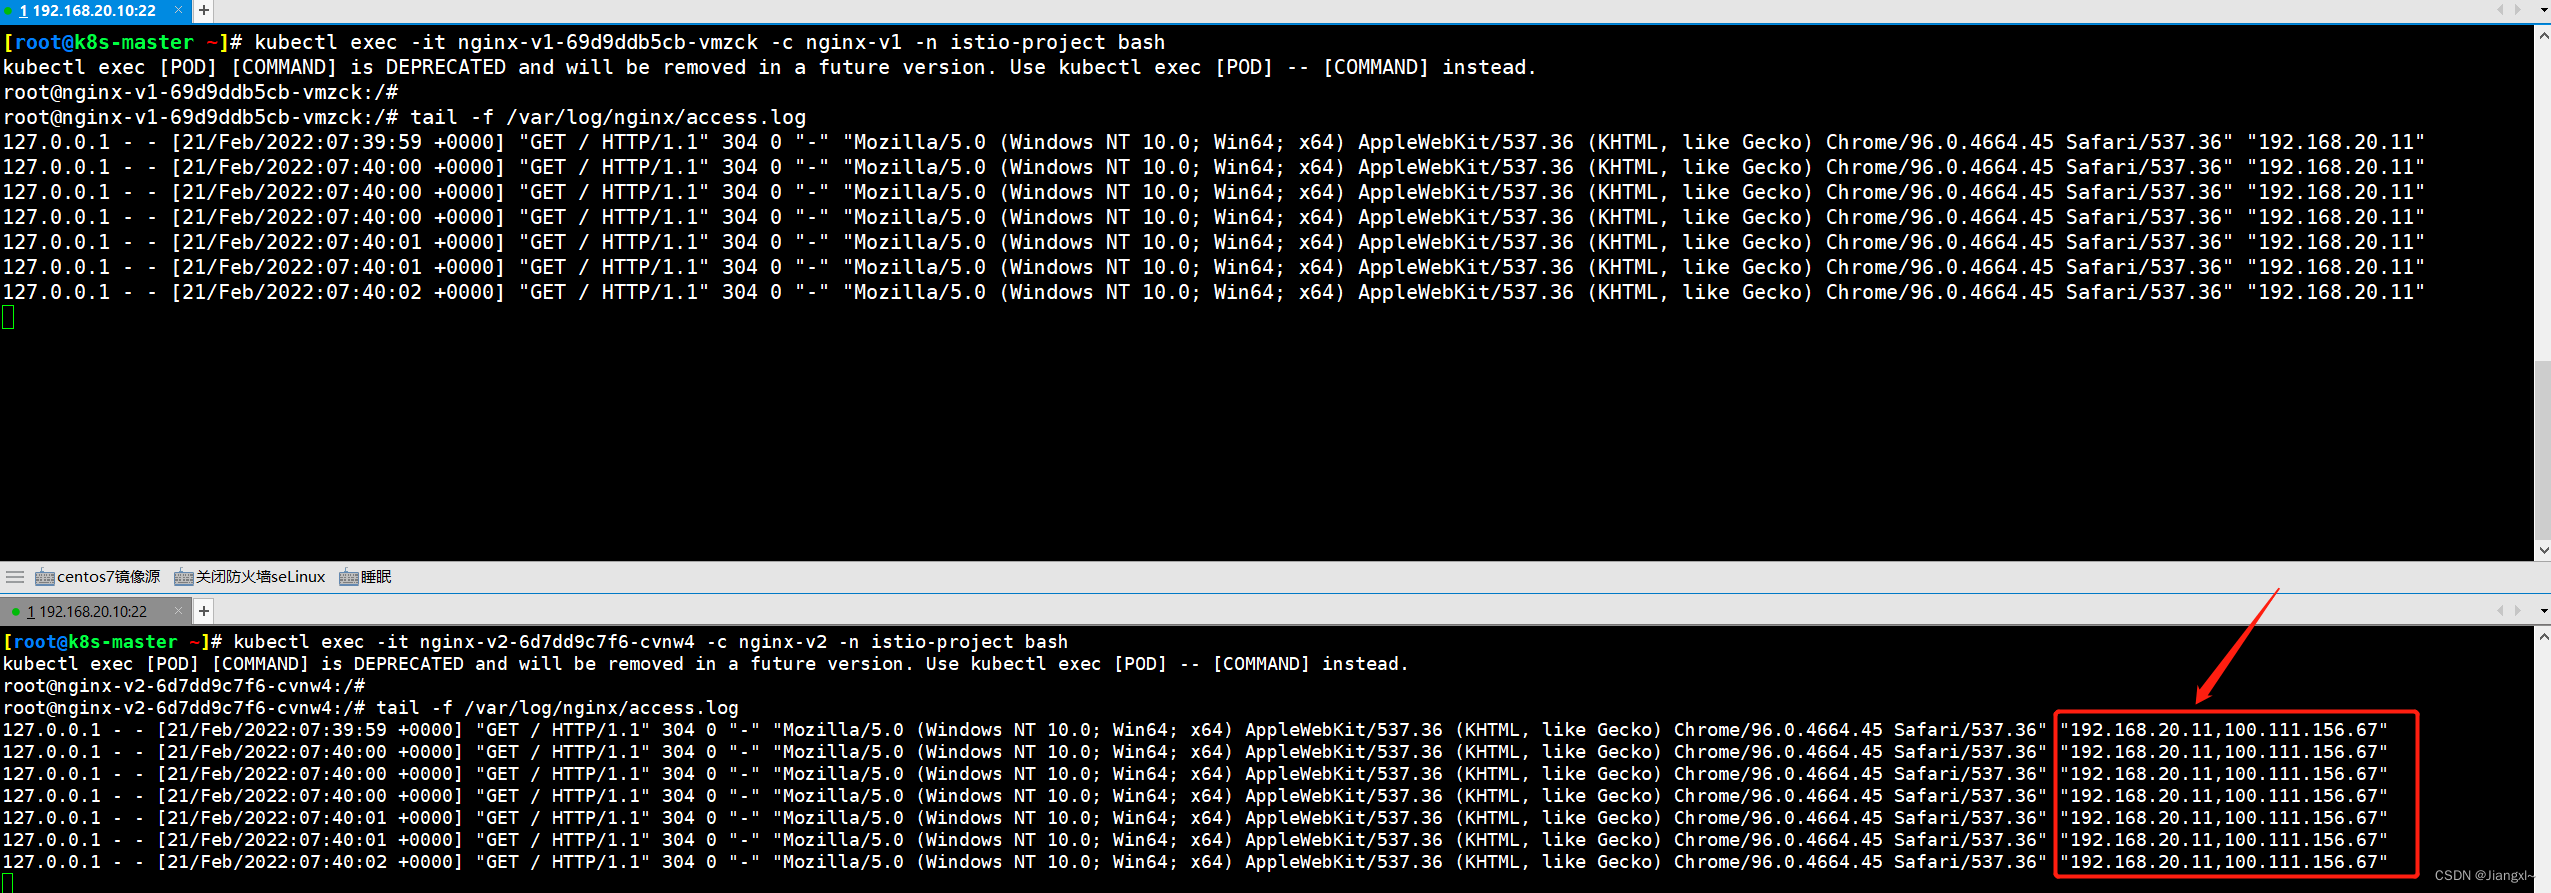
浏览器访问V1版本,观察V2版本是否会有和V1版本相同的请求。

观察V1和V2版本的访问日志,会发现用户访问线上V1版本的所有请求流量都会被Istio完全复制一份到V2的测试版本,在日志中的X-Forword-For字段中可以明确看到增加了一个IP地址,这个IP地址就是Istio的IngressGateway的地址,由IngressGateway将流量复制到V2程序中。
