一、简介
SpringBoot 最强大的功能就是把我们常用的场景抽取成了一个个starter(场景启动器),我们通过引入springboot 为我提供的这些场景启动器,我们再进行少量的配置就能使用相应的功能。即使是这样,springboot也不能囊括我们所有的使用场景,往往我们需要自定义starter,来简化我们对springboot的使用。
二、如何自定义starter
1.实例
如何编写自动配置 ?
我们参照@WebMvcAutoConfiguration为例,我们看看们需要准备哪些东西,下面是WebMvcAutoConfiguration的
部分代码:
 @Configuration
 @ConditionalOnWebApplication
 @ConditionalOnClass({Servlet.class, DispatcherServlet.class, WebMvcConfigurerAdapter.class})
 @ConditionalOnMissingBean({WebMvcConfigurationSupport.class})
 @AutoConfigureOrder(‐2147483638)
 @AutoConfigureAfter({DispatcherServletAutoConfiguration.class, ValidationAutoConfiguration.class})
 public class WebMvcAutoConfiguration {

 @Import({WebMvcAutoConfiguration.EnableWebMvcConfiguration.class})
 @EnableConfigurationProperties({WebMvcProperties.class, ResourceProperties.class})
 public static class WebMvcAutoConfigurationAdapter extends WebMvcConfigurerAdapter {

 @Bean
 @ConditionalOnBean({View.class})
 @ConditionalOnMissingBean
 public BeanNameViewResolver beanNameViewResolver() {
 BeanNameViewResolver resolver = new BeanNameViewResolver();
 resolver.setOrder(2147483637);
 return resolver;
 }
 }
 }
我们可以抽取到我们自定义starter时同样需要的一些配置。
@Configuration //指定这个类是一个配置类
@ConditionalOnXXX //指定条件成立的情况下自动配置类生效
@AutoConfigureOrder //指定自动配置类的顺序
@Bean //向容器中添加组件
@ConfigurationProperties //结合相关xxxProperties来绑定相关的配置
@EnableConfigurationProperties //让xxxProperties生效加入到容器中
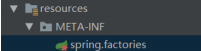
自动配置类要能加载需要将自动配置类,配置在META‐INF/spring.factories中
org.springframework.boot.autoconfigure.EnableAutoConfiguration=\
org.springframework.boot.autoconfigure.admin.SpringApplicationAdminJmxAutoConfiguration,\
org.springframework.boot.autoconfigure.aop.AopAutoConfiguration,\模式 我们参照 spring-boot-starter 我们发现其中没有代码:
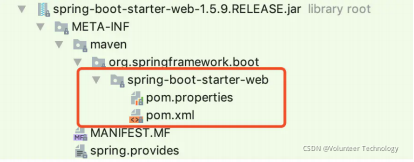
我们在看它的pom中的依赖中有个springboot-starter
 <dependency>
 <groupId>org.springframework.boot</groupId>
 <artifactId>spring‐boot‐starter</artifactId>
 </dependency>
我们再看看 spring-boot-starter 有个 spring-boot-autoconfigure
<dependency>
<groupId>org.springframework.boot</groupId>
<artifactId>spring‐boot‐autoconfigure</artifactId>
</dependency>
关于web的一些自动配置都写在了这里 ,所以我们有总结:
启动器(starter)是一个空的jar文件,仅仅提供辅助性依赖管理,这些依赖可能用于自动装配或其他类库。
需要专门写一个类似spring-boot-autoconfigure的配置模块
用的时候只需要引入启动器starter,就可以使用自动配置了
命名规范
官方命名空间
前缀:spring-boot-starter模式:spring-boot-starter-模块名
举例:spring-boot-starter-web、spring-boot-starter-jdbc
自定义命名空间
后缀:-spring-boot-starter
模式:模块-spring-boot-starter
举例:mybatis-spring-boot-starter
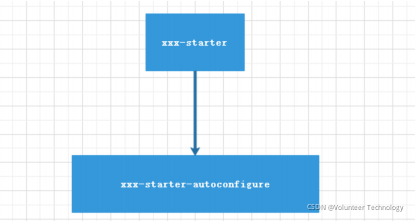
三、自定义starter实例
我们需要先创建一个父maven项目:springboot_custome_starter
两个Module: yiyong-spring-boot-starter 和 yiyong-spring-boot-starter-autoconfigurer
springboot_custome_starter
pom.xml

<?xml version="1.0" encoding="UTF‐8"?>
 <project xmlns="http://maven.apache.org/POM/4.0.0" xmlns:xsi="http://www.w3.org/2001/XMLSchema‐instanc
e"
 xsi:schemaLocation="http://maven.apache.org/POM/4.0.0 https://maven.apache.org/xsd/maven‐4.0.0.xsd">
 <modelVersion>4.0.0</modelVersion>
 <modules>
 <module>yiyong‐spring‐boot‐starter</module>
 <module>yiyong‐spring‐boot‐autoconfigure</module>
 </modules>
 <parent>
 <groupId>org.springframework.boot</groupId>
 <artifactId>spring‐boot‐starter‐parent</artifactId>
 <version>2.3.6.RELEASE</version>
  <relativePath/> <!‐‐ lookup parent from repository ‐‐>
  </parent>
 <packaging>pom</packaging>
 <groupId>com.yiyong.springboot</groupId>
 <artifactId>springboot_custome_starter</artifactId>
 <version>0.0.1‐SNAPSHOT</version>
 <name>springboot_custome_starter</name>
 <description>SpringBoot自定义starter</description>

 <properties>
 <java.version>1.8</java.version>
 </properties>

 <dependencies>
 <dependency>
 <groupId>org.springframework.boot</groupId>
 <artifactId>spring‐boot‐starter</artifactId>
 </dependency>
 </dependencies>

 </project>
1. yiyong-spring-boot-starter 1.pom.xml
<?xml version="1.0" encoding="UTF‐8"?>
 <project xmlns="http://maven.apache.org/POM/4.0.0"
 xmlns:xsi="http://www.w3.org/2001/XMLSchema‐instance"
xsi:schemaLocation="http://maven.apache.org/POM/4.0.0 http://maven.apache.org/xsd/maven‐4.0.0.xsd">
 <parent>
 <artifactId>springboot_custome_starter</artifactId>
 <groupId>com.yiyong.springboot</groupId>
 <version>0.0.1‐SNAPSHOT</version>
 </parent>
 <modelVersion>4.0.0</modelVersion>
 <description>
 启动器(starter)是一个空的jar文件,
 仅仅提供辅助性依赖管理,
 这些依赖需要自动装配或其他类库。
 </description>

 <artifactId>yiyong‐spring‐boot‐starter</artifactId>

 <dependencies>
<!‐‐引入autoconfigure‐‐>
 <dependency>
<groupId>com.yiyong.springboot</groupId>
<artifactId>yiyong‐spring‐boot‐autoconfigure</artifactId>
 <version>0.0.1‐SNAPSHOT</version>
 </dependency>

 <!‐‐如果当前starter 还需要其他的类库就在这里引用‐‐>
</dependencies>

 </project>
2. yiyong-spring-boot-starter-autoconfigurer 1. pom.xml
<?xml version="1.0" encoding="UTF‐8"?>
<project xmlns="http://maven.apache.org/POM/4.0.0"
xmlns:xsi="http://www.w3.org/2001/XMLSchema‐instance"
 xsi:schemaLocation="http://maven.apache.org/POM/4.0.0 http://maven.apache.org/xsd/maven‐4.0.0.xsd">
 <parent>
<artifactId>springboot_custome_starter</artifactId>
<groupId>com.yiyong.springboot</groupId>
 <version>0.0.1‐SNAPSHOT</version>
</parent>
 <modelVersion>4.0.0</modelVersion>

 <artifactId>yiyong‐spring‐boot‐autoconfigure</artifactId>
<dependencies>
 <dependency>
 <groupId>org.springframework.boot</groupId>
 <artifactId>spring‐boot‐starter‐web</artifactId>
 </dependency>
 <!‐‐‐导入配置文件处理器,配置文件进行绑定就会有提示‐‐>
 <dependency>
 <groupId>org.springframework.boot</groupId>
 <artifactId>spring‐boot‐configuration‐processor</artifactId>
 <optional>true</optional>
 </dependency>
 </dependencies>

 </project>
2. HelloProperties
import org.springframework.boot.context.properties.ConfigurationProperties;

 @ConfigurationProperties("yiyong.hello")
 public class HelloProperties {
 private String name;

 public String getName() {
 return name;
 }

 public void setName(String name) {
this.name = name;
}
 }
3. IndexController
 import org.springframework.beans.factory.annotation.Autowired;
 import org.springframework.web.bind.annotation.RequestMapping;
 import org.springframework.web.bind.annotation.RestController;

 @RestController
 public class IndexController {

 HelloProperties helloProperties;

 public IndexController(HelloProperties helloProperties) {
 this.helloProperties=helloProperties;
 }

 @RequestMapping("/")
 public String index(){
 return helloProperties.getName()+"欢迎您";
 }

 }
4. HelloAutoConfitguration
 import org.springframework.beans.factory.annotation.Autowired;
 import org.springframework.boot.autoconfigure.condition.ConditionalOnProperty;
 import org.springframework.boot.context.properties.EnableConfigurationProperties;
 import org.springframework.context.annotation.Bean;
 import org.springframework.context.annotation.Configuration;

 @Configuration
 @ConditionalOnProperty(value = "yiyong.hello.name")
 @EnableConfigurationProperties(HelloProperties.class)
 public class HelloAutoConfitguration {

 @Autowired
 HelloProperties helloProperties;

 @Bean
 public IndexController indexController(){
 return new IndexController(helloProperties);
 }
 }
5. spring.factories 在 resources 下创建文件夹 META-INF 并在 META-INF 下创建文件 spring.factories ,内容如下:
 org.springframework.boot.autoconfigure.EnableAutoConfiguration=\
 com.starter.yiyong.HelloAutoConfitguration
到这儿,我们的配置自定义的starter就写完了 ,我们hello-spring-boot-starter-autoconfigurer、hello-spring-bootstarter 安装成本地jar包。