在 Covid-19 疫情持续的情况下,人们出行需要在公共场合戴口罩。 在这里,我们分享一个计算机视觉模型,可以检测该人是否戴口罩。
数据集收集:
在数据集上建立模型,其中有 331 个训练图像和 17 个带有标签掩码的测试图像、以及没有掩码的侧视图像。
数据注释:
图像注释已使用 MakeSense.AI 完成。 这是一个开源网站,可帮助注释图像并根据我们的选择以任何格式下载。 这里的注解有两种方式:
1.在.xml格式中,我们有X-min,X-max,Y-min,Y-max坐标
2.txt 格式包含对象类别、对象坐标、图像宽度、图像高度
数据准备和建模:
由于在这里使用了 2 个不同的模型,因此数据准备以 2 种不同的方式完成。
1. 使用预训练的 SSD Resnet 进行 Tensorflow 对象检测:
必须从 xml 创建 .csv 文件。
import glob
# this library is needed to read XML files for converting it into CSV
import xml.etree.ElementTree as ET
import shutil
def xml_to_csv(data):
    xml_list=[]
    for files in data:
      if '.xml' in files:
        tree=ET.parse(files)
        root=tree.getroot()
        for member in root.findall('object'):
              #print(member)
              value = (root.find('filename').text,
                      int(root.find('size').find('width').text),
                      int(root.find('size').find('height').text),
                      member.find('name').text,
                      int(member.find('bndbox').find('xmin').text),
                      int(member.find('bndbox').find('ymin').text),
                      int(member.find('bndbox').find('xmax').text),
                      int(member.find('bndbox').find('ymax').text)
                      )
              xml_list.append(value)

    column_name = ['filename', 'width', 'height', 'class', 'xmin', 'ymin', 'xmax', 'ymax']
    xml_df = pd.DataFrame(xml_list, columns=column_name)
    return xml_df
复制代码
在此之后,我们需要分别创建训练和测试 tf 记录。
"""
Usage:
  # From tensorflow/models/
  # Create train data:
  python generate_tfrecord.py --csv_input=data/train_labels.csv  --output_path=train.record
  # Create test data:
  python generate_tfrecord.py --csv_input=data/test_labels.csv  --output_path=test.record
"""
from __future__ import division
from __future__ import print_function
from __future__ import absolute_import

import os
import io
import pandas as pd
import tensorflow as tf

from PIL import Image
import sys
sys.path.append('../')
from object_detection.utils import dataset_util
from collections import namedtuple, OrderedDict

# flags = tf.app.flags
# flags.DEFINE_string('csv_input', '', '/content/Object_Detection/test_labels.csv')
# flags.DEFINE_string('output_path', '', '/content/Object_Detection/Annotations/test.record')
# flags.DEFINE_string('image_dir', '', '/content/Object_Detection/Images/test')
# FLAGS = flags.FLAGS


# TO-DO replace this with label map
def class_text_to_int(row_label):
    if row_label == 'no mask':
        return 1
    elif row_label == 'mask':
        return 2


def split(df, group):
    data = namedtuple('data', ['filename', 'object'])
    gb = df.groupby(group)
    return [data(filename, gb.get_group(x)) for filename, x in zip(gb.groups.keys(), gb.groups)]


def create_tf_example(group, path):
    with tf.io.gfile.GFile(os.path.join(path, '{}'.format(group.filename)), 'rb') as fid:
        encoded_jpg = fid.read()
    encoded_jpg_io = io.BytesIO(encoded_jpg)
    image = Image.open(encoded_jpg_io)
    width, height = image.size
    #change here based on your image extension
    filename = group.filename.encode('utf8')
    image_format = b'jpeg'
    xmins = []
    xmaxs = []
    ymins = []
    ymaxs = []
    classes_text = []
    classes = []

    for index, row in group.object.iterrows():
        xmins.append(row['xmin'] / width)
        xmaxs.append(row['xmax'] / width)
        ymins.append(row['ymin'] / height)
        ymaxs.append(row['ymax'] / height)
        classes_text.append(row['class'].encode('utf8'))
        classes.append(class_text_to_int(row['class']))

    tf_example = tf.train.Example(features=tf.train.Features(feature={
        'image/height': dataset_util.int64_feature(height),
        'image/width': dataset_util.int64_feature(width),
        'image/filename': dataset_util.bytes_feature(filename),
        'image/source_id': dataset_util.bytes_feature(filename),
        'image/encoded': dataset_util.bytes_feature(encoded_jpg),
        'image/format': dataset_util.bytes_feature(image_format),
        'image/object/bbox/xmin': dataset_util.float_list_feature(xmins),
        'image/object/bbox/xmax': dataset_util.float_list_feature(xmaxs),
        'image/object/bbox/ymin': dataset_util.float_list_feature(ymins),
        'image/object/bbox/ymax': dataset_util.float_list_feature(ymaxs),
        'image/object/class/text': dataset_util.bytes_list_feature(classes_text),
        'image/object/class/label': dataset_util.int64_list_feature(classes),
    }))
    return tf_example


def main_train():
    writer = tf.io.TFRecordWriter('/content/FaceMaskDetection/Annotations/train.record')
    path = os.path.join('/content/FaceMaskDetection/Images/train')
    examples = pd.read_csv('/content/FaceMaskDetection/train.csv')
    grouped = split(examples, 'filename')
    for group in grouped:
        tf_example = create_tf_example(group, path)
        writer.write(tf_example.SerializeToString())

    writer.close()
    output_path = os.path.join(os.getcwd(),'/content/FaceMaskDetection/Annotations/train.record')
    print('Successfully created the TFRecords: {}'.format(output_path))
复制代码
我们已经对模型进行了 10000 步的训练。 对于最后几个步骤,这里是损失的样子:
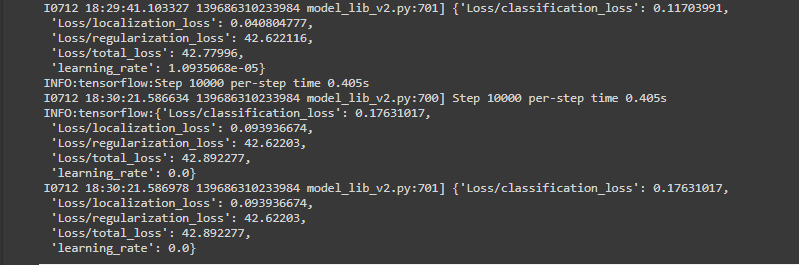
从上面我们可以看到总损失太多了,所以我们不期望这个模型能正常工作。对于模型的推断,我们提供了以下要点。
category_index = label_map_util.create_category_index_from_labelmap(files['LABELMAP'])
IMAGE_PATH = os.path.join('/content/FaceMaskDetection/Images/train/N47.jpeg')

img = cv2.imread(IMAGE_PATH)
image_np = np.array(img)

input_tensor = tf.convert_to_tensor(np.expand_dims(image_np, 0), dtype=tf.float32)
detections = detect_fn(input_tensor)

num_detections = int(detections.pop('num_detections'))
detections = {key: value[0, :num_detections].numpy()
              for key, value in detections.items()}

detections['num_detections'] = num_detections

# detection_classes should be ints.
detections['detection_classes'] = detections['detection_classes'].astype(np.int64)

label_id_offset = 1

image_np_with_detections = image_np.copy()

viz_utils.visualize_boxes_and_labels_on_image_array(
            image_np_with_detections,
            detections['detection_boxes'],
            detections['detection_classes']+label_id_offset,
            detections['detection_scores'],
            category_index,
            use_normalized_coordinates=True,
            max_boxes_to_draw=1,
            min_score_thresh=0.1,
            agnostic_mode=False)

newsize = (300, 300,3)
plt.figure(figsize=(15,10))
#image_np_with_detections = image_np_with_detections.resize(newsize)
plt.imshow(cv2.cvtColor(image_np_with_detections, cv2.COLOR_BGR2RGB))

plt.show()
复制代码
让我们检查一下模型的执行效果。
从上面可以清楚地看到这个模型表现得不够好。要么需要训练更多的步骤,要么需要使用更好的模型,但是相对来说,损失并没有减少太多,可能已经达到了饱和点。我们需要使用更好的模型。
2. YoloV5s:
在这里,我们将使用 .txt 文件注释来训练模型。yolo v5 有不同的版本。我们最初使用 Yolo v5s 版本来检查模型的性能。
import yaml
with open("data.yaml", 'r') as stream:
    num_classes = str(yaml.safe_load(stream)['nc'])
from IPython.core.magic import register_line_cell_magic

@register_line_cell_magic
def writetemplate(line, cell):
    with open(line, 'w') as f:
        f.write(cell.format(**globals()))
%%writetemplate /content/yolov5/models/custom_yolov5s.yaml

# parameters
nc: 2  # number of classes  # CHANGED HERE
depth_multiple: 0.33  # model depth multiple
width_multiple: 0.50  # layer channel multiple

# anchors
anchors:
  - [10,13, 16,30, 33,23]  # P3/8
  - [30,61, 62,45, 59,119]  # P4/16
  - [116,90, 156,198, 373,326]  # P5/32

# YOLOv5 backbone
backbone:
  # [from, number, module, args]
  [[-1, 1, Focus, [64, 3]],  # 0-P1/2
   [-1, 1, Conv, [128, 3, 2]],  # 1-P2/4
   [-1, 3, BottleneckCSP, [128]],
   [-1, 1, Conv, [256, 3, 2]],  # 3-P3/8
   [-1, 9, BottleneckCSP, [256]],
   [-1, 1, Conv, [512, 3, 2]],  # 5-P4/16
   [-1, 9, BottleneckCSP, [512]],
   [-1, 1, Conv, [1024, 3, 2]],  # 7-P5/32
   [-1, 1, SPP, [1024, [5, 9, 13]]],
   [-1, 3, BottleneckCSP, [1024, False]],  # 9
  ]

# YOLOv5 head
head:
  [[-1, 1, Conv, [512, 1, 1]],
   [-1, 1, nn.Upsample, [None, 2, 'nearest']],
   [[-1, 6], 1, Concat, [1]],  # cat backbone P4
   [-1, 3, BottleneckCSP, [512, False]],  # 13

   [-1, 1, Conv, [256, 1, 1]],
   [-1, 1, nn.Upsample, [None, 2, 'nearest']],
   [[-1, 4], 1, Concat, [1]],  # cat backbone P3
   [-1, 3, BottleneckCSP, [256, False]],  # 17 (P3/8-small)

   [-1, 1, Conv, [256, 3, 2]],
   [[-1, 14], 1, Concat, [1]],  # cat head P4
   [-1, 3, BottleneckCSP, [512, False]],  # 20 (P4/16-medium)

   [-1, 1, Conv, [512, 3, 2]],
   [[-1, 10], 1, Concat, [1]],  # cat head P5
   [-1, 3, BottleneckCSP, [1024, False]],  # 23 (P5/32-large)

   [[17, 20, 23], 1, Detect, [nc, anchors]],  # Detect(P3, P4, P5)
  ]
复制代码
在训练模型之前,请确保文件结构如下所示:

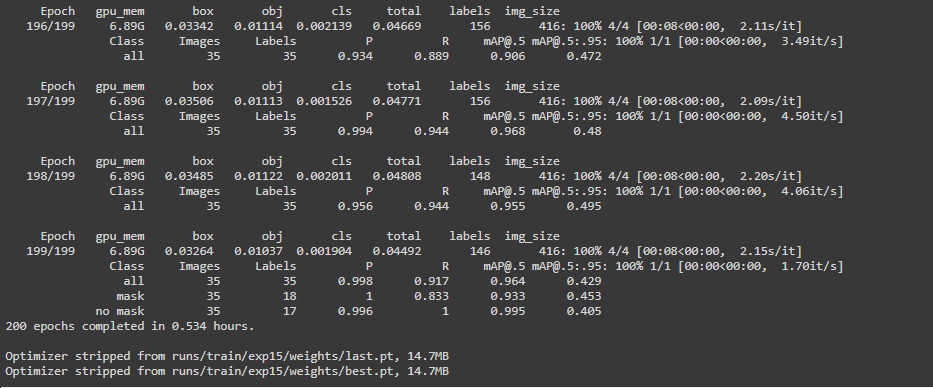
确保图像的情况下,标签文件名应该完全相同,否则会引发错误。现在我们将以 80 的批量大小训练我们的模型 200 个时期。 对于最后几个时期,这就是我们损失的样子。
让我们检查一下我们的模型的执行效果:
可以看到这个模型表现良好。让我们看看具体是怎样的:
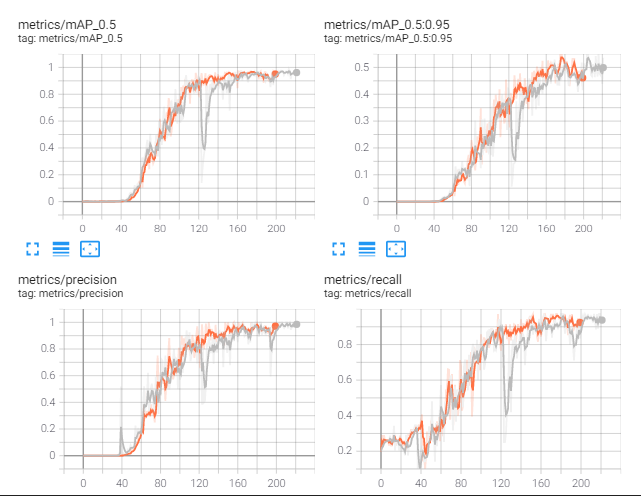
从上面我们可以观察到,模型根本没有过拟合。
计算机视觉技术的示例:
TSINGSEE青犀视频基于多年视频领域的技术经验积累,在人工智能技术+视频领域,也不断研发,将AI检测、智能识别技术融合到各个视频应用场景中,如:安防监控、视频中的人脸检测、人流量统计、危险行为(攀高、摔倒、推搡等)检测识别等。典型的示例如EasyCVR视频融合云服务,具有AI人脸识别、车牌识别、语音对讲、云台控制、声光告警、监控视频分析与数据汇总的能力。