参考文章:
https://zhuanlan.zhihu.com/p/161947638
https://mp.weixin.qq.com/s?__biz=Mzg2NTAzMTExNg==&mid=2247483909&idx=1&sn=201ee629b9ce3b9276a263e18812e607&scene=19#wechat_redirect
1. 依赖导入
1.1 直接导入
<dependency>
    <groupId>io.springfox</groupId>
    <artifactId>springfox-swagger2</artifactId>
    <version>2.9.2</version>
</dependency>
<dependency>
    <groupId>io.springfox</groupId>
    <artifactId>springfox-swagger-ui</artifactId>
    <version>2.9.2</version>
</dependency>
1.2 基于SpringBoot的依赖
<dependency>
     <groupId>io.springfox</groupId>
      <artifactId>springfox-boot-starter</artifactId>
      <version>3.0.0</version>
</dependency>
Swagger到了3.0后,他已经集成到了SpringBoot中,只需要导入一个依赖即可了
2. 配置
2.1 Swagger2的配置
创建一个SwaggerConfig.class,并在其类上添加注解 @EnableSwagger2 即可使用,若使用的SpringBoot,则在Application类中上添加该注解也可以的,下面同理。
@Configuration
@EnableSwagger2
public class SwaggerConfig {


    @Bean
    public Docket docket() {


        return new Docket(DocumentationType.SWAGGER_2)
                .apiInfo(apiInfo())
                .select()
                .apis(RequestHandlerSelectors.basePackage("com.mei.Controller"))
                .paths(PathSelectors.any()) //选择要扫描的路径
                .build();
    }

    private ApiInfo apiInfo() {


        //作者信息
        Contact contact = new Contact("Xavier", null, "[email protected]");

        return new ApiInfo(
                "学习Swagger的使用",
                "如何使用Swagger",
                "1.0",
                "urn:tos",
                contact,
                "Apache 2.0",
                "http://www.apache.org/licenses/LICENSE-2.0",
                new ArrayList()
        );
    }
}
说明:
Docket中的apis()是选择哪些包可以生成api信息,paths()是选择需要扫描的路径。
2.2 Swagger3配置
将 @EnableSwagger2 注解换成 @EnableOpenApi 注解即可
3. 使用
@Api:用在请求类(Controller)上,表示对类的说明
    tags="说明该类的作用,可以在UI界面上看到的注解"
    value="该参数没什么意义,在UI界面上也看到,所以不需要配置"


@ApiOperation:用在请求类的方法上,说明方法的用途、作用
    value="说明方法的用途、作用"
    notes="方法的备注说明"


@ApiModel:用在实体类(pojo)上,说明实体类的信息
    @ApiModelProperty:用在实体类的属性上,描述属性的用途

--------------------------------------------------------------------------------

@ApiImplicitParams:用在请求的方法上,表示一组参数说明
    @ApiImplicitParam:用在@ApiImplicitParams注解中,指定一个请求参数的各个方面
        name:参数名
        value:参数的汉字说明、解释
        required:参数是否必须传
        paramType:参数放在哪个地方
            · header --> 请求参数的获取:@RequestHeader
            · query --> 请求参数的获取:@RequestParam
            · path(用于restful接口)--> 请求参数的获取:@PathVariable
            · div(不常用)
            · form(不常用)
        dataType:参数类型,默认String,其它值dataType="Integer"
        defaultValue:参数的默认值


@ApiResponses:用在请求的方法上,表示一组响应
    @ApiResponse:用在@ApiResponses中,一般用于表达一个错误的响应信息
        code:数字,例如400
        message:信息,例如"请求参数没填好"
        response:抛出异常的类
4. 实例
User.class:
@ApiModel("用户实体")
@Data
@AllArgsConstructor
@NoArgsConstructor
public class User {


    private Integer id;

    @ApiModelProperty("用户名")
    private String name;

    private String pwd;
}
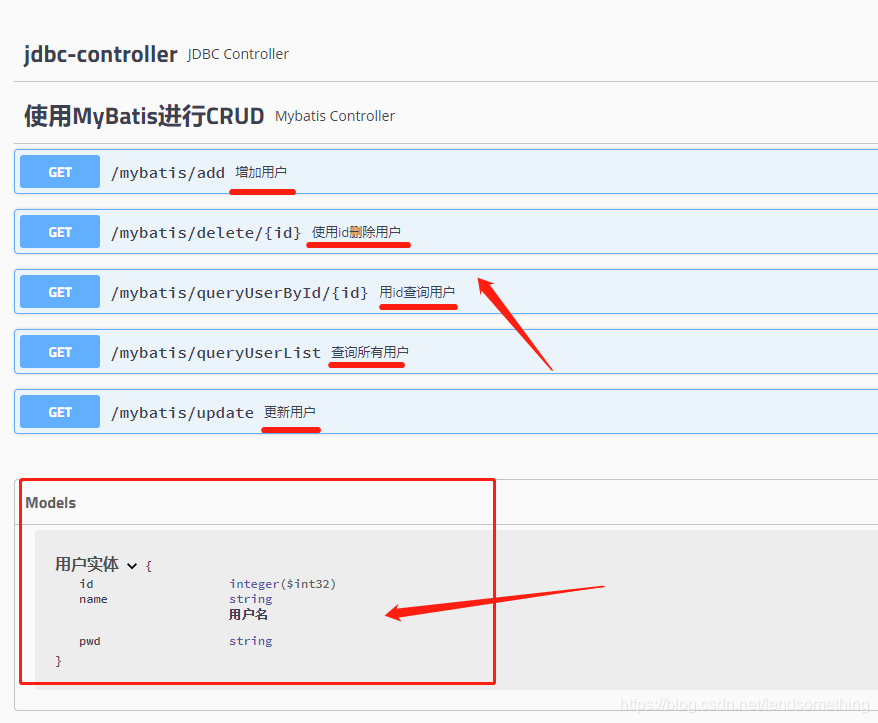
MybatisController.class:
@Api(tags = "使用MyBatis进行CRUD")
@RestController
@RequestMapping("/mybatis")
public class MybatisController {


    @Autowired
    private UserMapper userMapper;

    @ApiOperation("查询所有用户")
    @GetMapping("/queryUserList")
    public List<User> queryUserList() {


        return userMapper.queryUserList();
    }

    @ApiOperation("用id查询用户")
    @GetMapping("/queryUserById/{id}")
    public User queryUserById(@PathVariable("id") int id) {


        return userMapper.queryUserById(id);
    }

    @ApiOperation("增加用户")
    @GetMapping("/add")
    public String addUser() {


        userMapper.addUser(new User(1, "xxxx", "123456"));
        return "add_OK";
    }

    @ApiOperation("更新用户")
    @GetMapping("/update")
    public String updateUser() {


        userMapper.updateUser(new User(8, "xxx", "789456"));
        return "update_OK";
    }

    @ApiOperation("使用id删除用户")
    @GetMapping("/delete/{id}")
    public String deleteUser(@PathVariable("id") int id) {


        userMapper.deleteUser(id);
        return "delete_OK";
    }
}
效果: