实验 一 、GPIO实验
自律 学习 坚强 ,拒绝迷茫。
作者:行走的皮卡丘
时间:2020/3/23
喜欢就去追,这个红灯等不到,说不定下一个红灯等到了,嘻嘻!!!!!!!
一、 实验目的
1、 掌握嵌入式GPIO程序设计流程。
2、 熟悉STM32固件库的基本使用。
二、 实验内容
-
1、新建工程模板。
-
2、编程实现LED1、LED2、LED3交替闪烁,每个LED闪烁间隔时间0.2S(一亮一灭共0.2S),持续1S。
-
3、编程实现LED1、LED2、LED3正向流水灯功能(即依次顺序点亮,从上到下),LED间隔时间0.2S。
-
4、编程实现以下功能:
若键盘未按下,LED1、LED2、LED3交替闪烁,每个LED闪烁间隔时间0.2S(一亮一灭 共0.2S),持续1S。
若键盘K2按下,实现LED1、LED2、LED3正向流水灯功能(即依次顺序点亮,从上到 下),LED间隔时间0.2S。
若键盘K3按下,实现LED1、LED2、LED3反向流水灯功能(即依次顺序点亮,从下到 上),LED间隔时间0.2S。
定义头文件,宏定义对应函数,以便使用
主函数main():先执行对应初始化程序,并执行一次流水动作(1秒)

死循环while(1)中:用if函数判断按键的状态,来实现切换正逆流水功能。
部分代码
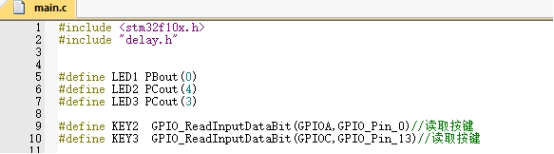
#include <stm32f10x.h> //定义头文件
#include "delay.h"
/**************************************************
* Function main
* @author 行走的皮卡丘
* @date 2021/3/23
* @brief
* @param[in]
* @param[out] void
* @retval void
* @par History 无
* LED1 ---> PB.0
* LED2 ---> PC.4
* LED3 ---> PC.3
*************************************************/
#define LED1 PBout(0) //LED1
#define LED2 PCout(4) //LED2
#define LED3 PCout(3) //LED3
#define KEY2 GPIO_ReadInputDataBit(GPIOA,GPIO_Pin_0)//读取按键
#define KEY3 GPIO_ReadInputDataBit(GPIOC,GPIO_Pin_13)//读取按键
void LED_Init(void)
{
GPIO_InitTypeDef GPIO_InitStr;
RCC_APB2PeriphClockCmd(RCC_APB2Periph_GPIOB|RCC_APB2Periph_GPIOC,ENABLE);//
GPIO_InitStr.GPIO_Mode=GPIO_Mode_Out_PP;//推挽
GPIO_InitStr.GPIO_Pin=GPIO_Pin_0;
GPIO_InitStr.GPIO_Speed=GPIO_Speed_50MHz;
GPIO_Init(GPIOB,&GPIO_InitStr); // PB0 LED1
GPIO_InitStr.GPIO_Pin=GPIO_Pin_4;
GPIO_Init(GPIOC,&GPIO_InitStr); // PC4 LED2
GPIO_InitStr.GPIO_Pin=GPIO_Pin_3;
GPIO_Init(GPIOC,&GPIO_InitStr); // PC3 LED3
GPIO_SetBits(GPIOB,GPIO_Pin_0);
GPIO_SetBits(GPIOC,GPIO_Pin_4);
GPIO_SetBits(GPIOC,GPIO_Pin_3);
}
void KEY_Init(void)
{
GPIO_InitTypeDef GPIO_InitStr;
RCC_APB2PeriphClockCmd(RCC_APB2Periph_GPIOA|RCC_APB2Periph_GPIOC,ENABLE); //开启时钟
GPIO_InitStr.GPIO_Mode=GPIO_Mode_IPD;//下拉输入
GPIO_InitStr.GPIO_Pin=GPIO_Pin_0;
GPIO_Init(GPIOA,&GPIO_InitStr); // PA0 KEY2
GPIO_InitStr.GPIO_Pin=GPIO_Pin_13;
GPIO_Init(GPIOC,&GPIO_InitStr); // PC13 KEY1
}
int main()
{
int i;
delay_init();
LED_Init();
KEY_Init();
LED1 = 0; LED2 = 1; LED3 = 1; delay_ms(200);
LED1 = 1; LED2 = 1; LED3 = 1; delay_ms(200);
LED1 = 1; LED2 = 0; LED3 = 1; delay_ms(200);
LED1 = 1; LED2 = 1; LED3 = 1; delay_ms(200);
LED1 = 1; LED2 = 1; LED3 = 0; delay_ms(200);
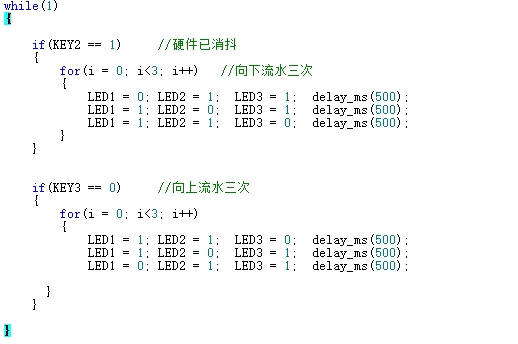
while(1)
{
if(KEY2 == 1) //硬件已消抖
{
for(i = 0; i<3; i++) //向下流水三次
{
LED1 = 0; LED2 = 1; LED3 = 1; delay_ms(500);
LED1 = 1; LED2 = 0; LED3 = 1; delay_ms(500);
LED1 = 1; LED2 = 1; LED3 = 0; delay_ms(500);
}
}
if(KEY3 == 0) //向上流水三次
{
for(i = 0; i<3; i++)
{
LED1 = 1; LED2 = 1; LED3 = 0; delay_ms(500);
LED1 = 1; LED2 = 0; LED3 = 1; delay_ms(500);
LED1 = 0; LED2 = 1; LED3 = 1; delay_ms(500);
}
}
}
}
三、 实验总结
加油!!!行走的皮卡丘!!!!