文章目录
- 1. 软件安装/环境搭建
- 2. 创建工程
- 3.[前端](https://blog.csdn.net/qq_25046005/article/details/112094332)
- 4.分布式组件
-
- 1. 微服务注册中心nacos
- 2. 远程调用openfen
- 3. 配置中心Nacos
- 4. 网关
-
- 1、注册“gulimall-gateway”到Nacos
-
- 1)创建“gulimall-gateway”
- 2)添加“gulimall-common”依赖和“spring-cloud-starter-gateway”依赖
- 3)“com.bigdata.gulimall.gulimallgateway.GulimallGatewayApplication”类上加上“@EnableDiscoveryClient”注解
- 4)在Nacos中创建“gateway”命名空间,同时在该命名空间中创建“gulimall-gateway.yml”
- 5)创建“bootstrap.properties”文件,添加如下配置,指明配置中心地址和所属命名空间
- 6)创建“application.properties”文件,指定服务名和注册中心地址
- 7)启动“gulimall-gateway”
- 2、案例
- 5.业务
1. 软件安装/环境搭建
1.安装vagrant/Centos7
2. docker中安装mysql/Redis
2. 创建工程
创建maven工程
1. 执行sql脚本
gulimall_oms.sql
gulimall_pms.sql
gulimall_sms.sql
gulimall_ums.sql
gulimall_wms.sql
pms_catelog.sql
sys_menus.sql
2.renren
3.前端
4.分布式组件
阿里18年开发的微服务一站式解决方案。
springboot与springcloud版本的对应关系
| spring-cloud-alibaba | spring-cloud |
|---|---|
| 2.2.x | Hoxton |
| 2.1.x | Greenwich |
在common的pom.xml中加入
<dependencyManagement>
    <dependencies>
        <dependency>
            <groupId>com.alibaba.cloud</groupId>
            <artifactId>spring-cloud-alibaba-dependencies</artifactId>
            <version>2.2.0.RELEASE</version>
            <type>pom</type>
            <scope>import</scope>
        </dependency>
    </dependencies>
</dependencyManagement>
上面是依赖管理,相当于以后再dependencies里引spring cloud alibaba就不用写版本号, 全用dependencyManagement进行管理
1. 微服务注册中心nacos
一个更易于构建云原生应用的动态服务发现、配置管理和服务管理平台。作为我们的注册中心和配置中心。
要注意nacos集群所在的server,一定要关闭防火墙,否则容易出现各种问题。
1.启动nacos server
获取nacos server 的两种方式
1. 直接下载:[下载nacos server](https://github.com/alibaba/nacos/releases),解压zip,双击bin里的startup.cmd就启动了。
2. 源码构建:进入 [Nacos Github](https://github.com/alibaba/nacos) 项目页面,将代码 git clone 到本地自行编译打包,[参考此文档](https://nacos.io/zh-cn/docs/quick-start.html)。推荐使用源码构建方式以获取最新版本
启动、停止(bin目录下)
# Linux/Unix/Mac
sh startup.sh -m standalone
sh shutdown.sh

# Windows
cmd startup.cmd sh -m standalone
cmd shutdown.cmd
前端页面
http://192.168.56.10:8848/nacos/
#账号/密码
nacos
2.pom文件
<dependency>
    <groupId>com.alibaba.cloud</groupId>
    <artifactId>spring-cloud-starter-alibaba-nacos-discovery</artifactId>
</dependency>
3.在配置文件中配置 Nacos Server 地址
spring.application.name=service-provider
spring.cloud.nacos.discovery.server-addr=127.0.0.1:8848
4.使用 @EnableDiscoveryClient 注解开启服务注册与发现功能
在启动类添加注解,不添加也可能好用
2. 远程调用openfen
1.pom
	<dependency>
        <groupId>org.springframework.cloud</groupId>
        <artifactId>spring-cloud-starter-openfeign</artifactId>
    </dependency>
2.编写接口
在调用方编写一个接口,告诉SpringCLoud这个接口需要调用远程服务
被调用方
修改“com.bigdata.gulimall.coupon.controller.CouponController”,添加以下controller方法:
    @RequestMapping("/member/list")
    public R memberCoupons(){


        CouponEntity couponEntity = new CouponEntity();
        couponEntity.setCouponName("discount 20%");
        return R.ok().put("coupons",Arrays.asList(couponEntity));
    }
调用方
新建“com.bigdata.gulimall.member.feign.CouponFeignService”接口
@FeignClient("gulimall_coupon")
public interface CouponFeignService {


    @RequestMapping("/coupon/coupon/member/list")
    public R memberCoupons();
}
修改“com.bigdata.gulimall.member.GulimallMemberApplication”类,添加上"@EnableFeignClients":
@SpringBootApplication
@EnableDiscoveryClient
@EnableFeignClients(basePackages = "com.bigdata.gulimall.member.feign")
public class GulimallMemberApplication {


    public static void main(String[] args) {


        SpringApplication.run(GulimallMemberApplication.class, args);
    }
}
声明接口的每一个方法都是调用哪个远程服务的那个请求
3.开启远程调用功能
调用方
com.bigdata.gulimall.member.controller.MemberController
@RequestMapping("/coupons")
    public R test(){


        MemberEntity memberEntity=new MemberEntity();
        memberEntity.setNickname("zhangsan");
        R memberCoupons = couponFeignService.memberCoupons();

        return memberCoupons.put("member",memberEntity).put("coupons",memberCoupons.get("coupons"));
    }
4.测试
访问http://localhost:8000/member/member/coupons
停止“gulimall-coupon”服务,能够看到注册中心显示该服务的健康值为0:
再次访问:http://localhost:8000/member/member/coupons
启动“gulimall-coupon”服务,再次访问,又恢复了正常。
3. 配置中心Nacos
在指明了相同的配置信息时,配置中心中设置的值优先于本地配置。
1.修改项目注册到nacos
添加pom依赖:
<dependency>
    <groupId>com.alibaba.cloud</groupId>
    <artifactId>spring-cloud-starter-alibaba-nacos-config</artifactId>
</dependency>
创建bootstrap.properties文件,该配置文件会优先于“application.yml”加载。
spring.application.name=gulimall-coupon
spring.cloud.nacos.config.server-addr=192.168.137.14:8848
2.配置Nacos-server
1.在Nacos注册中心中,点击“配置列表”,添加配置规则:
DataID:gulimall-coupon
配置格式:properties
文件的命名规则为:
{spring.application.name}−{spring.profiles.active}.${spring.cloud.nacos.config.file-extension}${spring.application.name}:为微服务名
${spring.profiles.active}:指明是哪种环境下的配置,如dev、test或info
${spring.cloud.nacos.config.file-extension}:配置文件的扩展名,可以为properties、yml等
2.查看配置:
3.添加“@RefreshScope”注解
在需要配置属性刷新的类加@RefreshScope注解,使刷新生效
@RestController
@RequestMapping("coupon/coupon")
@RefreshScope
public class CouponController {


}
这样都会动态的从配置中心读取配置.
4.测试
3.Nacos支持三种配置加载方方案
Nacos支持“Namespace+group+data ID”的配置解决方案。
详情见:https://github.com/alibaba/spring-cloud-alibaba/blob/master/spring-cloud-alibaba-docs/src/main/asciidoc-zh/nacos-config.adoc
1.Namespace方案
通过命名空间实现环境区分
下面是配置实例:
1、创建命名空间:
“命名空间”—>“创建命名空间”:
创建三个命名空间,分别为dev,test和prop
2、回到配置列表中,能够看到所创建的三个命名空间
下面我们需要在dev命名空间下,创建“gulimall-coupon.properties”配置规则:
3、访问:http://localhost:7000/coupon/coupon/test
并没有使用我们在dev命名空间下所配置的规则,而是使用的是public命名空间下所配置的规则,这是怎么回事呢?
查看“gulimall-coupon”服务的启动日志:
2020-04-24 16:37:24.158  WARN 32792 --- [           main] c.a.c.n.c.NacosPropertySourceBuilder     : Ignore the empty nacos configuration and get it based on dataId[gulimall-coupon] & group[DEFAULT_GROUP]
2020-04-24 16:37:24.163  INFO 32792 --- [           main] c.a.nacos.client.config.utils.JVMUtil    : isMultiInstance:false
2020-04-24 16:37:24.169  INFO 32792 --- [           main] b.c.PropertySourceBootstrapConfiguration : Located property source: [BootstrapPropertySource {name='bootstrapProperties-gulimall-coupon.properties,DEFAULT_GROUP'}, BootstrapPropertySource {name='bootstrapProperties-gulimall-coupon,DEFAULT_GROUP'}]
"gulimall-coupon.properties",默认就是public命名空间中的内容中所配置的规则。
4、指定命名空间
如果想要使得我们自定义的命名空间生效,需要在“bootstrap.properties”文件中,指定使用哪个命名空间:
spring.cloud.nacos.config.namespace=a2c83f0b-e0a8-40fb-9b26-1e9d61be7d6d
这个命名空间ID来源于我们在第一步所创建的命名空间
5、重启“gulimall-coupon”,再次访问:http://localhost:7000/coupon/coupon/test
但是这种命名空间的粒度还是不够细化,对此我们可以为项目的每个微服务module创建一个命名空间。
6、为所有微服务创建命名空间
7、回到配置列表选项卡,克隆pulic的配置规则到coupon命名空间下
切换到coupon命名空间下,查看所克隆的规则:
8、修改“gulimall-coupon”下的bootstrap.properties文件,添加如下配置信息
spring.cloud.nacos.config.namespace=7905c915-64ad-4066-8ea9-ef63918e5f79
这里指明的是,读取时使用coupon命名空间下的配置。
9、重启“gulimall-coupon”,访问:http://localhost:7000/coupon/coupon/test
2.DataID方案
通过指定spring.profile.active和配置文件的DataID,来使不同环境下读取不同的配置,读取配置时,使用的是默认命名空间public,默认分组(default_group)下的DataID。
默认情况,Namespace=public,Group=DEFAULT GROUP,默认Cluster是DEFAULT
3.Group方案
通过Group实现环境区分
实例:通过使用不同的组,来读取不同的配置,还是以上面的gulimall-coupon微服务为例
1、新建“gulimall-coupon.properties”,将它置于“tmp”组下
2、修改“bootstrap.properties”配置,添加如下的配置
spring.cloud.nacos.config.group=tmp
3、重启“gulimall-coupon”,访问:http://localhost:7000/coupon/coupon/test
4.同时加载多个配置集
当微服务数量很庞大时,将所有配置都书写到一个配置文件中,显然不是太合适。对此我们可以将配置按照功能的不同,拆分为不同的配置文件。
如下面的配置文件:
server:
  port: 7000

spring:
  datasource:
    #MySQL配置
    driverClassName: com.mysql.cj.jdbc.Driver
    url: jdbc:mysql://192.168.137.14:3306/gulimall_sms?useUnicode=true&characterEncoding=UTF-8&useSSL=false
    username: root
    password: root

  application:
    name: gulimall-coupon
  cloud:
    nacos:
      discovery:
        server-addr: 192.168.137.14:8848


mybatis-plus:
  global-config:
    db-config:
      id-type: auto
  mapper-locations: classpath:/mapper/**/*.xml
我们可以将,
数据源有关的配置写到一个配置文件中:
spring:
  datasource:
    #MySQL配置
    driverClassName: com.mysql.cj.jdbc.Driver
    url: jdbc:mysql://192.168.137.14:3306/gulimall_sms?useUnicode=true&characterEncoding=UTF-8&useSSL=false
    username: root
    password: root
和框架有关的写到另外一个配置文件中:
mybatis-plus:
  global-config:
    db-config:
      id-type: auto
  mapper-locations: classpath:/mapper/**/*.xml
也可以将上面的这些配置交给nacos来进行管理。
实例:将“gulimall-coupon”的“application.yml”文件拆分为多个配置,并放置到nacos配置中心
1、创建“datasource.yml”,用于存储和数据源有关的配置
spring:
  datasource:
    #MySQL配置
    driverClassName: com.mysql.cj.jdbc.Driver
    url: jdbc:mysql://192.168.137.14:3306/gulimall_sms?useUnicode=true&characterEncoding=UTF-8&useSSL=false
    username: root
    password: root
在coupon命名空间中,创建“datasource.yml”配置
2、将和mybatis相关的配置,放置到“mybatis.yml”中
mybatis-plus:
  global-config:
    db-config:
      id-type: auto
  mapper-locations: classpath:/mapper/**/*.xml
3、创建“other.yml”配置,保存其他的配置信息
server:
  port: 7000

spring:
  application:
    name: gulimall-coupon
  cloud:
    nacos:
      discovery:
        server-addr: 192.168.137.14:8848
现在“mybatis.yml”、“datasource.yml”和“other.yml”共同构成了微服务的配置。
4、修改“gulimall-coupon”的“bootstrap.properties”文件,加载“mybatis.yml”、“datasource.yml”和“other.yml”配置
spring.cloud.nacos.config.extension-configs[0].data-id=mybatis.yml
spring.cloud.nacos.config.extension-configs[0].group=dev
spring.cloud.nacos.config.extension-configs[0].refresh=true

spring.cloud.nacos.config.extension-configs[1].data-id=datasource.yml
spring.cloud.nacos.config.extension-configs[1].group=dev
spring.cloud.nacos.config.extension-configs[1].refresh=true


spring.cloud.nacos.config.extension-configs[2].data-id=other.yml
spring.cloud.nacos.config.extension-configs[2].group=dev
spring.cloud.nacos.config.extension-configs[2].refresh=true
"spring.cloud.nacos.config.ext-config"已经被废弃,建议使用“spring.cloud.nacos.config.extension-configs”
5、注释“application.yml”文件中的所有配置
6、重启“gulimall-coupon”服务,然后访问:http://localhost:7000/coupon/coupon/test
7、访问:http://localhost:7000/coupon/coupon/list,查看是否能够正常的访问数据库
小结:
1)、微服务任何配置信息,任何配置文件都可以放在配置中心;
2)、只需要在bootstrap.properties中,说明加载配置中心的哪些配置文件即可;
3)、@Value, @ConfigurationProperties。都可以用来获取配置中心中所配置的信息;
4)、配置中心有的优先使用配置中心中的,没有则使用本地的配置。
4. 网关
注意版本spring-boot和spring-cloud的版本对应
    <parent>
        <groupId>org.springframework.boot</groupId>
        <artifactId>spring-boot-starter-parent</artifactId>
        <version>2.2.5.RELEASE</version>
        <relativePath/> <!-- lookup parent from repository -->
    </parent>
    <properties>
        <java.version>1.8</java.version>
        <spring-cloud.version>Hoxton.SR4</spring-cloud.version>
    </properties>
1、注册“gulimall-gateway”到Nacos
1)创建“gulimall-gateway”
SpringCloud gateway
2)添加“gulimall-common”依赖和“spring-cloud-starter-gateway”依赖
        <dependency>
            <groupId>com.bigdata.gulimall</groupId>
            <artifactId>gulimall-common</artifactId>
            <version>1.0-SNAPSHOT</version>
        </dependency>
        <dependency>
            <groupId>org.springframework.cloud</groupId>
            <artifactId>spring-cloud-starter-gateway</artifactId>
        </dependency>
3)“com.bigdata.gulimall.gulimallgateway.GulimallGatewayApplication”类上加上“@EnableDiscoveryClient”注解
4)在Nacos中创建“gateway”命名空间,同时在该命名空间中创建“gulimall-gateway.yml”
5)创建“bootstrap.properties”文件,添加如下配置,指明配置中心地址和所属命名空间
spring.application.name=gulimall-gateway
spring.cloud.nacos.config.server-addr=192.168.137.14:8848
spring.cloud.nacos.config.namespace=1c82552e-1af0-4ced-9a48-26f19c2d315f
6)创建“application.properties”文件,指定服务名和注册中心地址
spring.application.name=gulimall-gateway
spring.cloud.nacos.discovery.server-addr=192.168.137.14:8848
server.port=88
7)启动“gulimall-gateway”
启动报错:
Description:

Failed to configure a DataSource: 'url' attribute is not specified and no embedded datasource could be configured.

Reason: Failed to determine a suitable driver class
解决方法:在“com.bigdata.gulimall.gulimallgateway.GulimallGatewayApplication”中排除和数据源相关的配置
@SpringBootApplication(exclude = {

    DataSourceAutoConfiguration.class})
重新启动
访问:http://192.168.137.14:8848/nacos/#,查看到该服务已经注册到了Nacos中
2、案例
现在想要实现针对于“http://localhost:88/hello?url=baidu”,转发到“https://www.baidu.com”,针对于“http://localhost:88/hello?url=qq”的请求,转发到“https://www.qq.com/”
1)创建“application.yml”
spring:
  cloud:
    gateway:
      routes:
        - id: baidu_route
          uri: https://www.baidu.com
          predicates:
            - Query=url, baidu
        - id: qq_route
          uri: https://www.qq.com/
          predicates:
            - Query=url, qq
2)启动“gulimall-gateway”
3)测试
访问:http://localhost:88/hello?url=baidu
访问:http://localhost:88/hello?url=qq
5.业务
1.product
1. 递归树形结构获取数据
在注册中心中“product”命名空间中,创建“gulimall-product.yml”配置文件:
将“application.yml”内容拷贝到该配置文件中
server:
  port: 10000

spring:
  datasource:
    #MySQL配置
    driverClassName: com.mysql.cj.jdbc.Driver
    url: jdbc:mysql://192.168.137.14:3306/gulimall_pms?useUnicode=true&characterEncoding=UTF-8&useSSL=false
    username: root
    password: root
  application:
    name: gulimall-product
  cloud:
    nacos:
      discovery:
        server-addr: 192.168.137.14:8848


mybatis-plus:
  global-config:
    db-config:
      id-type: auto
  mapper-locations: classpath:/mapper/**/*.xml
在本地创建“bootstrap.properties”文件,指明配置中心的位置和使用到的配置文件:
spring.application.name=gulimall-product
spring.cloud.nacos.config.server-addr=192.168.137.14:8848
spring.cloud.nacos.config.namespace=3c50ffaa-010b-4b59-9372-902e35059232
spring.cloud.nacos.config.extension-configs[0].data-id=gulimall-product.yml
spring.cloud.nacos.config.extension-configs[0].group=DEFAULT_GROUP
spring.cloud.nacos.config.extension-configs[0].refresh=true
然后启动gulimall-product,查看到该服务已经出现在了nacos的注册中心中了
修改“com.bigdata.gulimall.product.service.CategoryService”类,添加如下代码:
    /**
     * 列表
     */
    @RequestMapping("/list/tree")
    public List<CategoryEntity> list(){


        List<CategoryEntity> categoryEntities = categoryService.listWithTree();

        return categoryEntities;
    }
测试:http://localhost:10000/product/category/list/tree
如何区别是哪种分类级别?
答:可以通过分类的parent_cid来进行判断,如果是一级分类,其值为0.
     /**
     * 列表
     */
    @RequestMapping("/list/tree")
    public List<CategoryEntity> list(){


        List<CategoryEntity> categoryEntities = categoryService.listWithTree();
        //找到所有的一级分类
        List<CategoryEntity> level1Menus = categoryEntities.stream()
                .filter(item -> item.getParentCid() == 0)
                .map(menu->{


                    menu.setChildCategoryEntity(getChildrens(menu,categoryEntities));
                    return menu;
                })
                .sorted((menu1, menu2) -> {


                  return (menu1.getSort() ==null ? 0:menu1.getSort())- (menu2.getSort()==null?0:menu2.getSort());

                })
                .collect(Collectors.toList());


        return level1Menus;
    }

    public List<CategoryEntity> getChildrens(CategoryEntity root,List<CategoryEntity> all){


        List<CategoryEntity> childrens = all.stream().filter(item -> {


            return item.getParentCid() == root.getCatId();
        }).map(item -> {


            item.setChildCategoryEntity(getChildrens(item, all));
            return item;
        }).sorted((menu1, menu2) -> {


            return (menu1.getSort() ==null ? 0:menu1.getSort())- (menu2.getSort()==null?0:menu2.getSort());
        }).collect(Collectors.toList());

        return childrens;
    }
下面是得到的部分JSON数据
[
  {


    "catId": 1,
    "name": "图书、音像、电子书刊",
    "parentCid": 0,
    "catLevel": 1,
    "showStatus": 1,
    "sort": 0,
    "icon": null,
    "productUnit": null,
    "productCount": 0,
    "childCategoryEntity": [
      {


        "catId": 22,
        "name": "电子书刊",
        "parentCid": 1,
        "catLevel": 2,
        "showStatus": 1,
        "sort": 0,
        "icon": null,
        "productUnit": null,
        "productCount": 0,
        "childCategoryEntity": [
          {


            "catId": 165,
            "name": "电子书",
            "parentCid": 22,
            "catLevel": 3,
            "showStatus": 1,
            "sort": 0,
            "icon": null,
            "productUnit": null,
            "productCount": 0,
            "childCategoryEntity": []
          },
          {


            "catId": 166,
            "name": "网络原创",
            "parentCid": 22,
            "catLevel": 3,
            "showStatus": 1,
            "sort": 0,
            "icon": null,
            "productUnit": null,
            "productCount": 0,
            "childCategoryEntity": []
          },
          {


            "catId": 167,
            "name": "数字杂志",
            "parentCid": 22,
            "catLevel": 3,
            "showStatus": 1,
            "sort": 0,
            "icon": null,
            "productUnit": null,
            "productCount": 0,
            "childCategoryEntity": []
          },
          {


            "catId": 168,
            "name": "多媒体图书",
            "parentCid": 22,
            "catLevel": 3,
            "showStatus": 1,
            "sort": 0,
            "icon": null,
            "productUnit": null,
            "productCount": 0,
            "childCategoryEntity": []
          }
        ]
      },
      {


        "catId": 23,
        "name": "音像",
        "parentCid": 1,
        "catLevel": 2,
        "showStatus": 1,
        "sort": 0,
        "icon": null,
        "productUnit": null,
        "productCount": 0,
        "childCategoryEntity": [
          {


            "catId": 169,
            "name": "音乐",
            "parentCid": 23,
            "catLevel": 3,
            "showStatus": 1,
            "sort": 0,
            "icon": null,
            "productUnit": null,
            "productCount": 0,
            "childCategoryEntity": []
          },
          {


            "catId": 170,
            "name": "影视",
            "parentCid": 23,
            "catLevel": 3,
            "showStatus": 1,
            "sort": 0,
            "icon": null,
            "productUnit": null,
            "productCount": 0,
            "childCategoryEntity": []
          },
          {


            "catId": 171,
            "name": "教育音像",
            "parentCid": 23,
            "catLevel": 3,
            "showStatus": 1,
            "sort": 0,
            "icon": null,
            "productUnit": null,
            "productCount": 0,
            "childCategoryEntity": []
          }
        ]
      },
      {
启动后端项目renren-fast
启动前端项目renren-fast-vue:
npm run dev
1
访问: http://localhost:8001/#/login
创建一级菜单:
创建完成后,在后台的管理系统中会创建一条记录:
然后创建子菜单:
创建renren-fast-vue\src\views\modules\product目录,子所以是这样来创建,是因为product/category,对应于product-category
在该目录下,新建“category.vue”文件:
1
刷新页面出现404异常,查看请求发现,请求的是“http://localhost:8080/renren-fast/product/category/list/tree”
这个请求是不正确的,正确的请求是:http://localhost:10000/product/category/list/tree,
修正这个问题:
替换“static\config\index.js”文件中的“window.SITE_CONFIG[‘baseUrl’]”
替换前:
window.SITE_CONFIG['baseUrl'] = 'http://localhost:8080/renren-fast';
替换后:
window.SITE_CONFIG['baseUrl'] = 'http://localhost:88/api';
http://localhost:88,这个地址是我们网关微服务的接口。
这里我们需要通过网关来完成路径的映射,因此将renren-fast注册到nacos注册中心中,并添加配置中心
application:
    name: renren-fast
  cloud:
    nacos:
      discovery:
        server-addr: 192.168.137.14:8848

      config:
        name: renren-fast
        server-addr: 192.168.137.8848
        namespace: ee409c3f-3206-4a3b-ba65-7376922a886d
配置网关路由,前台的所有请求都是经由“http://localhost:88/api”来转发的,在“gulimall-gateway”中添加路由规则:
        - id: admin_route
          uri: lb://renren-fast
          predicates:
            - Path=/api/**
但是这样做也引入了另外的一个问题,再次访问:http://localhost:8001/#/login,发现验证码不再显示:
分析原因:
- 现在的验证码请求路径为,http://localhost:88/api/captcha.jpg?uuid=69c79f02-d15b-478a-8465-a07fd09001e6
- 原始的验证码请求路径:http://localhost:8001/renren-fast/captcha.jpg?uuid=69c79f02-d15b-478a-8465-a07fd09001e6
在admin_route的路由规则下,在访问路径中包含了“api”,因此它会将它转发到renren-fast,网关在转发的时候,会使用网关的前缀信息,为了能够正常的取得验证码,我们需要对请求路径进行重写
关于请求路径重写:
6.16. The RewritePath GatewayFilter Factory
The RewritePath GatewayFilter factory takes a path regexp parameter and a replacement parameter. This uses Java regular expressions for a flexible way to rewrite the request path. The following listing configures a RewritePath GatewayFilter:
Example 41. application.yml
spring:
  cloud:
    gateway:
      routes:
      - id: rewritepath_route
        uri: https://example.org
        predicates:
        - Path=/foo/**
        filters:
        - RewritePath=/red(?<segment>/?.*), $\{

    segment}
For a request path of /red/blue, this sets the path to /blue before making the downstream request. Note that the $ should be replaced with $\ because of the YAML specification.
修改“admin_route”路由规则:
        - id: admin_route
          uri: lb://renren-fast
          predicates:
            - Path=/api/**
          filters:
            - RewritePath=/api/(?<segment>/?.*), /renren-fast/$\{

    segment}
再次访问:http://localhost:8001/#/login,验证码能够正常的加载了。
但是很不幸新的问题又产生了,访问被拒绝了
问题描述:已拦截跨源请求:同源策略禁止读取位于 http://localhost:88/api/sys/login 的远程资源。(原因:CORS 头缺少 ‘Access-Control-Allow-Origin’)。
问题分析:这是一种跨域问题。访问的域名和端口和原来的请求不同,请求就会被限制
跨域流程:
解决方法:在网关中定义“GulimallCorsConfiguration”类,该类用来做过滤,允许所有的请求跨域。
@Configuration
public class GulimallCorsConfiguration {


    @Bean
    public CorsWebFilter corsWebFilter(){


        UrlBasedCorsConfigurationSource source=new UrlBasedCorsConfigurationSource();
        CorsConfiguration corsConfiguration = new CorsConfiguration();
        corsConfiguration.addAllowedHeader("*");
        corsConfiguration.addAllowedMethod("*");
        corsConfiguration.addAllowedOrigin("*");
        corsConfiguration.setAllowCredentials(true);

        source.registerCorsConfiguration("/**",corsConfiguration);
        return new CorsWebFilter(source);
    }
}
再次访问:http://localhost:8001/#/login
http://localhost:8001/renre已拦截跨源请求:同源策略禁止读取位于 http://localhost:88/api/sys/login 的远程资源。(原因:不允许有多个 ‘Access-Control-Allow-Origin’ CORS 头)n-fast/captcha.jpg?uuid=69c79f02-d15b-478a-8465-a07fd09001e6
出现了多个请求,并且也存在多个跨源请求。
为了解决这个问题,需要修改renren-fast项目,注释掉“io.renren.config.CorsConfig”类。然后再次进行访问。
在显示分类信息的时候,出现了404异常,请求的http://localhost:88/api/product/category/list/tree不存在
这是因为网关上所做的路径映射不正确,映射后的路径为http://localhost:8001/renren-fast/product/category/list/tree
但是只有通过http://localhost:10000/product/category/list/tree路径才能够正常访问,所以会报404异常。
解决方法就是定义一个product路由规则,进行路径重写:
        - id: product_route
          uri: lb://gulimall-product
          predicates:
            - Path=/api/product/**
          filters:
            - RewritePath=/api/(?<segment>/?.*),/$\{

    segment}
在路由规则的顺序上,将精确的路由规则放置到模糊的路由规则的前面,否则的话,精确的路由规则将不会被匹配到,类似于异常体系中try catch子句中异常的处理顺序。
2. 删除数据
添加delete和append标识,并且增加复选框
 <el-tree
    :data="menus"
    show-checkbox  //显示复选框
    :props="defaultProps"
    :expand-on-click-node="false" //设置节点点击时不展开
    node-key="catId"
  >
    <span class="custom-tree-node" slot-scope="{ node, data }">
      <span>{

   { node.label }}</span>
      <span>
        <el-button v-if="node.level <= 2" type="text" size="mini" @click="() => append(data)">Append</el-button>
        <el-button
          v-if="node.childNodes.length == 0"
          type="text"
          size="mini"
          @click="() => remove(node, data)"
        >Delete</el-button>
      </span>
    </span>
  </el-tree>
测试删除数据,打开postman输入“ http://localhost:88/api/product/category/delete ”,请求方式设置为POST,为了比对效果,可以在删除之前查询数据库的pms_category表:
由于delete请求接收的是一个数组,所以这里使用JSON方式,传入了一个数组:
再次查询数据库能够看到cat_id为1000的数据已经被删除了。
修改“com.bigdata.gulimall.product.controller.CategoryController”类,添加如下代码:
 @RequestMapping("/delete")
    public R delete(@RequestBody Long[] catIds){


        //删除之前需要判断待删除的菜单那是否被别的地方所引用。
//		categoryService.removeByIds(Arrays.asList(catIds));

        categoryService.removeMenuByIds(Arrays.asList(catIds));
        return R.ok();
    }
com.bigdata.gulimall.product.service.impl.CategoryServiceImpl
    @Override
    public   void removeMenuByIds(List<Long> asList) {


        //TODO 检查当前的菜单是否被别的地方所引用
        categoryDao.deleteBatchIds(asList);
    }
然而多数时候,我们并不希望删除数据,而是标记它被删除了,这就是逻辑删除;
可以设置show_status为0,标记它已经被删除。
mybatis-plus的逻辑删除:
配置全局的逻辑删除规则,在“src/main/resources/application.yml”文件中添加如下内容:
mybatis-plus:
  global-config:
    db-config:
      id-type: auto
      logic-delete-value: 1
      logic-not-delete-value: 0
修改“com.bigdata.gulimall.product.entity.CategoryEntity”类,添加上@TableLogic,表明使用逻辑删除:
	/**
	 * 是否显示[0-不显示,1显示]
	 */
	@TableLogic(value = "1",delval = "0")
	private Integer showStatus;
然后在POSTMan中测试一下是否能够满足需要。另外在“src/main/resources/application.yml”文件中,设置日志级别,打印出SQL语句:
logging:
  level:
    com.bigdata.gulimall.product: debug
打印的日志:
 ==>  Preparing: UPDATE pms_category SET show_status=0 WHERE cat_id IN ( ? ) AND show_status=1
 ==> Parameters: 1431(Long)
 <==    Updates: 1
 get changedGroupKeys:[]
3. 菜单拖动
| 同一个菜单内拖动 | 正常 |
| 拖动到父菜单的前面或后面 | 正常 |
| 拖动到父菜单同级的另外一个菜单中 | 正常 |
关注的焦点在于,拖动到目标节点中,使得目标节点的catlevel+deep小于3即可。拖动到目标节点前后的条件是,使得
拖动菜单时需要修改顺序和级别
需要考虑两种类型节点的catLevel
一种关系是:如果是同一个节点下的子节点的前后移动,则不需要修改其catLevel
如果是拖动到另外一个节点内或父节点中,则要考虑修改其catLevel
如果拖动到与父节点平级的节点关系中,则要将该拖动的节点的catLevel,设置为兄弟节点的Level,
先考虑parentCid还是先考虑catLevel?
两种关系在耦合
另外还有一种是前后拖动的情况
哪个范围最大?
肯定是拖动类型关系最大,
如果是前后拖动,则拖动后需要看待拖动节点的层级和设置待拖动节点的parentId,
如果待拖动节点和目标节点的层级相同,则认为是同级拖动,只需要修改节点的先后顺序即可;
否则认为是跨级拖动,则需要修改层级和重新设置parentID
如果
以拖动类型来分,并不合适,比较合适的是跨级拖动和同级拖动
如何判断是跨级拖动还是同级拖动,根据拖动的层级来看,如果是同一级的拖动,只需要修改先后顺序即可,但是这样也会存在一个问题,就是当拖动到另外一个分组下的同级目录中,显然也需要修改parentID,究竟什么样的模型最好呢?
另外也可以判断在跨级移动时,跨级后的parentID是否相同,如果不相同,则认为是在不同目录下的跨级移动需要修改parentID。
顺序、catLevel和parentID
同级移动:
(1)首先判断待移动节点和目标节点的catLevel是否相同,
(2)相同则认为是同级移动,
如果此时移动后目标节点的parentID和待移动节点的相同,但是移动类型是前后移动,只需要调整顺序即可,此时移动类型是inner,则需要修改catLevel和parentId和顺序
如果此时移动后目标节点的parentID和待移动节点的不相同,但是移动类型是前后移动,则需要调整顺序和parentId,此时移动类型是inner,则需要修改catLevel和parentId和顺序
通过这两步的操作能看到一些共性,如果抽取移动类型作为大的分类,则在这种分类下,
如果是前后移动,则分为下面几种情况:
同级别下的前后移动:界定标准为catLevel相同,但是又可以分为parentID相同和parentID不同,parent相同时,只需要修改顺序即可;parentID不同时,需要修改parentID和顺序
不同级别下的前后移动:界定标准为catLevel不同,此时无论如何都要修改parentID,顺序和catLevel
如果是inner类型移动,则分为一下的几种情况。
此时不论是同级inner,还是跨级innner,都需要修改parentID,顺序和catLevel
哪种情况需要更新子节点呢?
那就要看要拖拽的节点是否含有子节点,如果有子节点,则需要更新子节点的catLevel,不需要更新它之间的顺序和parentId,只需要更新catLevel即可。这种更新子节点的Level应该归类,目前的目标是只要有子节点就更新它的catLevel,
(2)如果待移动节点和目标节点的catLevel不同,则认为是跨级移动。如果是移动到父节点中,则需要设置catLevel,parentID和顺序。此时需要分两种情况来考虑,如果是移动到父节点中,则需要设置catLevel,parentID和顺序,如果是移动到兄弟节点中,则需要设置
包含移动到父节点同级目录,兄弟节点中。
设置菜单拖动开关
<el-switch v-model="draggable" active-text="开启拖拽" inactive-text="关闭拖拽"></el-switch>
但是现在存在的一个问题是每次拖拽的时候,都会发送请求,更新数据库这样频繁的与数据库交互,现在想要实现一个拖拽过程中不更新数据库,拖拽完成后,统一提交拖拽后的数据。
现在还存在一个问题,如果是将一个菜单连续的拖拽,最终还放到了原来的位置,但是updateNode中却出现了很多节点更新信息,这样显然也是一个问题。
批量删除
  <el-button type="danger" plain size="small" @click="batchDelete">批量删除</el-button>
1
 //批量删除
    batchDelete() {
      let checkNodes = this.$refs.menuTree.getCheckedNodes();

      //  console.log("被选中的节点:",checkNodes);

      let catIds = [];
      for (let i = 0; i < checkNodes.length; i++) {
        catIds.push(checkNodes[i].catId);
      }

      this.$confirm(`确定要删除?`, "提示", {
        confirmButtonText: "确定",
        cancelButtonText: "取消",
        type: "warning"
      })
        .then(() => {
          this.$http({
            url: this.$http.adornUrl("/product/category/delete"),
            method: "post",
            data: this.$http.adornData(catIds, false)
          }).then(({ data }) => {
            this.$message({
              message: "菜单批量删除成功",
              type: "success"
            });

            //重新刷新页面
            this.getMeus();
          });


        })
        .catch(() => {
          //取消删除
        });
    },
4. 品牌管理菜单
(2)将“”逆向工程得到的resources\src\views\modules\product文件拷贝到gulimall/renren-fast-vue/src/views/modules/product目录下,也就是下面的两个文件
brand.vue brand-add-or-update.vue
但是显示的页面没有新增和删除功能,这是因为权限控制的原因,
<el-button v-if="isAuth('product:brand:save')" type="primary" @click="addOrUpdateHandle()">新增</el-button>
<el-button v-if="isAuth('product:brand:delete')" type="danger" @click="deleteHandle()" :disabled="dataListSelections.length <= 0">批量删除</el-button>
查看“isAuth”的定义位置:
它是在“index.js”中定义,现在将它设置为返回值为true,即可显示添加和删除功能。
再次刷新页面能够看到,按钮已经出现了:
添加“显示状态按钮”
brand.vue
<template slot-scope="scope">
  <el-switch
    v-model="scope.row.showStatus"
    active-color="#13ce66"
    inactive-color="#ff4949"
    @change="updateBrandStatus(scope.row)"
    :active-value = "1"
    :inactive-value	= "0"
  ></el-switch>
</template>
brand-add-or-update.vue
 <el-form-item label="显示状态" prop="showStatus">
    <el-switch v-model="dataForm.showStatus" active-color="#13ce66" inactive-color="#ff4949"></el-switch>
 </el-form-item>
123
//更新开关的状态
    updateBrandStatus(data) {
      console.log("最新状态", data);
      let {brandId,showStatus} = data;
      this.$http({
        url: this.$http.adornUrl("/product/brand/update"),
        method: "post",
        data: this.$http.adornData({brandId,showStatus}, false)
      }).then(({ data }) => {

        this.$message({
          message: "状态更新成功",
          type: "success"
        });

      });
    },
添加上传
和传统的单体应用不同,这里我们选择将数据上传到分布式文件服务器上。
这里我们选择将图片放置到阿里云上,使用对象存储。
阿里云上使使用对象存储方式:
创建Bucket
上传文件:
上传成功后,取得图片的URL
这种方式是手动上传图片,实际上我们可以在程序中设置自动上传图片到阿里云对象存储。
上传模型:
查看阿里云关于文件上传的帮助: https://help.aliyun.com/document_detail/32009.html?spm=a2c4g.11186623.6.768.549d59aaWuZMGJ
1)添加依赖包
在Maven项目中加入依赖项(推荐方式)
在 Maven 工程中使用 OSS Java SDK,只需在 pom.xml 中加入相应依赖即可。以 3.8.0 版本为例,在 内加入如下内容:
<dependency>
    <groupId>com.aliyun.oss</groupId>
    <artifactId>aliyun-sdk-oss</artifactId>
    <version>3.8.0</version>
</dependency>
2)上传文件流
以下代码用于上传文件流:
// Endpoint以杭州为例,其它Region请按实际情况填写。
String endpoint = "http://oss-cn-hangzhou.aliyuncs.com";
// 云账号AccessKey有所有API访问权限,建议遵循阿里云安全最佳实践,创建并使用RAM子账号进行API访问或日常运维,请登录 https://ram.console.aliyun.com 创建。
String accessKeyId = "<yourAccessKeyId>";
String accessKeySecret = "<yourAccessKeySecret>";

// 创建OSSClient实例。
OSS ossClient = new OSSClientBuilder().build(endpoint, accessKeyId, accessKeySecret);

// 上传文件流。
InputStream inputStream = new FileInputStream("<yourlocalFile>");
ossClient.putObject("<yourBucketName>", "<yourObjectName>", inputStream);

// 关闭OSSClient。
ossClient.shutdown();
endpoint的取值:
accessKeyId和accessKeySecret需要创建一个RAM账号:
创建用户完毕后,会得到一个“AccessKey ID”和“AccessKeySecret”,然后复制这两个值到代码的“AccessKey ID”和“AccessKeySecret”。
另外还需要添加访问控制权限:
@Test
    public void testUpload() throws FileNotFoundException {


        // Endpoint以杭州为例,其它Region请按实际情况填写。
        String endpoint = "oss-cn-shanghai.aliyuncs.com";
        // 云账号AccessKey有所有API访问权限,建议遵循阿里云安全最佳实践,创建并使用RAM子账号进行API访问或日常运维,请登录 https://ram.console.aliyun.com 创建。
        String accessKeyId = "LTAI4G4W1RA4JXz2QhoDwHhi";
        String accessKeySecret = "R99lmDOJumF2x43ZBKT259Qpe70Oxw";

        // 创建OSSClient实例。
        OSS ossClient = new OSSClientBuilder().build(endpoint, accessKeyId, accessKeySecret);

        // 上传文件流。
        InputStream inputStream = new FileInputStream("C:\\Users\\Administrator\\Pictures\\timg.jpg");
        ossClient.putObject("gulimall-images", "time.jpg", inputStream);

        // 关闭OSSClient。
        ossClient.shutdown();
        System.out.println("上传成功.");
    }
更为简单的使用方式,是使用SpringCloud Alibaba
详细使用方法,见: https://help.aliyun.com/knowledge_detail/108650.html
(1)添加依赖
        <dependency>
            <groupId>com.alibaba.cloud</groupId>
            <artifactId>spring-cloud-starter-alicloud-oss</artifactId>
            <version>2.2.0.RELEASE</version>
        </dependency>
(2)创建“AccessKey ID”和“AccessKeySecret”
(3)配置key,secret和endpoint相关信息
      access-key: LTAI4G4W1RA4JXz2QhoDwHhi
      secret-key: R99lmDOJumF2x43ZBKT259Qpe70Oxw
      oss:
        endpoint: oss-cn-shanghai.aliyuncs.com
(4)注入OSSClient并进行文件上传下载等操作
但是这样来做还是比较麻烦,如果以后的上传任务都交给gulimall-product来完成,显然耦合度高。最好单独新建一个Module来完成文件上传任务。
其他方式
1)新建gulimall-third-party
2)添加依赖,将原来gulimall-common中的“spring-cloud-starter-alicloud-oss”依赖移动到该项目中
        <dependency>
            <groupId>com.alibaba.cloud</groupId>
            <artifactId>spring-cloud-starter-alicloud-oss</artifactId>
            <version>2.2.0.RELEASE</version>
        </dependency>

        <dependency>
            <groupId>com.bigdata.gulimall</groupId>
            <artifactId>gulimall-common</artifactId>
            <version>1.0-SNAPSHOT</version>
            <exclusions>
                <exclusion>
                    <groupId>com.baomidou</groupId>
                    <artifactId>mybatis-plus-boot-starter</artifactId>
                </exclusion>
            </exclusions>
        </dependency>
另外也需要在“pom.xml”文件中,添加如下的依赖管理
<dependencyManagement>

        <dependencies>
            <dependency>
                <groupId>org.springframework.cloud</groupId>
                <artifactId>spring-cloud-dependencies</artifactId>
                <version>${spring-cloud.version}</version>
                <type>pom</type>
                <scope>import</scope>
            </dependency>
            <dependency>
                <groupId>com.alibaba.cloud</groupId>
                <artifactId>spring-cloud-alibaba-dependencies</artifactId>
                <version>2.2.1.RELEASE</version>
                <type>pom</type>
                <scope>import</scope>
            </dependency>
        </dependencies>
    </dependencyManagement>
3)在主启动类中开启服务的注册和发现
@EnableDiscoveryClient
4)在nacos中注册
(1)创建命名空间“ gulimall-third-party ”
(2)在“ gulimall-third-party”命名空间中,创建“ gulimall-third-party.yml”文件
spring:
  cloud:
    alicloud:
      access-key: LTAI4G4W1RA4JXz2QhoDwHhi
      secret-key: R99lmDOJumF2x43ZBKT259Qpe70Oxw
      oss:
        endpoint: oss-cn-shanghai.aliyuncs.com
5)编写配置文件
application.yml
server:
  port: 30000

spring:
  application:
    name: gulimall-third-party
  cloud:
    nacos:
      discovery:
        server-addr: 192.168.137.14:8848

logging:
  level:
    com.bigdata.gulimall.product: debug
bootstrap.properties
spring.cloud.nacos.config.name=gulimall-third-party
spring.cloud.nacos.config.server-addr=192.168.137.14:8848
spring.cloud.nacos.config.namespace=f995d8ee-c53a-4d29-8316-a1ef54775e00
spring.cloud.nacos.config.extension-configs[0].data-id=gulimall-third-party.yml
spring.cloud.nacos.config.extension-configs[0].group=DEFAULT_GROUP
spring.cloud.nacos.config.extension-configs[0].refresh=true
6) 编写测试类
package com.bigdata.gulimall.thirdparty;

import com.aliyun.oss.OSS;
import com.aliyun.oss.OSSClient;
import com.aliyun.oss.OSSClientBuilder;
import org.junit.jupiter.api.Test;
import org.springframework.beans.factory.annotation.Autowired;
import org.springframework.boot.test.context.SpringBootTest;

import java.io.FileInputStream;
import java.io.FileNotFoundException;
import java.io.InputStream;

@SpringBootTest
class GulimallThirdPartyApplicationTests {


    @Autowired
    OSSClient ossClient;

    @Test
    public void testUpload() throws FileNotFoundException {


        // Endpoint以杭州为例,其它Region请按实际情况填写。
        String endpoint = "oss-cn-shanghai.aliyuncs.com";
        // 云账号AccessKey有所有API访问权限,建议遵循阿里云安全最佳实践,创建并使用RAM子账号进行API访问或日常运维,请登录 https://ram.console.aliyun.com 创建。
        String accessKeyId = "LTAI4G4W1RA4JXz2QhoDwHhi";
        String accessKeySecret = "R99lmDOJumF2x43ZBKT259Qpe70Oxw";

        // 创建OSSClient实例。
        OSS ossClient = new OSSClientBuilder().build(endpoint, accessKeyId, accessKeySecret);

         //上传文件流。
        InputStream inputStream = new FileInputStream("C:\\Users\\Administrator\\Pictures\\timg.jpg");
        ossClient.putObject("gulimall-images", "time3.jpg", inputStream);

        // 关闭OSSClient。
        ossClient.shutdown();
        System.out.println("上传成功.");
    }

}
https://help.aliyun.com/document_detail/31926.html?spm=a2c4g.11186623.6.1527.228d74b8V6IZuT
背景
采用JavaScript客户端直接签名(参见JavaScript客户端签名直传)时,AccessKeyID和AcessKeySecret会暴露在前端页面,因此存在严重的安全隐患。因此,OSS提供了服务端签名后直传的方案。
原理介绍
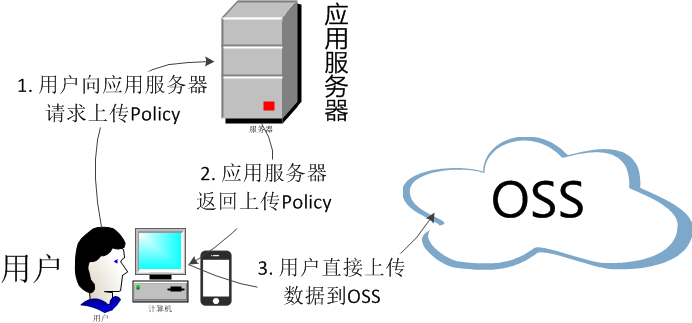
服务端签名后直传的原理如下:
- 用户发送上传Policy请求到应用服务器。
- 应用服务器返回上传Policy和签名给用户。
- 用户直接上传数据到OSS。
编写“com.bigdata.gulimall.thirdparty.controller.OssController”类:
package com.bigdata.gulimall.thirdparty.controller;

import com.aliyun.oss.OSS;
import com.aliyun.oss.common.utils.BinaryUtil;
import com.aliyun.oss.model.MatchMode;
import com.aliyun.oss.model.PolicyConditions;
import org.springframework.beans.factory.annotation.Autowired;
import org.springframework.beans.factory.annotation.Value;
import org.springframework.web.bind.annotation.RequestMapping;
import org.springframework.web.bind.annotation.RestController;

import java.text.SimpleDateFormat;
import java.util.Date;
import java.util.LinkedHashMap;
import java.util.Map;

@RestController
public class OssController {


    @Autowired
    OSS ossClient;
    @Value ("${spring.cloud.alicloud.oss.endpoint}")
    String endpoint ;

    @Value("${spring.cloud.alicloud.oss.bucket}")
    String bucket ;

    @Value("${spring.cloud.alicloud.access-key}")
    String accessId ;
    @Value("${spring.cloud.alicloud.secret-key}")
    String accessKey ;
    @RequestMapping("/oss/policy")
    public Map<String, String> policy(){


        String host = "https://" + bucket + "." + endpoint; // host的格式为 bucketname.endpoint

        String format = new SimpleDateFormat("yyyy-MM-dd").format(new Date());
        String dir = format; // 用户上传文件时指定的前缀。

        Map<String, String> respMap=null;
        try {


            long expireTime = 30;
            long expireEndTime = System.currentTimeMillis() + expireTime * 1000;
            Date expiration = new Date(expireEndTime);
            PolicyConditions policyConds = new PolicyConditions();
            policyConds.addConditionItem(PolicyConditions.COND_CONTENT_LENGTH_RANGE, 0, 1048576000);
            policyConds.addConditionItem(MatchMode.StartWith, PolicyConditions.COND_KEY, dir);

            String postPolicy = ossClient.generatePostPolicy(expiration, policyConds);
            byte[] binaryData = postPolicy.getBytes("utf-8");
            String encodedPolicy = BinaryUtil.toBase64String(binaryData);
            String postSignature = ossClient.calculatePostSignature(postPolicy);

            respMap= new LinkedHashMap<String, String>();
            respMap.put("accessid", accessId);
            respMap.put("policy", encodedPolicy);
            respMap.put("signature", postSignature);
            respMap.put("dir", dir);
            respMap.put("host", host);
            respMap.put("expire", String.valueOf(expireEndTime / 1000));

        } catch (Exception e) {


            // Assert.fail(e.getMessage());
            System.out.println(e.getMessage());
        } finally {


            ossClient.shutdown();
        }
        return respMap;
    }
}
测试: http://localhost:30000/oss/policy
{"accessid":"LTAI4G4W1RA4JXz2QhoDwHhi","policy":"eyJleHBpcmF0aW9uIjoiMjAyMC0wNC0yOVQwMjo1ODowNy41NzhaIiwiY29uZGl0aW9ucyI6W1siY29udGVudC1sZW5ndGgtcmFuZ2UiLDAsMTA0ODU3NjAwMF0sWyJzdGFydHMtd2l0aCIsIiRrZXkiLCIyMDIwLTA0LTI5LyJdXX0=","signature":"s42iRxtxGFmHyG40StM3d9vOfFk=","dir":"2020-04-29/","host":"https://gulimall-images.oss-cn-shanghai.aliyuncs.com","expire":"1588129087"}
1
以后在上传文件时的访问路径为“ http://localhost:88/api/thirdparty/oss/policy”,
在“gulimall-gateway”中配置路由规则:
        - id: third_party_route
          uri: lb://gulimall-gateway
          predicates:
            - Path=/api/thirdparty/**
          filters:
            - RewritePath=/api/thirdparty/(?<segment>/?.*),/$\{

    segment}
测试是否能够正常跳转: http://localhost:88/api/thirdparty/oss/policy
5.上传组件
放置项目提供的upload文件夹到components目录下,一个是单文件上传,另外一个是多文件上传
PS D:\Project\gulimall\renren-fast-vue\src\components\upload> ls


    目录: D:\Project\gulimall\renren-fast-vue\src\components\upload


Mode                LastWriteTime         Length Name
----                -------------         ------ ----
-a----  2020/4/29 星期三     12:0           3122 multiUpload.vue
                                2
-a----  2019/11/11 星期一     21:            343 policy.js
                               20
-a----  2020/4/29 星期三     12:0           3053 singleUpload.vue
                                1


PS D:\Project\gulimall\renren-fast-vue\src\components\upload>
修改这两个文件的配置后
开始执行上传,但是在上传过程中,出现了如下的问题:
Access to XMLHttpRequest at 'http://gulimall-images.oss-cn-shanghai.aliyuncs.com/' from origin 'http://localhost:8001' has been blocked by CORS policy: Response to preflight request doesn't pass access control check: No 'Access-Control-Allow-Origin' header is present on the requested resource.
这又是一个跨域的问题,解决方法就是在阿里云上开启跨域访问:
再次执行文件上传。
2.JSR303校验
前端校验的情况下,后端也要校验,防止越过前端请求
1.使用校验注解
1.注解
在Java中提供了一系列的校验方式,javax.validation.constraints,包中有如下注解
@NotNull
注解元素禁止为null,能够接收任何类型
@NotEmpty
该注解修饰的字段不能为null或"",支持类型 字符 集合 map 数组
@NotBlank
该注解不能为null,并且至少包含一个非空白字符。接收字符序列。
@Pattern
自定义规则(正则)
2.在请求方法中,使用校验注解@Valid
使用SpringBoot的@Validated注解可以分组校验
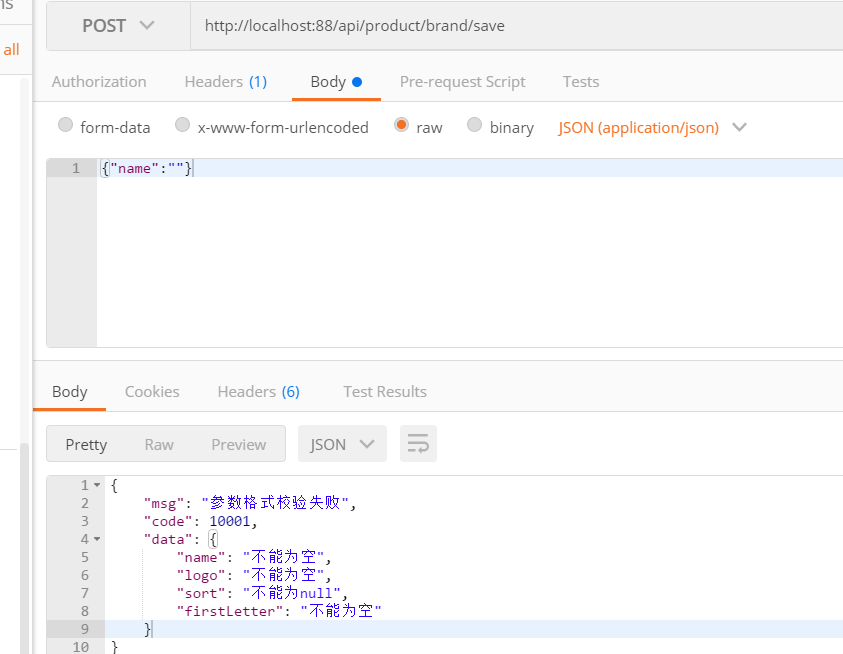
    @RequestMapping("/save")
    public R save(@Valid @RequestBody BrandEntity brand){


		brandService.save(brand);

        return R.ok();
    }
2.错误规则
1.错误规则
消息定义在“hibernate-validator”的“\org\hibernate\validator\ValidationMessages_zh_CN.properties”文件中。在该文件中定义了很多的错误规则:
javax.validation.constraints.AssertFalse.message     = 只能为false
javax.validation.constraints.AssertTrue.message      = 只能为true
javax.validation.constraints.DecimalMax.message      = 必须小于或等于{value}
javax.validation.constraints.DecimalMin.message      = 必须大于或等于{value}
javax.validation.constraints.Digits.message          = 数字的值超出了允许范围(只允许在{integer}位整数和{fraction}位小数范围内)
javax.validation.constraints.Email.message           = 不是一个合法的电子邮件地址
javax.validation.constraints.Future.message          = 需要是一个将来的时间
javax.validation.constraints.FutureOrPresent.message = 需要是一个将来或现在的时间
javax.validation.constraints.Max.message             = 最大不能超过{value}
javax.validation.constraints.Min.message             = 最小不能小于{value}
javax.validation.constraints.Negative.message        = 必须是负数
javax.validation.constraints.NegativeOrZero.message  = 必须是负数或零
javax.validation.constraints.NotBlank.message        = 不能为空
javax.validation.constraints.NotEmpty.message        = 不能为空
javax.validation.constraints.NotNull.message         = 不能为null
javax.validation.constraints.Null.message            = 必须为null
javax.validation.constraints.Past.message            = 需要是一个过去的时间
javax.validation.constraints.PastOrPresent.message   = 需要是一个过去或现在的时间
javax.validation.constraints.Pattern.message         = 需要匹配正则表达式"{regexp}"
javax.validation.constraints.Positive.message        = 必须是正数
javax.validation.constraints.PositiveOrZero.message  = 必须是正数或零
javax.validation.constraints.Size.message            = 个数必须在{min}和{max}之间

org.hibernate.validator.constraints.CreditCardNumber.message        = 不合法的信用卡号码
org.hibernate.validator.constraints.Currency.message                = 不合法的货币 (必须是{value}其中之一)
org.hibernate.validator.constraints.EAN.message                     = 不合法的{type}条形码
org.hibernate.validator.constraints.Email.message                   = 不是一个合法的电子邮件地址
org.hibernate.validator.constraints.Length.message                  = 长度需要在{min}和{max}之间
org.hibernate.validator.constraints.CodePointLength.message         = 长度需要在{min}和{max}之间
org.hibernate.validator.constraints.LuhnCheck.message               = ${validatedValue}的校验码不合法, Luhn模10校验和不匹配
org.hibernate.validator.constraints.Mod10Check.message              = ${validatedValue}的校验码不合法, 模10校验和不匹配
org.hibernate.validator.constraints.Mod11Check.message              = ${validatedValue}的校验码不合法, 模11校验和不匹配
org.hibernate.validator.constraints.ModCheck.message                = ${validatedValue}的校验码不合法, ${modType}校验和不匹配
org.hibernate.validator.constraints.NotBlank.message                = 不能为空
org.hibernate.validator.constraints.NotEmpty.message                = 不能为空
org.hibernate.validator.constraints.ParametersScriptAssert.message  = 执行脚本表达式"{script}"没有返回期望结果
org.hibernate.validator.constraints.Range.message                   = 需要在{min}和{max}之间
org.hibernate.validator.constraints.SafeHtml.message                = 可能有不安全的HTML内容
org.hibernate.validator.constraints.ScriptAssert.message            = 执行脚本表达式"{script}"没有返回期望结果
org.hibernate.validator.constraints.URL.message                     = 需要是一个合法的URL

org.hibernate.validator.constraints.time.DurationMax.message        = 必须小于${inclusive == true ? '或等于' : ''}${days == 0 ? '' : days += '天'}${hours == 0 ? '' : hours += '小时'}${minutes == 0 ? '' : minutes += '分钟'}${seconds == 0 ? '' : seconds += '秒'}${millis == 0 ? '' : millis += '毫秒'}${nanos == 0 ? '' : nanos += '纳秒'}
org.hibernate.validator.constraints.time.DurationMin.message        = 必须大于${inclusive == true ? '或等于' : ''}${days == 0 ? '' : days += '天'}${hours == 0 ? '' : hours += '小时'}${minutes == 0 ? '' : minutes += '分钟'}${seconds == 0 ? '' : seconds += '秒'}${millis == 0 ? '' : millis += '毫秒'}${nanos == 0 ? '' : nanos += '纳秒'}
2.自定义错误消息
默认的错误信息
public @interface NotBlank {


	String message() default "{javax.validation.constraints.NotBlank.message}";
覆盖信息:添加注解的时候,修改message
	@NotBlank(message = "品牌名必须非空")
	private String name;
3.统一异常处理
异常处理类
package com.dyn.mall.common.exception;

import com.dyn.mall.common.utils.R;
import lombok.extern.slf4j.Slf4j;
import org.slf4j.Logger;
import org.slf4j.LoggerFactory;
import org.springframework.dao.DuplicateKeyException;
import org.springframework.validation.BindingResult;
import org.springframework.web.bind.MethodArgumentNotValidException;
import org.springframework.web.bind.annotation.ExceptionHandler;
import org.springframework.web.bind.annotation.RestControllerAdvice;
import org.springframework.web.servlet.NoHandlerFoundException;

import java.util.HashMap;
import java.util.Map;

/**
 * 异常处理器
 *
 * @author Mark [email protected]
 */
@Slf4j
@RestControllerAdvice(basePackages = "com.dyn.*.*.controller")
public class RRExceptionHandler {


    private Logger logger = LoggerFactory.getLogger(getClass());

    /**
     * 处理自定义异常
     */
    @ExceptionHandler(RRException.class)
    public R handleRRException(RRException e) {


        R r = new R();
        r.put("code", e.getCode());
        r.put("msg", e.getMessage());

        return r;
    }

    @ExceptionHandler(NoHandlerFoundException.class)
    public R handlerNoFoundException(Exception e) {


        logger.error(e.getMessage(), e);
        return R.error(404, "路径不存在,请检查路径是否正确");
    }

    @ExceptionHandler(DuplicateKeyException.class)
    public R handleDuplicateKeyException(DuplicateKeyException e) {


        logger.error(e.getMessage(), e);
        return R.error("数据库中已存在该记录");
    }

//	@ExceptionHandler(AuthorizationException.class)
//	public R handleAuthorizationException(AuthorizationException e){


//		logger.error(e.getMessage(), e);
//		return R.error("没有权限,请联系管理员授权");
//	}

    @ExceptionHandler(Exception.class)
    public R handleException(Exception e) {


        logger.error(e.getMessage(), e);
        return R.error();
    }

    @ExceptionHandler(value = Exception.class)
    public R handleValidException(MethodArgumentNotValidException ex) {


        Map<String, String> map = new HashMap<>();
        BindingResult bindingResult = ex.getBindingResult();
        bindingResult.getFieldErrors().forEach(fieldError -> {


            String message = fieldError.getDefaultMessage();
            String field = fieldError.getField();
            map.put(field, message);
        });
        log.error("数据校验异常{},异常类型{}", ex.getMessage(), ex.getClass());
        return R.error(BizCodeEnum.VALID_EXCEPTION.getCode(), BizCodeEnum.VALID_EXCEPTION.getMsg()).put("data", map);
    }

    // 默认异常处理
    @ExceptionHandler(value = Throwable.class)
    public R handleException(Throwable throwable) {


        log.error("未知异常{},异常类型{}", throwable.getMessage(), throwable.getClass());
        return R.error(BizCodeEnum.UNKNOW_EXCEPTION.getCode(), BizCodeEnum.UNKNOW_EXCEPTION.getMsg());
    }

}
错误码和信息定义类
/**
错误码和信息定义类
1.错误码定义规则为5位数字
2.前两位表示业务场景,最后三位表示错误码
3.维护错误码后需要维护错误描述,定义为枚举形式
错误码列表:
10:通用
	001:参数格式校验
11:商品
12:订单
13:购物车
14:物流
*/
public enum BizCodeEnum{


    UNKNOW_EXCEPTION(10000,"系统未知异常"),
    VALID_EXCEPTION(10001,"参数格式校验失败");
    private int code;
    private String msg;

    BizCodeEnum(int code,String msg){


    	this.code=code;
        this.msg=msg;
	}
    public int getCode(){


        return code;
    }
    public String getMsg(){


        return msg;
    }

}
4.分组校验功能(完成多场景的复杂校验)
1.定义group(标识)
public interface AddGroup{


}
public interface UpdateGroup{


}
2.给校验注解分组(指定什么时候校验)
@NotBlank(message="品牌名必须非空",groups={

    UpdateGroup.class,AddGroup.class})
private String name;
3.方法参数上使用@Validated注解
    @RequestMapping("/save")
    public R save(@Validated({

    AddGroup.class}) @RequestBody BrandEntity brand){


        return R.ok();
    }
    @RequestMapping("/update")
    public R update(@Validated({

    UpdateGroup.class}) @RequestBody BrandEntity brand){


        return R.ok();
    }
4.没有指定分组的校验注解,在分组校验情况下不生效,只会在@Validated生效
5.@Validated的value方法:
指定一个或多个验证组以应用于此注释启动的验证步骤。
JSR-303 将验证组定义为自定义注释,应用程序声明的唯一目的是将它们用作类型安全组参数,如 SpringValidatorAdapter 中实现的那样。
其他SmartValidator 实现也可以以其他方式支持类参数。
5.自定义校验功能
// 修改状态时校验
public interface UpdateStatusGroup{


}

/**
 * 显示状态[0-不显示;1-显示]
*/
@NotNull(groups = {

    AddGroup.class, UpdateStatusGroup.class})
private Integer showStatus;
1、编写一个自定义的校验注解
@Documented
// 可以指定多个不同的校验器适配不同类型的校验
@Constraint(validatedBy = {

     })
@Target({

     METHOD, FIELD, ANNOTATION_TYPE, CONSTRUCTOR, PARAMETER, TYPE_USE })
@Retention(RUNTIME)
public @interface ListValue {


    String message() default "{com.bigdata.common.valid.ListValue.message}";

    Class<?>[] groups() default {

     };

    Class<? extends Payload>[] payload() default {

     };

    int[] value() default {

    };
}
新建配置文件ValidationMessages.properties,存放校验信息,会覆盖源文件的校验信息
com.bigdata.common.valid.ListValue.message=必须提交指定的值
2、编写一个自定义的校验器
public class ListValueConstraintValidator implements ConstraintValidator<ListValue,Integer> {


    private Set<Integer> set=new HashSet<>();

    // 初始化方法
    @Override
    public void initialize(ListValue constraintAnnotation) {


        int[] value = constraintAnnotation.value();
        //非空判断
        for (int i : value) {


            set.add(i);
        }
    }

    // 判断是否校验成功
    // value需要校验的值
    @Override
    public boolean isValid(Integer value, ConstraintValidatorContext context) {


        return  set.contains(value);
    }
}
3、关联自定义的校验器和自定义的校验注解
@Constraint(validatedBy = {

     ListValueConstraintValidator.class})
4、使用实例
	/**
	 * 显示状态[0-不显示;1-显示]
	 */
	@ListValue(value = {

    0,1},groups ={

    AddGroup.class})
	private Integer showStatus;
3. 商品SPU和SKU管理(属性分组)
1.SPU与SKU
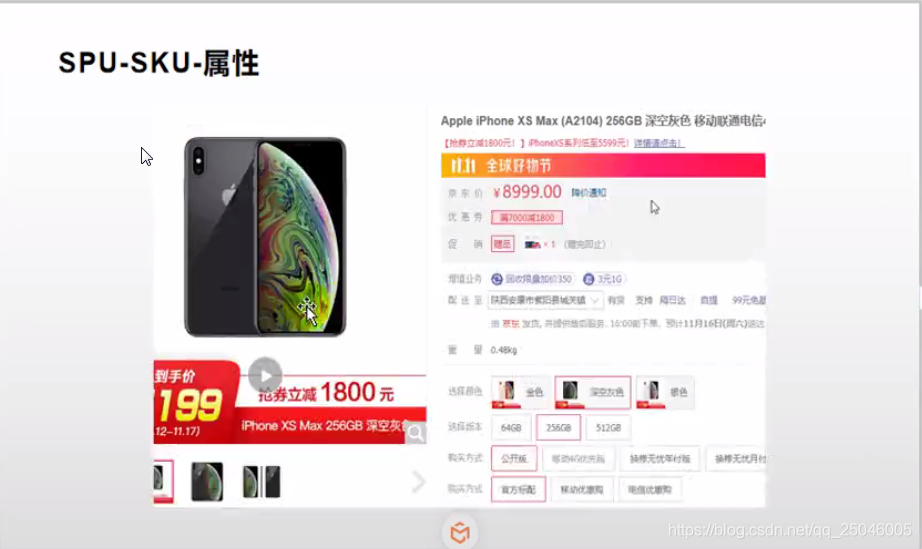
SPU:Standard Product Unit(标准化产品单元)
是商品信息聚合的最小单位,是一组可复用、易检索的标准化信息的集合,该集合描述了一个产品的特性。
SKU:Stock Keeping Unit(库存量单位)
即库存进出计量的基本单元,可以是件、盒等为单位。SKU是对于大型连锁超市DC(配送中心)物流管理的一个必要的方法。现在已经被引申为产品统一编号的简称,每种产品均对应有唯一的SKU号。
SPU与SKU类似 类与对象的关系
iPhoneX:SPU
iPhoneX 64G 黑曜石:SKU
2.基本属性规格参数与销售属性
每个分类下的商品共享规格参数,与销售属性。只是有些商品不一定要用这个分类下的全部属性
- 属性是以三级分类组织起来的
- 规格参数中有些是可以提供检索的
- 规格参数也是基本属性,他们具有自己的分组
- 属性的分组也是以三级分类组织起来的
- 属性名确定的,但是值是每个商品不同来决定的
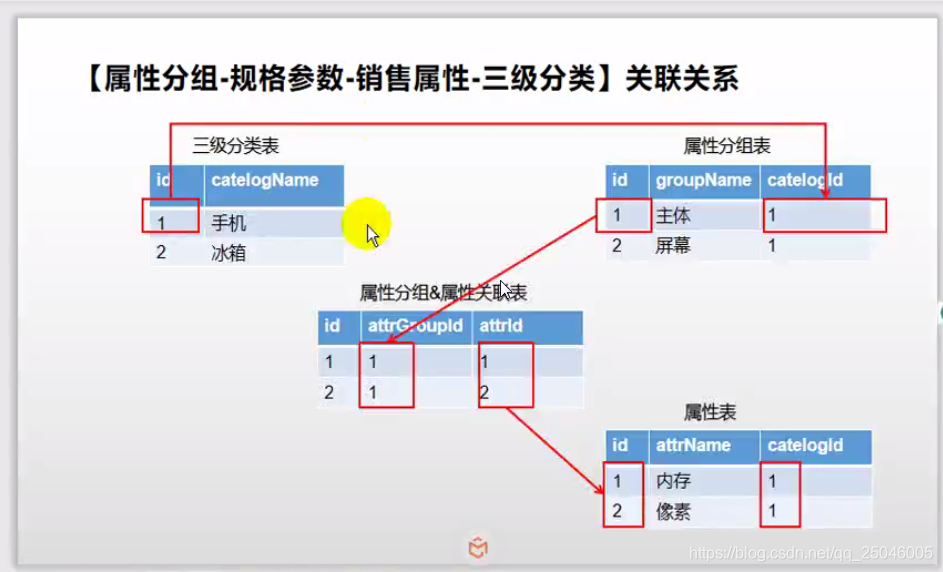
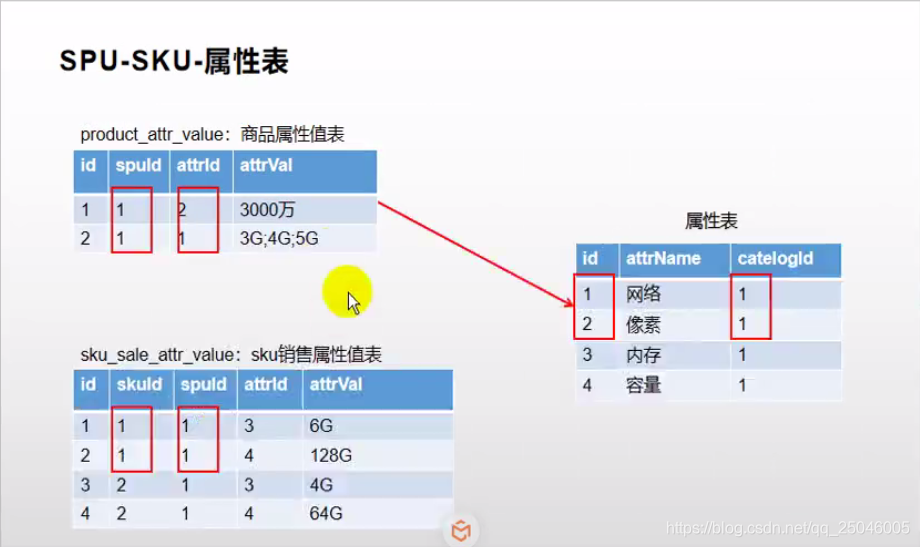
https://easydoc.xyz/#/s/78237135
3. 点击子组件,父组件触发事件
现在想要实现点击菜单的左边,能够实现在右边展示数据
父子组件传递数据:
1)子组件给父组件传递数据,事件机制;
在category.vue中绑定node-click事件,
<el-tree :data="menus" :props="defaultProps" node-key="catId" ref="menuTree" @node-click="nodeClick" ></el-tree>
2)子组件给父组件发送一个事件,携带上数据;
    //传递给data属性的数组中该节点所对应的对象、节点对应的node、节点组件本身
    nodeClick(data,node,component){
       console.log("子组件",data,node,component);
       this.$emit("tree-node-click",data,node,component);
    },
this.$emit(事件名,“携带的数据”);
3)attrgroup.vue父组件中的获取发送的事件
<category @tree-node-click="treeNodeClick"></category>

//获取发送的事件数据
treeNodeClick(data,Node,component){
    console.log("attgroup感知到的category的节点被点击",data,Node,component);
    console.log("刚才被点击的菜单ID",data.catId);
},
common/category.vue
<!-- 公共菜单组件 -->
<template>
  <div class="">
    <el-tree
      :data="dataList"
      :props="defaultProps"
      node-key="catId"
      ref="menuTree"
      @node-click="nodeClick"
    ></el-tree>
  </div>
</template>

<script>
//这里可以导入其他文件(比如:组件,工具js,第三方插件js,json文件,图片文件等等)
//例如:import 《组件名称》 from '《组件路径》';

export default {
  //import引入的组件需要注入到对象中才能使用
  components: {},
  data() {
    //这里存放数据
    return {
      expandedKeys: [],
      dataList: [],
      defaultProps: {
        children: "children",
        label: "name",
      },
    };
  },
  //监听属性 类似于data概念
  computed: {},
  //监控data中的数据变化
  watch: {},
  //方法集合
  methods: {
    // 获取菜单
    getMenus() {
      this.$http({
        url: this.$http.adornUrl("/product/category/list/tree"),
        method: "get",
      }).then(({ data }) => {
        if (data && data.code === 0) {
          this.dataList = data.page;
          this.totalPage = data.page.length;
        } else {
          this.dataList = [];
          this.totalPage = 0;
        }
      });
    },
    //传递给data属性的数组中该节点所对应的对象、节点对应的node、节点组件本身
    nodeClick(data, node, component) {
      console.log("子组件", data, node, component);
      this.$emit("tree-node-click", data, node, component);
    },
  },
  //生命周期 - 创建完成(可以访问当前this实例)
  created() {
    this.getMenus();
  },
  //生命周期 - 挂载完成(可以访问DOM元素)
  mounted() {},
  beforeCreate() {}, //生命周期 - 创建之前
  beforeMount() {}, //生命周期 - 挂载之前
  beforeUpdate() {}, //生命周期 - 更新之前
  updated() {}, //生命周期 - 更新之后
  beforeDestroy() {}, //生命周期 - 销毁之前
  destroyed() {}, //生命周期 - 销毁完成
  activated() {}, //如果页面有keep-alive缓存功能,这个函数会触发
};
</script>
<style >
</style>
product/attrgroup.vue
<template>
  <!-- gutter间隔20 一共24列 -->
  <el-row :gutter="20">
    <el-col :span="6">
      <category @tree-node-click="treeNodeClick"></category>
    </el-col>
    <el-col :span="18">
      <div class="mod-config">
        <el-form
          :inline="true"
          :model="dataForm"
          @keyup.enter.native="getDataList()"
        >
          <el-form-item>
            <el-input
              v-model="dataForm.key"
              placeholder="参数名"
              clearable
            ></el-input>
          </el-form-item>
          <el-form-item>
            <el-button @click="getDataList()">查询</el-button>
            <el-button
              v-if="isAuth('product:attrgroup:save')"
              type="primary"
              @click="addOrUpdateHandle()"
              >新增</el-button
            >
            <el-button
              v-if="isAuth('product:attrgroup:delete')"
              type="danger"
              @click="deleteHandle()"
              :disabled="dataListSelections.length <= 0"
              >批量删除</el-button
            >
          </el-form-item>
        </el-form>
        <el-table
          :data="dataList"
          border
          v-loading="dataListLoading"
          @selection-change="selectionChangeHandle"
          style="width: 100%"
        >
          <el-table-column
            type="selection"
            header-align="center"
            align="center"
            width="50"
          >
          </el-table-column>
          <el-table-column
            prop="attrGroupId"
            header-align="center"
            align="center"
            label="分组id"
          >
          </el-table-column>
          <el-table-column
            prop="attrGroupName"
            header-align="center"
            align="center"
            label="组名"
          >
          </el-table-column>
          <el-table-column
            prop="sort"
            header-align="center"
            align="center"
            label="排序"
          >
          </el-table-column>
          <el-table-column
            prop="descript"
            header-align="center"
            align="center"
            label="描述"
          >
          </el-table-column>
          <el-table-column
            prop="icon"
            header-align="center"
            align="center"
            label="组图标"
          >
          </el-table-column>
          <el-table-column
            prop="catelogId"
            header-align="center"
            align="center"
            label="所属分类id"
          >
          </el-table-column>
          <el-table-column
            fixed="right"
            header-align="center"
            align="center"
            width="150"
            label="操作"
          >
            <template slot-scope="scope">
              <el-button
                type="text"
                size="small"
                @click="addOrUpdateHandle(scope.row.attrGroupId)"
                >修改</el-button
              >
              <el-button
                type="text"
                size="small"
                @click="deleteHandle(scope.row.attrGroupId)"
                >删除</el-button
              >
            </template>
          </el-table-column>
        </el-table>
        <el-pagination
          @size-change="sizeChangeHandle"
          @current-change="currentChangeHandle"
          :current-page="pageIndex"
          :page-sizes="[10, 20, 50, 100]"
          :page-size="pageSize"
          :total="totalPage"
          layout="total, sizes, prev, pager, next, jumper"
        >
        </el-pagination>
        <!-- 弹窗, 新增 / 修改 -->
        <add-or-update
          v-if="addOrUpdateVisible"
          ref="addOrUpdate"
          @refreshDataList="getDataList"
        ></add-or-update>
      </div>
    </el-col>
  </el-row>
</template>

<script>
import AddOrUpdate from "./attrgroup-add-or-update";
import Category from "../common/category";
export default {
  data() {
    return {
      catId: 0,
      dataForm: {
        key: "",
      },
      dataList: [],
      pageIndex: 1,
      pageSize: 10,
      totalPage: 0,
      dataListLoading: false,
      dataListSelections: [],
      addOrUpdateVisible: false,
    };
  },
  components: {
    Category,
    AddOrUpdate,
  },
  activated() {
    this.getDataList();
  },
  methods: {
    // 获取数据列表
    getDataList() {
      this.dataListLoading = true;
      this.$http({
        url: this.$http.adornUrl(`/product/attrgroup/list/${this.catId}`),
        method: "get",
        params: this.$http.adornParams({
          page: this.pageIndex,
          limit: this.pageSize,
          key: this.dataForm.key,
        }),
      }).then(({ data }) => {
        if (data && data.code === 0) {
          this.dataList = data.page.list;
          this.totalPage = data.page.totalCount;
        } else {
          this.dataList = [];
          this.totalPage = 0;
        }
        this.dataListLoading = false;
      });
    },
    // 每页数
    sizeChangeHandle(val) {
      this.pageSize = val;
      this.pageIndex = 1;
      this.getDataList();
    },
    // 当前页
    currentChangeHandle(val) {
      this.pageIndex = val;
      this.getDataList();
    },
    // 多选
    selectionChangeHandle(val) {
      this.dataListSelections = val;
    },
    // 新增 / 修改
    addOrUpdateHandle(id) {
      this.addOrUpdateVisible = true;
      this.$nextTick(() => {
        this.$refs.addOrUpdate.init(id);
      });
    },
    //获取发送的事件数据
    treeNodeClick(data, node, component) {
      console.log("刚才被点击的菜单ID", data.catId);
      console.log("刚才被点击的菜单ID", node.level);
      if (node.level == 3) {
        this.catId = data.catId;
        //重新查询
        this.getDataList();
      }
    },
    // 删除
    deleteHandle(id) {
      var ids = id
        ? [id]
        : this.dataListSelections.map((item) => {
            return item.attrGroupId;
          });
      this.$confirm(
        `确定对[id=${ids.join(",")}]进行[${id ? "删除" : "批量删除"}]操作?`,
        "提示",
        {
          confirmButtonText: "确定",
          cancelButtonText: "取消",
          type: "warning",
        }
      ).then(() => {
        this.$http({
          url: this.$http.adornUrl("/product/attrgroup/delete"),
          method: "post",
          data: this.$http.adornData(ids, false),
        }).then(({ data }) => {
          if (data && data.code === 0) {
            this.$message({
              message: "操作成功",
              type: "success",
              duration: 1500,
              onClose: () => {
                this.getDataList();
              },
            });
          } else {
            this.$message.error(data.msg);
          }
        });
      });
    },
  },
};
</script>
product/attrgroup-add-or-update.vue
<template>
  <el-dialog
    :title="!dataForm.id ? '新增' : '修改'"
    :close-on-click-modal="false"
    :visible.sync="visible"
    @closed="dialogClose"
  >
    <el-form
      :model="dataForm"
      :rules="dataRule"
      ref="dataForm"
      @keyup.enter.native="dataFormSubmit()"
      label-width="80px"
    >
      <el-form-item label="组名" prop="attrGroupName">
        <el-input
          v-model="dataForm.attrGroupName"
          placeholder="组名"
        ></el-input>
      </el-form-item>
      <el-form-item label="排序" prop="sort">
        <el-input v-model="dataForm.sort" placeholder="排序"></el-input>
      </el-form-item>
      <el-form-item label="描述" prop="descript">
        <el-input v-model="dataForm.descript" placeholder="描述"></el-input>
      </el-form-item>
      <el-form-item label="组图标" prop="icon">
        <el-input v-model="dataForm.icon" placeholder="组图标"></el-input>
      </el-form-item>
      <el-form-item label="所属分类id" prop="catelogId">
        <!-- <el-input
          v-model="dataForm.catelogId"
          placeholder="所属分类id"
        ></el-input> -->
        <!-- filterable可搜索 -->
        <el-cascader
          v-model="dataForm.catelogPath"
          :options="categorys"
          :props="props"
          filterable
          placeholder="试试搜索:手机"
        ></el-cascader>
      </el-form-item>
    </el-form>
    <span slot="footer" class="dialog-footer">
      <el-button @click="visible = false">取消</el-button>
      <el-button type="primary" @click="dataFormSubmit()">确定</el-button>
    </span>
  </el-dialog>
</template>

<script>
export default {
  data() {
    return {
      props: {
        value: "catId",
        label: "name",
        children: "children",
      },
      categorys: [],
      visible: false,
      dataForm: {
        attrGroupId: 0,
        attrGroupName: "",
        sort: "",
        descript: "",
        icon: "",
        catelogPath: [],
        catelogId: 0,
      },
      dataRule: {
        attrGroupName: [
          { required: true, message: "组名不能为空", trigger: "blur" },
        ],
        sort: [{ required: true, message: "排序不能为空", trigger: "blur" }],
        descript: [
          { required: true, message: "描述不能为空", trigger: "blur" },
        ],
        icon: [{ required: true, message: "组图标不能为空", trigger: "blur" }],
        catelogId: [
          { required: true, message: "所属分类id不能为空", trigger: "blur" },
        ],
      },
    };
  },
  methods: {
    //对话框关闭时清空表单数据
    dialogClose() {
      this.dataForm.catelogPath = [];
    },
    // 获取菜单
    getCategorys() {
      this.$http({
        url: this.$http.adornUrl("/product/category/list/tree"),
        method: "get",
      }).then(({ data }) => {
        if (data && data.code === 0) {
          this.categorys = data.page;
          this.totalPage = data.page.length;
        } else {
          this.categorys = [];
          this.totalPage = 0;
        }
      });
    },
    init(id) {
      this.dataForm.attrGroupId = id || 0;
      this.visible = true;
      this.$nextTick(() => {
        this.$refs["dataForm"].resetFields();
        if (this.dataForm.attrGroupId) {
          this.$http({
            url: this.$http.adornUrl(
              `/product/attrgroup/info/${this.dataForm.attrGroupId}`
            ),
            method: "get",
            params: this.$http.adornParams(),
          }).then(({ data }) => {
            if (data && data.code === 0) {
              this.dataForm.attrGroupName = data.attrGroup.attrGroupName;
              this.dataForm.sort = data.attrGroup.sort;
              this.dataForm.descript = data.attrGroup.descript;
              this.dataForm.icon = data.attrGroup.icon;
              this.dataForm.catelogId = data.attrGroup.catelogId;
              //查出catelogId 的完整路径
              this.dataForm.catelogPath = data.attrGroup.catelogPath;
            }
          });
        }
      });
    },
    // 表单提交
    dataFormSubmit() {
      this.$refs["dataForm"].validate((valid) => {
        if (valid) {
          this.$http({
            url: this.$http.adornUrl(
              `/product/attrgroup/${
                !this.dataForm.attrGroupId ? "save" : "update"
              }`
            ),
            method: "post",
            data: this.$http.adornData({
              attrGroupId: this.dataForm.attrGroupId || undefined,
              attrGroupName: this.dataForm.attrGroupName,
              sort: this.dataForm.sort,
              descript: this.dataForm.descript,
              icon: this.dataForm.icon,
              catelogId: this.dataForm.catelogPath[
                this.dataForm.catelogPath.length - 1
              ],
            }),
          }).then(({ data }) => {
            if (data && data.code === 0) {
              this.$message({
                message: "操作成功",
                type: "success",
                duration: 1500,
                onClose: () => {
                  this.visible = false;
                  this.$emit("refreshDataList");
                },
              });
            } else {
              this.$message.error(data.msg);
            }
          });
        }
      });
    },
  },
  created() {
    this.getCategorys();
  },
};
</script>
    //数据表里不存在
    @TableField(exist = false)
    //children字段如果为空时,children字段则不返给前端,如果返给前端,前端会显示空列表
    @JsonInclude(JsonInclude.Include.NON_EMPTY)
    private List<CategoryEntity> children;
   /**
     * 信息
     */
    @RequestMapping("/info/{attrGroupId}")
    public R info(@PathVariable("attrGroupId") Long attrGroupId) {


        AttrGroupEntity attrGroup = attrGroupService.getById(attrGroupId);
        Long cateLogId = attrGroup.getCatelogId();
        Long[] path = categoryService.findCateLogPath(cateLogId);
        attrGroup.setCatelogPath(path);

        return R.ok().put("attrGroup", attrGroup);
    }

	/***
     *@Description: 找到catelogId的完整路径
     *@Param: [cateLogId]
     *@return: java.lang.Long[]
     *@Author: dyn
     *@date: 2021/2/2 0002 下午 9:01
     */
    @Override
    public Long[] findCateLogPath(Long cateLogId) {


        List<Long> paths = new ArrayList<>();
        List<Long> parentPath = findParentPath(cateLogId, paths);
        Collections.reverse(parentPath);
        return parentPath.toArray(new Long[parentPath.size()]);
    }

    // 225,25,2
    private List<Long> findParentPath(Long cateLogId, List<Long> paths) {


        //1.收集当前节点id
        paths.add(cateLogId);
        CategoryEntity entity = this.getById(cateLogId);
        if (entity.getParentCid() != 0) {


            findParentPath(entity.getParentCid(), paths);
        }
        return paths;
    }
@Configuration
//开始事务
@EnableTransactionManagement
@MapperScan("com..dao")
public class MyBatisConfig{


    //引入分类插件
    @Bean
    public PaginationInterceptor paginationInterceptor() {


        PaginationInterceptor paginationInterceptor = new PaginationInterceptor();
        // 设置请求的页面大于最大页后操作, true调回到首页,false 继续请求  默认false
        paginationInterceptor.setOverflow(true);
        // 设置最大单页限制数量,默认 500 条,-1 不受限制
        paginationInterceptor.setLimit(1000);
        // 开启 count 的 join 优化,只针对部分 left join
        paginationInterceptor.setCountSqlParser(new JsqlParserCountOptimize(true));
        return paginationInterceptor;
    }
}
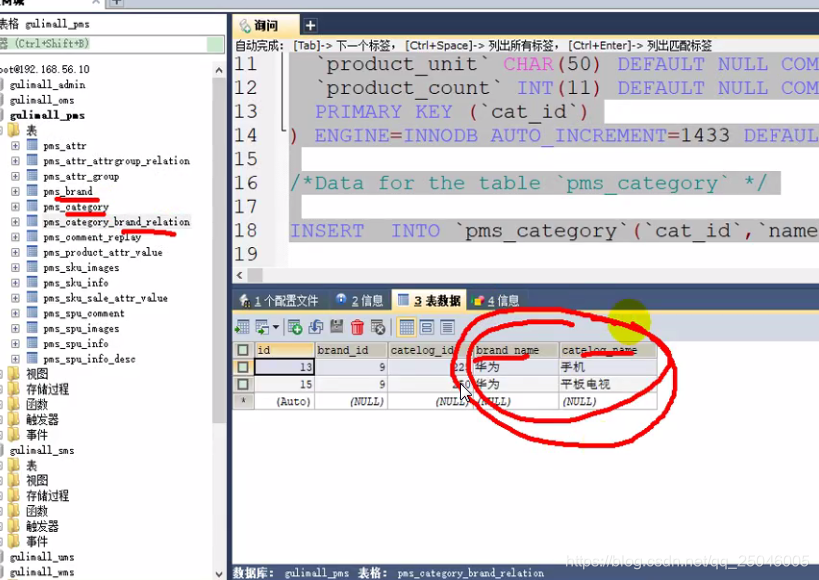
品牌与分类 多对多
平台属性/属性分组
 数据量大时关联查询消耗性能,可以在关联表里冗余存储
冗余存储要注意数据一致性
@Mapper
public interface CategoryBrandRelationDao extends BaseMapper<CategoryBrandRelationEntity> {


    // 超过一个的参数,使用@Param表明
    void updateCategory(@Param("catId") Long catId, @Param("name") String name);

}
4. 规格参数新增与VO
规格参数新增时,请求的URL:Request URL:
http://localhost:88/api/product/attr/base/list/0?t=1588731762158&page=1&limit=10&key=
当有新增字段时,我们往往会在entity实体类中新建一个字段,并标注数据库中不存在该字段,然而这种方式并不规范
比较规范的做法是,新建一个vo文件夹,将每种不同的对象,按照它的功能进行了划分。在java中,涉及到了这几种类型
Request URL: http://localhost:88/api/product/attr/save,现在的情况是,它在保存的时候,只是保存了attr,并没有保存attrgroup,为了解决这个问题,我们新建了一个vo/AttrVo,在原AttrEntity基础上增加了attrGroupId字段,使得保存新增数据的时候,也保存了它们之间的关系。
通过" BeanUtils.copyProperties(attr,attrEntity);"能够实现在两个Bean之间拷贝数据,但是两个Bean的字段要相同
   @Override
    public void saveAttr(AttrVo attr) {


        AttrEntity attrEntity = new AttrEntity();
        BeanUtils.copyProperties(attr,attrEntity);
        this.save(attrEntity);
    }
123456
问题:现在有两个查询,一个是查询部分,另外一个是查询全部,但是又必须这样来做吗?还是有必要的,但是可以在后台进行设计,两种查询是根据catId是否为零进行区分的。
24. 查询分组关联属性和删除关联
获取属性分组的关联的所有属性
API:https://easydoc.xyz/doc/75716633/ZUqEdvA4/LnjzZHPj
发送请求:/product/attrgroup/{attrgroupId}/attr/relation
获取当前属性分组所关联的属性
如何查找:既然给出了attr_group_id,那么到中间表中查询出来所关联的attr_id,然后得到最终的所有属性即可。
可能出现null值的问题
25. 查询分组未关联的属性
/product/attrgroup/{attrgroupId}/noattr/relation
API:https://easydoc.xyz/doc/75716633/ZUqEdvA4/d3EezLdO
获取属性分组里面还没有关联的本分类里面的其他基本属性,方便添加新的关联
Request URL: http://localhost:88/api/product/attrgroup/1/noattr/relation?t=1588780783441&page=1&limit=10&key=
属性分组,对应于“pms_attr_group”表,每个分组下,需要查看到关联了哪些属性信息,销售属性不需要和分组进行关联,但是规格参数要和属性分组进行关联。
规格参数:对应于pms_attr表,attr_type=1,需要显示分组信息
销售属性:对应于pms_attr`表,attr_type=0,不需要显示分组信息
分组ID为9的分组:Request URL: http://localhost:88/api/product/attrgroup/9/noattr/relation?t=1588822258669&page=1&limit=10&key=
对应的数据库字段
attr_group_id attr_group_name sort descript icon catelog_id
        9  主体                    1  型号 平台                   wu               454
       10  显卡                    1  显存容量                    wu               454
       11  输入设备                  1  鼠标 键盘                   wu               454
       12  主板                    1  显卡类型 芯片组                wu               454
       13  规格                    1  尺寸                      wu               454
查询attrgroupId=9的属性分组:
AttrGroupEntity attrGroupEntity = attrGroupDao.selectById(attrgroupId);
获取到分类信息:
Long catelogId = attrGroupEntity.getCatelogId();
目标:取属性分组没有关联的其他属性
也就是获取attrgroupId=9的属性分组中,关联的分类catelog_id =454 (台式机),其他基本属性
在该属性分组中,现在已经关联的属性:
本分类下,存在哪些基本属性?
没有关联的其他属性
已经关联的属性,这些属性是如何关联上的?
答:在创建规格参数的时候,已经设置了需要关联哪些属性分组。
想要知道还没有关联哪些,先查看关联了哪些,如何排除掉这些就是未关联的
在中间表中显示了属性和属性分组之间的关联关系,在属性表中显示了所有的属性,
先查询中间表,得到所有已经关联的属性的id,然后再次查询属性表,排除掉已经建立关联的属性ID,将剩下的属性ID和属性建立起关联关系
26. 添加属性和分组的关联关系
请求类型:Request URL: http://localhost:88/api/product/attrgroup/attr/relation
请求方式:POST
请求数据:[{“attrId”:10,“attrGroupId”:9}]
API:https://easydoc.xyz/doc/75716633/ZUqEdvA4/VhgnaedC
响应数据:
{


	"msg": "success",
	"code": 0
}
1234
本质就是在中间表pms_attr_attrgroup_relation中,添加一条记录的过程
27. 发布商品
获取所有会员等级:/member/memberlevel/list
API:https://easydoc.xyz/doc/75716633/ZUqEdvA4/jCFganpf
在“gulimall-gateway”中修改“”文件,添加对于member的路由
        - id: gulimall-member
          uri: lb://gulimall-member
          predicates:
            - Path=/api/member/**
          filters:
            - RewritePath=/api/(?<segment>/?.*),/$\{

    segment}
123456
在“gulimall-member”中,创建“bootstrap.properties”文件,内容如下:
spring.cloud.nacos.config.name=gulimall-member
spring.cloud.nacos.config.server-addr=192.168.137.14:8848
spring.cloud.nacos.config.namespace=795521fa-77ef-411e-a8d8-0889fdfe6964
spring.cloud.nacos.config.extension-configs[0].data-id=gulimall-member.yml
spring.cloud.nacos.config.extension-configs[0].group=DEFAULT_GROUP
spring.cloud.nacos.config.extension-configs[0].refresh=true
123456
获取分类关联的品牌:/product/categorybrandrelation/brands/list
API:https://easydoc.xyz/doc/75716633/ZUqEdvA4/HgVjlzWV
遇到PubSub问题
- 首先安装pubsub-js
`npm install --save pubsub-js`
1
- 订阅方组件
`import PubSub from 'pubsub-js'`
1
该this.PubSub为PubSub。
获取分类下所有分组&关联属性
请求类型:/product/attrgroup/{catelogId}/withattr
请求方式:GET
请求URL:http://localhost:88/api/product/attrgroup/225/withattr?t=1588864569478
mysql默认的隔离级别为读已提交,为了能够在调试过程中,获取到数据库中的数据信息,可以调整隔离级别为读未提交:
SET SESSION TRANSACTION ISOLATION LEVEL READ UNCOMMITTED;
1
但是它对于当前的事务窗口生效,如果想要设置全局的,需要加上global字段。
28. 商品管理
当新建时:
t: 1588983621569
status: 0
key:
brandId: 0
catelogId: 0
page: 1
limit: 10
1234567
当上架时:
t: 1588983754030
status: 1
key:
brandId: 0
catelogId: 0
page: 1
limit: 10
1234567
当下架时:
t: 1588983789089
status: 2
key:
brandId: 0
catelogId: 0
page: 1
limit: 10
1234567
在SPU中,写出的日期数据都不符合规则:
想要符合规则,可以设置写出数据的规则:
spring.jackson
  jackson:
    date-format: yyyy-MM-dd HH:mm:ss
12
SKU检索:
Request URL: http://localhost:88/api/product/skuinfo/list?t=1588989437944&page=1&limit=10&key=&catelogId=0&brandId=0&min=0&max=0
请求体:
t: 1588989437944
page: 1
limit: 10
key:
catelogId: 0
brandId: 0
min: 0
max: 0
12345678
API: https://easydoc.xyz/doc/75716633/ZUqEdvA4/ucirLq1D
29. 仓库管理
库存信息表:wms_ware_info
【1】仓库列表功能:
【2】查询商品库存:
【3】查询采购需求:
【4】 合并采购需求:
合并整单选中parcharseID:Request URL: http://localhost:88/api/ware/purchase/merge
请求数据:
{

    purchaseId: 1, items: [1, 2]}
items: [1, 2]
12
合并整单未选择parcharseID :Request URL: http://localhost:88/api/ware/purchase/merge
items: [1, 2]
1
涉及到两张表:wms_purchase_detail,wms_purchase
现在采购单中填写数据,然后关联用户,关联用户后,
总的含义,就是根据采购单中的信息,更新采购需求,在采购单中填写采购人员,采购单号,采购的时候,更新采购细节表中的采购人员ID和采购状态。
领取采购单
http://localhost:88/api/ware/purchase/received
(1)某个人领取了采购单后,先看采购单是否处于未分配状态,只有采购单是新建或以领取状态时,才更新采购单的状态
(2)
【1】仓库列表功能: https://easydoc.xyz/doc/75716633/ZUqEdvA4/mZgdqOWe
【2】查询商品库存: https://easydoc.xyz/doc/75716633/ZUqEdvA4/hwXrEXBZ
【3】查询采购需求: https://easydoc.xyz/doc/75716633/ZUqEdvA4/Ss4zsV7R
【4】 合并采购需求:https://easydoc.xyz/doc/75716633/ZUqEdvA4/cUlv9QvK
【5】查询未领取的采购单: https://easydoc.xyz/doc/75716633/ZUqEdvA4/hI12DNrH
【6】领取采购单: https://easydoc.xyz/doc/75716633/ZUqEdvA4/vXMBBgw1
完成采购,在完成采购过程中,需要涉及到设置SKU的name信息到仓库中,这是通过远程调用“gulimall-product”来实现根据sku_id查询得到sku_name的,如果这个过程发生了异常,事务不想要回滚,目前采用的方式是通过捕获异常的方式,防止事务回滚,是否还有其他的方式呢?这个问题留待以后解决。
 @Override
    public void addStock(Long skuId, Long wareId, Integer skuNum) {


        List<WareSkuEntity> wareSkuEntities = wareSkuDao.selectList(new QueryWrapper<WareSkuEntity>().eq("sku_id", skuId).eq("ware_id", wareId));

        if(wareSkuEntities == null || wareSkuEntities.size() ==0 ){


             //新增
            WareSkuEntity wareSkuEntity = new WareSkuEntity();
            wareSkuEntity.setSkuId(skuId);
            wareSkuEntity.setWareId(wareId);
            wareSkuEntity.setStock(skuNum);
            wareSkuEntity.setStockLocked(0);

            //远程查询SKU的name,若失败无需回滚
            try {


                R info = productFeignService.info(skuId);
                if(info.getCode() == 0){


                    Map<String,Object> data=(Map<String,Object>)info.get("skuInfo");
                    wareSkuEntity.setSkuName((String) data.get("skuName"));
                }
            } catch (Exception e) {


            }

            wareSkuDao.insert(wareSkuEntity);
        }else{


            //插入
            wareSkuDao.addStock(skuId,wareId,skuNum);
        }

    }
12345678910111213141516171819202122232425262728293031
30. 获取spu规格
在SPU管理页面,获取商品规格的时候,出现400异常,浏览器显示跳转不了
问题现象:
出现问题的代码:
    attrUpdateShow(row) {


      console.log(row);
      this.$router.push({


        path: "/product-attrupdate",
        query: {

     spuId: row.id, catalogId: row.catalogId }
      });
    },
1234567
暂时不知道如何解决问题。只能留待以后解决。
经过测试发现,问题和上面的代码没有关系,问题出现在“attrupdate.vue”上,该vue页面无法通过浏览器访问,当输入访问URL( http://localhost:8001/#/product-attrupdate )的时候,就会出现404,而其他的请求则不会出现这种情况,不知为何。
通过POSTMAN进行请求的时候,能够请求到数据。
经过分析发现,是因为在数据库中没有该页面的导航所导致的,为了修正这个问题,可以在“sys-menu”表中添加一行,内容位:
这样当再次访问的时候,在“平台属性”下,会出现“规格维护”菜单,
当再次点击“规格”的时候,显示出菜单
不过这种菜单并不符合我们的需要,我们需要让它以弹出框的形式出现。
31. 修改商品规格
API: https://easydoc.xyz/doc/75716633/ZUqEdvA4/GhnJ0L85
URL:/product/attr/update/{spuId}
小结:
1. 在open fen中会将调用的数据转换为JSON,接收方接收后,将JSON转换为对象,此时调用方和被调用方的处理JSON的对象不一定都是同一个类,只要它们的字段类型吻合即可。
调用方:
@FeignClient(value = "gulimall-coupon")
public interface CouponFenService {


    @PostMapping("/coupon/spubounds/save")
    R saveSpuBounds(@RequestBody SpuBoundTo spuBoundTo);

    @PostMapping("/coupon/skufullreduction/saveInfo")
    R saveSkuReduction(@RequestBody SkuReductionTo skuReductionTo);
}
123456789
被调用方:
    @PostMapping("/save")
    public R save(@RequestBody SpuBoundsEntity spuBounds){


		spuBoundsService.save(spuBounds);

        return R.ok();
    }

    @PostMapping("/saveInfo")
    public R saveInfo(@RequestBody SkuReductionTo skuReductionTo){


        skuFullReductionService.saveSkuReduction(skuReductionTo);
        return R.ok();
    }
123456789101112
调用方JSON化时的对象SpuBoundTo:
@Data
public class SpuBoundTo {
    private Long spuId;
    private BigDecimal buyBounds;
    private BigDecimal growBounds;
}
123456
被调用方JSON数据对象化时的对象SpuBoundsEntity:
/**
 * 商品spu积分设置
 *
 * @author cosmoswong
 * @email [email protected]
 * @date 2020-04-23 23:38:48
 */
@Data
@TableName("sms_spu_bounds")
public class SpuBoundsEntity implements Serializable {


	private static final long serialVersionUID = 1L;

	/**
	 * id
	 */
	@TableId
	private Long id;
	/**
	 *
	 */
	private Long spuId;
	/**
	 * 成长积分
	 */
	private BigDecimal growBounds;
	/**
	 * 购物积分
	 */
	private BigDecimal buyBounds;
	/**
	 * 优惠生效情况[1111(四个状态位,从右到左);0 - 无优惠,成长积分是否赠送;1 - 无优惠,购物积分是否赠送;2 - 有优惠,成长积分是否赠送;3 - 有优惠,购物积分是否赠送【状态位0:不赠送,1:赠送】]
	 */
	private Integer work;

}
1234567891011121314151617181920212223242526272829303132333435
2. 事务究竟要如何加上?
存在Batch操作的时候,才需要加上事务,单个操作无需添加事务控制。
SpringBoot中的是事务
批量操作的时候,才需要事务
一个事务标注的方法上,方法内存在这些操作:
(1)批量更新一个表中字段
(2)更新多张表中的操作
实际上不论是哪种类型,方法中所有对于数据库的写操作,都会被整体当做一个事务,在这个事务过程中,如果某个操作出现了异常,则整体都不会被提交。这就是对于SpringBoot中的@Transactional的理解。
@EnableTransactionManagement和@Transactional的区别?
https://blog.csdn.net/abysscarry/article/details/80189232
https://blog.csdn.net/Driver_tu/article/details/99679145
https://www.cnblogs.com/leaveast/p/11765503.html
其他
1. 文档参考地址
https://blog.csdn.net/ok_wolf/article/details/105400748
https://www.cnblogs.com/javalbb/p/12690862.html
https://blog.csdn.net/ok_wolf/article/details/105456170
https://easydoc.xyz/doc/75716633/ZUqEdvA4/jCFganpf
2. 开机启动docker
在Docker中设置开机启动容器
#查看防火墙状态
[root@hadoop-104 module]# systemctl status firewalld
  firewalld.service - firewalld - dynamic firewall daemon
   Loaded: loaded (/usr/lib/systemd/system/firewalld.service; enabled; vendor preset: enabled)
   Active: active (running) since Wed 2020-04-22 21:26:23 EDT; 10min ago
     Docs: man:firewalld(1)
 Main PID: 5947 (firewalld)
   CGroup: /system.slice/firewalld.service
           └─5947 /usr/bin/python -Es /usr/sbin/firewalld --nofork --nopid

Apr 22 21:26:20 hadoop-104 systemd[1]: Starting firewalld - dynamic firewall daemon...
Apr 22 21:26:23 hadoop-104 systemd[1]: Started firewalld - dynamic firewall daemon.
#查看防火墙是否是开机启动
[root@hadoop-104 module]# systemctl list-unit-files|grep firewalld
firewalld.service                             enabled
#关闭开机启动防火墙
[root@hadoop-104 module]# systemctl disable firewalld
Removed symlink /etc/systemd/system/multi-user.target.wants/firewalld.service.
Removed symlink /etc/systemd/system/dbus-org.fedoraproject.FirewallD1.service.
#停止防火墙
[root@hadoop-104 module]# systemctl stop firewalld
#再次查看防火墙
[root@hadoop-104 module]# systemctl list-unit-files|grep firewalld
firewalld.service                             disabled
[root@hadoop-104 module]#
12345678910111213141516171819202122232425
3. 查看命令的安装位置
whereis mysql:查看mysql的安装位置
4. vscode中生成代码片段
新建一个全局的代码片段,名字为vue,然后回车:
将下面的代码片段粘贴到“vue.code-snippets”
{


    // Place your 全局 snippets here. Each snippet is defined under a snippet name and has a scope, prefix, body and
    // description. Add comma separated ids of the languages where the snippet is applicable in the scope field. If scope
    // is left empty or omitted, the snippet gets applied to all languages. The prefix is what is
    // used to trigger the snippet and the body will be expanded and inserted. Possible variables are:
    // $1, $2 for tab stops, $0 for the final cursor position, and ${1:label}, ${2:another} for placeholders.
    // Placeholders with the same ids are connected.
    // Example:
    // "Print to console": {


    // 	"scope": "javascript,typescript",
    // 	"prefix": "log",
    // 	"body": [
    // 		"console.log('$1');",
    // 		"$2"
    // 	],
    // 	"description": "Log output to console"
    // }
    "生成vue模板": {


        "prefix": "vue",
        "body": [
            "<!-- $1 -->",
            "<template>",
            "<div class='$2'>$5</div>",
            "</template>",
            "",
            "<script>",
            "//这里可以导入其他文件(比如:组件,工具js,第三方插件js,json文件,图片文件等等)",
            "//例如:import 《组件名称》 from '《组件路径》';",
            "",
            "export default {",
            "//import引入的组件需要注入到对象中才能使用",
            "components: {},",
            "data() {",
            "//这里存放数据",
            "return {",
            "",
            "};",
            "},",
            "//监听属性 类似于data概念",
            "computed: {},",
            "//监控data中的数据变化",
            "watch: {},",
            "//方法集合",
            "methods: {",
            "",
            "},",
            "//生命周期 - 创建完成(可以访问当前this实例)",
            "created() {",
            "",
            "},",
            "//生命周期 - 挂载完成(可以访问DOM元素)",
            "mounted() {",
            "",
            "},",
            "beforeCreate() {}, //生命周期 - 创建之前",
            "beforeMount() {}, //生命周期 - 挂载之前",
            "beforeUpdate() {}, //生命周期 - 更新之前",
            "updated() {}, //生命周期 - 更新之后",
            "beforeDestroy() {}, //生命周期 - 销毁之前",
            "destroyed() {}, //生命周期 - 销毁完成",
            "activated() {}, //如果页面有keep-alive缓存功能,这个函数会触发",
            "}",
            "</script>",
            "<style lang='scss' scoped>",
            "//@import url($3); 引入公共css类",
            "$4",
            "</style>"
        ],
        "description": "生成VUE模板"
    },
    "http-get请求": {


        "prefix": "httpget",
        "body": [
            "this.\\$http({",
            "url: this.\\$http.adornUrl(''),",
            "method: 'get',",
            "params: this.\\$http.adornParams({})",
            "}).then(({ data }) => {",
            "})"
        ],
        "description": "httpGET请求"
    },
    "http-post请求": {


        "prefix": "httppost",
        "body": [
            "this.\\$http({",
            "url: this.\\$http.adornUrl(''),",
            "method: 'post',",
            "data: this.\\$http.adornData(data, false)",
            "}).then(({ data }) => { });"
        ],
        "description": "httpPOST请求"
    }
}
12345678910111213141516171819202122232425262728293031323334353637383940414243444546474849505152535455565758596061626364656667686970717273747576777879808182838485868788899091929394
更多详细说明见: https://blog.csdn.net/z772330927/article/details/105730430/
5. vscode快捷键
ctrl+shift+f 全局搜索
alt+shift+f 格式化代码
6. 关闭eslint的语法检查
1
7. 安装mybatisx插件
在Marketplace中搜索“mybatisx”,安装后重启IDEA,使用时会自动在@Mapper标注的接口上,产生小图标,然后alt+enter,generate statement,就会自动的在xml文件中生成SQL。
8. mysql的批量删除
DELETE FROM  `pms_attr_attrgroup_relation` WHERE (attr_id= ? AND attr_group_id ) OR (attr_id= ? AND attr_group_id )
1
9. String.join
java.lang.String @NotNull
public static String join(@NotNull CharSequence delimiter,
                          @NotNull Iterable<? extends CharSequence> elements)
123
Returns a new String composed of copies of the CharSequence elements joined together with a copy of the specified delimiter.
返回一个由CharSequence元素的副本和指定分隔符的副本组成的新字符串。
For example,
 List<String> strings = new LinkedList<>();
 strings.add("Java");strings.add("is");
 strings.add("cool");
 String message = String.join(" ", strings);
 //message returned is: "Java is cool"

 Set<String> strings = new LinkedHashSet<>();
 strings.add("Java"); strings.add("is");
 strings.add("very"); strings.add("cool");
 String message = String.join("-", strings);
 //message returned is: "Java-is-very-cool"
1234567891011
Note that if an individual element is null, then “null” is added.
注意,如果单个元素为null,则添加“null”。
Params:
delimiter – a sequence of characters that is used to separate each of the elements in the resulting String
用于分隔结果字符串中的每个元素的字符序列
elements – an Iterable that will have its elements joined together.
将其元素连接在一起的可迭代的。
Returns:
a new String that is composed from the elements argument
由elements参数组成的新字符串
Throws:
NullPointerException – If delimiter or elements is null
    public static String join(CharSequence delimiter,
            Iterable<? extends CharSequence> elements) {


        Objects.requireNonNull(delimiter);
        Objects.requireNonNull(elements);
        StringJoiner joiner = new StringJoiner(delimiter);
        for (CharSequence cs: elements) {


            joiner.add(cs);
        }
        return joiner.toString();
    }
12345678910
能够看到实际上它就是通过创建StringJoiner,然后遍历elements,加入每个元素来完成的。
StringJoiner
java.util public final class StringJoiner
extends Object
12
StringJoiner is used to construct a sequence of characters separated by a delimiter and optionally starting with a supplied prefix and ending with a supplied suffix.
tringJoiner用于构造由分隔符分隔的字符序列,可以选择以提供的前缀开始,以提供的后缀结束。
Prior to adding something to the StringJoiner, its sj.toString() method will, by default, return prefix + suffix. However, if the setEmptyValue method is called, the emptyValue supplied will be returned instead. This can be used, for example, when creating a string using set notation to indicate an empty set, i.e. “{}”, where the prefix is “{”, the suffix is “}” and nothing has been added to the StringJoiner.
在向StringJoiner添加内容之前,它的sj.toString()方法在默认情况下会返回前缀+后缀。但是,如果调用setEmptyValue方法,则返回所提供的emptyValue。例如,当使用set符号创建一个字符串来表示一个空集时,可以使用这种方法。“{}”,其中前缀是“{”,后缀是“}”,没有向StringJoiner添加任何内容。
apiNote:
The String “[George:Sally:Fred]” may be constructed as follows:
 StringJoiner sj = new StringJoiner(":", "[", "]");
 sj.add("George").add("Sally").add("Fred");
 String desiredString = sj.toString();
123
A StringJoiner may be employed to create formatted output from a java.util.stream.Stream using java.util.stream.Collectors.joining(CharSequence). For example:
使用StringJoiner从java.util.stream创建格式化输出流,使用java.util.stream.Collectors.joining (CharSequence进行)。例如:
 List<Integer> numbers = Arrays.asList(1, 2, 3, 4);
 String commaSeparatedNumbers = numbers.stream()
     .map(i -> i.toString())
     .collect(Collectors.joining(", "));
1234
通过分析源码发现,在“”内部维护了一个StringBuilder,所有加入到它内部的元素都会先拼接上分割符,然后再拼接上加入的元素
 public StringJoiner add(CharSequence newElement) {


        prepareBuilder().append(newElement);
        return this;
 }
1234
   private StringBuilder prepareBuilder() {


        if (value != null) {


            value.append(delimiter);
        } else {


            value = new StringBuilder().append(prefix);
        }
        return value;
    }
12345678
10. 在Service中微服务比较多的时候,可以配置将一些微服务放置到compound中,组成一个小组
以后再运行时,直接选择这个compound即可很方便的运行或停止一组微服务:
另外可以单独为每个微服务,设置需要的运行时最大堆内存大小:
11. mysql的dateTime和timestamp的区别?
MySQL中datetime和timestamp的区别及使用
TIMESTAMP和DATETIME的相同点:
1> 两者都可用来表示YYYY-MM-DD HH:MM:SS[.fraction]类型的日期。
TIMESTAMP和DATETIME的不同点:
1> 两者的存储方式不一样
对于TIMESTAMP,它把客户端插入的时间从当前时区转化为UTC(世界标准时间)进行存储。查询时,将其又转化为客户端当前时区进行返回。
而对于DATETIME,不做任何改变,基本上是原样输入和输出。
2> 两者所能存储的时间范围不一样
timestamp所能存储的时间范围为:‘1970-01-01 00:00:01.000000’ 到 ‘2038-01-19 03:14:07.999999’。
datetime所能存储的时间范围为:‘1000-01-01 00:00:00.000000’ 到 ‘9999-12-31 23:59:59.999999’。
总结:TIMESTAMP和DATETIME除了存储范围和存储方式不一样,没有太大区别。当然,对于跨时区的业务,TIMESTAMP更为合适。
https://www.cnblogs.com/Jashinck/p/10472398.html
12. SpringBoot中的事务
https://blog.csdn.net/Z__Sheng/article/details/89489053