首先先介绍一下概念
Prometheus :一个开源的服务监控系统和时间序列数据库。
consul: google开源的一个使用go语言开发的服务发现、配置管理中心服务。内置了服务注册与发现框 架、分布一致性协议实现、健康检查、Key/Value存储、多数据中心方案,不再需要依赖其他工具。
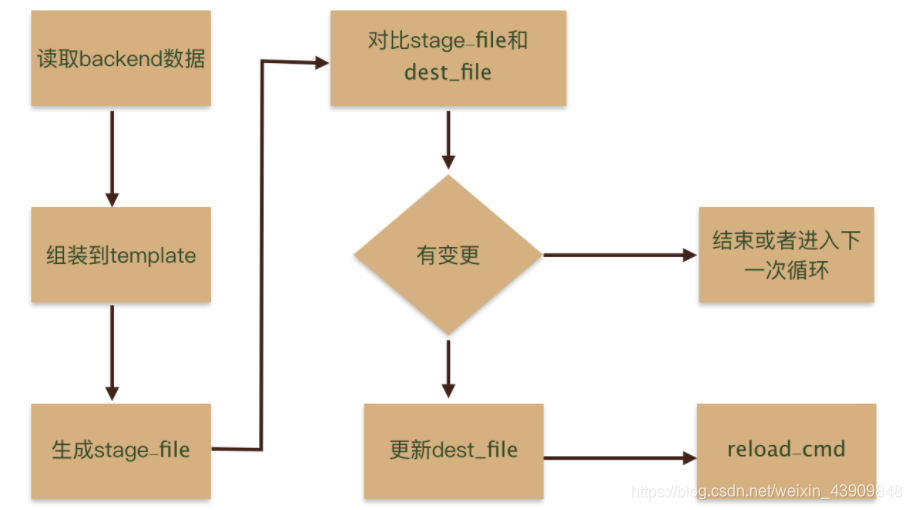
confd:集中式配置管理中心,主要用于提供统一的配置管理,配置变更的自动下发,及时生效。下图为confd动态配置的流程图,结合配置后更好理解。
结合使用的好处:用过prometheus的都知道prometheus非常依赖配置文件,节点等都是在配置文件中进行配置,但是每次配置后都要重启prometheus,在节点非常多的时候手动添加会显得非常沉重,这时候需要和consul结合使用,管理服务,prometheus的告警规则也需要配置在配置文件中,同理,更新后需要手动重启项目,用confd能在文件更改后自动同步并重启。
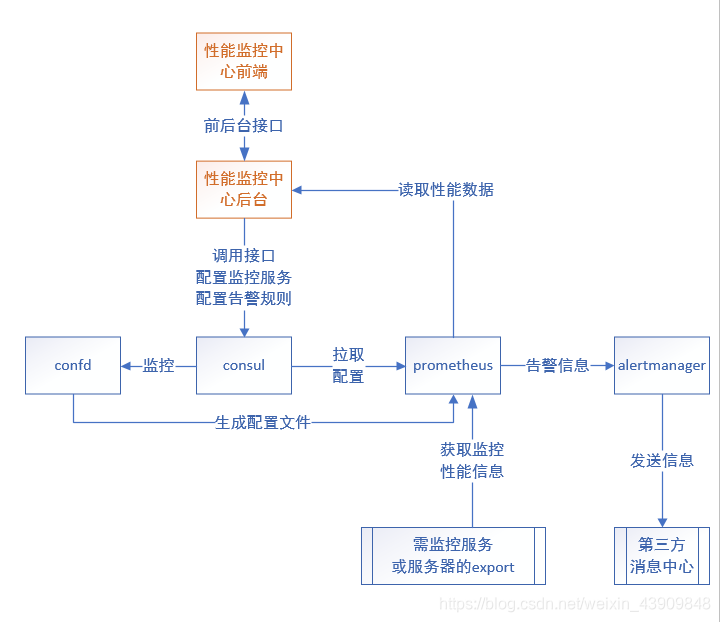
首先看一下整个流程图:
本文采用docker安装(除了confd),便利快捷。
一、prometheus安装使用
1.创建配置文件
mkdir /opt/prometheus
cd /opt/prometheus/
vim prometheus.yml
内容如下:
global:
  scrape_interval:     60s #抓取数据的时间间隔
  evaluation_interval: 60s #触发告警检测的时间
scrape_configs:
  - job_name: prometheus  #任务名称
    static_configs:  #静态配置节点
      - targets: ['localhost:9090']
        labels:
          instance: prometheus  #实例名称
2.安装prometheus
docker run  -d \
  -p 9090:9090 \
  -v /opt/prometheus/prometheus1.yml:/etc/prometheus/prometheus.yml \
  -v /opt/prometheus/data:/prometheus \
  prom/prometheus \
3.访问地址: http://localhost:9090/graph
二、consul安装使用
1.安装consul
docker run \
--name consul \
-p 8500:8500 \
-v /data/consul/conf/:/consul/conf/ \
-v /data/consul/data/:/consul/data/ \
-d consul
访问地址: http://ip:8500/graph(ip为你安装的服务器地址)
2.使用consul
首先了解consul+prometheus的大致流程

(1) 在服务器上装一个node节点(exporter节点),启动节点,例如mysql-exporter端口为9104
(2) 将该服务器注册到consul的server中,在安装consul的服务器执行命令
curl -X PUT -d '{"id": "test-exporter","name": "test-exporter","address": "ip","port": 9104,"tags": ["jvm-exporter"],"checks": [{"http": "http://ip:9104/metrics","interval":"5s"}]}' http://ip:8500/v1/agent/service/register
name:consul的service注册名称
id:consul的实例名称
address:监控地址ip
port:监控的端口号
tags:标签名
checks:检查的节点的路径
(3) 在prometheus中配置服务自动发现,去读取consul中配置的服务器,只要consul有新的服务注册,prometheus也会更新节点,在prometheus.yml中修改为
- job_name: 'consul-node-exporter'
    consul_sd_configs:
    - server: 'ip:8500' #consul的地址
(4) 配置不同分类的job,对添加的标签进行正则表达式过滤,符合则添加到相应job分类
如上配置的缺点是,所有的注册节点都会归类到consul-node-exporter这个工作类别下面,有时候想对注册的服务进行分类,比如mysql为一类,oracle为一类,就要修改配置为:
- job_name: 'consul-node-exporter'
    consul_sd_configs:
    - server: 'ip:8500'
    relabel_configs: #通过标签设置
      - source_labels: [__meta_consul_tags] #源标签
        regex: .*node.*  #正则表达式,只要__meta_consul_tags包含node就归为这个类别下
        action: keep #丢弃 source_labels 的值中没有匹配到正则表达式内容的Target 实例,用drop则相反
以上配置表名对标签进行顾虑,符合要求的会规划为该类,不符合则丢弃。
(5) 如果要在consul删除服务,解绑服务,使用命令:
curl -v -X PUT http://ip:8500/v1/agent/service/deregister/服务名称
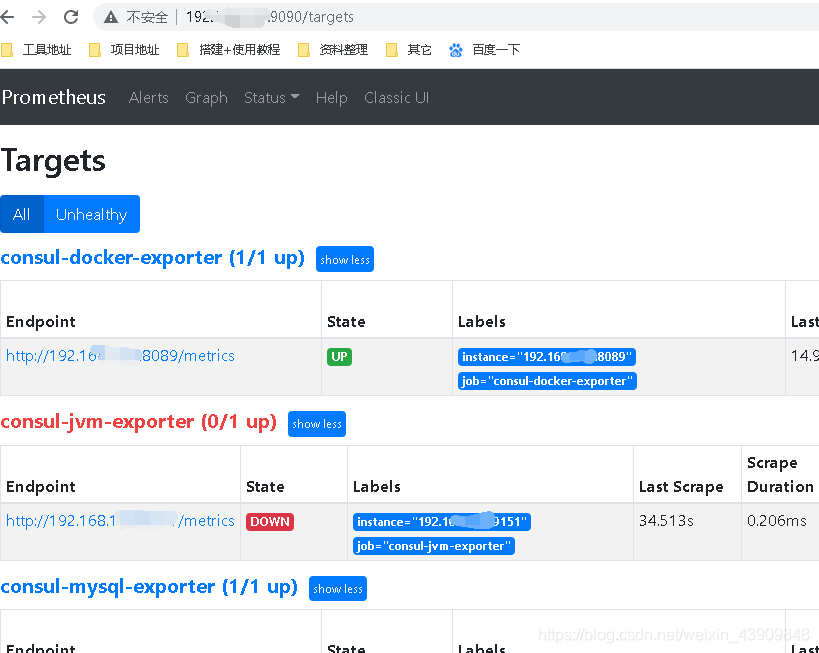
到这里,我们就可以通过consul注册服务并且同步归类到prometheus页面了,在
ip:9090/targets可以查看
三、confd安装使用
接下来就该配置告警了
confd流程:以键值对形式注册规则到consul–写好需要的模板文件–配置confd生成规则配置文件yml–prometheus读取规则配置文件
而后,只要将规则通过接口或者其它方式注册到consul,confd通过配置读取consul中的值并根据模板生成文件(stage_file),生成的文件和prometheus的配置文件(dest_file)不一样时,便会同步文件实现动态刷新配置(如果是第一次读取会将stage_file作为配置文件到相应目录)。
1.安装confd
# Download the binary
wget https://github.com/kelseyhightower/confd/releases/download/v0.16.0/confd-0.16.0-linux-amd64
# 重命名二进制文件,并移动到PATH的目录下
mv confd-0.16.0-linux-amd64 /usr/local/bin/confd
chmod +x /usr/local/bin/confd
# 验证是否安装成功
confd --help
2. 创建配置文件目录
在prometheus目录下创建
mkdir  conf.d
mkdir templates
conf.d:confd的配置文件,主要包含配置的生成逻辑,例如模板源,后端存储对应的keys,命令执行等。
templates:配置模板Template,即基于不同组件的配置,修改为符合 Golang text templates的模板文件。
模板源配置文件是TOML格式的文件,主要包含配置的生成逻辑,例如模板源,后端存储对应的keys,命令执行等。默认目录在conf.d,在这里主要是要配置告警规则,所以我们配置prometheus告警规则模板文件。
(1) 用键值对形式注册告警到consul(这里我们采用的json格式,因为后期提取生成文件也用json,也可以用yml配置文件)
通过接口向consul注册规则键值对(用命令行其实也可以,不过其中有单引号目前还没找到方法转义)
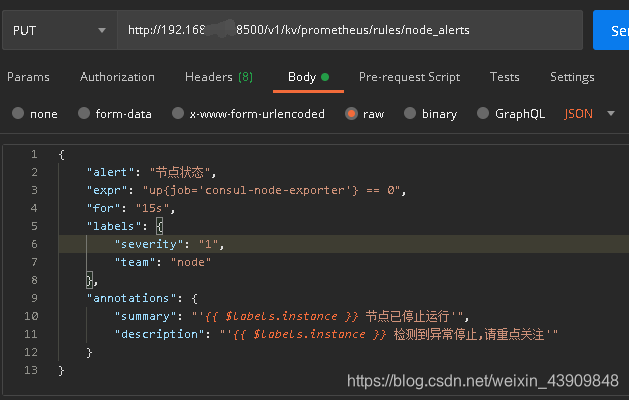
{


    "alert": "节点状态",
    "expr": "up{job='consul-node-exporter'} == 0",
    "for": "15s",
    "labels": {


        "severity": "1",
        "team": "node"
    },
    "annotations": {


        "summary": "'{

    { $labels.instance }} 节点已停止运行'",
        "description": "'{

    { $labels.instance }} 检测到异常停止,请重点关注'"
    }
}
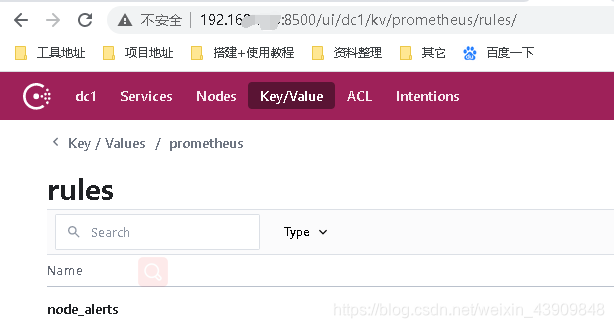
查看consul服务中心:
(2) 配置模板文件templates/my.conf.tmpl
groups:
- name: node-alerts
  rules:{

    {

    range gets "/prometheus/rules/*"}}{

    {

    $data := json .Value}} #循环获取consul中/prometheus/rules/键下面所有的值,因为告警规则不止一个,所以采用循环方式,最后用json获取
  - alert: {

    {

    $data.alert}}
    expr: {

    {

    $data.expr}}
    for: {

    {

    $data.for}}
    labels:
      severity: {

    {

    $data.labels.severity}}
    annotations:
      summary: {

    {

    $data.annotations.summary}}
      description: {

    {

    $data.annotations.description}}
{

    {

    end}}
(3) 配置confd/config.toml,读取模板文件,生成配置文件
[template]
src = "/my.conf.tmpl"  #模板文件
dest = "/opt/prometheus/rules/node_alerts.yml" #生成的目标文件
keys = [
        "/prometheus/rules/*",
]
check_cmd = "touch /tmp/check"
reload_cmd = "docker restart 382b64f17a28" #重启prometheus,此处用的容器
(4) 启动confd
nohup ./confd -interval 20 -log-level info -confdir ./ -config-file conf.d/config.toml -backend consul -node ip:8500 &
以上整个流程就结束了,规则配置文件已经生成在相应目录(/opt/prometheus/rules/node_alerts.yml),此时还需要在prometheus中配置读取规则配置文件,添加:
# Load rules once and periodically evaluate them according to the global 'evaluation_interval'.
rule_files:
  - "/opt/prometheus/rules/*.yml"  #读取该目录下所有yml配置文件
最后重启prometheus,整个配置就完成了,通过consul可以动态添加服务和更新规则配置文件。(以上在consul中注册多个key/value规则只会生成一个yml规则文件)