title: 简简单单实现一个mini版RPC框架
comments: false
toc: true
categories:
- 分布式方案
tags: - RPC框架
- MiniRPC
date: 2021-01-06 23:31:58
所谓的RPC,是指Remote Procedure Call(远程过程调用),让我们可以调用本地的函数一样去调远程函数。
RPC可以屏蔽远程调用跟本地调用的区别,让我们感觉就是调用项目内的方法。
RPC隐藏底层网络通信的复杂性,让我们更专注于业务逻辑。
RPC的原理
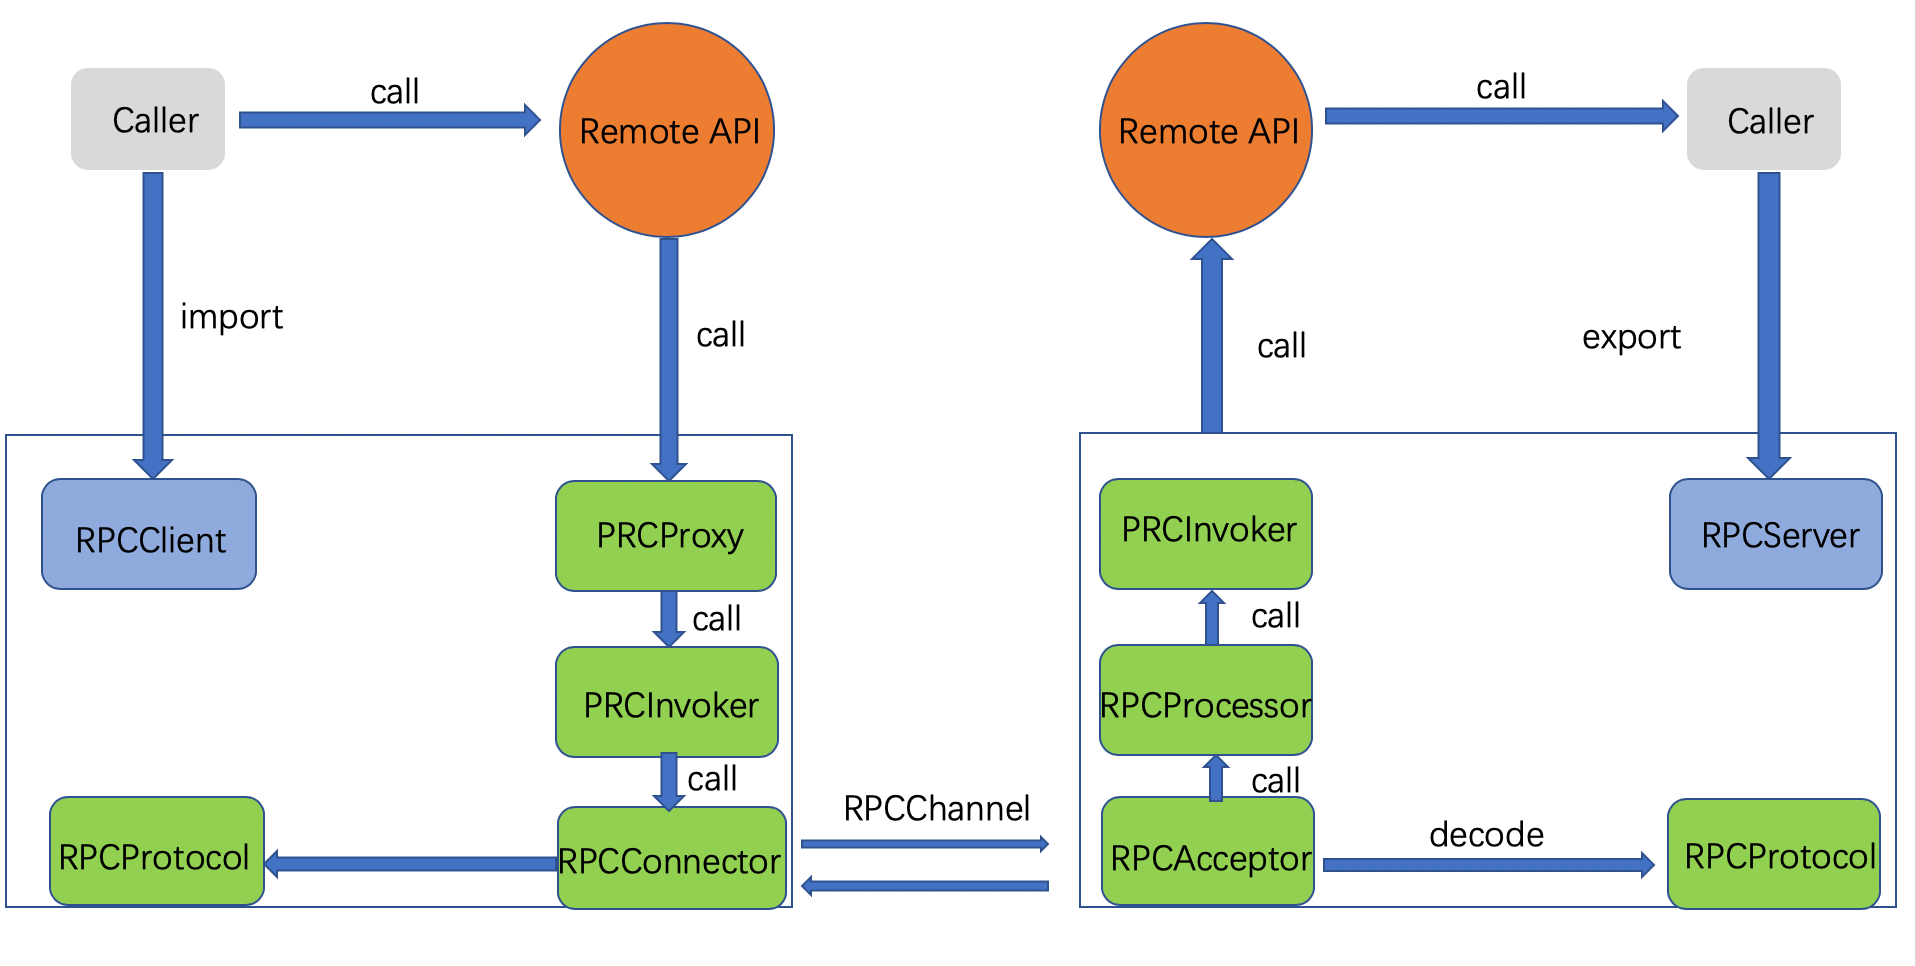
- RPC 服务方通过 RpcServer 去导出(export)远程接口方法,而客户方通过 RpcClient 去引入(import)远程接口方法。
- 客户方像调用本地方法一样去调用远程接口方法,RPC 框架提供接口的代理实现,实际的调用将委托给代理RpcProxy 。
- 代理封装调用信息并将调用转交给RpcInvoker 去实际执行。在客户端的RpcInvoker 通过连接器RpcConnector 去维持与服务端的通道RpcChannel,并使用RpcProtocol 执行协议编码(encode)并将编码后的请求消息通过通道发送给服务方。
写一个RPC框架需要实现哪些功能?
服务路由发现。目的是解决怎么找到远程方法,只有当找到了远程的方法,才能执行它;在dubbo这类成熟的RPC框架里一般由注册中心来解决。网络传输。由于远程过程调用是不同进程之间程序的调用,那么必然涉及到通信传输;比如在dubbo中支持HTTP、TCP、等协议。序列化和反序列化。由于数据需要在网络中传输,而数据在客户端内存里可能是以对象存在的,如果需要将对象通过二进制传输,则传输前需要序列化,传输后需要反序列化。常见的序列化方式有:json、java二进制序列化、Hessian 、ProtoBuff等。
本文将会实现一个最mini版本的RPC框架,我们暂不实现其分布式环境下服务路由发现,仅实现点对点的远程过程调用。
本文对应的项目源代码地址:https://github.com/leeksisn/mini-rpc
整个系统的大致架构如下:
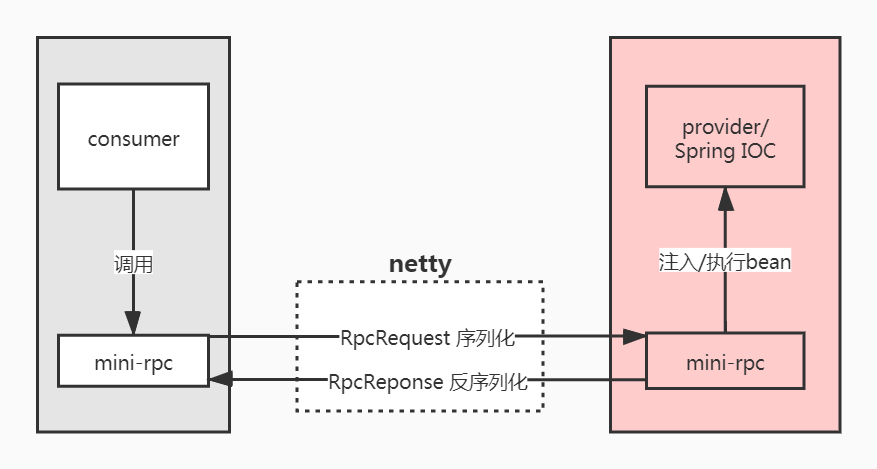
- 当consumer要使用远程调用时,把mini-rpc作为“桩”,返回其动态代理对象。
- 执行业务方法时,mini-rpc通过netty与provider工程下的mini-rpc通信模块连接,将远程调用的信息序列化为RpcRequest对象
- 通过请求的业务类,方法名称,方法参数等从Spring IOC容器中查找对象。
- 找到后则执行对应的方法,并返回序列化的RpcReponse对象。
- 返回执行结果给consumer。
mini-rpc 核心源码剖析
consumer端的代码处理
RpcRequest业务请求类
public class RpcRequest {


    /**
     * 请求对象的ID
     */
    private String requestId;

    /**
     * 类名
     */
    private String className;

    /**
     * 方法名
     */
    private String methodName;

    /**
     * 参数类型
     */
    private Class<?>[] parameterTypes;

    /**
     * 入参
     */
    private Object[] parameters;
    // 省略getter和setter
}
consumer端根据接口查找其实现类信息(remote方法)
// 供消费端根据接口类获取远程调用sub
public static Object remote(Class<?> serviceClass) {


    return createProxy(serviceClass);
}

// 使用JDK的动态代理创建对象
private static Object createProxy(Class<?> serviceClass) {


    MiniRPCHandler miniRPCHandler = RPCConsumerStarter.startListen();
    //2)返回代理对象
    return Proxy.newProxyInstance(Thread.currentThread().getContextClassLoader(),
            new Class[]{

    serviceClass}, new InvocationHandler() {


                @Override
                public Object invoke(Object o, Method method, Object[] objects) throws Throwable {


                    //1> 封装请求参数对象
                    RpcRequest rpcRequest = new RpcRequest();
                    rpcRequest.setClassName(serviceClass.getName());
                    rpcRequest.setMethodName(method.getName());
                    rpcRequest.setParameterTypes(method.getParameterTypes());
                    rpcRequest.setParameters(objects);

                    //2)miniRPCHandler 设置param参数
                    miniRPCHandler.setRpcRequest(rpcRequest);

                    //3).使用线程池,开启一个线程处理处理call() 写操作,并返回结果
                    Object result = executorService.submit(miniRPCHandler).get();

                    //4)return 结果
                    return result;
                }
            });
}
可以从JDK动态代理方法中看到,将请求的业务类名称,方法名称,参数类型,参数值封装为RpcRequest对象,然后通过线程执行调用netty底层通信。下面咱们看看miniRPCHandler是怎么处理的:
public class MiniRPCHandler extends ChannelInboundHandlerAdapter implements Callable {


    //1.定义成员变量
    private ChannelHandlerContext context; //事件处理器上下文对象 (存储handler信息,写操作)
    private Object result; // 记录服务器返回的数据
    //    private String param; //记录将要返送给服务器的数据
    private RpcRequest rpcRequest;

    //2.实现channelActive  客户端和服务器连接时,该方法就自动执行
    @Override
    public void channelActive(ChannelHandlerContext ctx) throws Exception {


        //初始化ChannelHandlerContext
        this.context = ctx;
    }

    //3.实现channelRead 当我们读到服务器数据,该方法自动执行
    @Override
    public synchronized void channelRead(ChannelHandlerContext ctx, Object msg) throws Exception {


        //将读到的服务器的数据msg ,设置为成员变量的值
        if (msg instanceof RpcReponse) {


            RpcReponse reponse = (RpcReponse) msg;
            result = reponse.getResult();
        } else {


            System.out.println("server is wroing:" + msg);
        }
        notify();
    }

    //4.将客户端的数写到服务器
    @Override
    public synchronized Object call() throws Exception {


        //context给服务器写数据
        context.writeAndFlush(rpcRequest);
        wait();
        return result;
    }

    public void setRpcRequest(RpcRequest rpcRequest) {


        this.rpcRequest = rpcRequest;
    }
}
可以看到 MiniRPCHandler继承了netty的 ChannelInboundHandlerAdapter类,并实现了线程Callable接口,当在线程池提交时,会调用call方法,将rpcRequest对象传输给server端。
netty不能直接传输java对象,必须自定义一个加码器,将其序列化为字节码后方可传输,在consumer的netty初始化位置已添加加码器:
private static void initClient() throws InterruptedException {


    //1) 初始化UserClientHandler
    miniRPCHandler = new MiniRPCHandler();
    //2)创建连接池对象
    EventLoopGroup group = new NioEventLoopGroup();
    // 2.5 注册hook,优雅关闭
    Runtime.getRuntime().addShutdownHook(new Hook(group));
    //3)创建客户端的引导对象
    Bootstrap bootstrap = new Bootstrap();
    //4)配置启动引导对象
    bootstrap.group(group)
            //设置通道为NIO
            .channel(NioSocketChannel.class)
            //设置请求协议为TCP
            .option(ChannelOption.TCP_NODELAY, true)
            //监听channel 并初始化
            .handler(new ChannelInitializer<SocketChannel>() {


                protected void initChannel(SocketChannel socketChannel) throws Exception {


                    //获取ChannelPipeline
                    ChannelPipeline pipeline = socketChannel.pipeline();
                    //粘包问题处理
                    //这里使用自定义分隔符
                    // ByteBuf delimiter = Unpooled.copiedBuffer("\r\n".getBytes());
                    // pipeline.addFirst(new DelimiterBasedFrameDecoder(8192, delimiter));
                    //设置编码
                    pipeline.addLast(new RpcEncoder(RpcRequest.class, new JSONSerializer()));
                    pipeline.addLast(new RpcDecoder(RpcReponse.class, new JSONSerializer()));
                    //添加自定义事件处理器
                    pipeline.addLast(miniRPCHandler);
                }
            });

    // 输出host&port日志
    final String host = MiniConfig.host;
    final int port = MiniConfig.port;
    System.out.println("start rpc consumer...." + host + ":" + port);
    //5)连接服务端
    ChannelFuture future = bootstrap.connect(host, port).sync();

}
注意关键代码,定义了一个RpcRequest的加码器,和一个RpcReponse的解码器,因为对于consumer端来说,需要对自己的请求序列化,然后将服务器的响应值进行反序列化:
pipeline.addLast(new RpcEncoder(RpcRequest.class, new JSONSerializer()));
pipeline.addLast(new RpcDecoder(RpcReponse.class, new JSONSerializer()));
再细看一下RpcEncoder代码,核心功能就是根据类属性进行序列化,我这儿用到的是fastjson,不再赘述。
public class RpcEncoder extends MessageToByteEncoder {


    private Class<?> clazz;

    private Serializer serializer;

    public RpcEncoder(Class<?> clazz, Serializer serializer) {


        this.clazz = clazz;
        this.serializer = serializer;
    }

    @Override
    protected void encode(ChannelHandlerContext channelHandlerContext, Object msg, ByteBuf byteBuf) throws Exception {


        if (clazz != null && clazz.isInstance(msg)) {


            byte[] bytes = serializer.serialize(msg);
            // 写入消息体的字节长度
            byteBuf.writeInt(bytes.length);
            // 写入消息的二进制数据
            byteBuf.writeBytes(bytes);
            // byteBuf.writeBytes("\r\n".getBytes());
        } else {


            System.out.println("无法加码:" + msg.toString());
        }
    }
}
RpcDecoder和RpcEncoder代码类似,根据字节长度进行解码,比较特殊的是解决了半包问题:
public class RpcDecoder extends ByteToMessageDecoder {
private int package_total_length = -1;
// 用来临时保留没有处理过的请求报文
private ByteBuf tempMsg = null;
private Class<?> clazz;
private Serializer serializer;
public RpcDecoder(Class<?> clazz, Serializer serializer) {
this.clazz = clazz;
this.serializer = serializer;
}
@Override
protected void decode(ChannelHandlerContext channelHandlerContext, ByteBuf in, List<Object> list) throws Exception {
// 0.可读字节数
int totalReadableBytes = in.readableBytes();
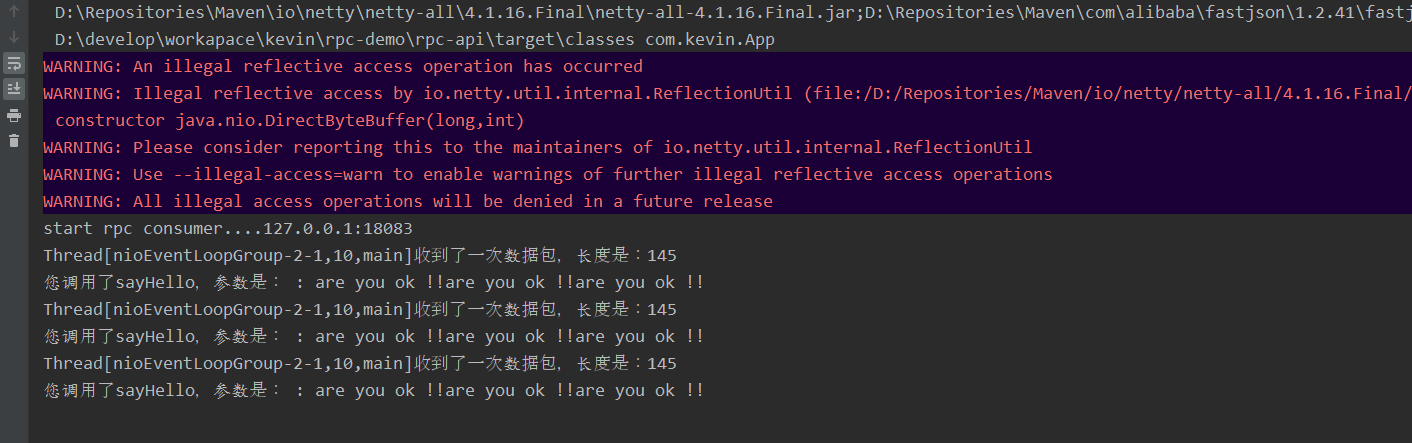
System.out.println(Thread.currentThread() + "收到了一次数据包,长度是:" + totalReadableBytes);
// 1.第一次读取,初始化总包大小、待缓存buffer
if (package_total_length == -1) {
//创建有效字节长度数组
package_total_length = in.readInt();
tempMsg = Unpooled.buffer(package_total_length);
}
// 2.写入缓存中
tempMsg.writeBytes(in);
// 3.还未整包读取完整
if (tempMsg.readableBytes() != package_total_length) {
System.out.println("发生了半包问题");
return;
}
// 4.读取buffer中数据保存在字节数组
byte[] bytes = new byte[package_total_length];
tempMsg.readBytes(bytes);
if (bytes != null && bytes.length > 0) {
Object deserialize = serializer.deserialize(clazz, bytes);
list.add(deserialize);
} else {
System.out.println("解码错误!");
}
// 5.整包读取完整,资源释放
tempMsg.release();
package_total_length = -1;
}
}
provider端的代码处理
看看接受到RpcRequest对象后怎么处理的
public class ServiceHandler extends ChannelInboundHandlerAdapter {


    //当客户端读取数据时,该方法会被调用
    @Override
    public void channelRead(ChannelHandlerContext ctx, Object msg) throws Exception {


        //注意:  客户端将来发送请求为RpcRequest对象
        //1.判断当前的请求是否符合规则
        if (msg instanceof RpcRequest) {


            //2.如果符合规则,调用实现类货到一个result
            RpcRequest rpcRequest = (RpcRequest) msg;

            // 3.根据RpcRequest寻找对应的接口和方法
            Class<?> aClass = Thread.currentThread().getContextClassLoader().loadClass(rpcRequest.getClassName());
            if (aClass == null) {


                writeAndFlushResponse(ctx, rpcRequest.getRequestId(), "not support class:" + rpcRequest.getClassName());
                return;
            }

            Object bean = SpringContextHolder.getBean(aClass);
            if (bean == null) {


                writeAndFlushResponse(ctx, rpcRequest.getRequestId(), "not support class:" + rpcRequest.getClassName());
                return;
            }
            Method declaredMethod = bean.getClass().getDeclaredMethod(rpcRequest.getMethodName(), rpcRequest.getParameterTypes());
            if (declaredMethod == null) {


                writeAndFlushResponse(ctx, rpcRequest.getRequestId(), "not support method:" + rpcRequest.getMethodName());
                return;
            }
            // 4.并执行它
            Object invoke = declaredMethod.invoke(bean, rpcRequest.getParameters());

            // 5.把调用实现类的方法获得的结果写到客户端
            writeAndFlushResponse(ctx, rpcRequest.getRequestId(), invoke);
        } else {


            System.out.println("请求了数据:" + msg.toString());
            writeAndFlushResponse(ctx, null, "fail");
        }
    }

    private void writeAndFlushResponse(ChannelHandlerContext ctx, String requestId, Object msg) {


        RpcReponse rpcReponse = new RpcReponse(requestId, msg);
        ctx.writeAndFlush(rpcReponse);
    }

    @Override
    public void exceptionCaught(ChannelHandlerContext ctx, Throwable cause) throws Exception {


        // 忽略掉远方主机下线异常
        if ("远程主机强迫关闭了一个现有的连接。".equals(cause.getMessage())) {


            return;
        }
        super.exceptionCaught(ctx, cause);
    }

}
核心思路如下:
- 根据类名称进行类加载
- 从Spring IOC容器中根据类对象查找其实现bean
- 查找其需要执行的方法
- 执行该方法,并将响应值封装为RpcReponse
- 通过netty响应至consumer
这样,所以provider端通过Spring IOC容器管理的对象均能通过RPC调用到了。
测试demo演示
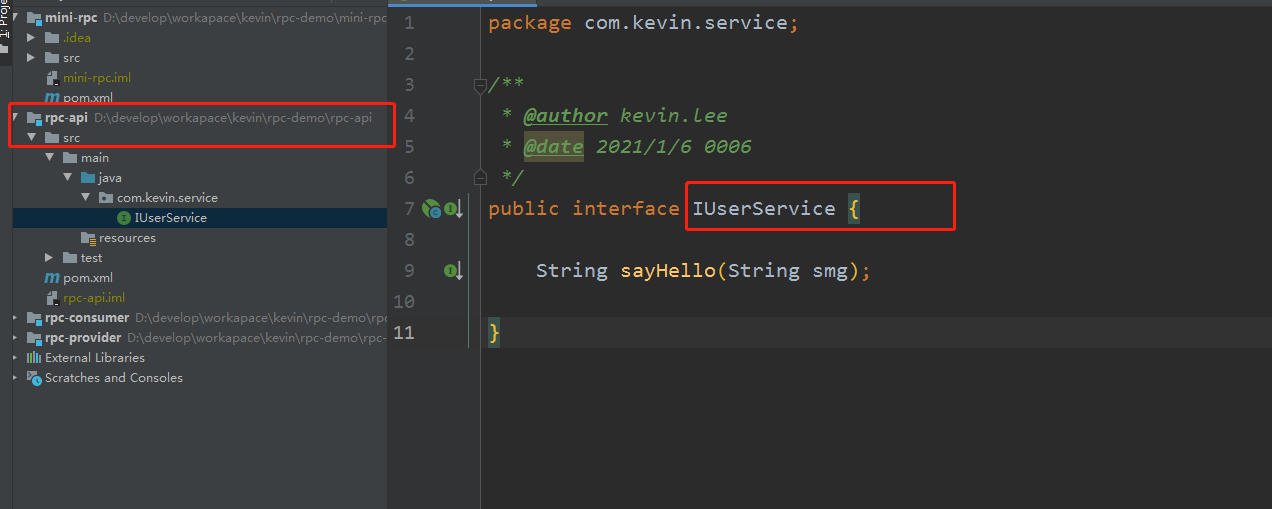
新增一个rpc-api模块,用来定义业务接口。
首先rpc-comsumer和rpc-provider分别引入rpc-api模块。
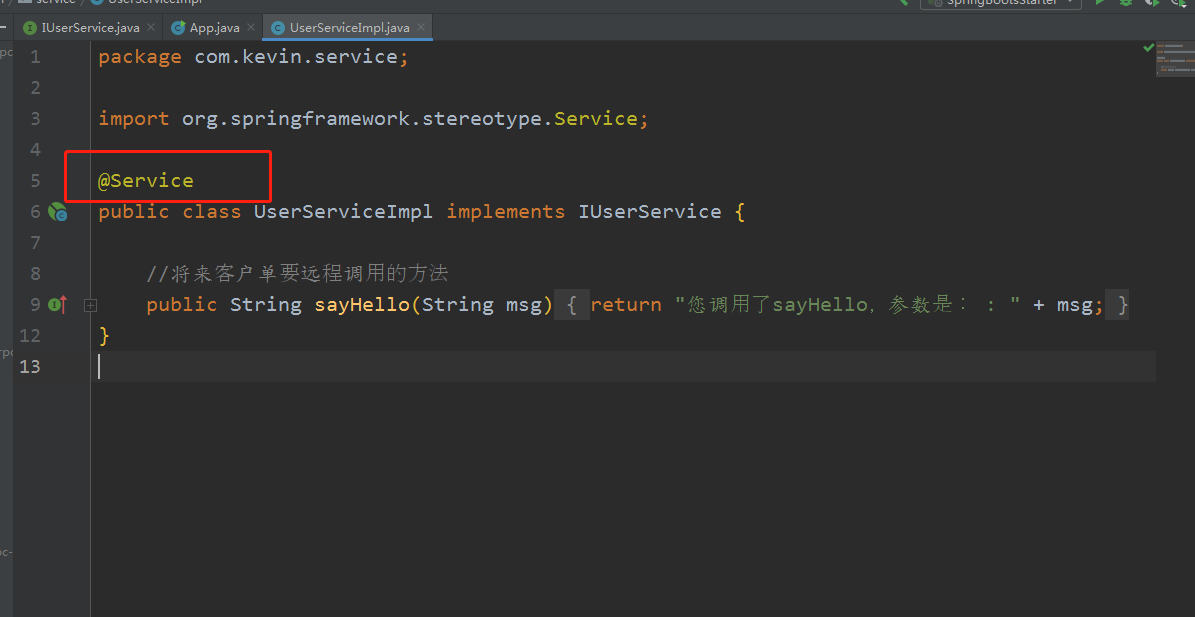
接着rpc-provider里注入其实现类,将请求参数给返回,并拼接了“您调用了sayHello。。。。”
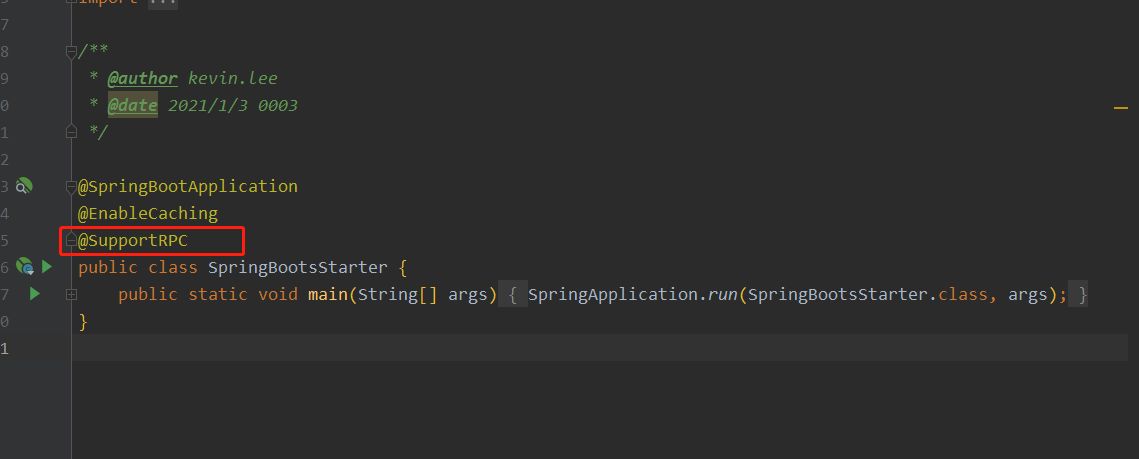
再启动rpc-provider的springboot主方法,不要忘记添加supportRpc注解,此注解会将netty的启动通过@import的方式监听容器启动后完成初始化。
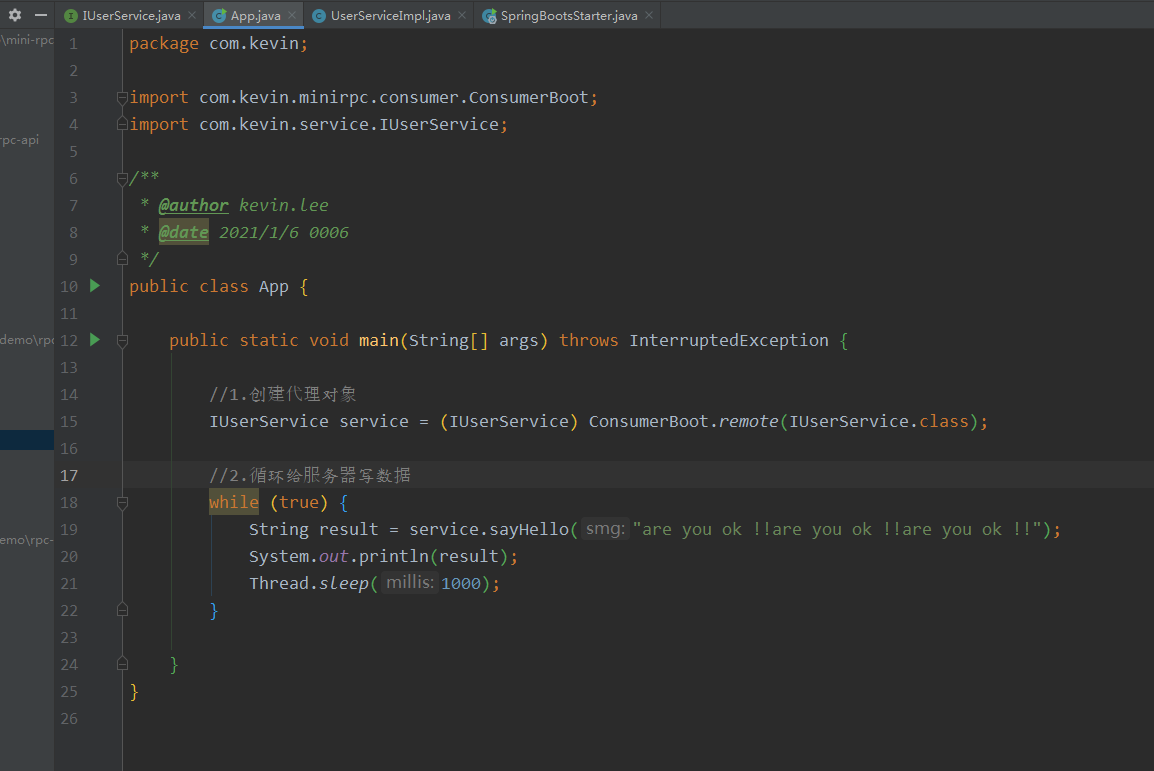
看看consumer的远程调用方法
最后控制台看看效果