非原创,做一个知识点的传播者~~
因为fabric里面读取配置文件等使用的是viper,这里也学习一下,做个使用笔记。
go get github.com/spf13/viper
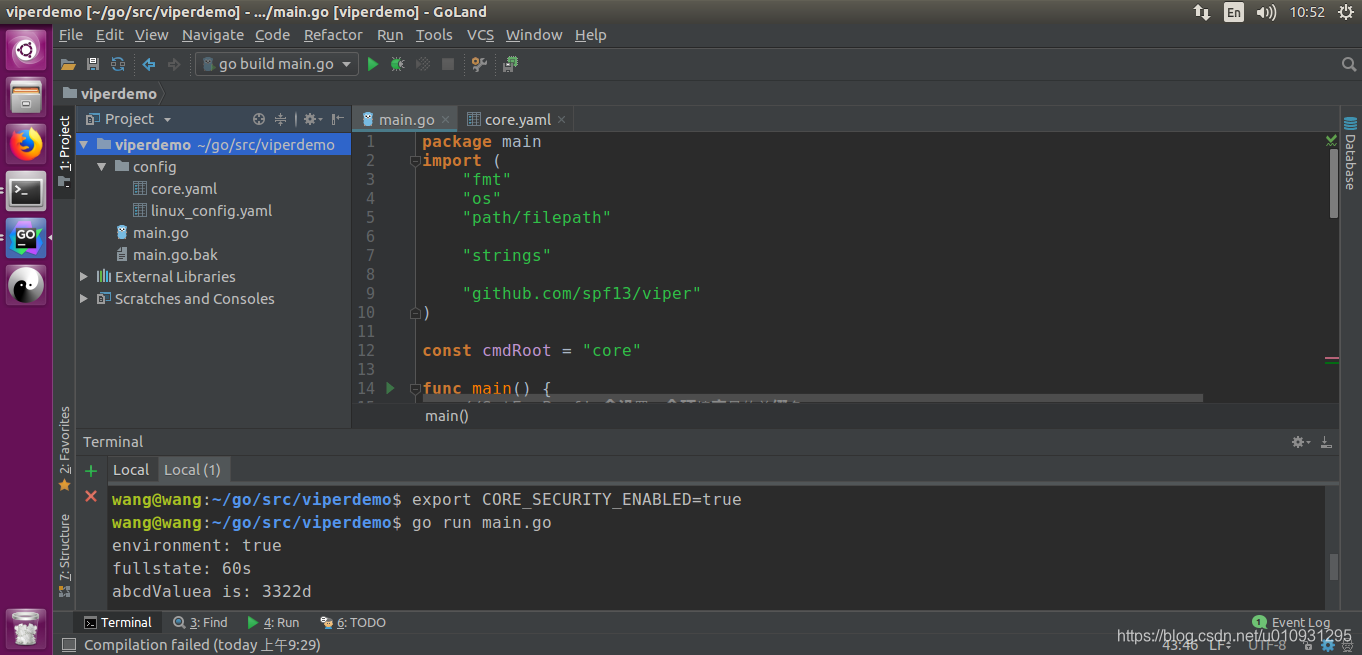
其中main.go内容:
package main
import (
	"fmt"
	"os"
	"path/filepath"

	"strings"

	"github.com/spf13/viper"
)

const cmdRoot = "core"

func main() {
	//SetEnvPrefix会设置一个环境变量的前缀名
	viper.SetEnvPrefix(cmdRoot)
	//会获取所有的环境变量,同时如果设置过了前缀则会自动补全前缀名
	viper.AutomaticEnv()
	replacer := strings.NewReplacer(".", "_")
	viper.SetEnvKeyReplacer(replacer)
	viper.SetConfigName(cmdRoot)
	viper.AddConfigPath("./config")
	viper.SetConfigType("yaml")
	gopath := os.Getenv("GOPATH")
	for _, p := range filepath.SplitList(gopath) {
		peerpath := filepath.Join(p, "src/viperdemo")
		viper.AddConfigPath(peerpath)
	}
	//在./config以及$GOPATH/src/viperdemo下寻找名为cmdRoot即“core”、类型为yaml的文件,core.yaml,读取里面的配置
	err := viper.ReadInConfig() // Find and read the config file
	if err != nil {             // Handle errors reading the config file
		fmt.Println(fmt.Errorf("Fatal error when reading %s config file: %s\n", cmdRoot, err))
	}
	//security.enabled的.替换成_,同时前面加上前缀core,环境变量前缀大小写不区分
	//export CORE_SECURITY_ENABLED=TRUE
	environment := viper.GetBool("security.enabled")
	fmt.Println("environment:", environment)

	fullstate := viper.GetString("statetransfer.timeout.fullstate")
	fmt.Println("fullstate:", fullstate)

	abcdValuea := viper.GetString("peer.abcd")
	fmt.Println("abcdValuea is:", abcdValuea)
}
core.yaml内容:
statetransfer:

    # Should a replica attempt to fix damaged blocks?
    # In general, this should be set to true, setting to false will cause
    # the replica to panic, and require a human's intervention to intervene
    # and fix the corruption
    recoverdamage: true

    # The number of blocks to retrieve per sync request
    blocksperrequest: 20

    # The maximum number of state deltas to attempt to retrieve
    # If more than this number of deltas is required to play the state up to date
    # then instead the state will be flagged as invalid, and a full copy of the state
    # will be retrieved instead
    maxdeltas: 200

    # Timeouts
    timeout:

        # How long may returning a single block take
        singleblock: 2s

        # How long may returning a single state delta take
        singlestatedelta: 2s

        # How long may transferring the complete state take
        fullstate: 60s
peer:
    abcd:   3322d
更多用法:http://www.cnblogs.com/cnblogs-wangzhipeng/p/9484460.html
本文主要是为读者介绍一个轻便好用的Golang配置库viper
正文
viper 的功能
viper 支持以下功能:
1. 支持Yaml、Json、 TOML、HCL 等格式的配置
2. 可以从文件、io、环境变量、command line中提取配置
3. 支持自动转换的类型解析
4. 可以远程从etcd中读取配置
示例代码
定义一个类型:
type config struct {
    v  *viper.Viper;
}
用于测试的Yaml配置文件 config.yaml
TimeStamp: "2018-07-16 10:23:19"
Author: "WZP"
PassWd: "Hello"
Information:
   Name: "Harry"
   Age: "37"
   Alise:
   - "Lion"
   - "NK"
   - "KaQS"
   Image: "/path/header.rpg"
   Public: false

Favorite:
  Sport:
  - "swimming"
  - "football"
  Music:
  - "zui xuan min zu feng"
  LuckyNumber: 99
读取yaml配置文件:
func LoadConfigFromYaml (c *config) error  {
    c.v = viper.New();

    //设置配置文件的名字
    c.v.SetConfigName("config")

    //添加配置文件所在的路径,注意在Linux环境下%GOPATH要替换为$GOPATH
    c.v.AddConfigPath("%GOPATH/src/")
    c.v.AddConfigPath("./")

    //设置配置文件类型
    c.v.SetConfigType("yaml");

    if err := c.v.ReadInConfig(); err != nil{
        return  err;
    }

    log.Printf("age: %s, name: %s \n", c.v.Get("information.age"), c.v.Get("information.name"));
    return nil;
}
注意:如果不用AddConfigPath去指定路径,它会在程序执行的目录去寻找config.yaml
从IO中读取配置:
//由IO读取配置
func ReadConfigFormIo(c *config) error {
    c.v = viper.New()
    if f, err := os.Open("config.yaml"); err != nil{
        log.Printf("filure: %s", err.Error());
        return err;
    }else {

        confLength, _ :=f.Seek(0,2);
        //注意,通常写c++的习惯害怕读取字符串的时候越界,都会多留出一个NULL在末尾,但是在这里不行,会报出如下错误:
        //While parsing config: yaml: control characters are not allowed
        //错误参考网址:https://stackoverflow.com/questions/33717799/go-yaml-control-characters-are-not-allowed-error
        configData := make([]byte, confLength);
        f.Seek(0, 0);
        f.Read(configData);
        log.Printf("%s\n", string(configData))

        c.v.SetConfigType("yaml");
        if err := c.v.ReadConfig(bytes.NewBuffer(configData)); err != nil{
            log.Fatalf(err.Error());
        }
    }
    log.Printf("age: %s, name: %s \n", c.v.Get("information.age"), c.v.Get("information.name"));

    return nil;
}
上面的代码是把配置文件中的数据导入IO,然后再从IO中读取
从环境变量中读取配置
//读取本地的环境变量
func EnvConfigPrefix(c *config) error {
    c.v = viper.New();

    //BindEnv($1,$2)
    // 如果只传入一个参数,则会提取指定的环境变量$1,如果设置了前缀,则会自动补全 前缀_$1
    //如果传入两个参数则不会补全前缀,直接获取第二参数中传入的环境变量$2
    os.Setenv("LOG_LEVEL", "INFO");
    if nil == c.v.Get("LOG_LEVEL ") {
        log.Printf("LOG_LEVEL is nil");
    }else {
        return ErrorNotMacth;
    }

        //必须要绑定后才能获取
    c.v.BindEnv("LOG_LEVEL");
    log.Printf("LOG_LEVEL is %s", os.Getenv("log_level"));


    //会获取所有的环境变量,同时如果过设置了前缀则会自动补全前缀名
    c.v.AutomaticEnv();
    //环境变量前缀大小写不区分
    os.Setenv("DEV_ADDONES","none");
    log.Printf("DEV_ADDONES: %s", c.v.Get("dev_addones"));

    //SetEnvPrefix会设置一个环境变量的前缀名
    c.v.SetEnvPrefix("DEV");

    os.Setenv("DEV_MODE", "true");
    //此时会自动补全前缀,实际去获取的是DEV_DEV_MODE
    if nil ==  c.v.Get("dev_mode"){
        log.Printf("DEV_MODE is nil") ;
    }else {
        return ErrorNotMacth;
    }

        //此时我们直接指定了loglevel所对应的环境变量,则不会去补全前缀
    c.v.BindEnv("loglevel", "LOG_LEVEL");
    log.Printf("LOG_LEVEL: %s", c.v.Get("loglevel")) ;

    return nil
}
SetEnvPrefix 和 AutomaticEnv、BindEnv搭配使用很方便,比如说我们把当前程序的环境变量都设置为xx_ ,这样方便我们管理,也避免和其他环境变量冲突,而在读取的时候又很方便的就可以读取。
方便的替换符
func EnvCongiReplacer(c *config, setPerfix bool) error {
    c.v = viper.New();
    c.v.AutomaticEnv();
    c.v.SetEnvKeyReplacer(strings.NewReplacer(".","_"));

    os.Setenv("API_VERSION","v0.1.0");
    //Replacer和prefix一起使用可能会冲突,比如我下面的例子
    //因为会自动补全前缀最终由获取API_VERSION变成API_API_VERSION
    if setPerfix{ c.v.SetEnvPrefix("api");}
    if s := c.v.Get("api.version"); s==nil{
        return ErrorNoxExistKey
    }else {
        log.Printf("%s", c.v.Get("api.version"));
    }

    return nil;
}
我们有时候需要去替换key中的某些字符,来转化为对应的环境变脸,比如说例子中将’ . ‘替换为’_’ ,由获取api.version变成了api_version,但是有一点需要注意的,SetEnvPrefix和SetEnvKeyReplacer一起用的时候可能会混淆。
别名功能
//设置重载 和别名
func SetAndAliases(c *config) error {
    c.v = viper.New();
    c.v.Set("Name","wzp");
    c.v.RegisterAlias("id","Name");
    c.v.Set("id","Mr.Wang");

    //我们可以发现当别名对应的值修改之后,原本的key也发生变化
    log.Printf("id %s, name %s",c.v.Get("id"),c.v.Get("name") );
    return nil;
}
我们可以为key设置别名,当别名的值被重置后,原key对应的值也会发生变化。
序列化和反序列化
type favorite struct {
    Sports []string;
    Music []string;
    LuckyNumber int;
}

type information struct {
    Name string;
    Age  int;
    Alise []string;
    Image string;
    Public bool
}

type YamlConfig struct {
    TimeStamp string
    Author string
    PassWd string
    Information information
    Favorite favorite;
}


//将配置解析为Struct对象
func UmshalStruct(c *config) error  {
    LoadConfigFromYaml(c);
    var cf YamlConfig
    if err := c.v.Unmarshal(&cf); err != nil{
        return err;
    }


    return nil;
}

func YamlStringSettings(c *config) string {
    c.v = viper.New();
    c.v.Set("name", "wzp");
    c.v.Set("age", 18);
    c.v.Set("aliase",[]string{"one","two","three"})

    cf := c.v.AllSettings()
    bs, err := yaml.Marshal(cf)
    if err != nil {
        log.Fatalf("unable to marshal config to YAML: %v", err)
    }
    return string(bs)
}

func JsonStringSettings(c *config) string {
    c.v = viper.New();
    c.v.Set("name", "wzp");
    c.v.Set("age", 18);
    c.v.Set("aliase",[]string{"one","two","three"})

    cf := c.v.AllSettings()
    bs, err := json.Marshal(cf)
    if err != nil {
        log.Fatalf("unable to marshal config to YAML: %v", err)
    }
    return string(bs)
}
超级实惠的一个功能,直接把配置反序列化到一个结构体,爽歪歪有木有?也可以把设置直接序列化为我们想要的类型:yaml、json等等
从command Line中读取配置
func main()  {
    flag.String("mode","RUN","please input the mode: RUN or DEBUG");
    pflag.Int("port",1080,"please input the listen port");
    pflag.String("ip","127.0.0.1","please input the bind ip");
    //获取标准包的flag
    pflag.CommandLine.AddGoFlagSet(flag.CommandLine);
    pflag.Parse();

    //BindFlag
    //在pflag.Init key后面使用
    viper.BindPFlag("port", pflag.Lookup("port"));
    log.Printf("set port: %d", viper.GetInt("port"));

    viper.BindPFlags(pflag.CommandLine);
    log.Printf("set ip: %s", viper.GetString("ip"));
}
可以使用标准的flag也可以使用viper包中自带的pflag,作者建议使用pflag。
监听配置文件
//监听配置文件的修改和变动
func WatchConfig(c *config) error {
    if err := LoadConfigFromYaml(c); err !=nil{
        return err;
    }
    ctx, cancel := context.WithCancel(context.Background());

    c.v.WatchConfig()

        //监听回调函数
    watch := func(e fsnotify.Event) {
        log.Printf("Config file is changed: %s \n", e.String())
        cancel();
    }

    c.v.OnConfigChange(watch);
    <-ctx.Done();
    return nil;
}
重点来了啊,这个可以说是非常非常实用的一个功能,以往我们修改配置文件要么重启服务,要么搞一个api去修改,Viper把这个功能帮我们实现了。只要配置文件被修改保存后,我们事先注册的watch函数就回被触发,只要我们在这里面添加更新操作就ok了。不过美中不足的是,它目前只监听配置文件。
拷贝子分支
func TestSubConfig(t *testing.T)  {
    c := config{};
    LoadConfigFromYaml(&c);
    sc := c.v.Sub("information");
    sc.Set("age", 80);
    scs,_:=yaml.Marshal(sc.AllSettings())
    t.Log(string(scs));
    t.Logf("age: %d", c.v.GetInt("information.age"));
}
拷贝一个子分支最大的用途就是我们可以复制一份配置,这样在修改拷贝的时候原配置不会被修改,如果修改的配置出现了问题,我们可以方便的回滚。
获取配置项的方法
//测试各种get类型
func TestGetValues(t *testing.T)  {
    c := &config{}
    if err := LoadConfigFromYaml(c); err != nil{
        t.Fatalf("%s: %s",t.Name(), err.Error());
    }

    if info := c.v.GetStringMap("information"); info != nil{
        t.Logf("%T", info);
    }

    if aliases := c.v.GetStringSlice("information.aliases"); aliases != nil{
        for _, a := range  aliases{
            t.Logf("%s",a);
        }
    }

    timeStamp := c.v.GetTime("timestamp");
    t.Logf("%s", timeStamp.String());

    if public := c.v.GetBool("information.public"); public{
        t.Logf("the information is public");
    }

    age := c.v.GetInt("information.age");
    t.Logf("%s age  is %d", c.v.GetString("information.name"), age);
}
如果我们直接用Get获取的返回值都是interface{}类型,这样我们还要手动转化一下,可以直接指定类型去获取,方便快捷。
除了以上所说的功能外,viper还有从etcd提取配置以及自定义flage的功能,这些大家感兴趣可以自己去了解一下。
有趣的应用
虽然Unmarshal Struct已经足够好用了,但有作者还是想开发一下新的玩法,比如说这个配置文件和当前的新版本不是很匹配,当然实际生产中我们是要讲究向下兼容的。
      var yamlConfig =  YamlConfig{};
    ycType := reflect.TypeOf(yamlConfig);

    for i := 0 ; i < ycType.NumField();i++{
        name := ycType.Field(i).Name;
        element := reflect.ValueOf(yamlConfig).Field(i).Interface();
        if err = config.UnmarshalKey(name, element); err != nil{
            logger.Errorf("Error reading configuration:", err);
        }
    }
如上代码所示,我们从最外围的结构体中找出子元素的名
还有一篇文章:https://blog.csdn.net/sd653159/article/details/83143760
前言
viper 支持Yaml、Json、 TOML、HCL 等格式,读取非常的方便。
安装
go get github.com/spf13/viper
   如果提示找不到golang.org/x/text/这个库,是因为golang.org/x/text/这个库在GitHub上托管的路径不一致。

   解决办法:

   可以从https://github.com/golang/text下载源码下来,然后到$GOPATH/src下面创建golang.org/x/文件夹(已存在的忽略),把压缩包的文件解压到golang.org/x/文件夹之下。

   然后执行  go install -x  golang.org/x/text  即可解决:
正文
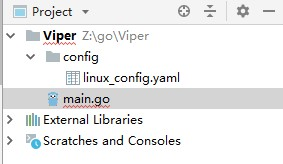
初始结构目录如下:
准备测试使用的yaml文件,注意yaml的格式十分严格,主要是每个冒号后面必须要有空格,数组前要加“-”号表示连续(注意减号后面也有空格),内容如下:
TimeStamp: "2018-10-18 10:09:23"
Address: "Shenzhen"
Postcode: 518000
CompanyInfomation:
  Name: "Sunny"
  MarketCapitalization: 50000000
  EmployeeNum: 200
  Department:
    - "Finance"
    - "Design"
    - "Program"
    - "Sales"
  IsOpen: false
读取yaml文件:
package main

import (
	"github.com/spf13/viper"
	"fmt"
)

func main() {
	//读取yaml文件
	v := viper.New()
	//设置读取的配置文件
	v.SetConfigName("linux_config")
	//添加读取的配置文件路径
	v.AddConfigPath("./config/")
	//windows环境下为%GOPATH,linux环境下为$GOPATH
	v.AddConfigPath("$GOPATH/src/")
	//设置配置文件类型
	v.SetConfigType("yaml")

	if err := v.ReadInConfig();err != nil {
		fmt.Printf("err:%s\n",err)
	}

	fmt.Printf(
		`
		TimeStamp:%s
		CompanyInfomation.Name:%s
		CompanyInfomation.Department:%s `,
		v.Get("TimeStamp"),
		v.Get("CompanyInfomation.Name"),
		v.Get("CompanyInfomation.Department"),
	)

	/*
	result:
	TimeStamp:2018-10-18 10:09:23
	CompanyInfomation.Name:Sunny
	CompanyInfomation.Department:[Finance Design Program Sales]
	*/

}
也可以直接反序列化为Struct,非常的方便:
package main

import (
	"github.com/spf13/viper"
	"fmt"
)

func main() {
	//读取yaml文件
	v := viper.New()
	//设置读取的配置文件
	v.SetConfigName("linux_config")
	//添加读取的配置文件路径
	v.AddConfigPath("./config/")
	//windows环境下为%GOPATH,linux环境下为$GOPATH
	v.AddConfigPath("$GOPATH/src/")
	//设置配置文件类型
	v.SetConfigType("yaml")

	if err := v.ReadInConfig();err != nil {
		fmt.Printf("err:%s\n",err)
	}

	fmt.Printf(
		`
		TimeStamp:%s
		CompanyInfomation.Name:%s
		CompanyInfomation.Department:%s `,
		v.Get("TimeStamp"),
		v.Get("CompanyInfomation.Name"),
		v.Get("CompanyInfomation.Department"),
	)

	/*
	result:
	TimeStamp:2018-10-18 10:09:23
	CompanyInfomation.Name:Sunny
	CompanyInfomation.Department:[Finance Design Program Sales]
	*/

	//反序列化
	parseYaml(v)

}

type CompanyInfomation struct{
	Name string
	MarketCapitalization int64
	EmployeeNum int64
	Department []interface{}
	IsOpen bool
}

type YamlSetting struct{
	TimeStamp string
	Address string
	Postcode int64
	CompanyInfomation CompanyInfomation
}


func parseYaml(v *viper.Viper){
	var yamlObj YamlSetting;
	if err := v.Unmarshal(&yamlObj) ; err != nil{
		fmt.Printf("err:%s",err)
	}
	fmt.Println(yamlObj)
	/*
	result:
	{2018-10-18 10:09:23 Shenzhen 518000 {Sunny 50000000 200 [Finance Design Program Sales] false}}
	*/
}
viper也提供了读取Command Line参数的功能:
package main

import (
	"github.com/spf13/pflag"
	"github.com/spf13/viper"
	"fmt"
)

func main() {
	pflag.String("hostAddress", "127.0.0.1", "Server running address")
	pflag.Int64("port", 8080, "Server running port")
	pflag.Parse()

	viper.BindPFlags(pflag.CommandLine)
	fmt.Printf("hostAddress :%s , port:%s", viper.GetString("hostAddress"), viper.GetString("port"))
	/*
	example:
	go run main2.go --hostAddress=192.192.1.10 --port=9000
	help:
	Usage of /tmp/go-build183981952/b001/exe/main:
     --hostAddress string   Server running address (default "127.0.0.1")
     --port int             Server running port (default 8080)
	*/

}
很多时候,我们服务器启动之后,如果临时想修改某些配置参数,需要重启服务器才能生效,但是viper提供了监听函数,可以免重启修改配置参数,非常的实用:
package main

import (
	"github.com/spf13/viper"
	"fmt"
	"golang.org/x/net/context"
	"github.com/fsnotify/fsnotify"
)

func main() {
	//读取yaml文件
	v := viper.New()
	//设置读取的配置文件
	v.SetConfigName("linux_config")
	//添加读取的配置文件路径
	v.AddConfigPath("./config/")
	//windows环境下为%GOPATH,linux环境下为$GOPATH
	v.AddConfigPath("$GOPATH/src/")
	//设置配置文件类型
	v.SetConfigType("yaml")

	if err := v.ReadInConfig(); err != nil {
		fmt.Printf("err:%s\n", err)
	}

	//创建一个信道等待关闭(模拟服务器环境)
	ctx, _ := context.WithCancel(context.Background())
	//cancel可以关闭信道
	//ctx, cancel := context.WithCancel(context.Background())
	//设置监听回调函数
	v.OnConfigChange(func(e fsnotify.Event) {
		fmt.Printf("config is change :%s \n", e.String())
		//cancel()
	})
	//开始监听
	v.WatchConfig()
	//信道不会主动关闭,可以主动调用cancel关闭
	<-ctx.Done()

	/*
	result:
	config is change :"/home/share/go/Viper/config/linux_config.yaml": CREATE
	config is change :"/home/share/go/Viper/config/linux_config.yaml": CREATE
	*/
}
文章出处:https://blog.csdn.net/sd653159/article/details/83143760
http://www.cnblogs.com/cnblogs-wangzhipeng/p/9484460.html